
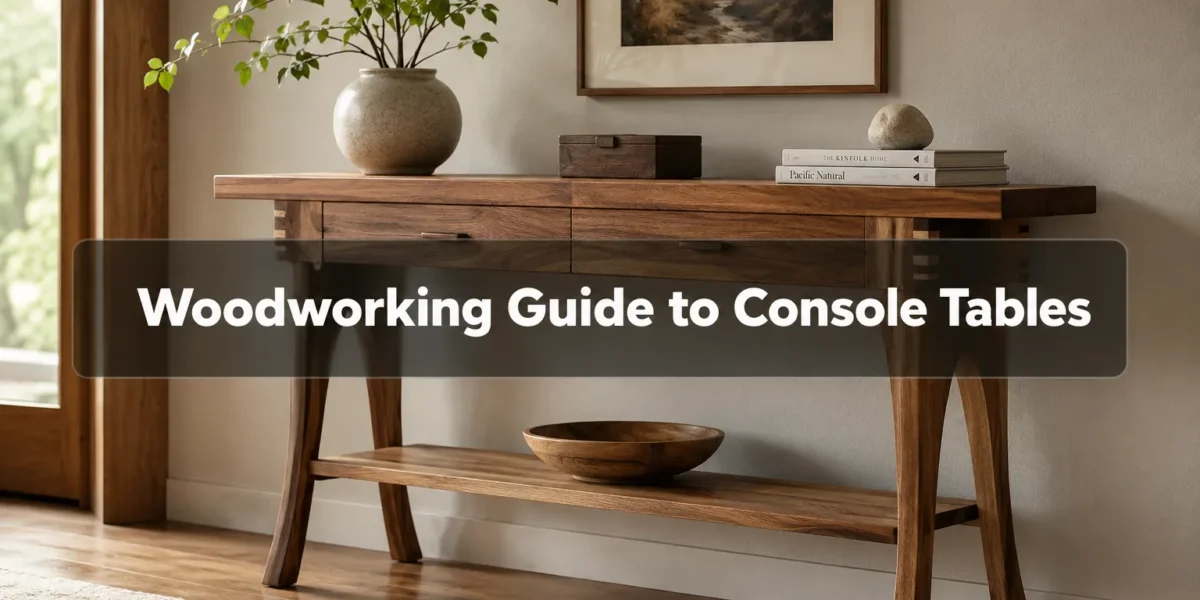
The vast majority of console tables are not built for aesthetics alone; they fulfill a crucial functional role, often in high-traffic areas. Understanding the specific design parameters, entryway sizes, leg styles, and structural stability, is paramount for any woodworker aiming to create a piece that is both beautiful and enduring. This article, “The Ultimate Woodworking Guide to Console Tables: Entryway Sizes, Leg Styles, and Structural Stability,” delves into the critical considerations for crafting these versatile furniture pieces in 2026, treating them as a distinct design category rather than a singular build.
Key Takeaways
- Proportionality is Key: Console tables must fit their entryway without obstructing traffic flow, typically being slim (10-14 inches deep) and between 30-34 inches high.
- Leg Style Defines Aesthetics & Stability: From tapered to cabriole, leg styles impact visual appeal and require specific joinery for strength.
- Structural Stability is Non-Negotiable: Narrow depth and potential for heavy use demand robust joinery (mortise and tenon, dado joints) and effective bracing to prevent tipping.
- Material Choice Impacts Durability: Select woods like oak, maple, or cherry for superior strength and longevity, especially for load-bearing components.
- Hidden Storage Enhances Functionality: Consider incorporating drawers, shelves, or cubbies to maximize utility, particularly in entryways.
Understanding Entryway Console Table Sizes and Proportions
Console tables are often the first piece of furniture guests encounter in a home, making their dimensions and placement critical for both aesthetics and functionality. Unlike a typical coffee table or dining table, console tables are characterized by their relatively shallow depth, designed to hug a wall without impeding foot traffic. This section of The Ultimate Woodworking Guide to Console Tables: Entryway Sizes, Leg Styles, and Structural Stability focuses on the optimal dimensions for various entryway scenarios.
Standard Console Table Dimensions
While “standard” can vary, general guidelines exist to ensure a console table fits comfortably in most entryways.
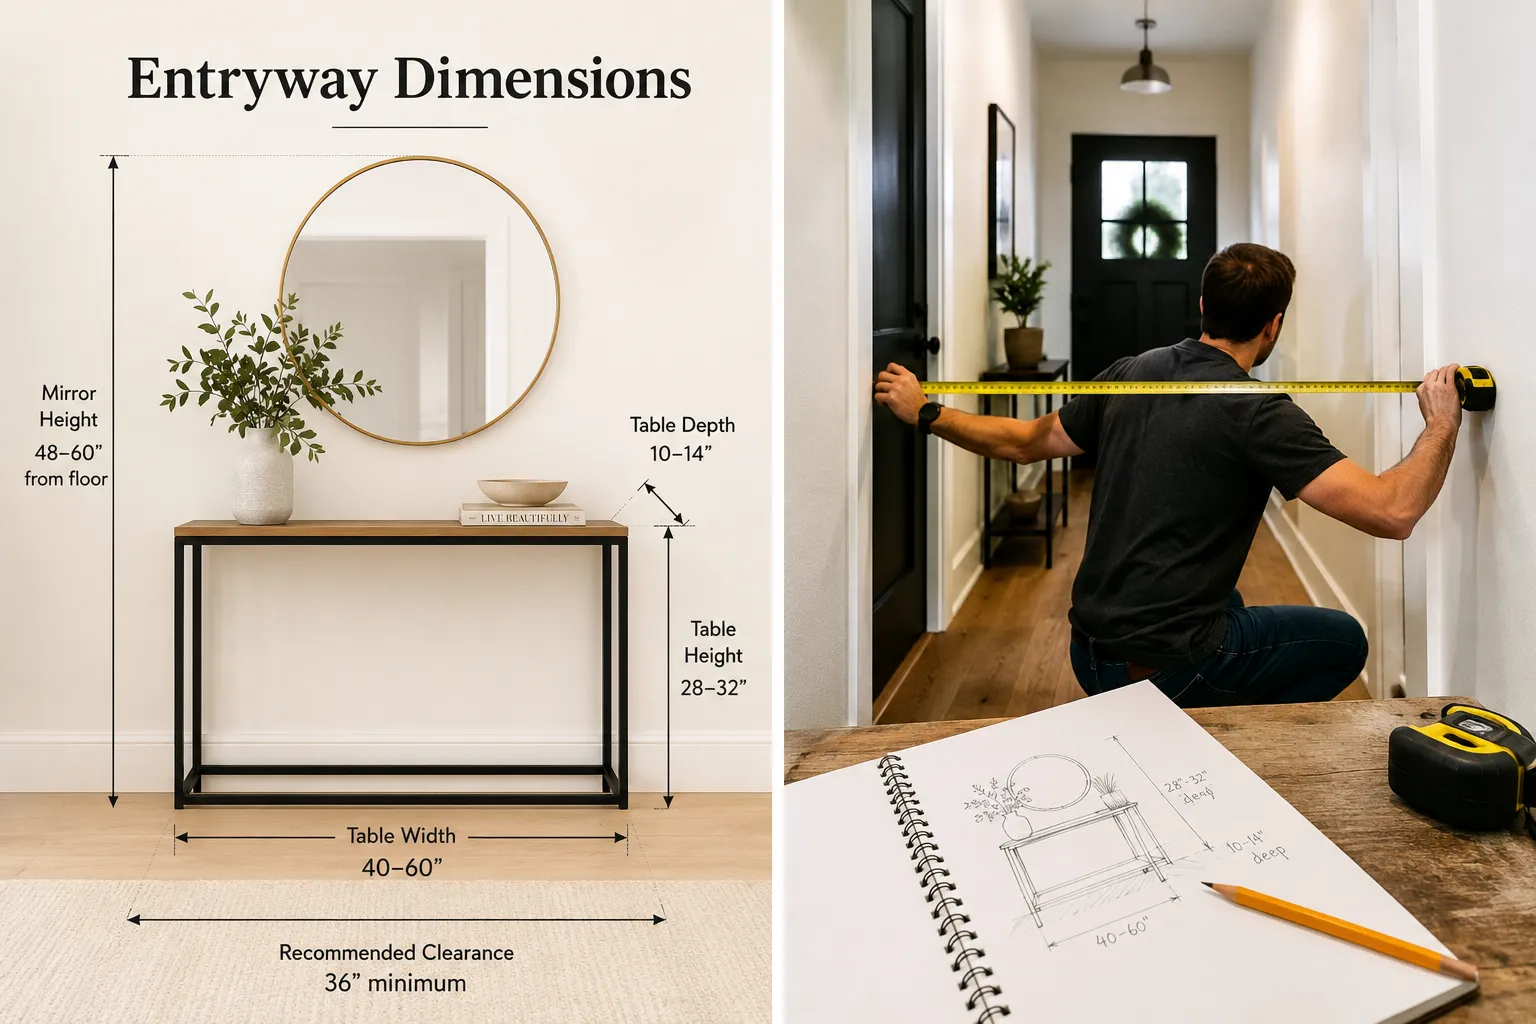
- Height: Most console tables stand between 30 and 34 inches tall. This height is comfortable for placing keys, mail, or decorative items, and often aligns well with wall art or mirrors hung above.
- Depth: This is arguably the most crucial dimension for an entryway. Console tables typically range from 10 to 14 inches deep. Anything deeper risks becoming an obstruction in a narrow hallway. For exceptionally narrow spaces, even slimmer designs (8-9 inches) might be necessary, requiring extra attention to stability. You can learn more about designing for these challenging spaces in our guide, “Console Tables for Narrow Hallways: How to Design Slim, Stable Tables.”
- Width: The width should be proportional to the wall space available. Common widths range from 36 to 60 inches, though custom builds can be shorter or longer. A good rule of thumb is to ensure there is at least 6-12 inches of clear wall space on either side of the table for a balanced look.
Tailoring Dimensions to Your Entryway
Every entryway is unique, and a truly custom console table should reflect that.
- Measure Thoroughly: Before any design work begins, meticulously measure the length of the wall, the width of the hallway, and the height of any existing architectural features (like wainscoting or electrical outlets).
- Consider Traffic Flow: Mark out the proposed footprint of the table on the floor with painter’s tape. Walk around it to ensure there’s ample space for people to pass comfortably, especially if it’s a primary thoroughfare.
- Visual Balance: Consider the scale of the entryway. A grand, spacious foyer can accommodate a wider, more substantial console, while a cramped apartment hallway demands a slender, minimalist approach. The table should not overwhelm the space, nor should it appear too small and lost.
- Purpose-Driven Design: What will the table be used for? If it’s purely decorative, a very slim design is fine. If it needs to hold a lamp, books, or a catch-all tray, ensure the depth is adequate for those items. For those interested in maximizing utility, consider designs with integrated drawers or shelves, as discussed in “Building Custom Entryway Tables with Hidden Storage: Drawers, Cubbies, and Shoe Slots.”
Exploring Diverse Console Table Leg Styles
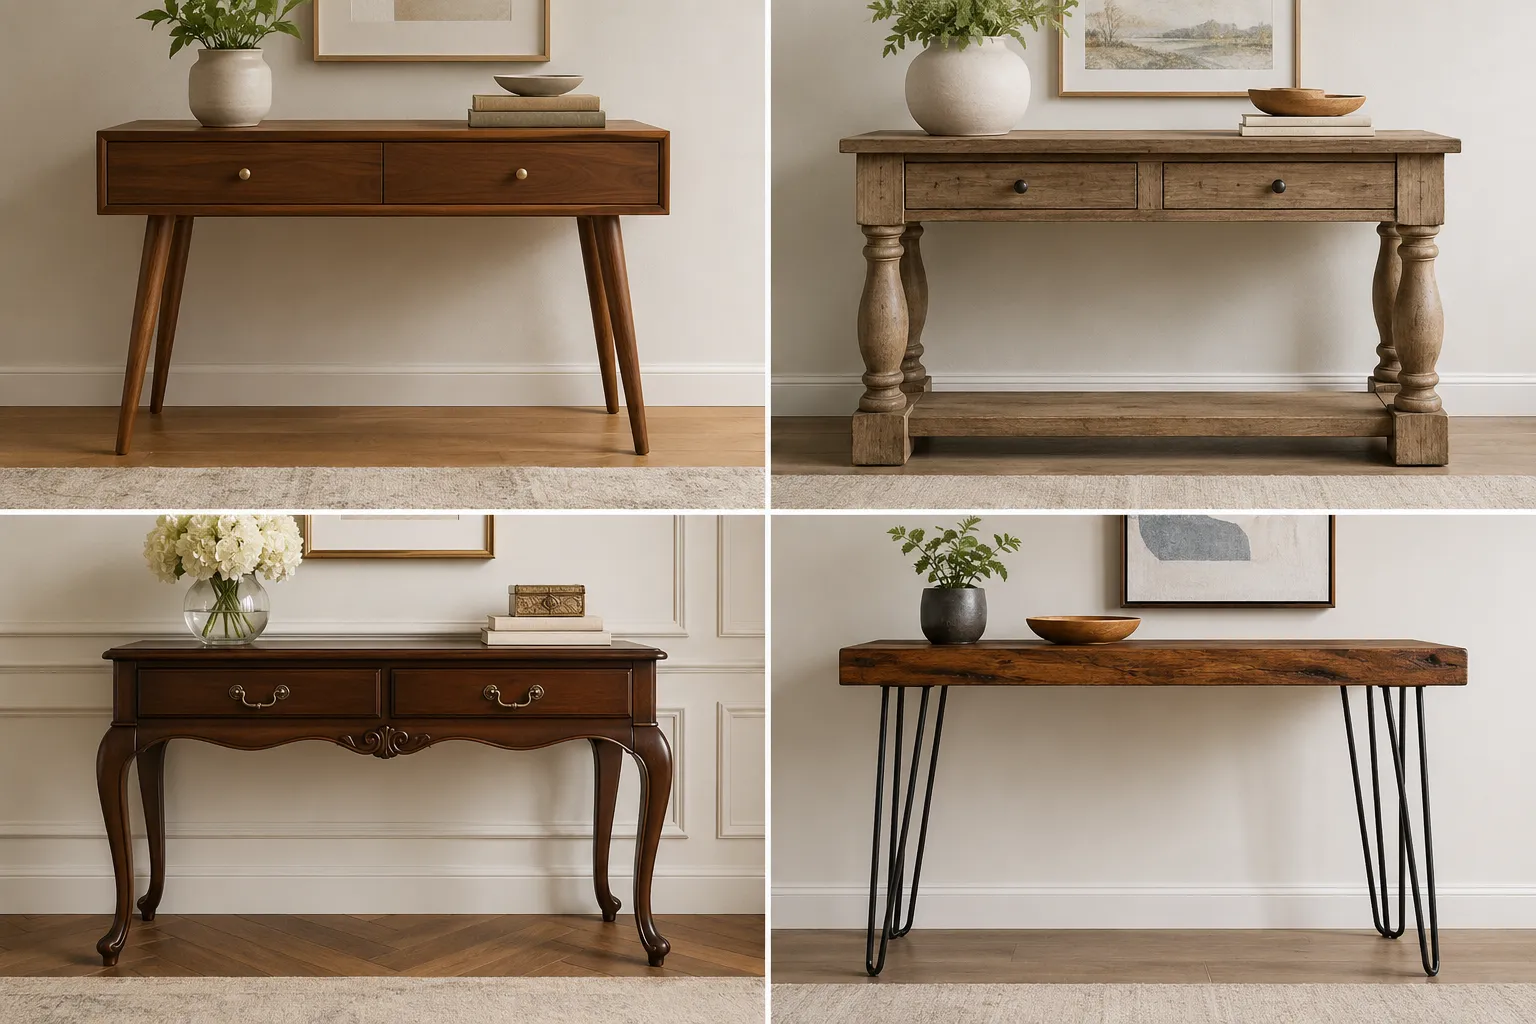
The legs of a console table are not merely structural supports; they are defining elements that dictate the piece’s aesthetic and contribute significantly to its perceived stability. As part of The Ultimate Woodworking Guide to Console Tables: Entryway Sizes, Leg Styles, and Structural Stability, understanding the various leg styles and their implications for joinery and design is essential.
Popular Leg Styles and Their Characteristics
Choosing a leg style often comes down to matching the overall design aesthetic of the home. Each style presents unique woodworking challenges and opportunities.
- Tapered Legs: Common in Mid-Century Modern and contemporary designs. Tapered legs gradually narrow from top to bottom, creating a light, elegant profile. They can be tapered on two or four sides.
- Joinery Considerations: Often joined to aprons (the horizontal frame connecting the legs) with mortise and tenon joints or specialized hardware for a clean look. The taper can influence the angle of the tenon.
- Straight/Square Legs: The simplest and most robust option, often found in Shaker, Mission, and modern industrial styles. They offer maximum stability and a clean, utilitarian aesthetic.
- Joinery Considerations: Ideal for strong mortise and tenon joints, dadoes, or even simple butt joints reinforced with screws and glue. They are forgiving for beginners.
- Turned Legs: Characterized by decorative profiles created on a wood lathe, ranging from simple spindles to intricate balusters. Popular in traditional, farmhouse, and rustic styles.
- Joinery Considerations: The turned section should ideally be below the apron connection point to allow for a strong, square tenon. The lathe work itself is a skill, as highlighted in “Ultimate Guide to Wood Lathe Turning: Pens, Bowls, and Advanced 2026 Curve Designs for Beginners.”
- Cabriole Legs: Distinctive S-shaped legs, swelling outwards from the top, curving inwards, and then flaring outwards at the foot (often with a “pad” foot or “claw and ball” foot). Synonymous with Queen Anne, Chippendale, and other classical furniture styles.
- Joinery Considerations: Extremely challenging to execute with traditional joinery due to their complex curves. Often involves large blanks of wood and significant carving. Stability can be compromised if the curves are too extreme or the wood is weak.
- Hairpin Legs: A modern, minimalist style made from bent metal rods. While not traditionally “woodworking” in construction, they are frequently paired with wooden console table tops for an industrial-chic look.
- Joinery Considerations: Simply attach with screws to the underside of the tabletop. The primary woodworking challenge is preparing a sturdy, flat top that can bear weight.
- Slab/Panel Legs: Solid panels of wood forming the legs, often creating a contemporary, monolithic appearance. Can be perpendicular to the top or angled.
- Joinery Considerations: Often secured with hidden fasteners, dadoes, or interlocking joinery for a seamless look. The thickness and grain direction are critical for preventing warping.
Matching Legs to Your Design and Skill Level
When selecting leg styles, consider not only the aesthetic but also your woodworking proficiency. Simple square or tapered legs are excellent starting points for beginners, allowing for mastery of fundamental joinery. More complex styles like turned or cabriole legs require specialized tools and advanced techniques. Always prioritize stability, especially for narrow console tables.
Ensuring Structural Stability in Narrow Console Tables
The inherent slenderness of console tables, particularly those designed for narrow entryways, makes structural stability a paramount concern. A wobbling or easily tipped console table is not only annoying but also a safety hazard. This segment of The Ultimate Woodworking Guide to Console Tables: Entryway Sizes, Leg Styles, and Structural Stability provides critical woodworking insights to guarantee a robust and long-lasting build.
The Physics of Stability: Why Console Tables Wobble
The primary challenge with console tables is their high center of gravity relative to their narrow base. Any lateral force (a bump, a child pulling on it, uneven flooring) can create a tipping moment. To counteract this, a design must:
- Maximize Base Footprint: While the depth is narrow, ensure the legs splay slightly or have a base that extends as far as possible without impeding traffic.
- Lower Center of Gravity: While difficult for the main tabletop, adding a lower shelf can help by distributing weight downwards, improving stability.
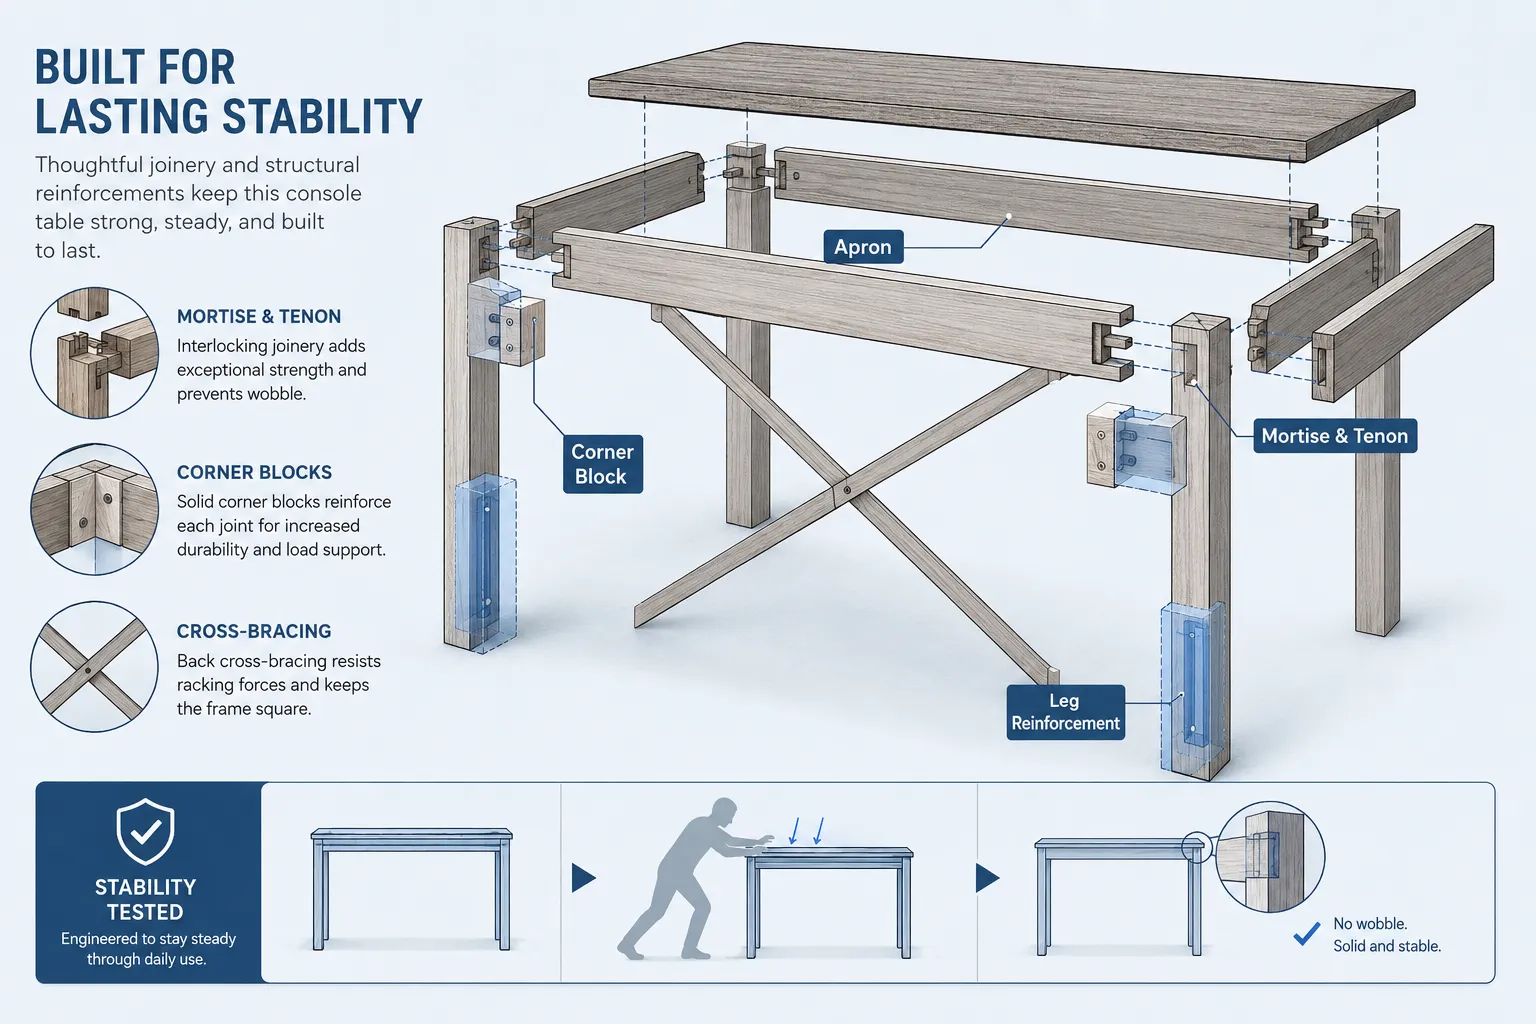
- Employ Robust Joinery: The connections between the legs, aprons, and top must be exceptionally strong to resist racking (sideways movement).
Essential Joinery Techniques for Stability
Weak joints are the leading cause of table instability. For console tables, prioritize joinery that offers maximum mechanical strength.
- Mortise and Tenon Joints: This is the gold standard for connecting legs to aprons. The tenon (a projection on the leg or apron) fits snugly into the mortise (a corresponding hole).
- Through Mortise and Tenon: Offers the strongest connection as the tenon passes entirely through the receiving piece and can be wedged or pegged.
- Blind Mortise and Tenon: The tenon does not pass through, offering a cleaner aesthetic, but still providing significant strength. Mastering these techniques is crucial, as detailed in “Beginners Guide to Hand-Cut Mortise and Tenon Joints: Mastering the Fundamentals for Strong Furniture.”
- Dado Joints: Excellent for attaching shelves or dividers within the table frame. A dado is a groove cut across the grain into which another piece of wood fits.
- Dovetail Joints: While often associated with drawers, dovetails can be used in certain console table designs, especially for connecting side panels or small storage components, providing exceptional strength against pulling forces.
- Reinforcement Blocks (Corner Blocks): These triangular or square blocks are glued and screwed into the inside corners where legs meet aprons, significantly increasing rigidity and preventing racking. They are particularly vital for larger or heavier tables.
- Cross-Bracing: For longer console tables, adding a stretcher or cross-brace between the legs, either at the bottom or mid-height, can dramatically improve lateral stability. This creates a more rigid frame that resists twisting and swaying.
Material Selection and Construction Best Practices
Beyond joinery, the choice of wood and careful construction methods play a vital role.
- Wood Species: Opt for hardwoods like oak, maple, walnut, or cherry for legs and frame components. These woods offer superior strength, stiffness, and screw-holding ability compared to softer woods like pine. Learn about selecting premium wood for your projects in “Premium Wood Selection for 2026 Projects: Walnut, Cherry, and Exotic Alternatives to Pine.”
- Grain Direction: Always consider grain direction. Legs should be cut so the grain runs vertically for maximum strength. Avoid short grain sections where possible, as these are prone to breaking.
- Panel Adhesion: If your tabletop or shelves are constructed from multiple boards, ensure proper glue-ups for strong, stable panels that won’t warp or separate.
- Leveling Feet: Incorporate adjustable leveling feet into your design, especially if the table will be placed on uneven flooring. This simple addition can prevent wobbling caused by slight discrepancies in leg length or floor imperfections, a common cause of “table squishy” that can be troubleshooted with resources like “Understanding ‘Table Squishy’: Troubleshooting Common Table Instability Issues and DIY Fixes.”
- Wall Anchoring: For extremely tall, narrow, or heavily loaded console tables, consider providing a discreet wall-anchoring mechanism (e.g., anti-tip straps or brackets) as a safety precaution, especially in homes with children or pets.
Finishing Your Console Table for Longevity and Beauty
Once the joinery is sound and the dimensions are perfect, the final steps in woodworking involve finishing the console table. A well-applied finish not only enhances the wood’s natural beauty but also provides crucial protection against moisture, wear, and tear, ensuring the table’s longevity in a busy entryway.
Surface Preparation: The Foundation of a Great Finish
No finish can hide poor surface preparation. This stage is critical.
- Sanding: Begin with coarser grits (e.g., 80 or 100) to remove milling marks and imperfections, then progress incrementally to finer grits (e.g., 180 or 220). Avoid skipping grits, as this can leave visible scratches. Ensure you sand with the grain.
- Dust Removal: After each sanding stage, thoroughly remove all dust using a vacuum, compressed air, and a tack cloth. Residual dust can create a bumpy or cloudy finish.
- Wood Conditioner: For woods prone to blotching (like pine or maple), apply a pre-stain wood conditioner. This helps the stain absorb more evenly, leading to a consistent color.
Choosing the Right Finish
The type of finish selected depends on the desired aesthetic, durability, and ease of application.
- Oil Finishes (e.g., Tung Oil, Linseed Oil): Penetrate the wood, enhancing its natural color and grain. They offer a warm, natural look and are easy to repair but provide less protection against scratches and moisture than film-forming finishes. For more on natural options, see “Natural Wood Finishing Without Chemicals: Plant-Based Stains, Oils, and Protective Coatings for Health-Conscious Makers and Eco-Conscious Buyers.”
- Varnish (Polyurethane, Spar Varnish): Create a durable, protective film on the wood’s surface. Polyurethane is very common for its excellent resistance to abrasion and moisture. Spar varnish offers superior UV and weather protection, ideal if the table might be near a sunny window.
- Lacquers: Provide a very hard, clear, and fast-drying finish that can be built up quickly. Often sprayed for the best results, they are highly durable but can be more challenging for beginners.
- Shellac: A natural, non-toxic finish that dries quickly and creates a warm, amber tone. It offers good protection but is susceptible to heat and alcohol. Often used as a sealer or a barrier coat.
- Wax Finishes: Offer a soft, low-sheen look, popular for rustic or antique pieces. Provides minimal protection and requires regular reapplication.
Application Techniques for a Flawless Finish
The application method significantly impacts the final look and durability.
- Staining: If applying a stain first, always test it on a scrap piece of the same wood. Apply evenly with a brush or rag, then wipe off excess according to the product instructions. For more guidance, check out “Beginner’s Guide to Wood Staining: Color Selection, Application, and Troubleshooting Common Issues.”
- Film-Building Finishes (Varnish, Lacquer): Apply thin, even coats, allowing each coat to dry thoroughly. Lightly sand with a fine grit (e.g., 220-320) between coats to ensure good adhesion and a smooth surface. Remove all dust before applying the next coat. Multiple thin coats are always better than one thick coat.
- Oil Finishes: Apply a generous coat, let it soak in, and then wipe off all excess. Repeat this process over several days or weeks to build up protection.
Curing and Care
Once the final coat is applied, allow the finish to cure completely before placing items on the table. This can take several days to several weeks, depending on the product and environmental conditions. Refer to the manufacturer’s instructions. Proper care, such as using coasters and cleaning with a damp cloth, will help maintain the beauty and integrity of your console table for years to come.
Conclusion
Crafting a console table that excels in both form and function requires a deep understanding of its unique design constraints and structural requirements. From carefully planning entryway sizes to selecting appropriate leg styles and employing robust joinery, every decision contributes to the final outcome. By meticulously considering dimensions, choosing the right wood, and applying proven woodworking techniques for stability, you can create a console table that not only enhances an entryway aesthetically but also withstands the test of time. In 2026, the demand for well-made, stable, and stylish furniture remains strong, and a custom-built console table is an excellent project for any woodworker looking to combine practicality with sophisticated design. Embark on your next build with confidence, knowing you have the foundational knowledge to create a truly exceptional piece.