

Imagine running your hand over a piece of wood, feeling its smooth, warm texture, and seeing its unique grain patterns glow with a soft, inviting luster. This isn’t just about protecting wood; it’s about revealing its soul. As a seasoned woodworker and enthusiast, I’ve spent countless hours exploring how to enhance wood’s inherent beauty, and I’m here to share the secrets of natural wood finishing techniques. In an age where sustainability and health are paramount, choosing natural finishes is not only a wise environmental decision but also an aesthetic one that yields unparalleled results. This guide will walk you through everything you need to know to bring out the best in your wooden projects, offering a deep dive into methods that are kind to both your craft and the planet in 2025.
Whether you’re crafting a beautiful DIY coffee table or a custom farmhouse dining table, understanding these techniques is crucial for a stunning, long-lasting finish.

Key Takeaways
- Embrace Natural Beauty: Natural finishes enhance the wood’s inherent grain and color without forming a plastic-like film, allowing the wood to breathe and age gracefully.
- Health and Environmental Benefits: Opting for natural finishing products minimizes exposure to harsh chemicals and reduces your ecological footprint, making them ideal for projects like children’s woodwork.
- Variety of Techniques: From penetrating oils to surface-building waxes and shellac, there’s a natural technique for almost every application, each offering unique protective and aesthetic qualities.
- Proper Preparation is Key: Success with natural finishes hinges on meticulous wood preparation, including thorough sanding and cleaning, to ensure optimal absorption and a flawless final look.
- Maintenance Matters: While beautiful, natural finishes often require periodic reapplication and specific care to maintain their protection and luster over time.
Understanding the Philosophy Behind Natural Wood Finishing Techniques
The world of wood finishing is vast, but natural wood finishing techniques stand apart. Unlike synthetic varnishes or polyurethanes that create a hard, often plastic-like shell on the surface, natural finishes aim to work with the wood, not against it. This approach respects the material, allowing its natural character to shine through while offering protection from moisture, wear, and tear.
When we talk about “natural,” we typically refer to finishes derived from plants 🌱 or insects 🐝. These include:
- Plant-based oils: Linseed oil, tung oil, hemp oil.
- Plant-based waxes: Carnauba wax, candelilla wax.
- Insect-derived products: Beeswax, shellac.
The appeal of these finishes goes beyond aesthetics. They are often less toxic, producing fewer volatile organic compounds (VOCs) during application and curing, which makes for a healthier workshop and home environment. This is especially important in 2025 as we become more conscious about indoor air quality and sustainable practices.
Why Choose Natural Wood Finishing Techniques?
There are compelling reasons why woodworkers, hobbyists, and homeowners alike are increasingly gravitating towards natural finishing methods:
- Enhanced Aesthetics: Natural finishes deepen the wood’s color, highlight the grain, and impart a warm, tactile feel that synthetic finishes often can’t replicate. The wood truly feels like wood.
- Reparability: Scratches and wear on naturally finished wood are often easier to repair than on film-building finishes. A quick sanding and reapplication of the finish can usually restore the area seamlessly.
- Breathability: These finishes allow wood to “breathe,” meaning they don’t trap moisture within the wood in the same way some film finishes can, which can be beneficial for the wood’s long-term stability.
- Eco-Friendly & Non-Toxic: Many natural finishes are biodegradable and derived from renewable resources. They are generally safer to work with and safer to have in your home, especially for items that come into contact with food or for furniture in children’s rooms.
- Historical Authenticity: For restoration projects or replicating traditional furniture styles, natural finishes like shellac and oil are often historically accurate choices.
“Choosing a natural finish is a commitment to the wood itself – to celebrate its origin, its character, and its enduring beauty without masking it.”
Preparing Wood for Natural Finishing
Regardless of the specific natural wood finishing technique you choose, proper preparation is the cornerstone of a beautiful and durable result. Think of it as preparing a canvas for a masterpiece. Any shortcuts here will be evident in the final finish.
Essential Steps for Wood Preparation
Sanding, Sanding, Sanding! 📈
- Start with a coarser grit sandpaper (e.g., 80-100 grit) to remove any major imperfections, mill marks, or old finishes.
- Progress through finer grits (120, 150, 180, 220). The goal is to remove the scratch marks from the previous grit before moving to the next.
- For furniture that will be handled frequently or requires a very smooth feel, you might even go up to 320 or 400 grit. However, some oils penetrate better into slightly less smooth surfaces, so balance is key.
- Pro Tip: After sanding with one grit, lightly dampen the wood surface with a cloth and allow it to dry. This raises any compressed wood fibers, which can then be sanded down with the next grit, resulting in a much smoother final finish and preventing “grain-raise” later.
Dust Removal: After sanding, removing all dust is critical.
- Use a vacuum cleaner with a brush attachment.
- Follow up with a tack cloth or a microfiber cloth lightly dampened with mineral spirits or denatured alcohol. Make sure the cloth is barely damp to avoid soaking the wood.
- Compressed air can also be useful for intricate areas.
Filling Imperfections (Optional): If there are small holes or cracks, you may want to fill them with wood filler. Choose a filler that accepts stain or finish well and try to match the wood’s natural color as closely as possible.
Pre-Treatments (When Necessary): Some woods, especially softwoods like pine, can be blotchy when finished with certain techniques. A pre-stain conditioner can help achieve a more even absorption. However, with true penetrating natural finishes, this is often less of an issue than with film-forming stains.
Remember, a perfectly prepared surface will make your chosen natural wood finishing techniques sing! For more on proper wood preparation, check out our guide to wood finishing techniques.
Popular Natural Wood Finishing Techniques and Their Applications
Let’s dive into the core of natural wood finishing. Each technique offers a distinct look, feel, and level of protection. Understanding their characteristics will help you choose the perfect finish for your project.
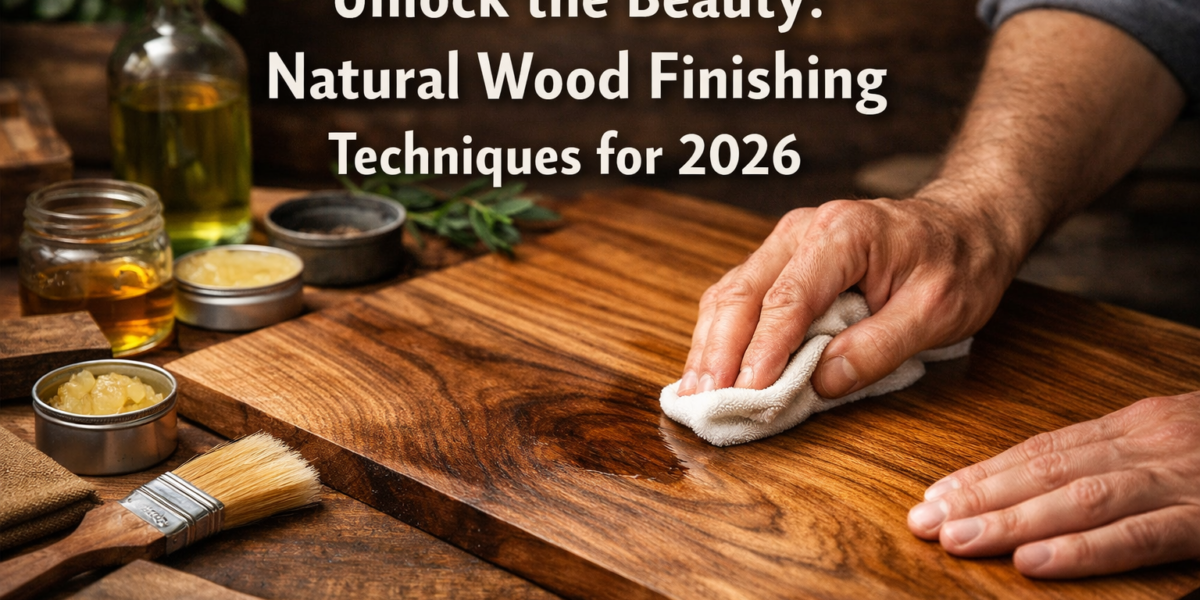
1. Oil Finishes: Deep Penetration and Natural Feel
Oil finishes are perhaps the most popular category of natural wood finishing techniques, cherished for their ability to bring out the wood’s natural warmth and grain. They penetrate the wood fibers, harden within them, and provide protection from the inside out, rather than sitting on top.
Types of Natural Oils:
Linseed Oil (Flaxseed Oil): One of the oldest and most widely used finishes.
- Boiled Linseed Oil (BLO): Contains metallic dryers to speed up curing time, which is usually several days to a week.
- Raw Linseed Oil: Cures extremely slowly (weeks to months) and is less common for general woodworking.
- Pros: Deepens wood color, easy to apply and repair, food-safe when fully cured (raw or pure BLO without toxic dryers).
- Cons: Slow curing time, can darken wood significantly over time, offers moderate water resistance.
- Application: Apply thin coats with a rag, allow to soak for 15-30 minutes, then wipe off all excess thoroughly. Repeat multiple times. Always dispose of oil-soaked rags properly (e.g., immerse in water or spread flat to dry) to prevent spontaneous combustion 🔥.
- Ideal for: Furniture, turned objects, tool handles. Excellent on woods like oak and walnut. For pine, oil on pine provides a beautiful finish.
Tung Oil: Derived from the nuts of the tung tree, it’s revered for its durability and water resistance.
- Pure Tung Oil: Takes a long time to cure but provides excellent protection.
- “Tung Oil Finish”: Be cautious; many products labeled “tung oil finish” are actually a blend of tung oil, varnish, and solvents. Always read the label.
- Pros: Very water-resistant, durable, produces a clear finish that doesn’t significantly darken wood, food-safe when pure and cured.
- Cons: Slower drying than BLO, can be more expensive.
- Application: Similar to linseed oil – thin coats, wipe off excess. Multiple coats build protection.
- Ideal for: Countertops, cutting boards, outdoor furniture, any item needing good water resistance.
Danish Oil: While often containing tung or linseed oil, Danish oil is typically a blend of oil, varnish, and solvent. It’s often categorized with oils because it penetrates the wood.
- Pros: Easy to apply, provides good protection with a satin finish, dries faster than pure oils.
- Cons: Not always 100% natural due to varnish components, reparability might be slightly less seamless than pure oils.
- Application: Wipe on, let soak, wipe off excess. Can be built up with multiple coats.
- Ideal for: Furniture, trim, anything needing a good balance of protection and ease of application. For a detailed comparison, explore Danish oil vs. linseed oil.
Hemp Seed Oil: A newer, truly natural option, often preferred for its clear finish and eco-friendliness.
- Pros: Non-toxic, food-safe, mild odor, doesn’t yellow over time, provides a lovely matte finish.
- Cons: Less durable than tung oil, slower drying than BLO.
- Application: Wiped on with a cloth, allowed to penetrate, and then buffed.
- Ideal for: Kitchen utensils, children’s toys, surfaces needing a very natural, low-sheen look.
2. Wax Finishes: Soft Sheen and Tactile Beauty
Waxes are typically used as a topcoat over an oil finish or directly on bare wood for a very subtle, soft luster. They provide some protection against moisture and minor scratches but are generally not as durable as oils or shellac on their own.
Types of Natural Waxes:
Beeswax: A natural wax produced by honey bees.
- Pros: Easy to apply, provides a beautiful soft sheen and a wonderfully smooth feel, pleasant natural scent, food-safe.
- Cons: Offers limited protection against water and wear, requires frequent reapplication, can attract dust if applied too thickly.
- Application: Often combined with a solvent (like mineral spirits) or oil to make it easier to apply. Rub a thin layer onto the wood, let it sit, then buff vigorously with a clean, soft cloth.
- Ideal for: Decorative items, antiques, surfaces that see light use, or as a topcoat over oil for added depth and feel.
Carnauba Wax: Derived from the leaves of the carnauba palm tree. It’s much harder than beeswax.
- Pros: Produces a higher sheen and offers better durability than beeswax, good water resistance.
- Cons: Harder to apply (often needs to be melted or dissolved in a solvent), can be brittle if too thick.
- Application: Typically blended with other waxes or oils. Applied thinly and buffed.
- Ideal for: Floors (in blends), furniture, or any project requiring a harder wax finish.
Paste Wax: Often a blend of beeswax, carnauba wax, and solvents.
- Pros: Easy to apply, enhances depth of existing finishes, provides a soft, warm glow.
- Cons: Not highly protective on its own, needs reapplication.
- Application: Apply with a soft cloth in a circular motion, allow to haze, then buff.
- Ideal for: Enhancing other finishes, light-use furniture.
3. Shellac: A Historical and Versatile Natural Finish
Shellac is a unique natural wood finishing technique derived from the secretions of the lac bug, processed into flakes and then dissolved in denatured alcohol. It’s one of the oldest and most versatile finishes available.
- Pros: Dries incredibly fast, non-toxic when dry (food-safe), beautiful warm amber tone (though clear “blonde” shellac exists), excellent sealer, good adhesion to almost any surface, easy to repair with more shellac.
- Cons: Not very resistant to heat or alcohol (which can dissolve it), moderate water resistance, prone to scratching.
- Application: Can be brushed, wiped, or sprayed. Multiple thin coats are applied. The “French Polish” method uses shellac for a high-gloss, deep finish.
- Ideal for: Sealer coat under other finishes, antique restoration, decorative items, indoor furniture not subject to heavy use or moisture, and for creating a beautiful, classic luster.
| Natural Finish Type | Appearance / Sheen | Protection Level | Drying Time | Ease of Application | Key Characteristics |
|---|---|---|---|---|---|
| Linseed Oil | Matte to Satin | Moderate | Slow (days/weeks) | Easy | Deepens color, enhances grain, reparable. |
| Tung Oil | Matte to Satin, Clearer | Good | Slow (days) | Moderate | Very water-resistant, durable, minimal yellowing. |
| Hemp Oil | Matte, Clear | Moderate | Moderate-Slow | Easy | Food-safe, non-yellowing, very natural feel. |
| Beeswax | Soft Satin | Low | Fast | Easy | Smooth feel, subtle shine, needs frequent re-waxing. |
| Carnauba Wax | Higher Sheen | Moderate | Fast | Moderate (blended) | Harder, more durable wax, good water resistance. |
| Shellac | Satin to High Gloss | Moderate | Very Fast (mins) | Moderate | Excellent sealer, amber tone, alcohol-soluble. |
Step-by-Step Application of Common Natural Wood Finishing Techniques
Now that we understand the various options, let’s walk through the general application process for these natural wood finishing techniques. Remember that specifics can vary based on the product, so always read the manufacturer’s instructions.
General Steps for Oil and Oil-Wax Blends
- Prepare the Wood: As detailed above, sand thoroughly and remove all dust.
- Apply the First Coat:
- Using a clean, lint-free cloth or brush, apply a generous, even coat of your chosen oil or oil-wax blend to the wood surface.
- Ensure good coverage. For oils, the wood will absorb a lot at first.
- Allow Penetration: Let the finish soak into the wood for the recommended time (usually 15-30 minutes for oils, check product specific instructions). You might see some areas absorb more quickly than others.
- Wipe Off Excess: This is CRITICAL for oil finishes. Using a clean, dry, lint-free cloth, thoroughly wipe off all excess oil from the surface. If you leave puddles or tacky spots, the finish will not cure properly and will remain sticky. Continue wiping until the surface feels dry to the touch and no more oil comes off on the rag.
- Dry Time: Allow the first coat to cure according to manufacturer directions. This can range from a few hours to a full day or more. Good ventilation is important.
- Light Sanding (Optional): After the first coat is dry, some woodworkers like to do a very light sanding with a super fine grit (400-600 grit) or fine steel wool (0000 grade) to smooth out any raised grain or dust nibs. This step is optional but can lead to an even smoother final finish. Remove all dust.
- Apply Subsequent Coats: Repeat steps 2-5. Most oil finishes benefit from 2-5 coats, sometimes more for high-wear items. Each subsequent coat will add depth and protection.
Safety Reminder: Always properly dispose of oil-soaked rags! They can spontaneously combust. Immerse them in water, spread them flat to dry completely outdoors, or store them in a sealed metal container.
Applying Wax Finishes (as a topcoat or standalone)
- Prepare the Wood: Sand and dust thoroughly. If applying over oil, ensure the oil is fully cured.
- Apply a Thin Layer: Use a clean cloth to apply a very thin, even layer of paste wax in a circular motion. A little goes a long way. Don’t apply too much, as it will be hard to buff.
- Haze Time: Allow the wax to dry and form a haze. This usually takes 10-20 minutes, depending on humidity and temperature.
- Buff: Using a separate clean, soft, lint-free cloth, buff the surface vigorously until you achieve the desired sheen.
- Multiple Coats (Optional): For added protection and sheen, you can apply a second thin coat after an hour or two and buff again.
Applying Shellac
- Prepare the Wood: Sand and dust thoroughly. Shellac also acts as a great sealer coat for other finishes.
- Mix Shellac (if using flakes): If you’re using shellac flakes, dissolve them in denatured alcohol to achieve your desired “cut” (e.g., a 2-pound cut is 2 pounds of flakes per gallon of alcohol). Let it sit overnight to fully dissolve.
- Apply First Coat:
- Brushing: Use a good quality natural bristle brush. Apply thin, even coats, moving quickly as shellac dries very fast. Avoid overworking it.
- Wiping: Use a lint-free cloth (a “rubber” in French polishing) to wipe on thin coats.
- Spraying: Shellac sprays beautifully when thinned appropriately.
- Dry Time: Shellac dries to the touch in minutes.
- Light Sanding: After the first coat, you can lightly sand with 320-400 grit sandpaper to remove any dust nibs. Dust off.
- Subsequent Coats: Apply 3-5 thin coats, sanding lightly between every few coats if desired for smoothness.
- Final Buff (Optional): For a higher sheen, you can buff the final cured coat with very fine steel wool (0000) and then apply a paste wax.
Choosing the Right Natural Wood Finishing Technique for Your Project
Selecting the best natural wood finishing technique depends heavily on the project itself and its intended use. Here’s a quick guide to help you decide in 2025:

| Project Type | Recommended Natural Finish | Why? |
|---|---|---|
| Kitchen Countertops/Cutting Boards | Pure Tung Oil, Hemp Oil | Food-safe, excellent water resistance, durable. |
| Dining Tables/Desks | Danish Oil, Tung Oil, Shellac + Wax | Good balance of durability, reparability, and aesthetic appeal. |
| Bedroom Furniture | Linseed Oil, Hemp Oil, Shellac | Highlights grain, soft feel, less prone to heavy wear than tables. See our guide to woodworking for your bedroom. |
| Decorative Items/Antiques | Shellac, Beeswax, Linseed Oil | Traditional, enhances natural beauty, easily reparable. |
| Children’s Toys | Hemp Oil, Pure Tung Oil, Beeswax | Non-toxic, food-safe, safe for little hands. |
| Outdoor Furniture | Tung Oil (exterior grade) | Best natural option for UV and water resistance. |
| Flooring | Hardwax Oils (specialized) | Designed for high traffic, often a blend of natural oils and waxes. |
Semantic Variations and Related Terms
When researching and discussing natural wood finishing techniques, you’ll often encounter related terms that are good to be familiar with:
- Eco-friendly wood finishes: Emphasizes the environmental aspect.
- Non-toxic wood coatings: Focuses on health and safety.
- Organic wood sealants: Highlights the natural composition.
- Sustainable wood treatments: Broader term for environmentally conscious practices.
- Traditional wood finishes: Refers to time-honored methods like oil and shellac.
- Penetrating finishes: Describes oils that soak into the wood.
- Film-forming natural finishes: Less common, but shellac does form a thin film.
Knowing these terms can help you find specific products or information as you explore the world of natural wood finishing techniques further.
Maintaining Your Naturally Finished Wood
One of the beauties of natural wood finishing techniques is their reparability, but they also require a different approach to maintenance compared to synthetic finishes. Regular care will ensure your wooden pieces remain beautiful for years to come.
General Maintenance Tips:
- Regular Cleaning: For most naturally finished surfaces, a simple wipe down with a damp (not wet!) cloth is sufficient. For tougher grime, use a very mild soap solution (like dish soap diluted in water) and immediately wipe dry. Avoid harsh chemical cleaners, as they can strip the finish.
- Reapplication: Natural finishes, particularly oils and waxes, wear down over time and require periodic reapplication.
- Oils: Depending on use, oiled surfaces might need a refresh coat every 6 months to 2 years. High-traffic areas (like a wooden work table or kitchen countertop) may need it more frequently.
- Waxes: Waxed surfaces benefit from re-waxing every few months to a year to maintain their sheen and protection.
- Shellac: Shellac is durable, but if it shows signs of wear or alcohol/heat damage, a new thin coat can be applied directly over the old, as shellac melts into itself.
- Addressing Scratches and Dents: One of the big advantages of natural finishes is easy repair.
- For light scratches on oil or wax finishes, a gentle buff with a fine abrasive pad (like a synthetic steel wool pad) followed by a fresh application of the finish often works wonders.
- Deeper dents can sometimes be raised with a damp cloth and a warm iron (use caution!), followed by sanding and re-oiling.
- Protect from Extremes: While natural finishes allow wood to breathe, extreme fluctuations in humidity and temperature are still bad for wood. Avoid placing naturally finished pieces in direct sunlight for prolonged periods or near heat sources, as this can cause drying and cracking. Use coasters under drinks to prevent water rings.
By understanding these simple maintenance steps, you can ensure your beautiful, naturally finished woodworking projects continue to impress and endure.
Conclusion
Choosing natural wood finishing techniques for your woodworking projects in 2025 is more than just a trend; it’s a return to craftsmanship, sustainability, and a deeper appreciation for the inherent beauty of wood. From the penetrating warmth of tung oil to the subtle glow of beeswax and the classic elegance of shellac, these finishes offer a unique combination of aesthetic appeal, environmental responsibility, and user-friendly application and repair.
I encourage you to experiment with these methods, starting with smaller projects perhaps, to truly understand the nuances of each. Don’t be afraid to try different oils, waxes, or shellac cuts to find what best suits your wood and your vision. The journey of discovering the perfect finish is as rewarding as the final result itself. With proper preparation and a little patience, you’ll uncover the rich, living beauty that only natural finishes can provide. Happy woodworking!
Actionable Next Steps:
- Start Small: Pick a simple project, like a small cutting board or a wooden box, to practice your chosen natural finishing technique.
- Gather Materials: Invest in high-quality natural oils, waxes, or shellac. Don’t forget proper sanding supplies and lint-free cloths.
- Read and Learn: Consult product-specific instructions and delve deeper into resources like WoodcraftWiz.com for more tips and inspiration.
- Embrace Patience: Natural finishes often require multiple thin coats and adequate drying time. Don’t rush the process!
- Document Your Progress: Take notes on what works well for different wood types and finishes, building your own expertise.
