

Mastering Oak Wood Finishing Techniques: A Comprehensive Guide for 2025
Welcome, fellow wood enthusiasts! There's something undeniably captivating about oak – its robust grain, inherent strength, and timeless appeal have made it a favorite among woodworkers and homeowners alike for centuries. However, unlocking the true beauty and longevity of oak wood lies not just in its selection, but profoundly in the artistry of its finishing. Mastering oak wood finishing techniques is the key to transforming a raw piece of lumber into a stunning heirloom, protecting it from wear and tear, and enhancing its natural character. In this comprehensive guide for 2025, we'll delve into the essential steps, popular methods, and expert tips to help you achieve professional-grade results on your oak projects. Whether you're aiming for a classic, natural look, a deep, rich stain, or a modern, subtle sheen, understanding the nuances of oak finishing will elevate your craft.

Key Takeaways
- Preparation is Paramount: The quality of your finish is directly proportional to the thoroughness of your surface preparation, particularly sanding and cleaning.
- Conditioning is Crucial for Oak: Due to its open grain, oak can be prone to blotchiness; wood conditioner is often essential for even stain absorption.
- Variety of Finishing Options: From durable polyurethanes to natural oils and classic shellac, a range of topcoats offers different aesthetics and levels of protection.
- Testing is Non-Negotiable: Always test your chosen finishing system on scrap oak identical to your project piece before applying it to the main work.
- Maintenance Extends Life: Proper care and occasional re-application of finishes ensure the lasting beauty and protection of your oak wood creations.
The Foundation: Preparing Oak for a Flawless Finish
The adage "a finish is only as good as the preparation underneath it" rings especially true for oak. Its prominent open grain, while beautiful, requires careful attention to detail during the preparatory stages to prevent an uneven or blotchy appearance. This is where many of the most critical oak wood finishing techniques are applied.
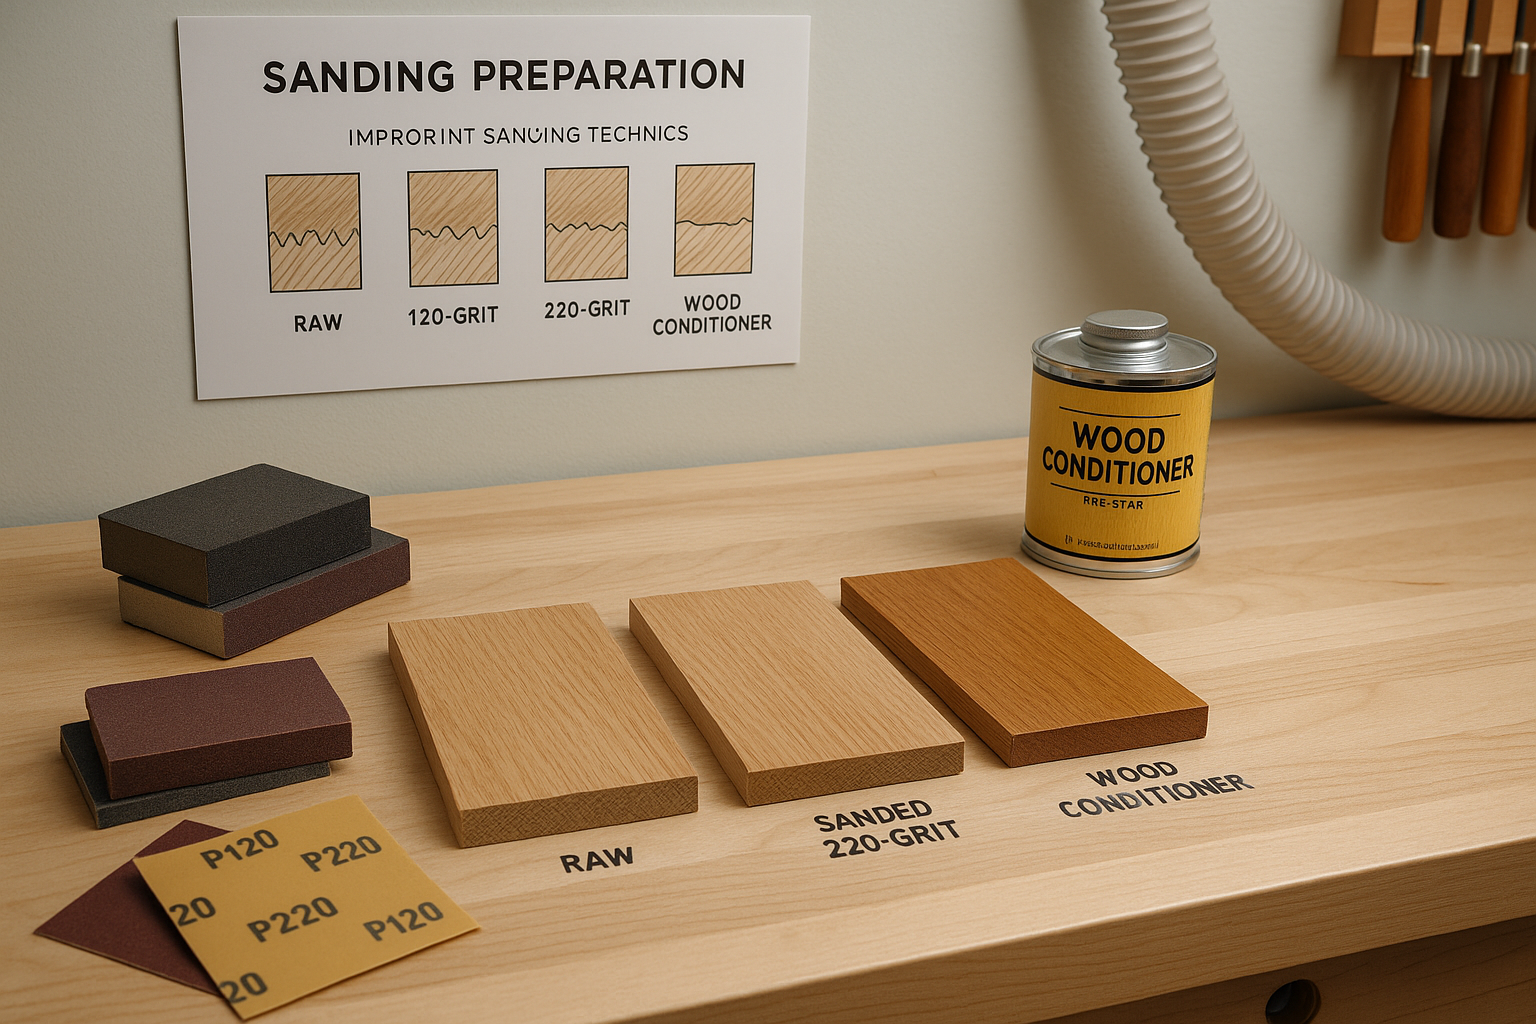
Sanding: The Art of Smoothness
Sanding is more than just making the wood feel smooth; it's about progressively refining the surface, removing imperfections, and opening the wood fibers to accept your chosen finish evenly. Rushing this step will compromise the final look, regardless of how high-quality your chosen stain or topcoat is.
- Start Coarse, Finish Fine: Begin with a coarser grit sandpaper (e.g., 80-100 grit) if there are significant imperfections, milling marks, or glue squeeze-out. Progress systematically through finer grits, typically 120, 150, 180, and finally 220 grit. For some finishes, stopping at 180 grit might be preferred as very fine sanding can "burnish" the wood, making it less receptive to stain.
- Even Pressure and Consistent Direction: Use a sanding block or an orbital sander to maintain even pressure across the surface. Always sand with the grain of the wood. Sanding across the grain, even momentarily, will leave visible scratches that become highly apparent once a stain or clear coat is applied.
- Dust Removal Between Grits: After each sanding grit, thoroughly remove all sanding dust. Dust left on the surface can embed in the wood during the next sanding stage, creating deeper scratches or an uneven texture. A shop vacuum, followed by a tack cloth, is highly recommended. For more efficient dust removal, consider upgrading your setup, much like improving your Craftsman table saw overview tips and upgrades.
Pro Tip: After your final sanding pass, wipe the wood with a damp cloth (water or mineral spirits). This "raises the grain," causing any loose fibers to stand up. Once dry, a very light pass with your final grit sandpaper will remove these raised fibers, resulting in a smoother finish that's less prone to fuzziness after the first coat of finish.
Cleaning: A Spotless Canvas
Once sanding is complete, the wood must be immaculately clean. Any residual dust, grease, or fingerprints can interfere with stain penetration and adhesion of your topcoat.
- Vacuum Thoroughly: Use a shop vacuum with a brush attachment to remove all visible dust from the surface, edges, and any nooks or crannies.
- Tack Cloth: A good quality tack cloth is indispensable. Lightly wipe the entire surface, ensuring it picks up even the finest dust particles. Fold the cloth frequently to expose a fresh surface.
- Solvent Wipe (Optional but Recommended): For particularly greasy or dirty wood, a wipe down with mineral spirits, denatured alcohol, or naphtha can be beneficial. These solvents evaporate quickly, leaving no residue. Always test on an inconspicuous area first.
“The secret to a truly stunning oak finish isn’t just about the topcoat you choose, but the meticulous care you invest in the preparation. Patience in sanding and cleaning pays dividends.”
Wood Conditioning: Taming Oak's Grain
Oak's open, often uneven grain structure can lead to blotchy or splotchy staining, where some areas absorb more stain than others, resulting in a darker, inconsistent appearance. This is why wood conditioner is a vital part of many oak wood finishing techniques.
- How it Works: Wood conditioner is a pre-treatment that partially seals the wood fibers, allowing subsequent stain coats to penetrate more evenly. It helps to regulate absorption, leading to a more uniform color.
- Application: Apply wood conditioner according to the manufacturer's instructions, typically by wiping it on generously and allowing it to soak in for a specified time (usually 5-15 minutes). Wipe off any excess before it dries.
- Timing is Key: Most conditioners require stain application within a specific window (e.g., 2 hours). If you wait too long, the conditioner can fully cure, hindering stain penetration. If you apply too soon, it might not have fully penetrated. Always read the label!
Staining Oak: Enhancing its Natural Beauty
Stain is applied to change or deepen the color of the oak, highlighting its grain pattern. Given oak's strong grain, staining can produce stunning results when done correctly.
Types of Stains
- Oil-Based Stains: These are very popular, offering excellent penetration and a long open time, which allows for easier blending and wiping. They dry slowly, giving you more control.
- Water-Based Stains: Environmentally friendlier and faster drying. They can sometimes raise the grain more than oil-based stains, requiring a light re-sanding after the first coat.
- Gel Stains: Thicker consistency, less penetration, which makes them excellent for achieving a uniform color on woods prone to blotching, even without conditioner. They essentially "sit on top" of the wood rather than soaking in deeply.
Application Techniques
- Stir, Don't Shake: Always stir your stain thoroughly before and during use to ensure pigments are evenly distributed. Shaking can introduce air bubbles.
- Apply Generously: Use a natural-bristle brush, foam brush, or lint-free rag to apply a generous, even coat of stain. Work in small sections, always with the grain.
- Allow Penetration: Let the stain sit for the recommended time (check the can). The longer it sits, the deeper the color will be.
- Wipe Off Excess: With a clean, lint-free rag, wipe off all excess stain, again working with the grain. Failure to wipe off excess stain will result in a tacky, uneven, and poorly cured finish. Use clean rags frequently.
- Second Coats (If Desired): If a darker color is desired, allow the first coat to dry completely (as per manufacturer's instructions, often 24 hours or more) before applying a second coat. Remember that subsequent coats will deepen the color significantly.
Protecting Your Investment: Clear Coat Options for Oak
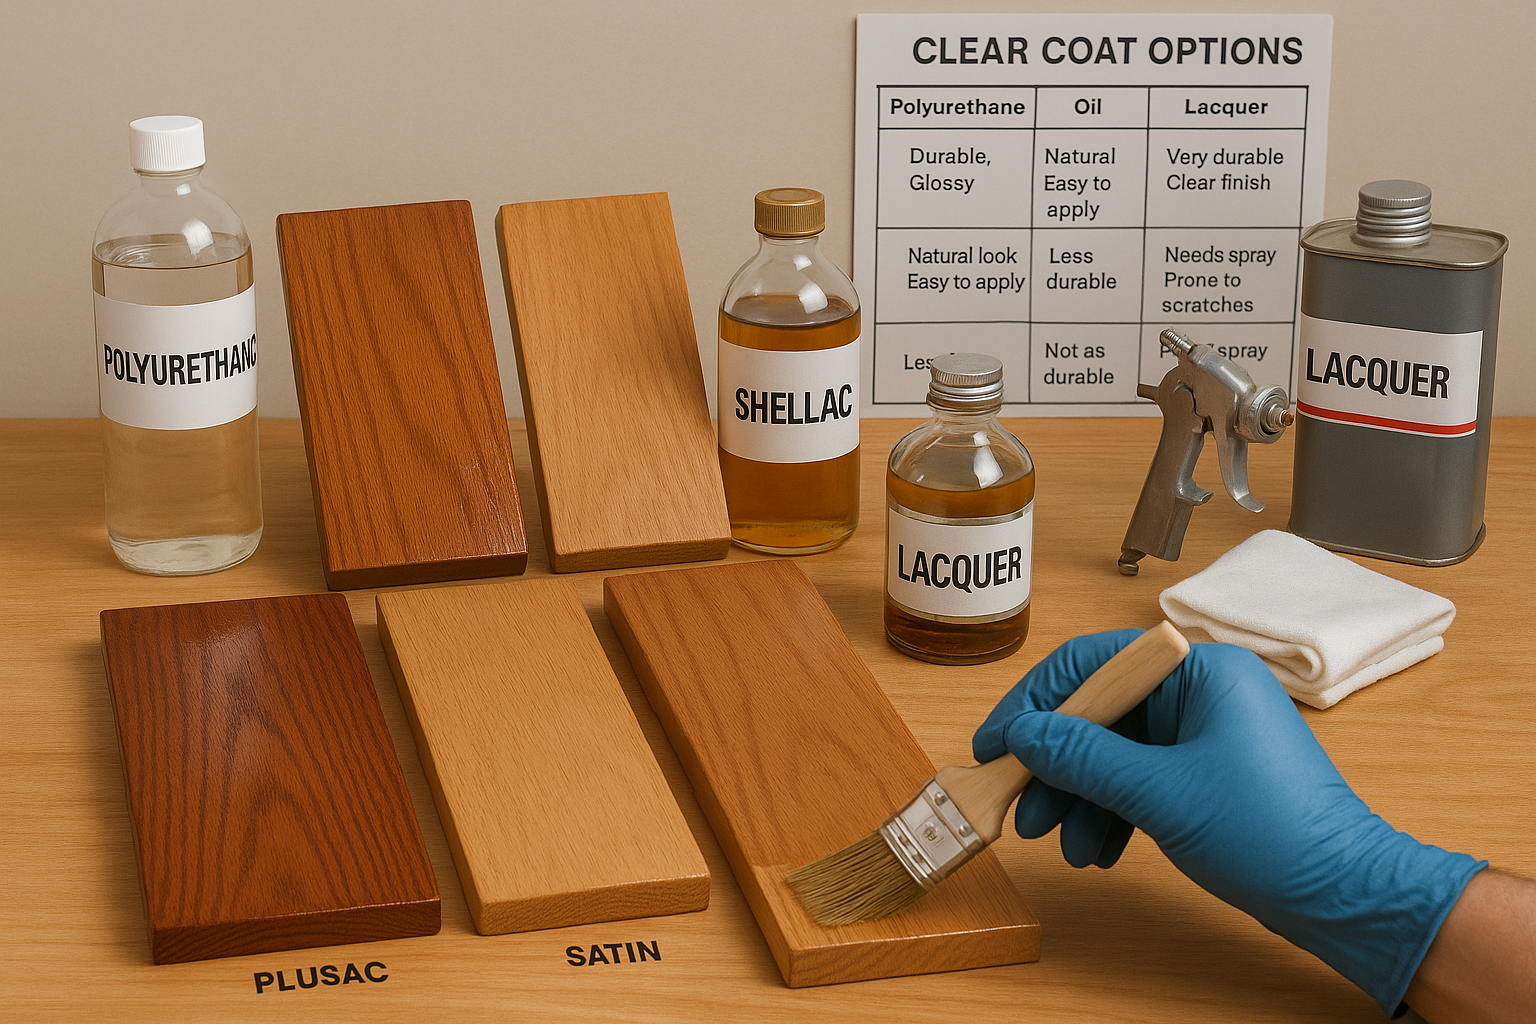
Once your oak is stained (or if you prefer a natural look), a clear protective topcoat is essential. This layer guards against moisture, scratches, and UV damage, ensuring the durability and longevity of your project. This is arguably where the most long-lasting oak wood finishing techniques are employed.
| Clear Coat Type | Pros | Cons | Ideal Use |
|---|---|---|---|
| Polyurethane | Extremely durable, good water resistance, available in oil-based (amber tint, slow dry) and water-based (clear, fast dry). | Can be challenging to apply without bubbles or brush marks, especially oil-based. Water-based can raise grain. Requires careful sanding between coats. Can chip with heavy impact. | High-traffic furniture, tabletops, floors, cabinetry (e.g., 12 plywood for cabinets). |
| Varnish | Very durable, excellent exterior protection (spar varnish), good moisture resistance, deeper amber tone than poly. | Slower drying times, can be difficult to apply evenly, often requires thinning. Less scratch resistant than polyurethane. | Outdoor furniture, boats, surfaces exposed to harsh elements (spar varnish); fine interior furniture (alkyd varnish). |
| Lacquer | Dries incredibly fast, very clear, forms a hard, durable finish, easy to repair. | Requires spray equipment for best results, strong fumes, less flexible than other finishes, can yellow over time. Not as water-resistant as poly or varnish. | Production furniture, intricate pieces, projects requiring a quick finish. |
| Shellac | Natural, food-safe, fast-drying, easy to repair, excellent sealer for problematic wood, warm amber tone. | Not very water-resistant, susceptible to alcohol and heat, less durable than poly/varnish. | Sealer coat, antique restoration, projects needing a traditional, natural look, food-contact items. |
| Wipe-On Oil Finishes (e.g., Tung Oil, Linseed Oil) | Easy to apply (wipe on, wipe off), penetrates deeply, natural feel, enhances grain, easily repairable. | Less protective than film-building finishes, requires multiple coats and regular re-application, slower drying. | Items needing a natural feel, cutting boards (basswood cutting board), turning projects, fine furniture. |
| Hardwax Oil | Combines natural oils with waxes, durable, water-resistant, natural look and feel, easy to repair. | More expensive, requires specific application techniques, can have a strong odor during application. | Floors, countertops, high-end furniture, projects where a natural, matte finish is desired. |
Application Best Practices for Clear Coats
- Follow Manufacturer Instructions: Drying times, recoat times, and thinning recommendations vary greatly between products. Always read the label!
- Thin Coats are Better: Multiple thin coats are always superior to one thick coat. Thick coats can lead to runs, drips, prolonged drying, and an uneven appearance.
- Sanding Between Coats: For most film-building finishes (polyurethane, varnish, lacquer), a light sanding with 220-320 grit sandpaper between coats is crucial. This creates "tooth" for the next coat to adhere to and smooths out any dust nibs or raised grain. Always clean thoroughly after sanding.
- Dust-Free Environment: Dust is the enemy of a smooth finish. Work in as clean an environment as possible. Using a good shop vac can significantly help manage dust in your workshop.
- Proper Ventilation: All finishes produce fumes. Ensure adequate ventilation in your workspace.
- Curing vs. Drying: A finish may feel dry to the touch in a few hours, but it takes much longer (days to weeks) to fully cure and reach its maximum hardness and durability. Avoid heavy use during the curing period.
Specialized Oak Finishing Techniques
Beyond the basics, there are several specialized oak wood finishing techniques that can achieve unique aesthetics.
Liming (Pickling) Oak
Liming oak creates a beautiful, rustic, whitewashed effect that highlights the prominent grain.
- Process: After preparing the wood, apply a specialized liming wax or a thinned white/pickling stain. Work it into the open grain with a brush or cloth.
- Wipe Back: Immediately wipe off the excess from the surface, leaving the white pigment primarily in the grain pores.
- Seal: Apply a clear, non-yellowing topcoat like a water-based polyurethane or lacquer.
Fuming Oak
Fuming is a traditional technique used primarily on white oak to darken and enrich its color without the use of stain.
- Process: White oak is exposed to ammonia fumes (historically, strong ammonia, now safer fuming solutions are available). The tannins in the oak react with the ammonia, creating a deep, rich brown or even black color.
- Safety First: This process must be done in a sealed, well-ventilated chamber with extreme caution, as ammonia fumes are hazardous.
- Results: Produces a unique, natural darkening that goes deep into the wood, creating a color that cannot be replicated with conventional stains.
Glazing Oak
Glazing adds depth and subtle color variations, often used to create an "aged" or antique look.

- Process: After a base coat of stain and/or a seal coat of clear finish (e.g., dewaxed shellac), a translucent glaze is applied.
- Manipulate: The glaze is then partially wiped off or brushed around to create shadows and highlights, emphasizing carved details or grain patterns.
- Topcoat: Once dry, a clear topcoat protects the glaze.
Grain Filling
For a perfectly smooth, glass-like finish on open-grained woods like oak, grain filling is sometimes employed.
- Purpose: Fills the natural pores of the wood, creating a completely flat surface.
- Products: Paste wood fillers (oil-based or water-based) are available, often tinted to match or contrast the wood color.
- Application: Applied with a squeegee or stiff brush, worked into the pores, then excess wiped off. Several applications may be needed.
- Timing: Done after staining and before the final topcoats.
Common Problems and Troubleshooting Oak Finishes
Even with the best intentions and techniques, problems can arise. Here's a quick guide to common issues and their solutions:
- Blotchiness: Usually caused by uneven stain absorption due to insufficient wood conditioning or improper sanding.
- Solution: Sand back to bare wood, recondition, and re-stain.
- Bubbles/Brush Marks: Often from applying finish too thick, stirring vigorously (instead of gently folding/stirring), or using the wrong type of brush/applicator.
- Solution: Lightly sand the affected area with fine grit sandpaper (e.g., 320-400), clean, and apply a thinner coat.
- Dust Nibs: Specks of dust embedded in the wet finish.
- Solution: Sand lightly with fine grit sandpaper, clean thoroughly, and apply another thin coat in a cleaner environment.
- Tackiness (Finish Not Drying): Too thick a coat, high humidity, old product, or mixing incompatible products.
- Solution: Scrape off the tacky finish if it's severe. If mild, wait longer and ensure good ventilation. Avoid applying polyurethane in high humidity.
- Poor Adhesion/Peeling: Incompatible finishes, oily residue on wood, or insufficient sanding between coats.
- Solution: Remove the peeling finish, clean, sand thoroughly, and reapply compatible products.
Conclusion: The Enduring Beauty of Finished Oak
Mastering oak wood finishing techniques is a rewarding journey that blends artistry with technical skill. From the initial meticulous preparation of sanding and conditioning to the careful application of stain and the protective embrace of a durable topcoat, each step contributes to the final masterpiece. Remember that patience, attention to detail, and a willingness to experiment are your greatest allies. The rich, varied grain of oak offers endless possibilities for customization, allowing you to create pieces that are not only beautiful but also resilient and long-lasting.
As you embark on your next oak project in 2025, always prioritize safety, work in a well-ventilated area, and don't shy away from testing your chosen finishing system on scrap pieces. The knowledge you've gained here will empower you to transform raw oak into stunning furniture, cabinetry, or decorative items that will be cherished for years to come. For more woodworking insights and guides, explore resources like WoodcraftWiz.com. Happy finishing!
Meta Title: Oak Wood Finishing Techniques: 2025 Expert Guide
Meta Description: Master oak wood finishing techniques in 2025 with our expert guide. Learn prep, staining, and topcoat methods for stunning, durable oak finishes.
