

Are you a woodworker looking to elevate your creations from functional to truly spectacular? Imagine adding personalized messages, intricate patterns, or even finely cut shapes to your projects with astonishing precision. This Beginner’s Guide to Laser Engraving and Cutting: Adding Intricate Details to Woodworking Projects will demystify the world of desktop laser engravers, making this powerful technology accessible to hobbyists and professionals alike in 2026. Whether you aim to customize existing builds or create unique small items, laser technology offers an unparalleled level of detail and efficiency.
Laser engraving and cutting is no longer a niche technology reserved for industrial applications. Affordable, user-friendly desktop models have opened a new realm of possibilities for woodworkers. This guide will walk you through essential safety measures, basic software operation, optimal material selection, and exciting project ideas, empowering you to integrate this versatile tool into your woodworking journey.

Key Takeaways
- Safety First: Always prioritize safety by using proper ventilation, eye protection, and understanding material reactions.
- Software is Key: Familiarize yourself with design software (vector graphics) and the laser engraver’s control software.
- Material Matters: Different woods react uniquely to lasers; experiment with power and speed settings for optimal results.
- Creative Potential: Laser engraving and cutting can transform ordinary woodworking projects into personalized, high-value items.
- Start Simple: Begin with basic engraving projects before moving to more complex cutting or intricate designs.
Understanding the Basics of Laser Engraving and Cutting for Woodworkers
{{IMG_SLOT_1}}
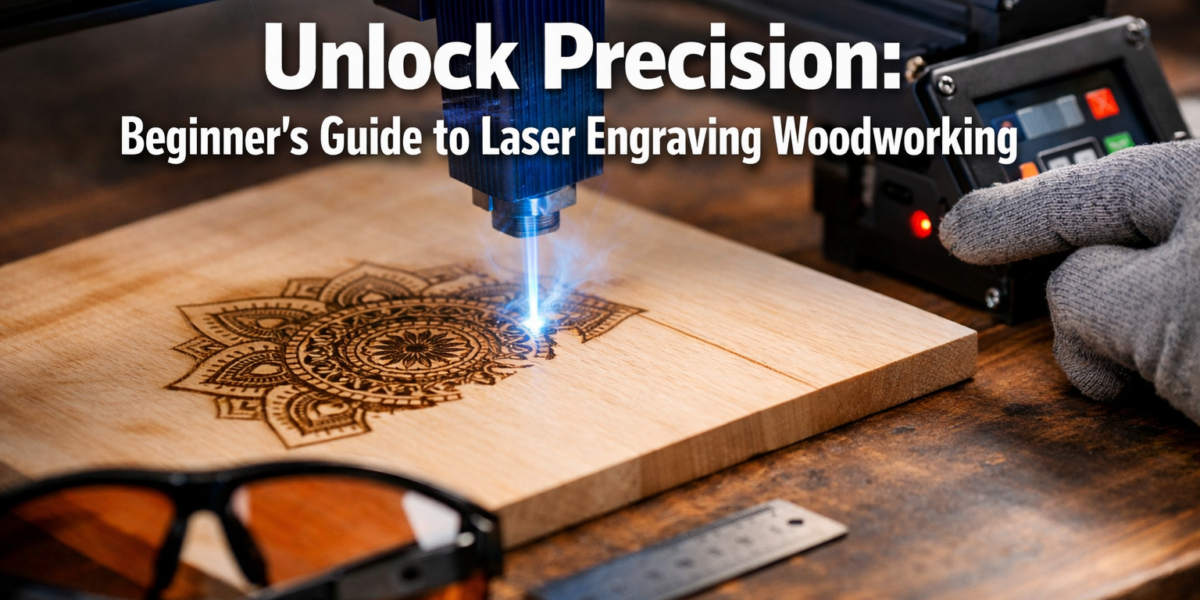
Before diving into specific projects, it’s crucial to grasp what laser engraving and cutting entails, especially for woodworking. A laser engraver uses a focused beam of light to either burn (engrave) or cut through material. For wood, this means you can etch surfaces with designs or cleanly slice through thinner boards. The process is controlled by computer software, translating your digital designs into physical actions.
How Laser Engravers Work
Desktop laser engravers typically use a diode or CO2 laser. Diode lasers are generally more affordable and compact, suitable for engraving and cutting thinner materials. CO2 lasers are more powerful, offering faster engraving and the ability to cut thicker wood more efficiently.
Regardless of the laser type, the principle is similar:
- Design Creation: You create a design using vector graphics software (e.g., Inkscape, Adobe Illustrator) or pixel-based software (e.g., Photoshop) for engraving.
- Software Control: This design is then imported into the laser engraver’s control software, where you set parameters like laser power, speed, and number of passes.
- Laser Operation: The laser head moves across the material, precisely firing the laser beam to create the design. For engraving, the laser burns the surface; for cutting, it penetrates through the material.
Essential Safety Considerations for Laser Engraving
Safety is paramount when operating any power tool, and laser engravers are no exception. The concentrated laser beam can cause severe eye damage and burns. Furthermore, burning wood produces smoke and fumes, which require proper ventilation.
Critical Safety Measures:
- Eye Protection: Always wear certified laser safety glasses specifically rated for your laser’s wavelength. Regular safety glasses are not sufficient.
- Ventilation: Operate your engraver in a well-ventilated area or use an exhaust system to vent fumes outdoors. A fume extractor with a HEPA filter is highly recommended.
- Fire Safety: Keep a fire extinguisher (Class ABC) readily accessible. Never leave the engraver unattended while operating, especially during cutting operations where ignition is more likely.
- Material Awareness: Understand how different woods react. Some exotic woods can produce toxic fumes when burned.
- Clear Workspace: Keep the area around the engraver free of flammable materials.
- Read the Manual: Always thoroughly read and understand your specific machine’s user manual before operation.
“Safety isn’t just a suggestion; it’s the foundation of successful and enjoyable laser woodworking. Neglecting it can lead to serious injury or damage.”
Setting Up Your Laser Engraver and Software for Woodworking Projects
{{IMG_SLOT_2}}
Once you have your laser engraver, the next step is setting it up and getting familiar with its accompanying software. This section covers the crucial steps for a smooth start, focusing on the needs of woodworking enthusiasts embarking on their Beginner’s Guide to Laser Engraving and Cutting: Adding Intricate Details to Woodworking Projects.
Hardware Setup and Calibration
Most desktop laser engravers are relatively straightforward to set up:
- Assembly: Follow the manufacturer’s instructions carefully for assembling the machine.
- Placement: Place the engraver on a stable, level surface in your workshop. Ensure adequate space around it for ventilation and access.
- Ventilation System: Connect your ventilation hose to an exhaust fan and route it safely outside a window or into a dedicated fume extraction system.
- Power Connection: Plug the machine into a grounded outlet.
- Focusing the Laser: This is a critical step for achieving sharp engravings and clean cuts. Most machines have a manual or auto-focus mechanism. A precisely focused laser beam ensures maximum power density.
Design Software Essentials
To create designs for your laser, you’ll primarily work with vector graphics software. Vector files (like .SVG, .AI, .DXF) are ideal because they define shapes using mathematical paths, allowing for infinite scaling without pixelation – crucial for precise cutting and crisp engraving.
Popular Software Options:
- Inkscape (Free): An excellent open-source alternative to paid software, highly capable for vector design.
- LightBurn (Paid, but affordable): Often considered the industry standard for hobbyist laser control software, it combines design capabilities with engraver control.
- Adobe Illustrator (Paid): Professional-grade vector graphics software.
- Affinity Designer (Paid, one-time purchase): A powerful and more affordable alternative to Illustrator.
For engraving images, you can use pixel-based software like Adobe Photoshop or GIMP (free) to prepare raster images (like .JPG, .PNG) by adjusting contrast, brightness, and converting them to grayscale or dithering patterns suitable for laser output.
Understanding Laser Control Software
Your laser engraver will come with its own control software (or be compatible with third-party software like LightBurn). This software is where you import your designs and define the laser’s operational parameters:

- Power: Controls the laser’s intensity. Higher power means a deeper burn or faster cut.
- Speed: Controls how fast the laser head moves. Slower speeds allow the laser to dwell longer, resulting in a deeper effect.
- Passes: The number of times the laser goes over the same path. Multiple passes can achieve deeper cuts or engravings.
- Resolution/DPI: For engraving, this determines the density of the laser dots per inch, affecting image detail.
Pro Tip: Always perform small test cuts and engravings on scrap pieces of the exact same material you plan to use for your project. This helps you dial in the optimal power and speed settings before committing to your final piece. Different wood species and even different batches of the same species can react differently.
Adding Intricate Details to Woodworking Projects: Techniques and Ideas
{{IMG_SLOT_3}}
Now for the exciting part: integrating laser technology into your woodworking. This section explores practical techniques and project ideas, demonstrating how a Beginner’s Guide to Laser Engraving and Cutting: Adding Intricate Details to Woodworking Projects can truly transform your craft.
Material Selection for Laser Engraving and Cutting
Not all wood is created equal when it comes to laser work.
- Plywood: Birch and basswood plywood are popular for laser cutting due to their consistent density and minimal voids. MDF also cuts well but can produce more noxious fumes.
- Solid Wood: Lighter, softer woods like basswood, maple, cherry, and alder tend to engrave beautifully with high contrast. Harder woods like oak or walnut can be engraved but may require more power and careful calibration to achieve desired contrast. Avoid oily or resinous woods as they can char excessively or even ignite.
- Thickness: Most desktop diode lasers can cut up to 1/8″ (3mm) to 1/4″ (6mm) plywood or thin solid wood. CO2 lasers can handle much thicker materials.
Engraving Techniques
Engraving adds texture, images, and text to the surface of your wood projects.
- Image Engraving: Convert photos or detailed graphics into grayscale or dithered patterns. Adjusting contrast in your image editor before importing to the laser software can significantly improve results.
- Text and Logos: Personalize cutting boards, picture frames, or furniture with names, dates, or brand logos. This is a fantastic way to add value to items like those found in “Profitable Small-Batch Woodworking: High-Demand Decorative P”.
- Pattern Engraving: Create intricate geometric, floral, or abstract patterns for decorative panels, jewelry boxes, or custom signage.
Cutting Techniques and Applications
Laser cutting allows you to create precise, complex shapes that would be challenging or impossible with traditional woodworking tools.
- Inlays and Overlays: Cut perfectly fitting pieces for stunning inlay work. You can cut a cavity in one piece of wood and a matching shape from another, contrasting wood for a beautiful effect.
- Decorative Elements: Create intricate fretwork, decorative borders, or custom stencils.
- Functional Parts: Cut parts for small projects like boxes, jigs, or even components for DIY Smart Home Integration with Custom Woodwork.
- Joints: While advanced, lasers can cut precise finger joints or dovetail pins/tails for smaller projects, offering a fast way to achieve intricate joinery for decorative purposes. For traditional hand-tool joinery, refer to “Hand Tool Joinery for Visible Wood Joints: Dovetails, Mortis”.
Project Ideas for Laser-Enhanced Woodworking
- Personalized Cutting Boards: Engrave recipes, family names, or intricate designs on cutting boards. This makes a fantastic gift or a high-selling item. See our guide on “Profitable Beginner Woodworking: Picture Frames, Cutting Boa” for more ideas.
- Custom Coasters: Cut and engrave unique coaster sets. This is a popular and profitable project for beginners. Check out “Crafting Engraved Wooden Coasters: Laser and Hand Tool Techniques for Personalized Gifts” for inspiration.
- Decorative Wall Art: Create multi-layered wooden art pieces by cutting different shapes and combining them.
- Jewelry Boxes/Small Storage: Engrave intricate designs on the lids and sides of small boxes, or even cut out decorative ventilation patterns for humidors.
- Picture Frames: Add personalized messages, dates, or decorative motifs directly onto wooden picture frames. This also features in “Customization Strategies for Mass-Producing Small Woodcraft”.
- Wooden Clocks: Engrave clock faces with numbers, patterns, or even cut out the hands themselves. Check out “Power Tool Mastery for Decorative Wood Projects: Creating Pr” for finishing touches.
- Unique Signage: From workshop signs to decorative home signs, laser engraving offers endless possibilities for personalized text and graphics.
Remember, the beauty of laser engraving and cutting lies in its precision and repeatability. Once you’ve perfected a design and its settings, you can reproduce it perfectly every time, making it ideal for creating batches of personalized gifts or profitable small items.
Conclusion
Embracing laser engraving and cutting opens up a thrilling new dimension in woodworking. From personalized gifts to intricate decorative pieces, the ability to add fine details with precision is a game-changer for any woodworker. As you’ve seen in this Beginner’s Guide to Laser Engraving and Cutting: Adding Intricate Details to Woodworking Projects, starting with proper safety, understanding the software, and experimenting with materials are your keys to success.
The journey into laser woodworking is an exciting one, blending traditional craftsmanship with modern technology. In 2026, desktop laser engravers are more accessible and user-friendly than ever, making it the perfect time to explore their potential. Start with simple projects, learn from each attempt, and soon you’ll be adding truly intricate and professional details to all your woodworking creations.
Actionable Next Steps:
- Research: Explore different desktop laser engraver models available and consider which best fits your budget and project needs.
- Software Familiarization: Download Inkscape or a trial version of LightBurn and start experimenting with vector design.
- Safety First: Prioritize setting up a safe workspace with proper ventilation and acquire certified laser safety glasses before you even power on your machine.
- Practice: Begin with simple engraving on scrap wood. Experiment with power and speed settings to see how different woods react.
- Small Projects: Start with achievable projects like personalized coasters or small engraved plaques to build your confidence and skills.
