

The average apartment kitchen measures approximately 100-150 square feet, a footprint that often leaves little room for a traditional dining set. For those navigating the realities of compact living or simply seeking to optimize every inch of their culinary space, the solution lies not in magic, but in ingenious design. Building a set of Breakfast Nook Tables: Compact Bench-and-Table Woodworking Plans for Kitchen Corners offers an elegant and practical way to create a dedicated dining area without sacrificing precious square footage. This approach, focused on custom-built benches and tables, transforms an underutilized corner into a cozy, functional hub for meals, work, and family gatherings.
Key Takeaways
- Breakfast nook tables with integrated benches maximize seating in tight kitchen corners, ideal for small homes and apartments.
- Custom woodworking allows for precise sizing and personalized design, ensuring a perfect fit and aesthetic.
- Utilizing durable woods and proper joinery techniques guarantees a long-lasting and sturdy dining solution.
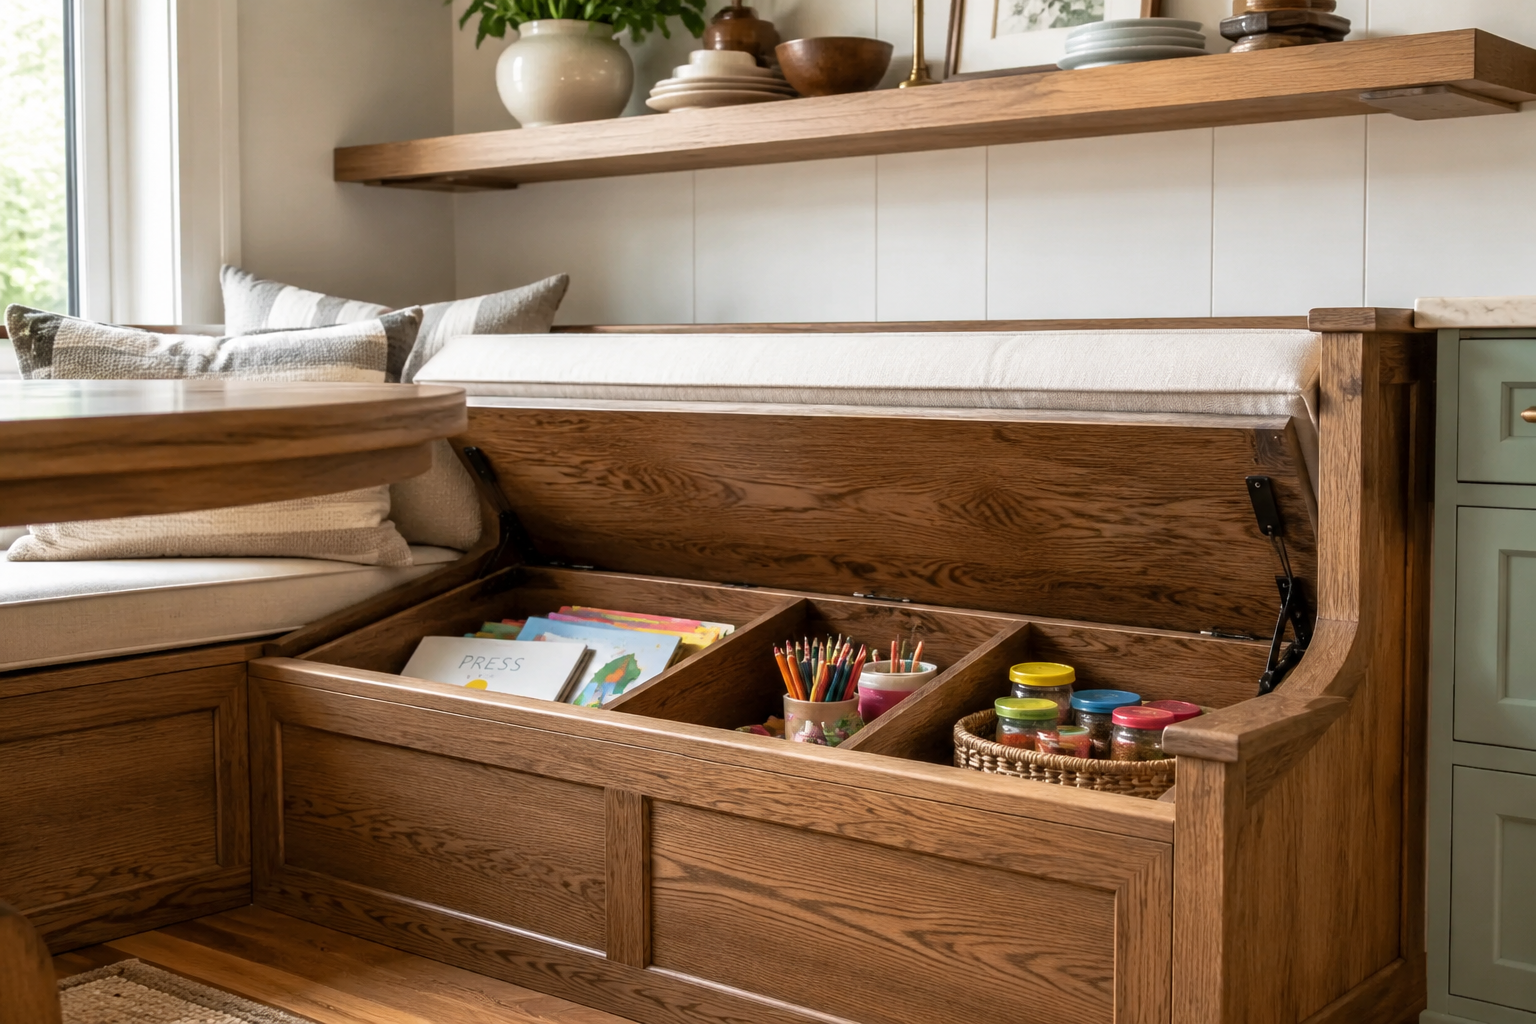
- Incorporating storage into bench seating adds significant utility, addressing common space constraints.
- Detailed planning, accurate measurements, and careful execution are crucial for a successful and satisfying DIY project.
Why Choose Breakfast Nook Tables: Compact Bench-and-Table Woodworking Plans for Kitchen Corners?
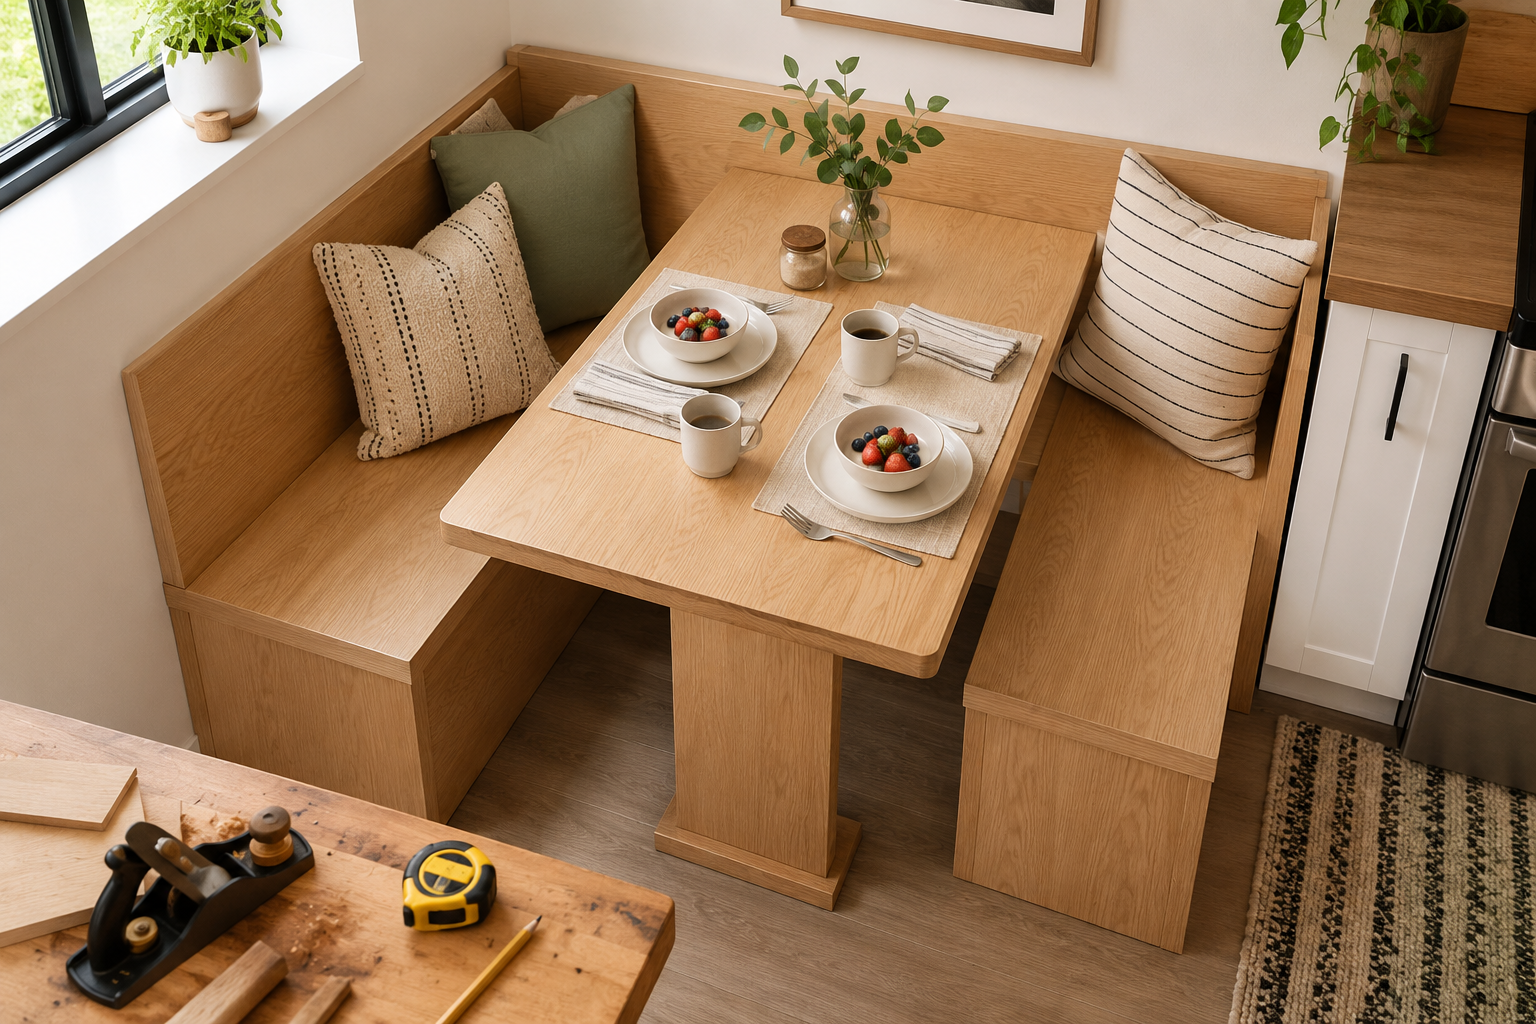
Opting for a custom-built breakfast nook isn’t just about saving space; it’s about crafting a dedicated, comfortable dining experience tailored to your home. Traditional dining tables can dominate a room, especially in smaller kitchens or open-plan living areas. A corner breakfast nook, however, leverages otherwise awkward or unused space, transforming it into a functional and inviting zone. This bespoke approach allows woodworkers to create pieces that not only fit perfectly but also complement the existing decor and architectural style of the home.

Maximizing Small Kitchen Layouts
The primary advantage of Breakfast Nook Tables: Compact Bench-and-Table Woodworking Plans for Kitchen Corners is their unparalleled efficiency in small spaces. By wrapping around a corner, these designs can seat more people than a freestanding table of similar footprint. The benches, often built with hinged tops, can double as valuable storage, perfect for stashing kitchen linens, seasonal items, or even children’s art supplies. This dual functionality is a game-changer for apartments and smaller houses where every storage opportunity counts. Imagine decluttering your pantry by moving infrequently used appliances into custom bench storage – it’s a tangible benefit.
Furthermore, a built-in nook creates a sense of permanence and architectural interest, making the kitchen feel more thoughtfully designed and less like a collection of disparate furniture pieces. It defines a dining zone without the need for walls or bulky room dividers, contributing to an open, airy feel while still providing a distinct area for meals.
Aesthetic and Functional Benefits
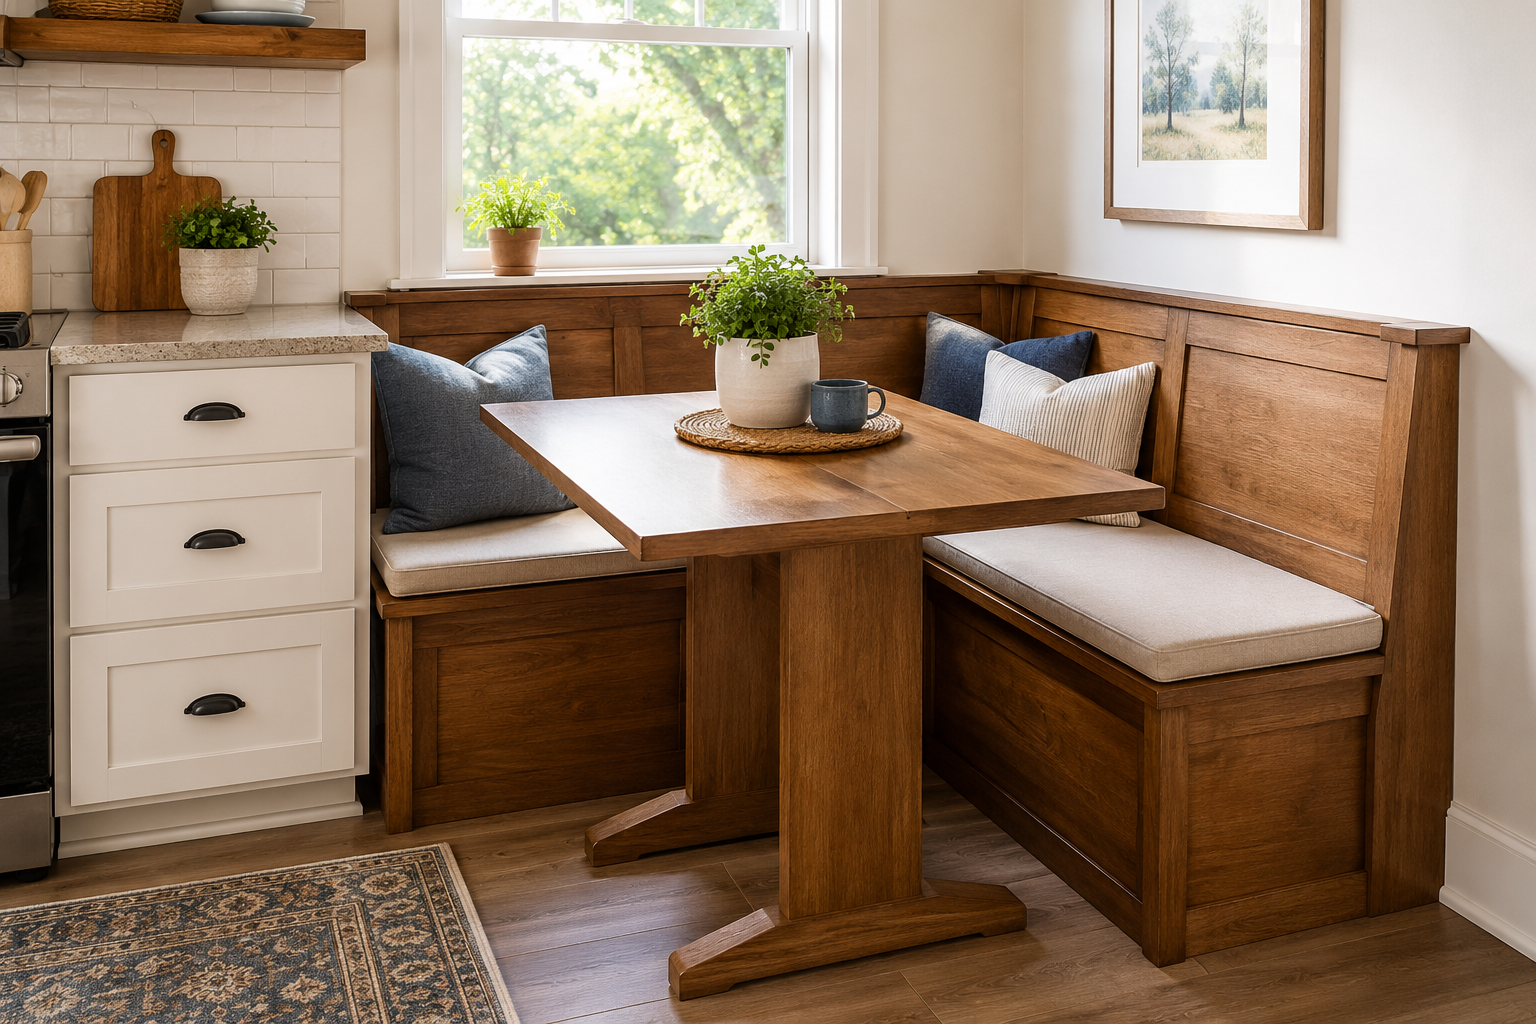
Beyond pure space-saving, a custom breakfast nook offers significant aesthetic advantages. You can select specific wood species, finishes, and hardware that perfectly match your kitchen cabinets or flooring. For example, using reclaimed wood can introduce a rustic charm, while a smooth, painted finish might suit a modern aesthetic. The benches can be upholstered with cushions in fabrics that tie into your home’s color scheme, adding comfort and a pop of personality.
Functionally, these nooks are incredibly versatile. While primarily for breakfast, they can easily serve as a casual dining spot for lunch and dinner, a homework station for children, or even a cozy home office setup during off-peak hours. The stability of a built-in structure also means less wobbling compared to some freestanding tables, especially beneficial for families with active children. Consider integrating power outlets into the bench base or nearby wall for charging devices, further enhancing its utility.
Designing Your Compact Bench-and-Table Nook
The success of your Breakfast Nook Tables: Compact Bench-and-Table Woodworking Plans for Kitchen Corners project hinges on careful design and meticulous planning. This isn’t a “measure once, cut once” endeavor; it requires precision and thoughtful consideration of materials, dimensions, and construction techniques.
Measuring and Planning for the Perfect Fit
Begin by thoroughly measuring your chosen kitchen corner. This includes wall lengths, ceiling height, and the location of any obstacles like windows, radiators, or electrical outlets. Sketch out your desired nook on graph paper, taking into account seating capacity and comfortable clearances.
Key Dimensions to Consider:
- Table Height: Standard dining height is 30 inches.
- Bench Height: Aim for 18-20 inches, including cushion, for comfortable seating.
- Bench Depth: 15-18 inches is typical for comfortable seating without being too deep.
- Tabletop Clearance: Allow 10-12 inches between the top of the bench cushion and the underside of the table for legroom.
- Seating Space: Allocate roughly 24 inches of linear space per person on the bench.
- Walkway Clearance: Ensure at least 30-36 inches of clear space around the nook for easy movement, especially if it’s in a high-traffic area.
Consider whether you want an L-shaped or U-shaped bench configuration. An L-shape is generally easier to build and fits into most corners, while a U-shape offers more seating if space permits. For a U-shaped design, you might have one long bench against a wall and two shorter benches flanking the table, often incorporating a detached chair on the fourth side.
Selecting Materials and Joinery
The choice of wood is crucial for both durability and aesthetics. Hardwoods like oak, maple, cherry, or walnut are excellent choices for their strength and beautiful grain patterns. Plywood, especially Baltic Birch, can be a cost-effective and stable option for the bench carcasses and even the tabletop, especially if you plan to paint or laminate it. For more advanced techniques, explore sustainable wood sourcing for the modern woodworker to find character-rich materials.
For joinery, robustness is paramount. Given the heavy use a breakfast nook will experience, strong joints are essential.
Recommended Joinery Techniques:
- Pocket Hole Joinery: Fast, strong, and relatively easy for securing panels and framing.
- Dadoes and Rabbets: Excellent for creating strong, load-bearing joints for shelves and internal bench structures.
- Mortise and Tenon Joints: While more time-consuming, they offer exceptional strength and are ideal for table legs and frame construction. For those interested in traditional methods, see our guide on hand tool joinery for visible wood joints.
- Dovetail Joints: Perfect for drawer boxes if you decide to incorporate drawers into your benches for additional storage. For mastering this, check out mastering dovetail joinery for drawers.
Securely attaching the benches to wall studs is vital for stability. Use appropriate lag screws or structural fasteners. The tabletop can be either freestanding on legs or supported by cleats attached to the bench frames and wall.
Building Your Breakfast Nook Tables: Compact Bench-and-Table Woodworking Plans for Kitchen Corners
Building a breakfast nook is a rewarding project that combines cabinet-making with furniture construction. With proper tools and a methodical approach, even intermediate woodworkers can achieve professional results in 2026.

Step-by-Step Construction Guide
- Cut List and Material Preparation: Based on your design, create a precise cut list for all components: bench sides, tops, fronts, back panels, table top, and table legs/support frame. Accurately cut all pieces to size. Using a 12-inch Craftsman table saw or similar can ensure precision.
- Bench Carcass Assembly:
- Assemble the bench frames using pocket holes, screws, or dadoes and rabbets. Ensure all corners are square.
- If incorporating storage, build an internal frame for the hinged lid and any dividers.
- For stability, add cross-supports every 18-24 inches within the bench frame.
- Bench Installation:
- Position the assembled bench carcasses in the corner. Use shims to level them if your floor is uneven.
- Secure the back and side panels of the benches directly to wall studs using long screws. This prevents movement and adds structural integrity.
- Table Base Construction:
- For a traditional table, build a sturdy leg assembly. Mortise and tenon joints are ideal for robust table legs.
- Alternatively, you can build a pedestal base or use heavy-duty steel legs for a modern look.
- If you plan to attach the tabletop directly to the benches and wall, install sturdy support cleats along the inside of the bench frames and against the wall where the table will rest.
- Tabletop Fabrication:
- Cut your tabletop material to the desired shape and size.
- Apply edge banding if using plywood, or rout a decorative edge profile if using solid wood. A router table is invaluable for consistent edges.
- Sand the tabletop thoroughly, progressively moving to finer grits.
- Assembly and Finishing:
- Attach the tabletop to its base or supports. For expansion and contraction, use Z-clips or figure-8 fasteners if attaching a solid wood top to a fixed base.
- Fill any screw holes or imperfections with wood filler.
- Sand all surfaces smooth, preparing for finish.
- Apply your chosen finish: stain, paint, varnish, or polyurethane. Consider a durable, food-safe finish for the tabletop. For excellent protection and ease of application, aerosol polyurethane can be a good choice for smaller areas.
- Add cushions to the benches for comfort and a finished look.
Tools and Safety Considerations
A project of this scale requires a range of woodworking tools. Essential power tools include a miter saw, table saw, circular saw, drill, and an orbital sander. Hand tools such as chisels, hand planes, and measuring and marking tools are also critical for precision. Always prioritize safety: wear eye protection, hearing protection, and a dust mask. Understand how to safely operate all your tools. If you’re building a new workspace, consider creating ergonomic workshop furniture to enhance safety and efficiency.
When working with wood, proper clamping is essential for strong joints. Invest in a good set of clamps of various sizes. If you plan to incorporate more intricate joinery, a sturdy workbench is invaluable. Consider guides on building a portable workbench or even a master woodworking storage bench to support your projects.
Conclusion
Building Breakfast Nook Tables: Compact Bench-and-Table Woodworking Plans for Kitchen Corners is more than just a woodworking project; it’s an investment in the functionality and aesthetics of your home. By thoughtfully designing and constructing a custom nook, you can reclaim unused kitchen space, enhance your home’s value, and create a warm, inviting hub for daily life. The satisfaction of crafting a piece that perfectly fits your needs and style, all while solving a common small-space dilemma, is immense. Take the time to plan meticulously, select the right materials, and apply sound woodworking techniques, and you’ll enjoy your bespoke breakfast nook for years to come.
Meta Title: DIY Breakfast Nook Tables: Compact Kitchen Corner Plans Meta Description: Build space-saving breakfast nook tables with integrated benches for your kitchen corner. Get woodworking plans for compact, stylish designs in 2026.
