
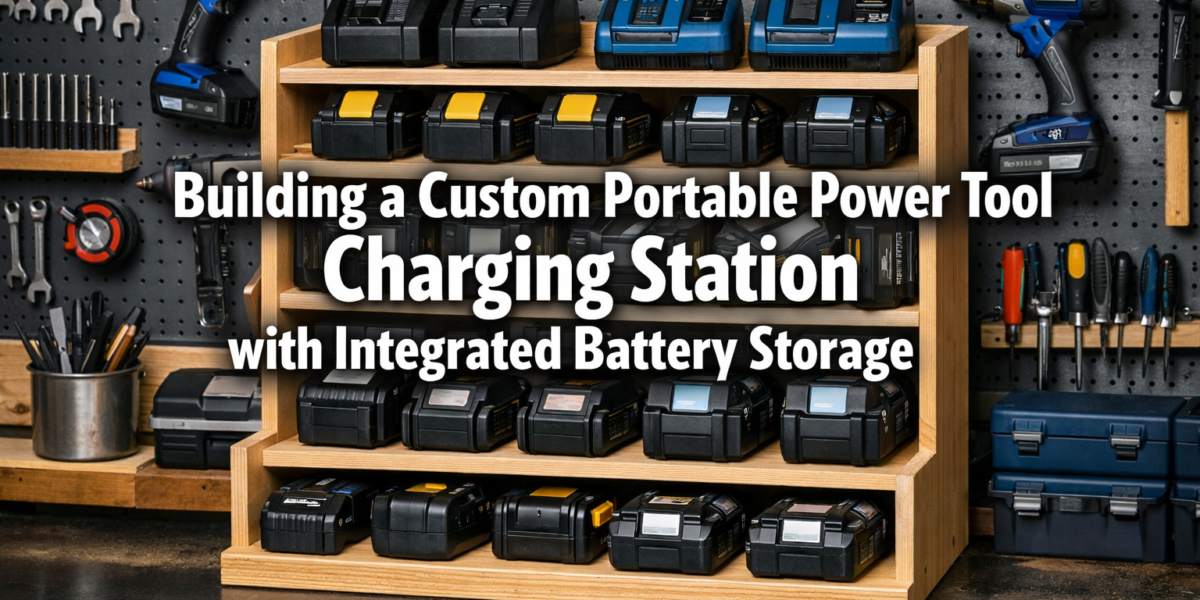

A cluttered workbench, tangled charging cables, and dead batteries are not merely inconveniences; they can slash productivity by up to 20% in a typical woodworking or DIY session, according to efficiency experts. This often overlooked issue highlights a critical need for optimized power management. Building a Custom Portable Power Tool Charging Station with Integrated Battery Storage addresses this challenge directly, transforming workshop chaos into streamlined efficiency. Such a station not only centralizes your charging needs but also protects your valuable battery investments, ensuring they are always ready for action, whether at your primary workbench or on a remote job site in 2026.
Key Takeaways
- Enhanced Organization: Centralizes all power tool batteries and chargers, eliminating clutter and saving valuable time searching for charged batteries.
- Improved Battery Longevity: Proper storage and charging practices within a dedicated station can extend the lifespan of expensive battery packs.
- Increased Portability & Flexibility: A custom-built station on casters allows for easy movement, making power readily available wherever work is being done.
- Safety & Efficiency: Reduces fire hazards by consolidating charging units and provides a structured environment for managing battery inventory.
- Customization for Specific Needs: Allows tailoring storage, charging capacity, and dimensions to match your unique collection of tools and workshop layout.
Designing Your Custom Portable Power Tool Charging Station with Integrated Battery Storage
The first step in building a custom portable power tool charging station is thorough planning and design. This phase dictates the functionality, safety, and longevity of your unit. Consider your current and future power tool inventory, available workshop space, and specific workflow needs. The goal is to create a station that is not just a storage box, but a smart, organized hub for your cordless power tools.

Assessing Your Needs and Tool Inventory
Before drawing any blueprints, take stock of your existing cordless power tools and their corresponding batteries and chargers.
- Tool Brands & Voltages: Do you use a single brand (e.g., DeWalt, Milwaukee, Ryobi) or a mix? Different brands often have proprietary charging systems. Note the voltage (12V, 18V, 20V, 40V) of each battery.
- Battery Quantity & Type: Count how many batteries of each voltage and capacity (Ah) you own. Consider if you plan to expand your collection soon.
- Charger Requirements: How many chargers do you have? Do you use single-port, multi-port, or rapid chargers? The station needs to accommodate all of them with adequate spacing for ventilation.
- Storage vs. Charging: Determine how many batteries will be actively charging at any given time versus those merely stored, awaiting use. This affects the number of electrical outlets needed.
Essential Design Considerations
A well-designed charging station incorporates several critical features:
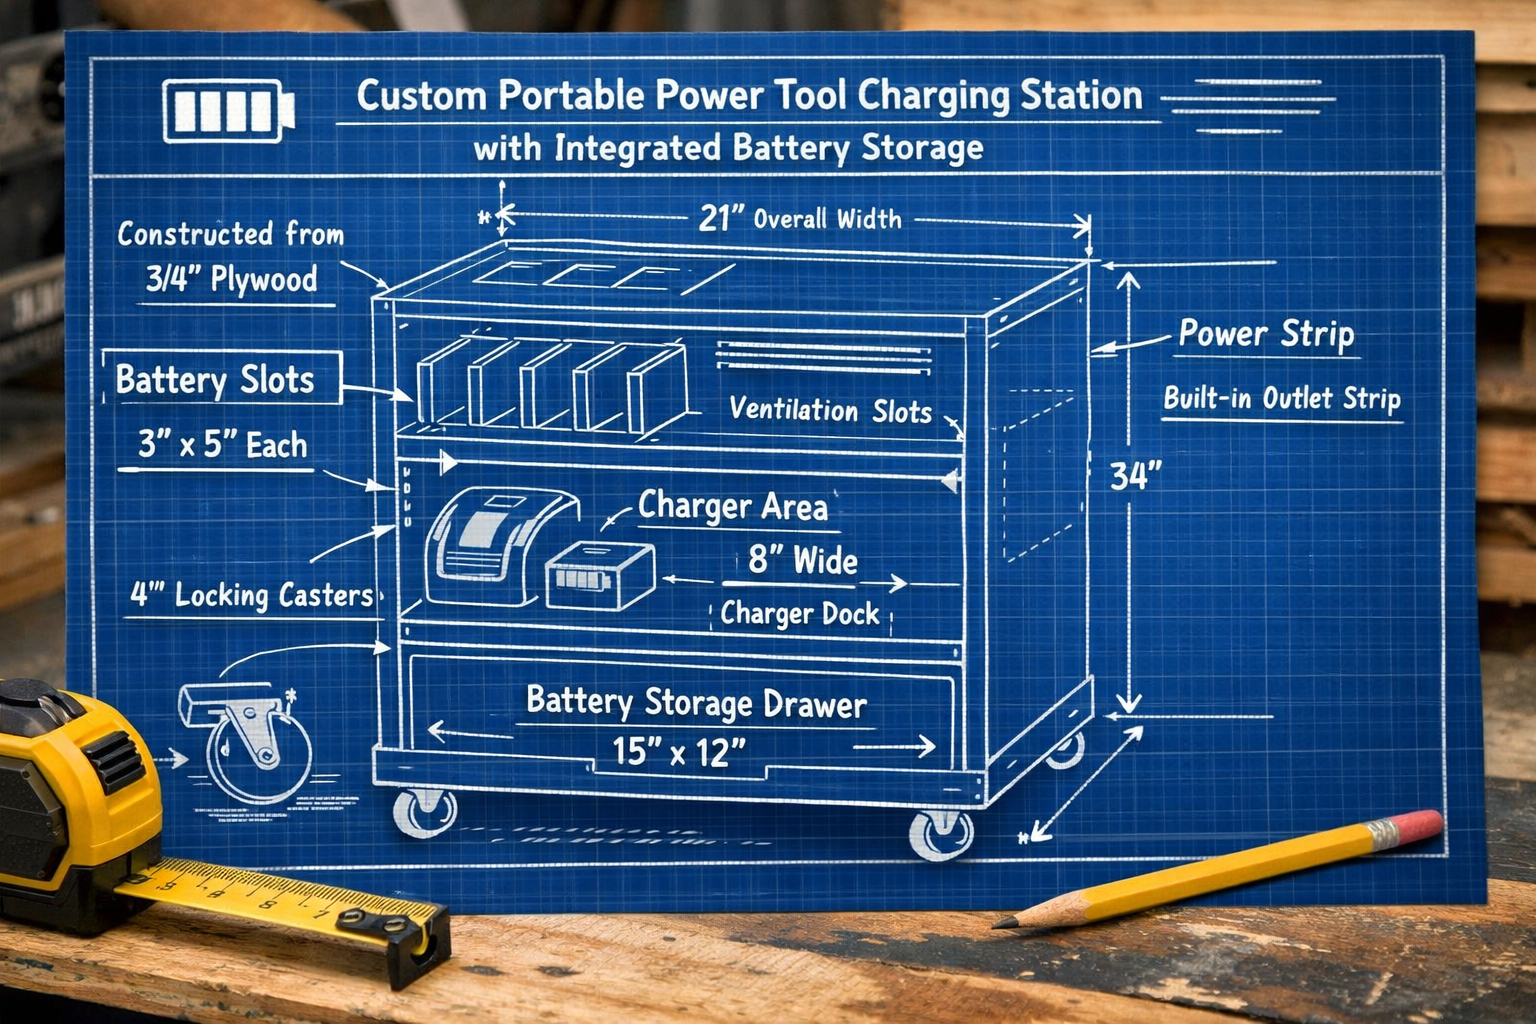
1. Dimensions and Footprint
The size of your station will depend on your tool count and available space.
- Vertical vs. Horizontal: A tall, narrow unit might suit a compact workshop, while a wider, lower one could fit under a workbench. For ideas on maximizing small spaces, explore Smart Workshop Storage Solutions: Maximizing Small Spaces with.
- Portability: If “portable” is key, incorporate heavy-duty casters with locking mechanisms. Ensure the overall size and weight are manageable for moving around.
2. Material Selection
Durability and safety are paramount.
- Plywood: High-quality ¾-inch plywood (e.g., Baltic birch or cabinet-grade) is an excellent choice for its strength and stability.
- MDF/Particle Board: Can be used for non-structural elements like dividers, but generally less durable than plywood.
- Metal: For extreme durability, a metal frame could be considered, though it adds complexity and cost.
3. Power Management and Electrical Safety
This is perhaps the most critical aspect of your design.
- Power Strip/Surge Protector: Integrate a high-quality, multi-outlet power strip or surge protector directly into the unit. Choose one with overload protection.
- Cable Management: Design channels or clips to keep charging cables neat and prevent tangles.
- Ventilation: Chargers and batteries generate heat. Ensure ample airflow to prevent overheating, which can shorten battery life or pose a fire risk. Include vents, mesh panels, or even small integrated fans.
- Dedicated Circuit: Consider plugging your station into a dedicated electrical circuit to prevent overloading household circuits, especially if charging many high-capacity batteries simultaneously.
4. Integrated Battery Storage Solutions
Beyond just holding chargers, the station should smartly store batteries.
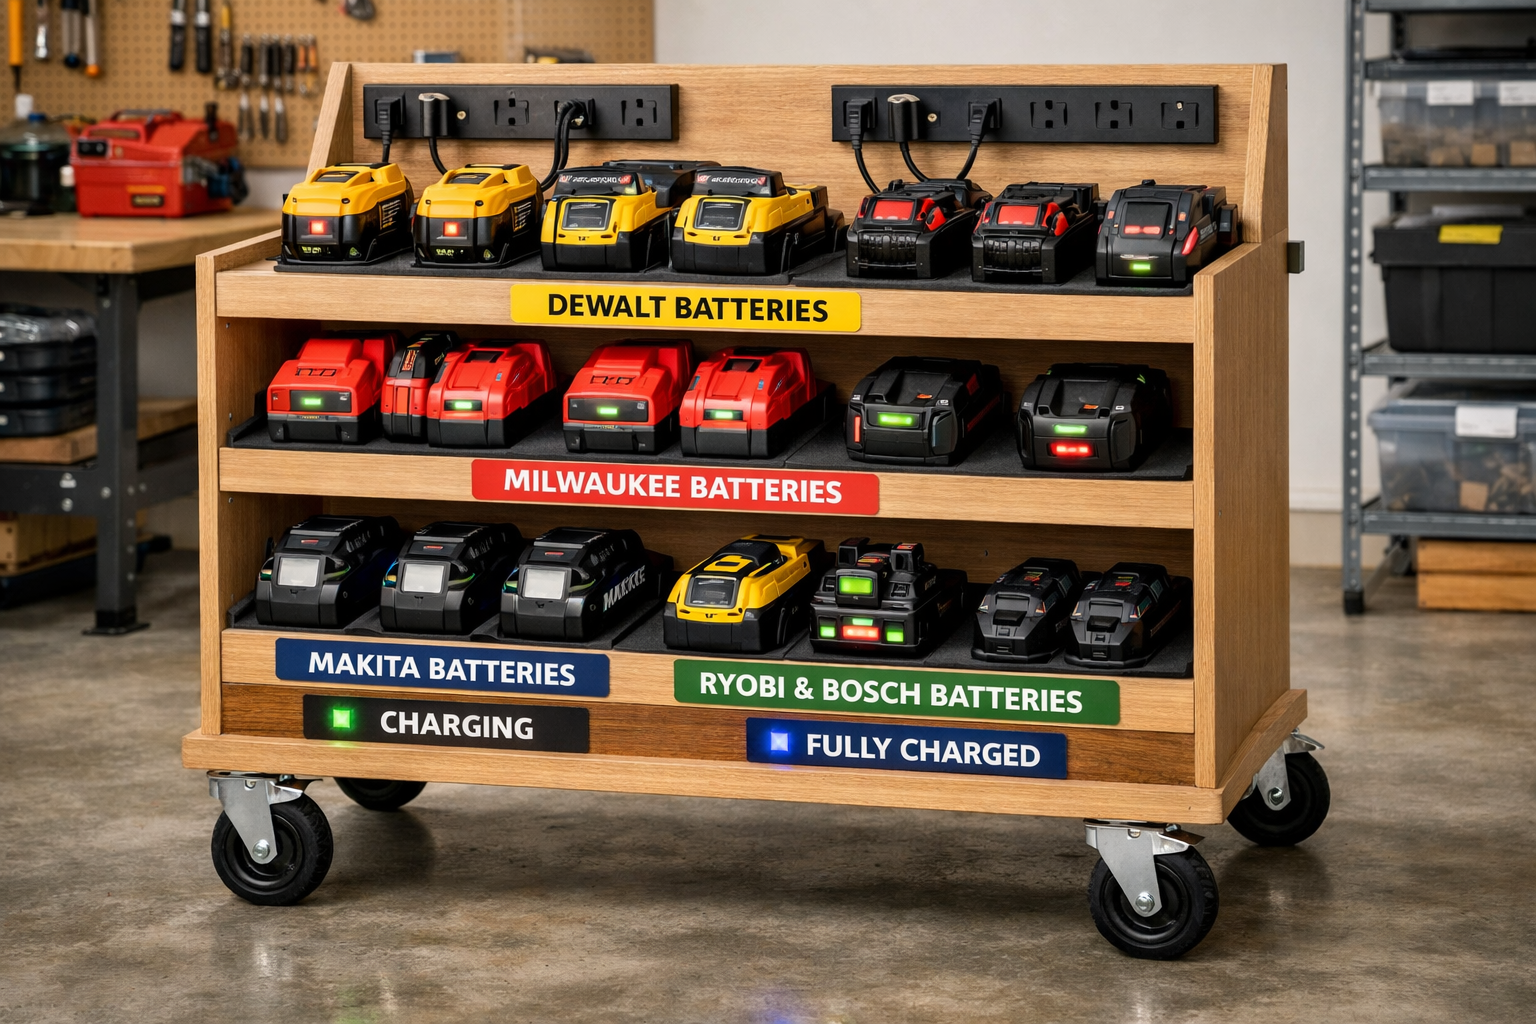
- Dedicated Slots/Shelves: Create individual slots or shelves for each battery size. This prevents batteries from rolling around and makes identification easier.
- Labeling: Incorporate a system for labeling batteries (e.g., “Charged,” “Discharged,” “Charging”) or tool types.
- Vertical Storage: Many batteries can be stored vertically using custom-fitted holders or 3D-printed mounts.
- Drawer Storage: For a more enclosed and dust-free option, shallow drawers with custom inserts can be highly effective.
5. Additional Features
Think about elements that enhance functionality.
- Tool Holder Hooks: Add hooks to the sides or front for frequently used smaller tools like drivers or drills.
- Accessory Bins: Small bins for drill bits, screws, or safety glasses can be integrated.
- LED Lighting: A small LED strip can illuminate the charging area, especially useful in dimly lit workshops.
- Magnetic Strips: Handy for holding small metal items like bits or screws.
Sketching and Prototyping
Once you’ve considered all these factors, create detailed sketches or even a scaled model.
- Orthographic Drawings: Front, side, and top views with precise measurements.
- Cut List: Develop a comprehensive cut list for all wood pieces.
- 3D Modeling: Software like SketchUp can help visualize the final product and identify potential issues before cutting wood.
By meticulously planning your design, you lay the groundwork for a highly functional, safe, and organized power tool charging station that will serve your workshop needs for years to come.
Building a Custom Portable Power Tool Charging Station with Integrated Battery Storage
With a solid design in hand, the construction phase brings your vision to life. This section details the steps and techniques for assembling a sturdy, safe, and efficient portable power tool charging station. The emphasis will be on precision, safety, and smart integration of electrical components.
Materials and Tools Required
Before beginning, gather your materials and tools.
Materials:
- Plywood: ¾-inch hardwood plywood (e.g., Baltic Birch, maple, oak) for main construction, ¼-inch plywood for dividers/backs.
- Wood Glue: High-quality wood glue.
- Screws: Wood screws (e.g., Kreg pocket hole screws or general purpose) appropriate for ¾-inch material.
- Casters: 4 heavy-duty locking casters.
- Power Strip/Surge Protector: With sufficient outlets and overload protection.
- Extension Cord (Optional): If the power strip cable isn’t long enough.
- Vents/Grilles: For airflow (plastic or metal).
- Cable Management Clips/Ties.
- Sandpaper: Various grits (80, 120, 220).
- Finish: Wood stain, paint, or clear coat.
Tools:
- Table Saw or Circular Saw: For accurate cuts (a Craftsman 137248 Table Saw can be very helpful here).
- Miter Saw: For cross-cuts (ensure proper miter saw table height).
- Drill/Driver: For pilot holes and driving screws.
- Pocket Hole Jig (Recommended): For strong, concealed joints.
- Router (Optional): For dados, rabbets, or edge profiling. Choosing and Using Router Tables offers valuable insights.
- Clamps: Essential for assembly.
- Tape Measure, Pencil, Speed Square.
- Safety Gear: Eye protection, hearing protection, dust mask.
Step-by-Step Construction Guide
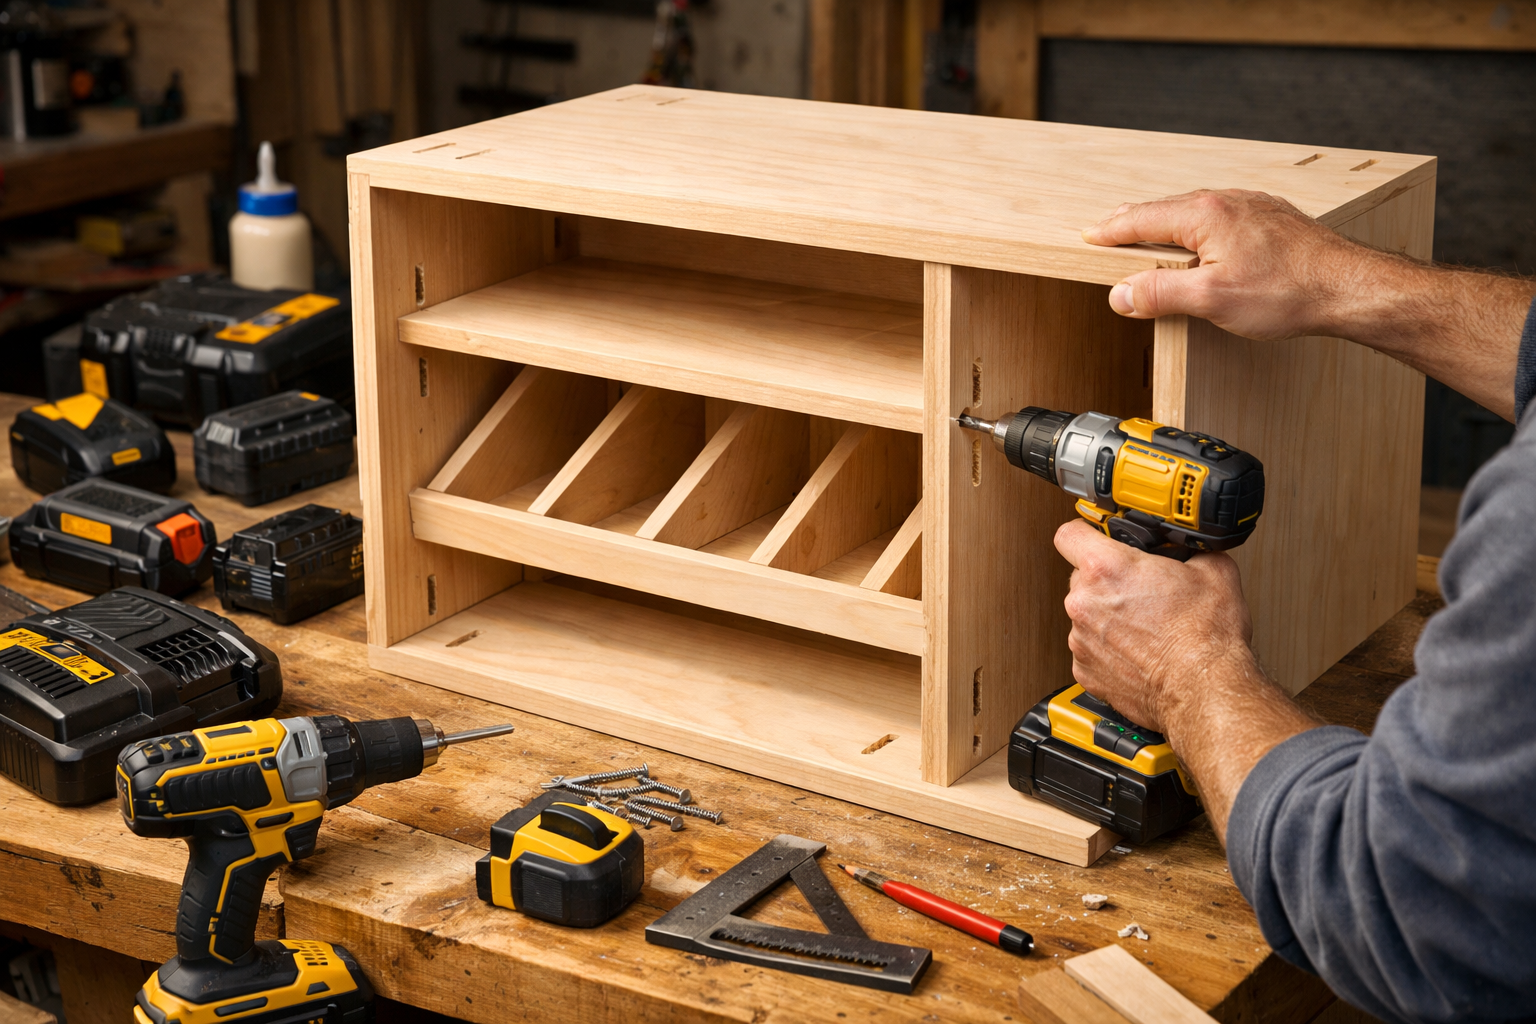
1. Cutting the Plywood
- Precision is Key: Carefully measure and cut all your plywood pieces according to your design. Double-check all measurements before cutting. Use a table saw for rip cuts and a miter saw for cross-cuts to ensure square and accurate pieces.
- Create Your Cut List: Label each piece as you cut it (e.g., “Side A,” “Top,” “Bottom,” “Shelf 1”).
2. Assembling the Main Cabinet Frame
- Joinery: Pocket hole joinery is ideal for strong, hidden connections. Drill pocket holes on the ends of your shelves and top/bottom pieces where they will connect to the sides. Alternatively, use dado joints for added strength and alignment, which can be cut with a router or a table saw.
- Dry Fit: Before applying glue, dry-fit all major frame pieces to ensure they fit correctly.
- Glue and Screw: Apply wood glue to all mating surfaces, then clamp the pieces together. Drive screws into the pocket holes or through pilot holes if using traditional butt joints. Ensure the frame is square.
3. Integrating Battery Storage and Charger Shelves
- Custom Dividers: Cut ¼-inch plywood or hardboard to create dividers for individual battery slots. These can be held in place with small dadoes, brad nails, or even hot glue for non-structural applications.
- Charger Shelves: Create shelves or cubbies sized specifically for your chargers, ensuring enough space for plugging them in and for heat dissipation.
- Back Panel: Attach a ¼-inch plywood back panel, leaving openings for ventilation and power cable routing.
4. Electrical Integration and Safety Features
- Power Strip Mounting: Securely mount your chosen power strip(s) inside the station. Consider a recessed mounting to protect outlets and plugs.
- Cable Routing: Drill holes (with grommets to prevent fraying) for charger cables to pass from the battery shelves to the power strip. Use cable clips or ties to keep wires neat and out of the way.
- Ventilation: Install vents or grilles on the sides, back, or top of the unit to promote airflow. For optimal airflow, consider placing intake vents low and exhaust vents high. If using fans, wire them safely according to manufacturer instructions.
- External Power Cord: Route the power strip’s main cord safely out of the unit, perhaps through a dedicated hole on the back or bottom.
5. Adding Portability
- Caster Installation: Attach the heavy-duty locking casters to the bottom corners of the station. Use appropriate length screws that won’t protrude into the unit’s interior. Ensure they are evenly spaced for stability.
6. Finishing Touches
- Sanding: Sand all surfaces smooth, progressively using finer grits.
- Finishing: Apply your chosen finish – stain and polyurethane, paint, or a clear coat – to protect the wood and enhance its appearance. Allow proper drying time between coats.
- Labels and Organization: Once dry, add labels for battery types, charge status, or tool brands. This makes finding the right battery quick and easy.
By following these steps, you can confidently build a robust and highly functional portable power tool charging station that not only organizes your batteries but also optimizes your workflow and contributes to a safer workshop environment. For general workbench construction, you might also find inspiration in Building a Custom Wood Workbench: Design Considerations and.
Optimizing Usage and Maintenance of Your Portable Power Tool Charging Station with Integrated Battery Storage
Once your custom portable power tool charging station is built and operational, understanding how to use it effectively and maintain it properly is crucial. This not only ensures maximum convenience and safety but also significantly extends the life of your valuable power tool batteries and the station itself.

Best Practices for Battery Management
Your charging station is designed to optimize battery life and readiness. Here’s how to get the most out of it:
- Charge Discharged Batteries Promptly: Modern lithium-ion batteries prefer to be charged before they are completely depleted. Avoid deep discharges where possible.
- Don’t Overcharge (Modern Batteries): Most modern chargers have intelligent circuitry to prevent overcharging, but leaving batteries on chargers indefinitely can still contribute to minor degradation over very long periods. A good practice is to remove fully charged batteries once charging is complete, especially if the station lacks advanced smart features.
- Temperature Control: Store and charge batteries in a moderate temperature environment. Extreme heat or cold can severely impact battery performance and longevity. Ensure your station’s ventilation is unobstructed.
- Battery Rotation: If you have multiple batteries for the same tool, rotate their usage to ensure even wear and tear, preventing one battery from being constantly cycled while others sit idle.
- Long-Term Storage: If storing batteries for extended periods (e.g., several months), charge them to around 40-50% capacity and store them in a cool, dry place. Avoid storing fully charged or completely depleted batteries for long durations.
Enhancing Safety and Workflow
A well-designed charging station is inherently safer and more efficient, but ongoing practices are vital.
- Regular Inspections: Periodically check all electrical connections, cords, and the power strip for signs of wear, fraying, or damage. Replace any compromised components immediately.
- Dust Management: Sawdust is highly flammable. Regularly clean your charging station, ensuring vents are clear and no dust accumulates around chargers or batteries. Integrating with a workshop dust collection system, as discussed in Building a DIY Smart Workshop Dust Collection System: Integrating IoT, can further improve safety.
- Clear Labeling: Maintain clear labels for battery status (charged/discharged) and tool compatibility. This prevents grabbing a dead battery or trying to fit an incompatible battery.
- Accessibility: Keep the station in an easily accessible location within your workshop, but also ensure it’s not in a high-traffic area where it could be bumped or damaged.
- Emergency Preparedness: Know the location of your fire extinguisher and ensure it’s rated for electrical fires (Class C).
Maintenance and Future Upgrades
Maintaining your charging station ensures it remains a valuable asset for years.
- Structural Integrity: Periodically check all joints and fasteners for tightness. Re-tighten screws as needed.
- Caster Maintenance: Lubricate caster wheels occasionally to ensure smooth movement. Check for any debris that might impede rolling.
- Electrical Upgrades: As technology evolves, consider upgrading your power strip or adding smart charging solutions if available for your tool ecosystem. DIY Smart Workshop Upgrades: Integrating AI and IoT for Enhanced provides ideas for integrating modern tech.
- Expansion: If your tool collection grows, consider if your existing station can be expanded or if a second, smaller satellite station is needed. Build with modularity in mind where possible.
- Cleaning: Regular wiping down of surfaces helps keep your station looking good and free of grime.
By adhering to these usage and maintenance guidelines, your custom portable power tool charging station will not only streamline your projects in 2026 but also safeguard your investment in cordless power tools for the long haul.
Conclusion
Building a custom portable power tool charging station with integrated battery storage is a transformative project for any workshop. It elevates organization, enhances safety, and significantly improves workflow efficiency. From the initial detailed design, carefully considering every battery, charger, and electrical requirement, through the meticulous construction phase utilizing durable materials and smart electrical integration, to the ongoing commitment to best practices in usage and maintenance – each step contributes to a highly functional and indispensable asset.
No longer will you face the frustration of searching for a charged battery or dealing with a tangled mess of cords. Instead, you’ll have a dedicated, mobile hub that keeps your power tools ready for action, extending battery life and allowing you to focus on the craft at hand. Invest the time in designing and building this essential workshop addition in 2026, and you’ll reap the benefits of an organized, efficient, and safer workspace for years to come.
Actionable Next Steps:
- Inventory Your Tools: Make a detailed list of all your cordless power tools, batteries, and chargers.
- Sketch Your Design: Start drafting a design based on your inventory and available space, focusing on electrical integration and ventilation.
- Gather Materials: Compile a comprehensive shopping list for plywood, hardware, and electrical components.
- Prioritize Safety: Always keep electrical safety and heat management at the forefront of your design and build.
SEO Meta Title: Build a Portable Power Tool Charging Station with Storage SEO Meta Description: Learn to build a custom portable power tool charging station with integrated battery storage in 2026. Optimize your workshop with organized power.
