


The average woodworker’s lumber collection expands by roughly 15-20% each year, often leading to cluttered workshops, wasted time searching for materials, and even safety hazards. The traditional approach of fixed, immovable shelving rarely keeps pace with this organic growth, forcing woodworkers to continually compromise on organization or undertake costly, disruptive overhauls. However, an entirely different strategy exists: Building a Modular Wood Storage System: Adapting to Your Growing Lumber Collection and Workshop Layout. This approach offers unparalleled flexibility, allowing your storage to evolve precisely as your needs change, transforming workshop chaos into an orderly, efficient workspace.
Key Takeaways
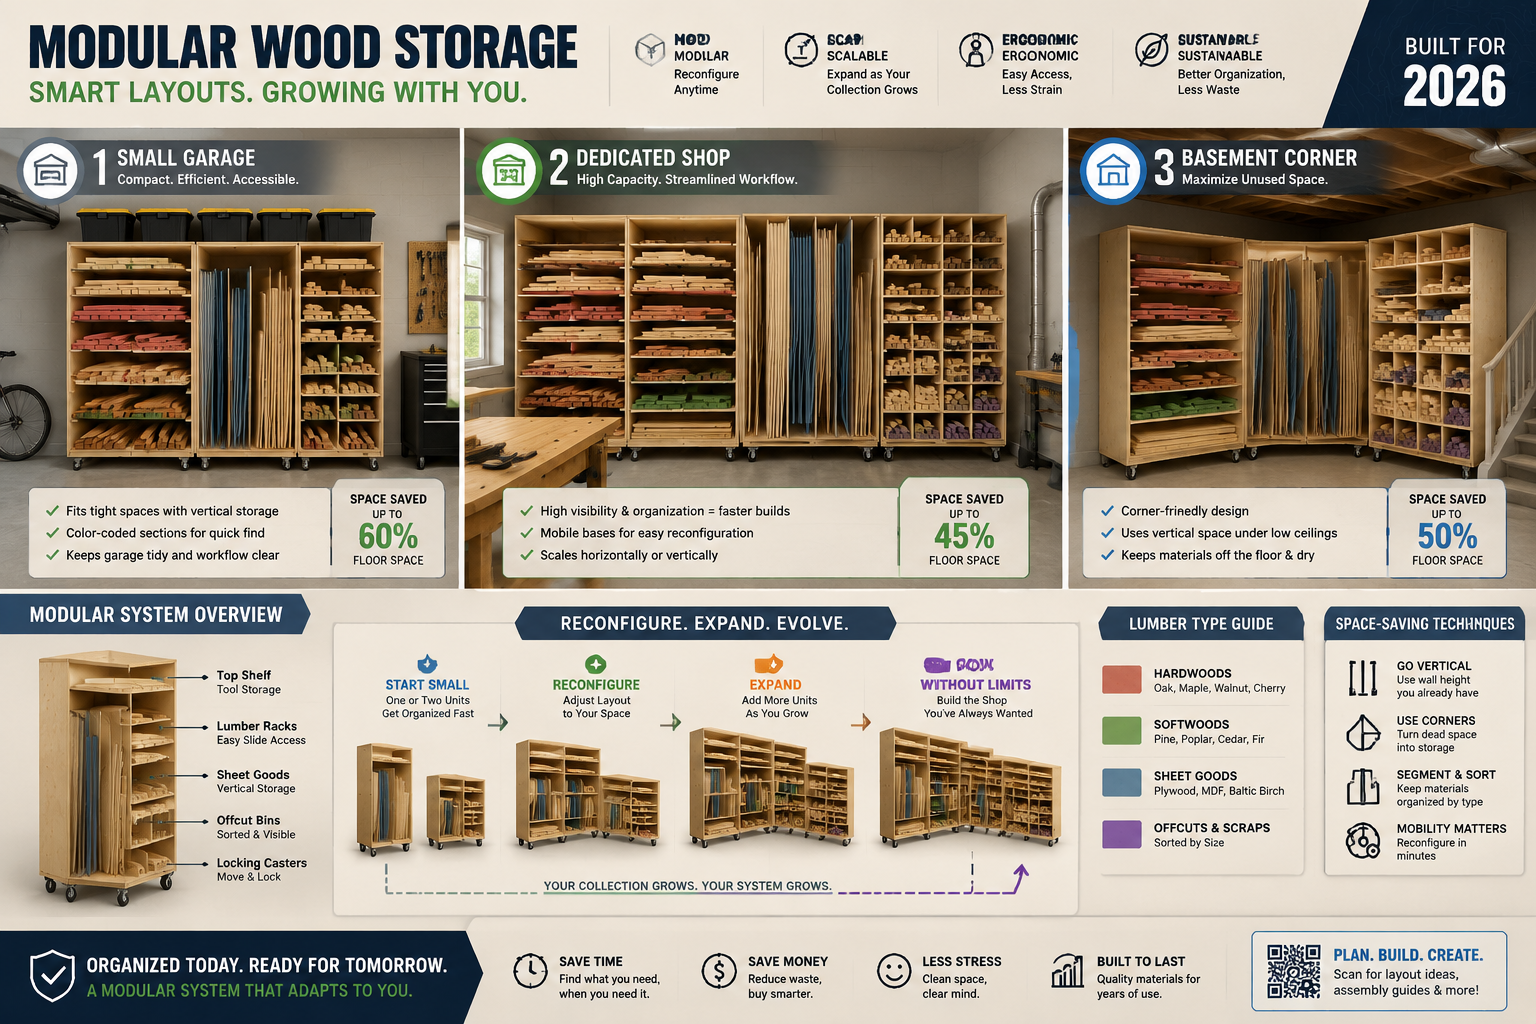
- Modular storage systems are designed for flexibility, allowing easy expansion and reconfiguration as your lumber collection grows.
- Careful planning of your workshop layout and lumber types is crucial for an effective modular system.
- Choose durable materials and robust construction methods for long-lasting, safe storage.
- Incorporating features like mobile carts, specialized bins, and clear labeling enhances accessibility and efficiency.
- A well-designed modular system improves safety, saves time, and maximizes workshop space.
Foundations of Flexibility: Designing Your Modular Storage System
The core principle behind Building a Modular Wood Storage System: Adapting to Your Growing Lumber Collection and Workshop Layout lies in its ability to be built in independent, interchangeable units that can be rearranged, expanded, or even relocated with relative ease. This contrasts sharply with fixed, monolithic storage solutions that quickly become obsolete as your lumber inventory or workshop needs evolve. Think of it less as a static structure and more as a dynamic ecosystem for your wood.

The initial design phase requires careful consideration of several factors:
Assessing Your Current and Future Needs
Before cutting a single board, take stock of your existing lumber collection. Categorize it by type (hardwood, softwood, sheet goods, exotic), dimension (length, width, thickness), and intended use (long-term storage, short-term project material, offcuts). Project how this collection might grow over the next 3-5 years. Are you venturing into larger furniture builds? Will you be stockpiling more exotic woods? Understanding this trajectory is vital for designing a system that won’t be outgrown too quickly.
Consider the diverse needs of different lumber types:
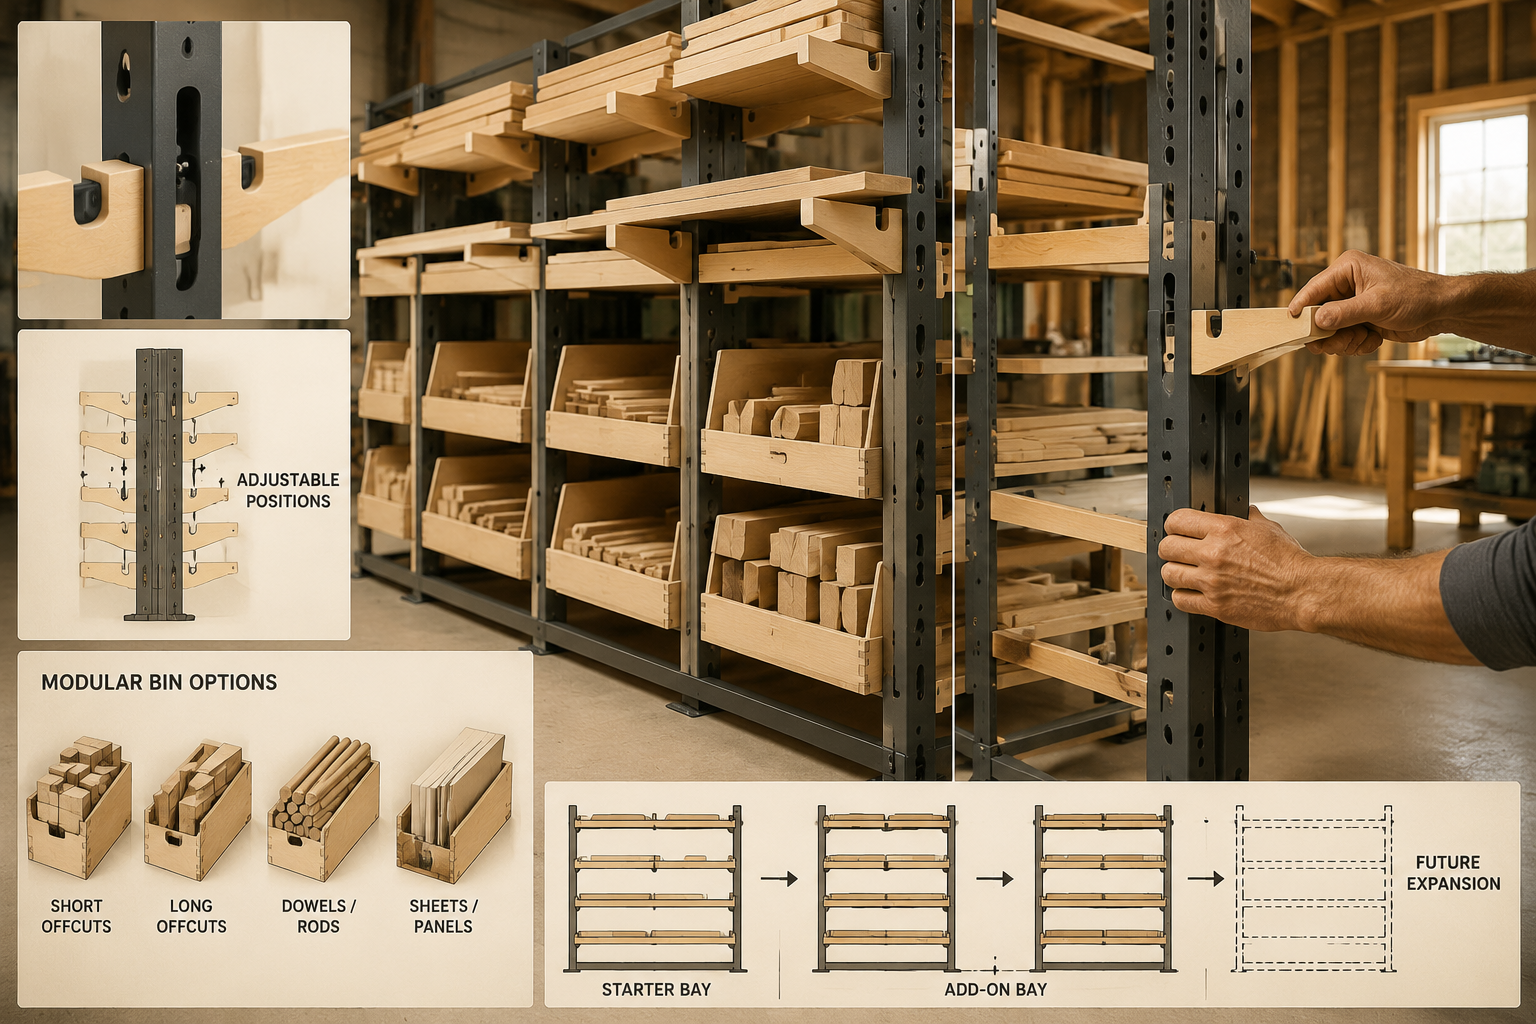
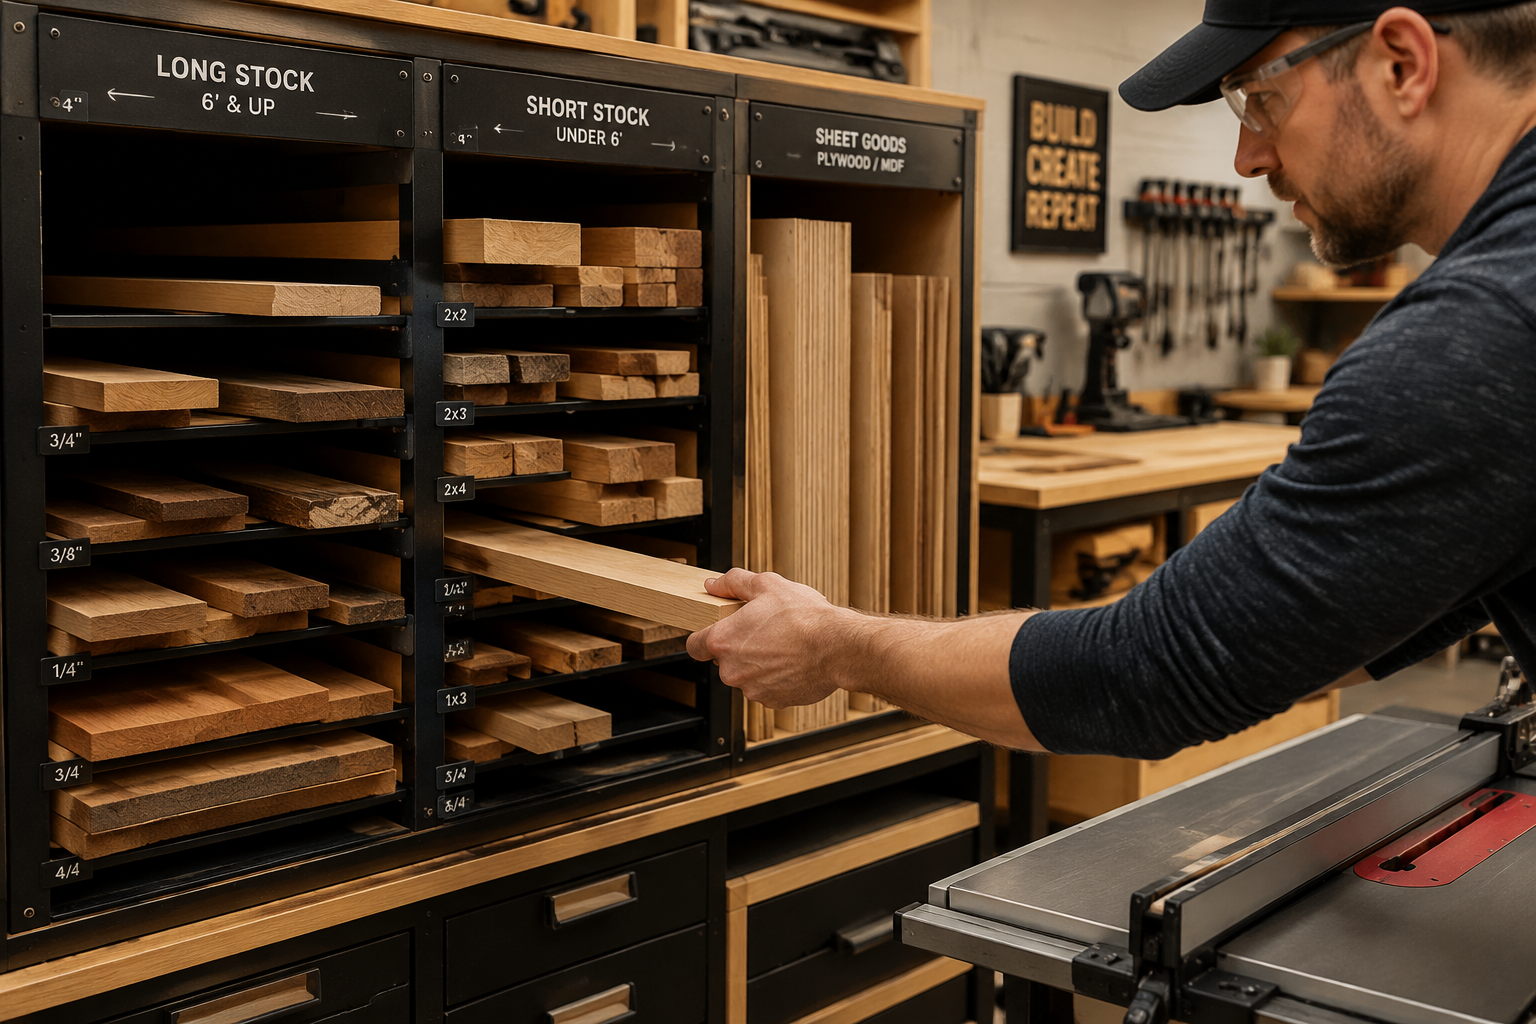
- Long Boards (8ft+): Require horizontal or vertical cantilever racks to prevent warping.
- Sheet Goods (Plywood, MDF): Best stored vertically or on a dedicated cart.
- Short Offcuts: Benefit from bins or cubbies for easy sorting and access.
- Highly Figured or Expensive Woods: May need dedicated, protected storage.
Choosing the Right Modular Components
The beauty of a modular system is the variety of components you can integrate. Common elements include:
- Vertical Standards: These are the backbone, often made from heavy-duty lumber (e.g., 2x4s, 2x6s) or metal uprights, secured to walls or built as freestanding units. They provide the attachment points for other modules.
- Adjustable Shelves/Racks: Cantilever arms, ladder-style racks, or traditional shelves that can be repositioned up and down the vertical standards. This adjustability is key.
- Mobile Carts and Dollies: Essential for handling heavy sheet goods or large quantities of lumber, allowing you to bring materials to your workbench rather than the other way around. Consider building a portable workbench that integrates with your mobile storage.
- Bins, Totes, and Cubbies: For smaller pieces, offcuts, and specialty woods. These can be integrated into larger units or designed as standalone modules.
- Wall-Mounted Systems: Utilizing French cleats or slotted standards to hang various storage components, allowing for easy rearrangement.
Material Selection for Durability: For the structure itself, robust materials are paramount. Plywood, especially 3/4″ Baltic birch or construction-grade plywood, is an excellent choice for shelves and bins due to its stability and strength. Solid dimensional lumber (pine, fir) is suitable for vertical standards and heavy-duty framework. For an even more industrial look and strength, consider steel angle iron or square tubing for critical load-bearing elements. Remember, you’re storing significant weight, so over-engineering is often a wise decision. For projects like this, understanding how many 2x8s in a bundle can help with material estimation and purchasing.
Integrating with Your Workshop Layout
 Your workshop layout directly impacts the effectiveness of your storage. A modular system should enhance workflow, not hinder it.
- Wall Space Optimization: Maximize vertical space by building upwards. Wall-mounted systems are ideal for long boards and frequently used stock.
- Traffic Flow: Ensure walkways remain clear, especially around machines. Mobile units can be tucked away when not in use.
- Proximity to Machines: Store frequently used lumber types closer to your table saw, miter saw, or planer. For ideas on creating ergonomic workspaces, explore articles like “Creating Ergonomic Workshop Furniture: Building Custom Workbenches,” which can inspire efficient layouts.
A well-planned modular wood storage system is not just about holding wood; it’s about creating an adaptable infrastructure that supports your woodworking journey in 2026 and beyond.
Constructing Expandable and Reconfigurable Modules
The true power of Building a Modular Wood Storage System: Adapting to Your Growing Lumber Collection and Workshop Layout comes from its construction. Each module should be robust enough to hold substantial weight yet designed for easy assembly, disassembly, and modification. Precision joinery and consistent dimensions across modules are vital for seamless integration.
Essential Joinery and Fasteners
For a system that can be taken apart and put back together, traditional permanent joinery like dadoes and rabbets can be used for stability within a module, but often mechanical fasteners are preferred for connecting modules.
- Bolts and T-nuts: Excellent for connecting major structural components. They provide strong, repeatable connections that can be easily undone and redone.
- Lag Screws and Washers: Good for securing vertical standards to wall studs or floors, offering immense holding power.
- Pocket Hole Screws: Useful for assembling individual boxes, bins, or sub-frames quickly and securely.
- Heavy-Duty Shelf Pins or Brackets: For adjustable shelving, ensuring they can bear the weight of stacked lumber.
When considering wood movement, which is crucial for any long-lasting wood project, be mindful of how different components might expand or contract seasonally. While less critical for utilitarian shop furniture, understanding wood movement can inform better choices for fixed parts of your storage system.
Building Core Modules: Examples
Here are a few common module types that form the backbone of many systems:
Cantilever Wall Rack Module:
- Description: Two or more vertical standards secured to wall studs. Horizontal arms (cantilevers) extend outwards to support long boards. Arms are often adjustable using pin-and-hole systems or cleat designs.
- Construction: Use sturdy 2x4s or 2x6s for vertical standards. Arms can be 2x4s or laminated plywood. Ensure robust connections where arms meet standards.
- Modularity: Easy to add more vertical standards along a wall as your collection grows. Arms can be moved up/down to accommodate different lumber thicknesses.
Vertical Sheet Goods Module:
- Description: A frame designed to hold plywood, MDF, or other sheet goods upright. Can be stationary or mobile. Dividers keep sheets separated.
- Construction: A robust base frame with vertical dividers. Can be built from 3/4″ plywood or dimensional lumber.
- Modularity: Multiple vertical storage bays can be built and joined together. Making it mobile by adding heavy-duty casters adds tremendous flexibility.
Bin/Cubbies Module:
- Description: A box-like structure divided into multiple compartments for storing smaller offcuts, turning blanks, or specialty wood.
- Construction: Can be made from 1/2″ or 3/4″ plywood using dadoes, rabbets, or pocket screws for strong internal divisions.
- Modularity: Several identical bins can be stacked, placed on shelves, or integrated into larger frame systems. They can be pulled out, emptied, and reorganized easily.
Step-by-Step Construction Considerations:
- Measure and Cut Accurately: Consistency is key for modularity. Use jigs for repetitive cuts where possible.
- Pre-Drill Holes: Especially for bolts and screws, to prevent splitting and ensure clean, repeatable connections.
- Build One Module at a Time: Focus on perfecting each component before moving to the next.
- Test Fit Components: Before final assembly, dry-fit connections to ensure everything aligns as intended.
- Finish for Longevity: While not always necessary for utilitarian shop storage, applying a coat of paint or sealer can protect the wood from moisture and make it easier to clean.
Remember, the goal is not just storage, but a system that actively helps you manage and adapt to your lumber collection.
Optimizing Your System: Accessibility, Organization, and Future Growth
Once the structural elements of your modular wood storage system are in place, the focus shifts to maximizing its functionality. Building a Modular Wood Storage System: Adapting to Your Growing Lumber Collection and Workshop Layout isn’t complete without strategic organization and foresight for future expansion.

Enhancing Accessibility and Workflow
An organized system is only effective if you can easily retrieve and put away materials.
- Clear Pathways: Ensure ample space around storage units, especially if using mobile carts or moving long boards.
- Ergonomic Height: Position frequently accessed lumber at a comfortable height. Heavy items should be lower, lighter items higher. For more on ergonomic designs, consider our guide on building a compact and ergonomic workbench for small workshops.
- Dedicated Zones: Create zones for different types of lumber or different stages of processing (e.g., rough stock, planed stock, cutoffs).
- Loading and Unloading: Design for easy loading of new lumber. If possible, have an entry point close to your vehicle for direct transfer.
Organization and Labeling: The Unsung Heroes
Even the most well-built system will falter without proper organization and labeling.
- Categorize Systematically: Develop a consistent method for sorting your lumber.
- Species: Hardwood vs. softwood, specific species (e.g., Oak, Maple, Pine).
- Dimensions: Length, width, thickness.
- Condition: Rough, S4S (surfaced four sides), project-specific.
- Project Specific: Store lumber for upcoming projects together.
- Effective Labeling:
- Clear and Concise: Use large, readable labels.
- Durable: Consider laminated labels or permanent markers.
- Location-Based: Label the rack or bin, not individual boards (unless they are very special).
- Measurement Indicators: Include common dimensions (e.g., “8′ Hardwood Mix,” “1×6 Cherry Offcuts”).
- Color-Coding: Assign colors to different lumber types or project stages.
Example Labeling System:
| Category | Label Example |
|---|---|
| Hardwoods | 🌳 Oak 1×4-1×8 |
| Softwoods | 🌲 Pine 2×4 |
| Sheet Goods | 📐 3/4″ Birch Plywood |
| Offcuts | ✨ Maple Shorts |
| Project Specific | 📦 Coffee Table |
Planning for Future Expansion and Adaptation
 The true advantage of a modular system is its ability to grow with you.
- Empty Space: Don’t fill every available spot immediately. Leave room for new acquisitions or the expansion of current categories.
- Standardized Modules: If you build modules of consistent sizes (e.g., all bins are 12″x12″ or all vertical standards are spaced 48″ apart), they can be rearranged and added to more easily.
- Documentation: Keep a simple drawing or plan of your system. Note where things are stored, and track your lumber inventory. This helps in long-term management.
- Flexibility in Placement: As your workshop evolves (perhaps you add a new machine or reconfigure your layout), your modular units can adapt. They can be moved, stacked differently, or split into separate areas. This allows for seamless transitions, unlike fixed structures. For additional organization ideas for specialized tools, you might find inspiration in “Mastering your craft: Building the ultimate woodworking storage bench in 2026”.
A well-executed modular wood storage system is an investment that pays dividends in reduced clutter, increased efficiency, and a safer, more enjoyable woodworking experience. It allows you to focus on your craft, knowing your materials are always organized and ready.
Conclusion
Building a Modular Wood Storage System: Adapting to Your Growing Lumber Collection and Workshop Layout represents a paradigm shift from rigid, static storage to a dynamic, scalable solution. In a world where workshop needs and lumber collections are constantly evolving, the ability to effortlessly expand, reconfigure, and optimize your storage is not just a convenience—it’s a strategic advantage. By carefully planning your needs, selecting robust modular components, employing strong, adaptable joinery, and meticulously organizing with clear labeling, you create an environment that fosters creativity and efficiency rather than frustration. This flexible approach ensures your workshop remains an organized, productive haven for your woodworking passion in 2026 and for many years to come.
Actionable Next Steps:
- Audit Your Lumber: Take inventory of your current stock and identify growth patterns.
- Map Your Workshop: Sketch your existing layout and envision optimal material flow.
- Choose Your Core Modules: Decide on the fundamental components (wall racks, bins, carts) that best suit your needs.
- Start Small, Think Big: Build one or two modular units first, then expand as your confidence and collection grow.
- Label Everything: Implement a clear and consistent labeling system from day one.
Remember, the best storage system is one that works for you and can adapt as your woodworking journey progresses.
References
- Fine Woodworking. (2020). Shop Storage Solutions: Practical Ideas for Every Woodworker. Taunton Press.
- Krenz, A. (2018). The Workbench Book. Taunton Press.
- Woodsmith Magazine. (2022). Workshop Solutions: Clever Shop Jigs & Projects. August/September 2022 issue.
