


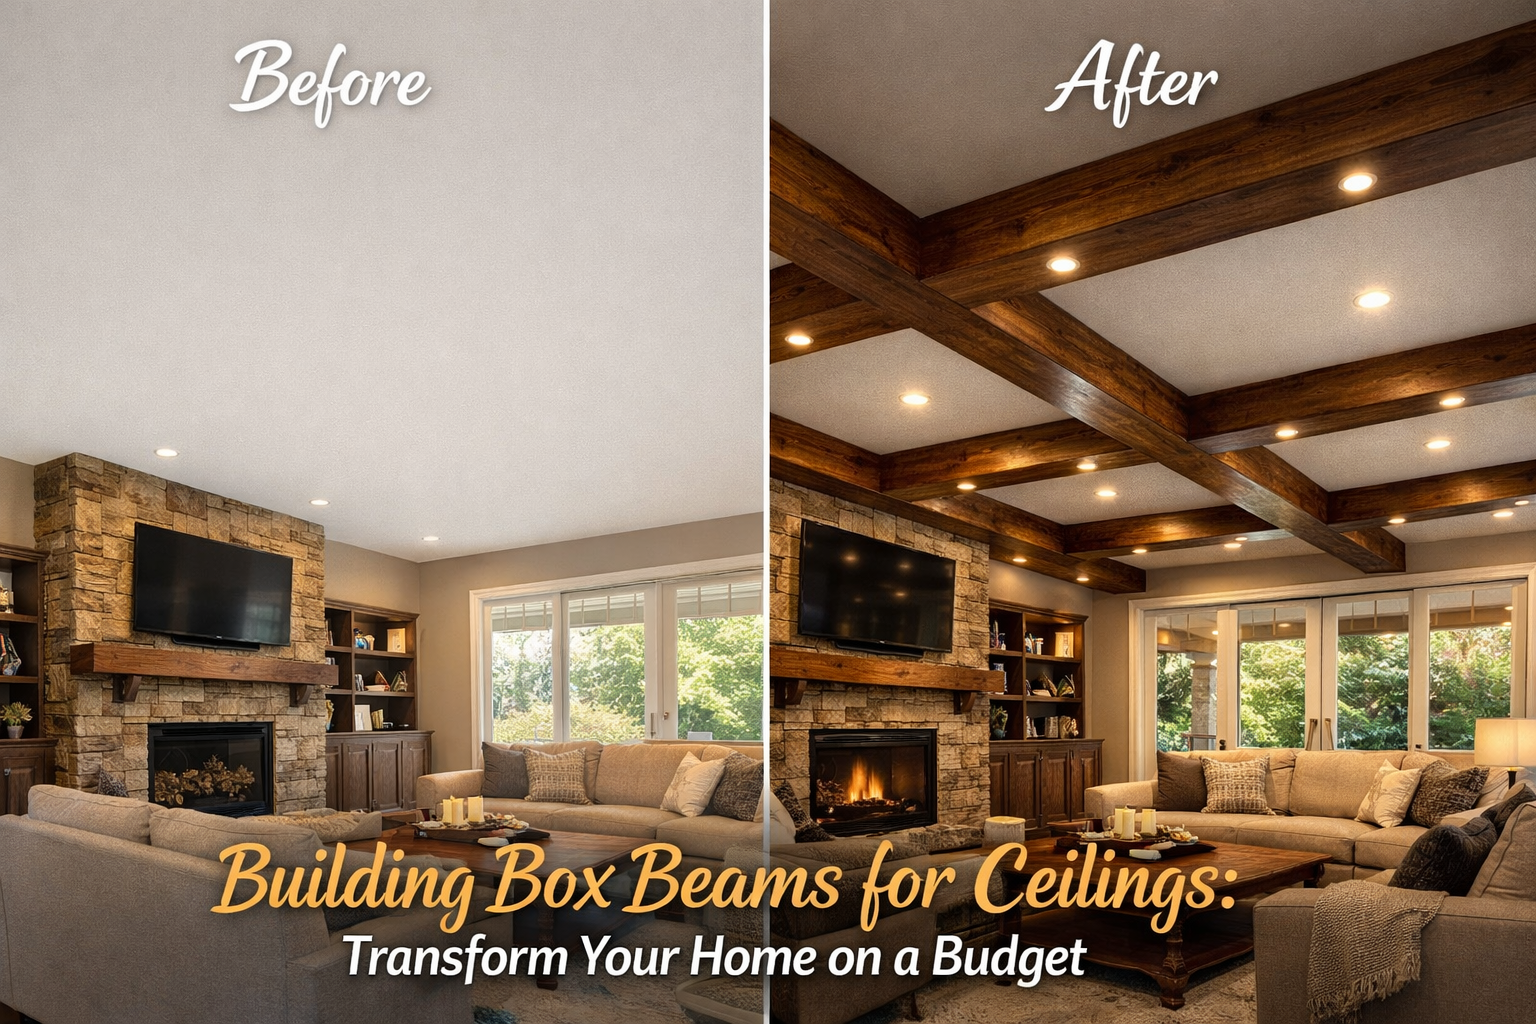
Are you looking to infuse your home with architectural character, warmth, and a touch of rustic elegance without breaking the bank? The answer might be right above your head! Wood ceiling treatments, particularly the classic box beam, are experiencing a massive resurgence in interior design. This article provides easy-to-follow tutorials on fabricating lightweight box beams that not only hide unsightly wiring but also dramatically enhance any room’s aesthetic. Discover how Building Box Beams for Ceilings: Transform Your Home on a Budget can become your next rewarding DIY project, adding significant value and appeal to your living space in 2026.
Box beams, also known as faux beams or coffered beams, offer the grandeur and visual weight of solid timber beams at a fraction of the cost and labor. Unlike solid beams, which are heavy and often require structural reinforcement, box beams are hollow, making them lighter, easier to install, and perfect for concealing electrical wires, plumbing, or even outdated popcorn ceilings. This comprehensive guide will walk you through everything you need to know, from planning and material selection to construction, finishing, and installation.

Key Takeaways
- Cost-Effective Transformation: Box beams provide the look of expensive solid timber beams at a significantly lower cost, making them an ideal budget-friendly home improvement.
- Aesthetic & Functional Benefits: They add architectural depth, warmth, and character, while also serving to conceal wiring, pipes, or ceiling imperfections.
- DIY Accessibility: With common woodworking tools and basic skills, homeowners can successfully build and install these beams.
- Customizable Design: Box beams can be tailored in size, wood type, and finish (stain, paint, distressed) to match any interior style.
- Enhanced Home Value: This architectural detail can significantly increase the perceived value and appeal of your home.
Planning and Material Selection for Your Box Beam Project
The success of Building Box Beams for Ceilings: Transform Your Home on a Budget hinges on meticulous planning and smart material choices. Before cutting any wood, it’s crucial to measure accurately, design your layout, and select the right materials. This foundational stage ensures a smooth construction process and a stunning final result.
Designing Your Ceiling Beam Layout
Before you even think about purchasing lumber, envision your desired outcome. Consider the following:
- Room Size and Ceiling Height: Taller ceilings can handle larger, more numerous beams without feeling overwhelming. Smaller rooms or lower ceilings might benefit from fewer, more modest beams.
- Beam Placement: Will they run parallel to existing walls? Will they form a grid (coffered ceiling)? Sketching different layouts can help visualize the impact. Use painter’s tape on the ceiling to get a real-world perspective.
- Beam Dimensions:
- Width: Typically ranges from 4 to 8 inches. Wider beams make a bolder statement.
- Depth (Projection from Ceiling): Usually 4 to 10 inches. Deeper beams create more shadow lines and a more pronounced architectural effect.
- Length: This will be determined by your room dimensions. Remember to account for any overlaps or miters if you’re creating a grid.
💡 Pro Tip: Ensure your beams align with existing ceiling joists or framing where possible for secure attachment. Use a stud finder to locate these structural elements. Mark their locations clearly on your ceiling.
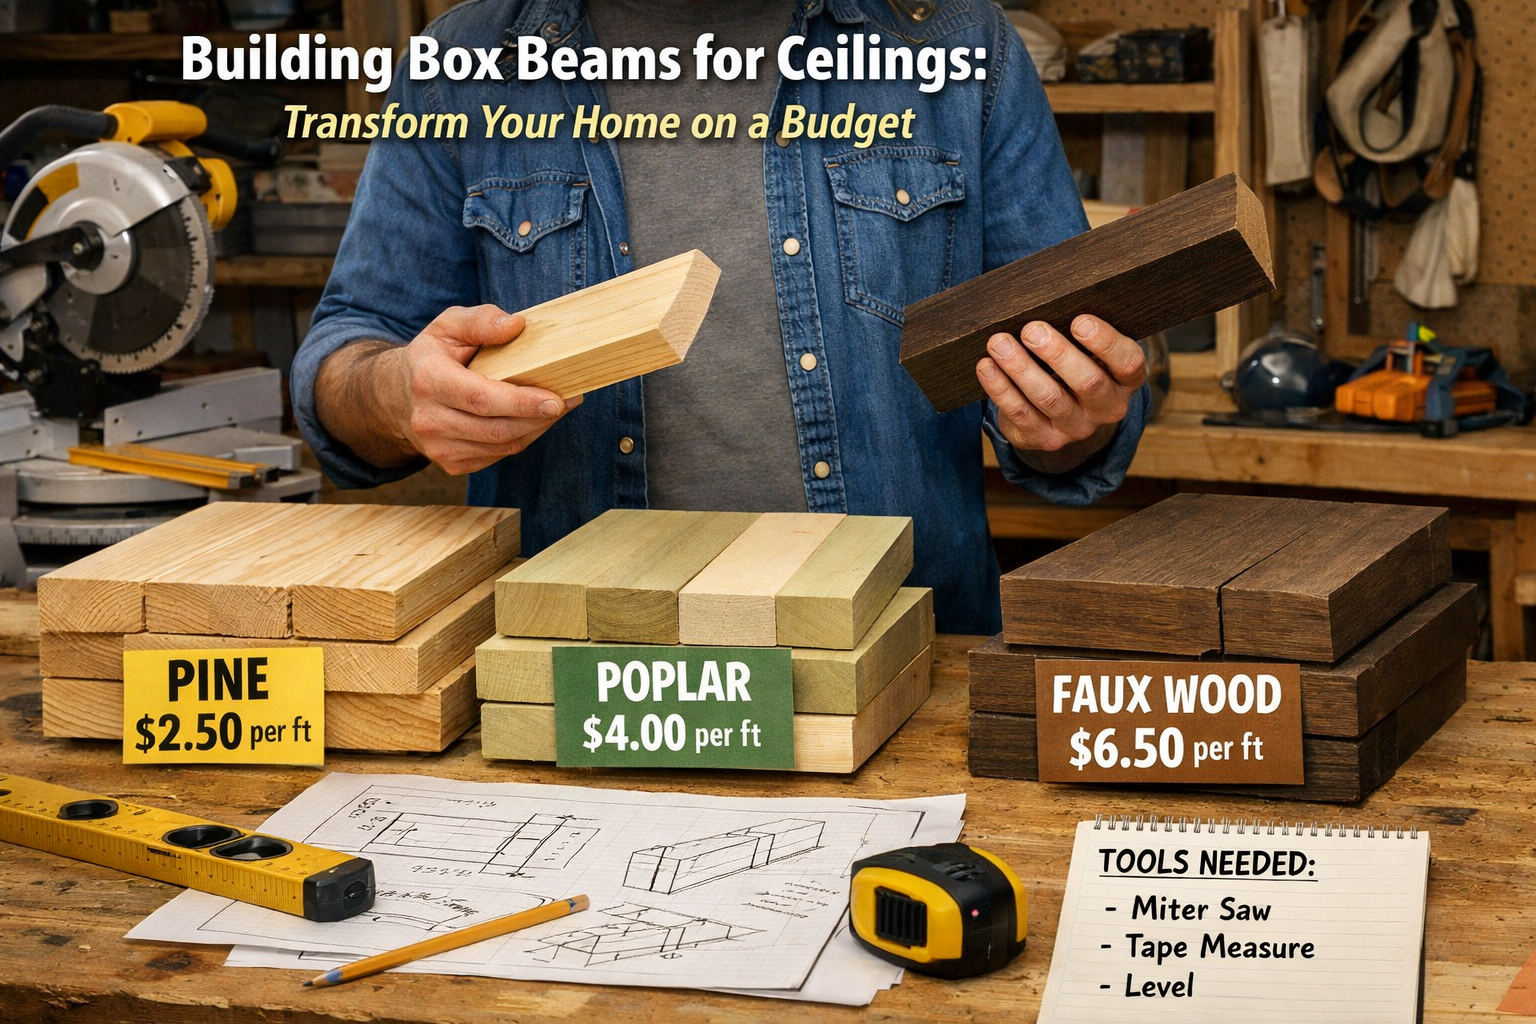
Choosing the Right Wood for Your Box Beams
When considering Building Box Beams for Ceilings: Transform Your Home on a Budget, wood choice plays a critical role in both aesthetics and cost.
Common & Budget-Friendly Options:
- Pine: Readily available, inexpensive, and easy to work with. Pine takes stain well but can sometimes have knots that require special treatment (e.g., knot sealer) if you’re aiming for a pristine finish.
- Poplar: A step up from pine, poplar is smoother, has a finer grain, and takes paint exceptionally well. It’s also suitable for staining if you prefer a subtle grain pattern.
- MDF (Medium-Density Fiberboard): Excellent for painted beams due to its smooth surface and lack of grain. It’s stable and relatively inexpensive but can be heavy and susceptible to moisture.
- Plywood (various species): A great option for the “sides” of your beams, especially if you’re going for a stained look and want to minimize warping. Birch or oak plywood can provide beautiful grain patterns.
Higher-End Options (for specific finishes):
- Oak (Red or White): Offers a prominent, beautiful grain that stains wonderfully. It’s heavier and more expensive than pine or poplar but delivers a classic, robust look. If using oak, consider red oak plywood stain for consistent finishes.
- Maple: Known for its fine, subtle grain, maple is excellent for a smooth, contemporary finish, whether stained or painted. It can be more challenging to stain evenly than oak.
- Faux Wood Panels: Some manufacturers offer lightweight, pre-finished faux wood panels designed to mimic the look of natural wood. While potentially more expensive than raw lumber, they save significant time on finishing.
Structural Considerations: For the internal framing that supports the box beam, use standard dimensional lumber like 2x4s or 2x6s, ensuring they are straight and free from warps.
Essential Tools and Supplies
Having the right tools makes Building Box Beams for Ceilings: Transform Your Home on a Budget a much smoother process. Here’s a list of what you’ll need:
| Category | Tool/Supply | Purpose |
|---|---|---|
| Measuring & Marking | Tape measure, Pencil, Speed square, Level (4ft and torpedo), Stud finder, Chalk line | Accurate measurements, marking cut lines, ensuring straight lines and level installation, locating ceiling joists. |
| Cutting | Miter saw (for precise angle cuts), Table saw (for ripping boards to width), Circular saw (for long straight cuts), Utility knife (for scoring plywood) | Essential for clean, accurate cuts on all lumber components. A Delta Table Saw 36-600 or a Pro Tech Table Saw can be invaluable here. |
| Assembly | Cordless drill/driver, Brad nailer or finish nailer (pneumatic or cordless), Wood clamps, Wood glue (e.g., Super Glue), Screws (wood screws appropriate for length), Sandpaper (various grits), Wood filler, Caulk gun & paintable caulk | Assembling the box beam components, securing them, clamping for glue drying, concealing fasteners, smoothing surfaces. |
| Finishing | Stain or paint, Primer (if painting), Polyurethane or clear coat (e.g., Sprayable Water Based Polyurethane), Brushes, rollers, or paint sprayer, Rags (for staining), Drop cloths | Applying desired finish, protecting the wood, achieving a professional look. For durable finishes, consider alternatives to traditional methods; sometimes spray polyurethane vs brush can be more efficient. |
| Safety | Safety glasses, Hearing protection, Dust mask | Protecting eyes, ears, and respiratory system from wood dust and noise. A Craftsman Home N Shop Vac can help keep your workspace clean. |
“Proper planning is the cornerstone of any successful woodworking project. Take the time to measure twice, cut once, and select materials that align with both your vision and your budget.”
Budgeting for Your Project
The “on a Budget” aspect of Building Box Beams for Ceilings: Transform Your Home on a Budget is key. Here’s a quick breakdown of potential costs:
- Lumber: This will be your largest expense. Pine is typically $1-$3 per linear foot, while oak can be $5-$10+ per linear foot. Plywood sheets (4×8 ft) range from $30-$100+ depending on species and grade.
- Adhesives & Fasteners: Wood glue, nails, and screws are relatively inexpensive, usually under $50 total for a medium-sized project.
- Finishing Supplies: Stain, paint, primer, and topcoats can range from $50-$200 depending on the quality and quantity needed. Don’t forget brushes, rollers, and rags.
- Tool Rental (if needed): If you don’t own all the tools, consider renting a table saw or miter saw for a day or weekend. This can save you hundreds compared to buying.
- Miscellaneous: Sandpaper, wood filler, caulk, safety gear.
By carefully planning your design and selecting materials, you can significantly control the overall cost, making this a truly budget-friendly home transformation.
Step-by-Step Construction and Assembly

Once your design is finalized and materials are gathered, the exciting part begins: constructing your box beams. This section details the process of cutting, assembling, and preparing your beams for installation. Precision at this stage is crucial for a professional-looking finish.
Cutting the Wood Components
Each box beam will typically consist of three primary pieces: a bottom piece and two side pieces. If you’re using thinner plywood or want extra stability, you might add internal bracing.
Bottom Piece:
- Using your table saw or circular saw with a straight edge guide, rip your chosen lumber (e.g., pine, poplar, or plywood) to the exact width you determined in your design.
- Cut the ripped board to the required length for each beam using your miter saw. Ensure all cuts are perfectly square.
Side Pieces:
- Rip your chosen lumber (again, pine, poplar, or plywood) to the exact depth (height) you want your beam to project from the ceiling. Remember to account for the thickness of the bottom piece. For example, if you want an 8-inch deep beam and your bottom piece is 3/4-inch thick, your side pieces will be 7 1/4 inches wide.
- Cut these ripped boards to the same length as your bottom pieces.
⚙️ Tool Highlight: A Super 125 Surface Planer can be used if you’re milling your own rough lumber, ensuring consistent thickness and smooth surfaces for all components.
Assembling the Box Beams
This is where your individual pieces come together to form the “U” shape of your box beam.
- Prepare Your Workspace: Lay down drop cloths to protect your floor. Have your wood glue, brad nailer, and clamps ready.
- Apply Glue: Run a continuous bead of wood glue along the edges of the bottom piece where the side pieces will attach.
- Attach Side Pieces: Carefully align one side piece with the edge of the bottom piece, ensuring the ends are flush. Press firmly to engage the glue.
- Nail in Place: Using your brad nailer (or finish nailer), secure the side piece to the bottom piece. Space nails approximately every 6-8 inches. For extra strength, you can clamp the pieces together while the glue dries, especially if you’re not planning to use many nails.
- Repeat for Second Side: Attach the second side piece in the same manner.
- Check for Squareness: Once assembled, quickly check the beam for squareness using a speed square or framing square. Make any minor adjustments before the glue sets.
- Allow to Dry: Let the glue cure completely according to the manufacturer’s instructions. While the glue is drying, consider working on the next beam if you’re building multiple.
Pull Quote: “The strength of a box beam lies not just in its materials, but in the precision of its assembly. Take your time, and let the glue do its job!”

Finishing Your Box Beams
Finishing the beams before installation is generally easier than doing it overhead.
Sanding:
- Start with a medium-grit sandpaper (e.g., 120-grit) to smooth out any rough spots or milling marks.
- Follow with a finer grit (e.g., 180-220 grit) for a silky-smooth finish. Ensure you sand with the grain.
- Wipe away all dust with a tack cloth or a damp rag. For efficient dust removal, a 14 Gal Ridgid Shop Vac or similar powerful shop vac is highly recommended.
Staining (if applicable):
- Apply wood conditioner if using softwoods like pine, to help achieve a more even stain.
- Apply your chosen stain according to the product directions, wiping off excess after the recommended time.
- Allow the stain to dry completely.
- For a consistent finish, especially on plywood, research oak plywood stain tips.
Painting (if applicable):
- Apply a high-quality wood primer, especially if using pine or MDF, to block knots and ensure uniform paint adhesion.
- Apply two thin coats of your chosen paint, allowing adequate drying time between coats. Lightly sand with fine-grit sandpaper between coats for a smoother finish.
Topcoat Protection:
- Apply 2-3 coats of polyurethane, varnish, or another clear protective finish. This protects the wood and enhances its durability.
- Lightly sand with fine-grit sandpaper (e.g., 220-grit) between coats and wipe clean.
- Consider applying polyurethane in high humidity if necessary, adjusting your technique for optimal results. For those looking for spray application, read about spraying water based poly.
This careful construction and finishing process ensures that your box beams are not only sturdy but also visually appealing, ready to transform your ceiling.
Installation and Final Touches for Your Transformed Ceiling
The final stage of Building Box Beams for Ceilings: Transform Your Home on a Budget involves securely installing your beautifully crafted beams and adding those crucial finishing touches. This is where your vision truly comes to life, enhancing the architectural appeal and warmth of your home.
Preparing the Ceiling
- Locate Ceiling Joists: Using a stud finder, carefully locate and mark all ceiling joists along the paths where your beams will be installed. These are vital for securely mounting the beams. If your beams run perpendicular to joists, you’ll need to use toggle bolts or other heavy-duty anchors, but direct attachment to joists is always preferred.
- Map Out Beam Paths: Use a chalk line to snap perfectly straight lines on the ceiling where the center of each beam will be. This serves as your installation guide.
- Install Mounting Blocks:
- Cut 2x4s or 2x6s into small blocks, typically 4-6 inches long.
- Align these blocks along your chalk line, centered where the beam will sit.
- Screw the blocks directly into the ceiling joists using long construction screws (e.g., 2.5-3 inch screws). Space these blocks every 2-3 feet along the length of the beam. These blocks will create a solid anchor point for your hollow box beams.
💡 Pro Tip: If you’re planning to run wiring inside the beams for recessed lighting or other fixtures, now is the time to run the wires and ensure they are properly secured and accessible.
Mounting the Box Beams
This step usually requires two people due to the length and awkwardness of handling the beams overhead.
- Lift and Position: Carefully lift a finished box beam and align its open “U” channel over the pre-installed mounting blocks on the ceiling.
- Secure with Fasteners:
- Using your cordless drill, drive screws up through the sides of the box beam and into the mounting blocks. Use at least two screws per block, ensuring they are long enough to penetrate well into the blocks but not so long they risk coming out the top of your joist.
- Alternatively, you can use a finish nailer to nail through the sides of the beam into the blocks. Brad nails are typically not strong enough for structural attachment here; use larger finish nails.
- Check for Level and Straightness: As you secure each beam, frequently check its level and make any minor adjustments.
- Repeat for All Beams: Continue this process for all your designed beams.
Adding Trim and Concealing Gaps
Even with careful measurements, small gaps between the beam and the ceiling or between beam sections are common.
- Caulking: Use paintable caulk to fill any small gaps where the beams meet the ceiling. Smooth the caulk with a wet finger or a caulk tool for a seamless transition.
- Decorative Trim (Optional but Recommended): Adding a small piece of decorative trim (like a quarter-round, cove molding, or a small flat strip) along the top edges where the beam meets the ceiling can beautifully hide any imperfections and give a truly finished, professional look.
- Cut trim pieces to size using your miter saw, paying close attention to inside and outside corner angles.
- Attach the trim with wood glue and small brad nails.
- Fill nail holes with wood filler, sand lightly, and touch up with paint or stain to match.
- For more intricate designs, explore how to unlock the secrets of brackets woodworking to add decorative elements to your beams.
Integrating Lighting (Optional)
Box beams are perfect for incorporating subtle or dramatic lighting.
- Recessed Lighting: Small LED recessed puck lights can be installed directly into the bottom of the box beams, providing excellent task or accent lighting. Ensure wiring is done by a qualified electrician if you’re not experienced.
- LED Strip Lighting: For a softer, ambient glow, LED strip lights can be hidden along the top inside edge of the beam, casting light upwards onto the ceiling. This creates a beautiful indirect lighting effect. If you’re also into creating custom lighting, consider combining these with techniques from “Illuminate Your Space: A Comprehensive Guide to Lamp Woodworking” – https://woodcraftwiz.com/illuminate-your-space-a-comprehensive-guide-to-lamp-woodworking/
The complete installation of Building Box Beams for Ceilings: Transform Your Home on a Budget will leave you with a stunning, custom architectural feature that significantly elevates the character and style of your home. Enjoy the renewed warmth and sophisticated ambiance!
Conclusion
Building Box Beams for Ceilings: Transform Your Home on a Budget is a rewarding project that offers immense aesthetic and functional benefits. From the initial spark of an idea to the final installation of beautifully crafted beams, this guide has provided a comprehensive roadmap for transforming your living space. By following the detailed steps for planning, material selection, construction, and installation, homeowners can achieve a high-end, custom look without the prohibitive cost of solid timber.
In 2026, as homeowners increasingly seek ways to personalize their spaces and add value, faux box beams stand out as an accessible and impactful solution. They not only introduce architectural warmth and character but also cleverly conceal modern necessities like wiring, making them both beautiful and practical. This DIY endeavor empowers you to take control of your home’s design, resulting in a unique, inviting, and truly transformed environment.
Actionable Next Steps:
- Measure and Design: Grab your tape measure and a notebook. Sketch out potential beam layouts for your room, considering dimensions and placement.
- Budget and Material Research: Research local lumber prices for pine, poplar, or plywood. Compare costs and decide on your preferred wood and finish.
- Gather Tools: Make a list of necessary tools. Determine which you already own, which you’ll need to purchase, and which you might rent for a day or weekend.
- Start Small (Optional): If you’re new to woodworking, consider building a shorter, single beam for a hallway or a small room first to practice your techniques.
- Enjoy the Transformation: Once installed, step back and admire the incredible difference your custom box beams have made. You’ve created a stunning architectural feature that elevates your home’s style and value!
