


In 2026, the appeal of reclaimed wood has transcended its rustic niche, evolving into a hallmark of luxury and sustainable design within contemporary homes. The timeless beauty and inherent story of aged timber offer an unparalleled warmth and character, making oversized, rough-hewn mantels a coveted feature. Mastering the intricate process of Building Reclaimed Wood Mantels: Sourcing, Restoration, and Installation Techniques is essential for woodworkers, designers, and homeowners seeking to incorporate these magnificent pieces into their spaces. This comprehensive guide will delve into every crucial step, from ethically acquiring the perfect beam to meticulously restoring its natural grandeur and securely installing it to become the focal point of any room.
Key Takeaways
- Sourcing is paramount: Prioritize ethical suppliers, inspect timber for structural integrity and desired character, and understand the history of the wood.
- Restoration balances preservation and refinement: Clean thoroughly, stabilize the wood, perform necessary repairs, and finish appropriately to highlight its natural beauty.
- Installation requires precision and structural knowledge: Choose the correct mounting method based on mantel weight and wall structure, ensuring safety and a seamless aesthetic.
- Embrace the wood’s unique imperfections: Natural checks, nail holes, and saw marks contribute to the authentic charm of reclaimed timber.
- Sustainability and storytelling: Reclaimed mantels are not just decor; they are pieces of history that add significant value and an eco-conscious touch to a home.
Sourcing the Perfect Reclaimed Wood Beam for Your Mantel
The journey of Building Reclaimed Wood Mantels: Sourcing, Restoration, and Installation Techniques begins with finding the ideal piece of timber. This isn’t merely about acquiring wood; it’s about discovering a fragment of history, a beam that carries the marks of its past life and is ready for a new purpose. The choices made during sourcing directly influence the mantel’s character, stability, and longevity.

Understanding Reclaimed Wood Sources
Reclaimed wood can originate from various exciting places, each offering unique characteristics and stories.
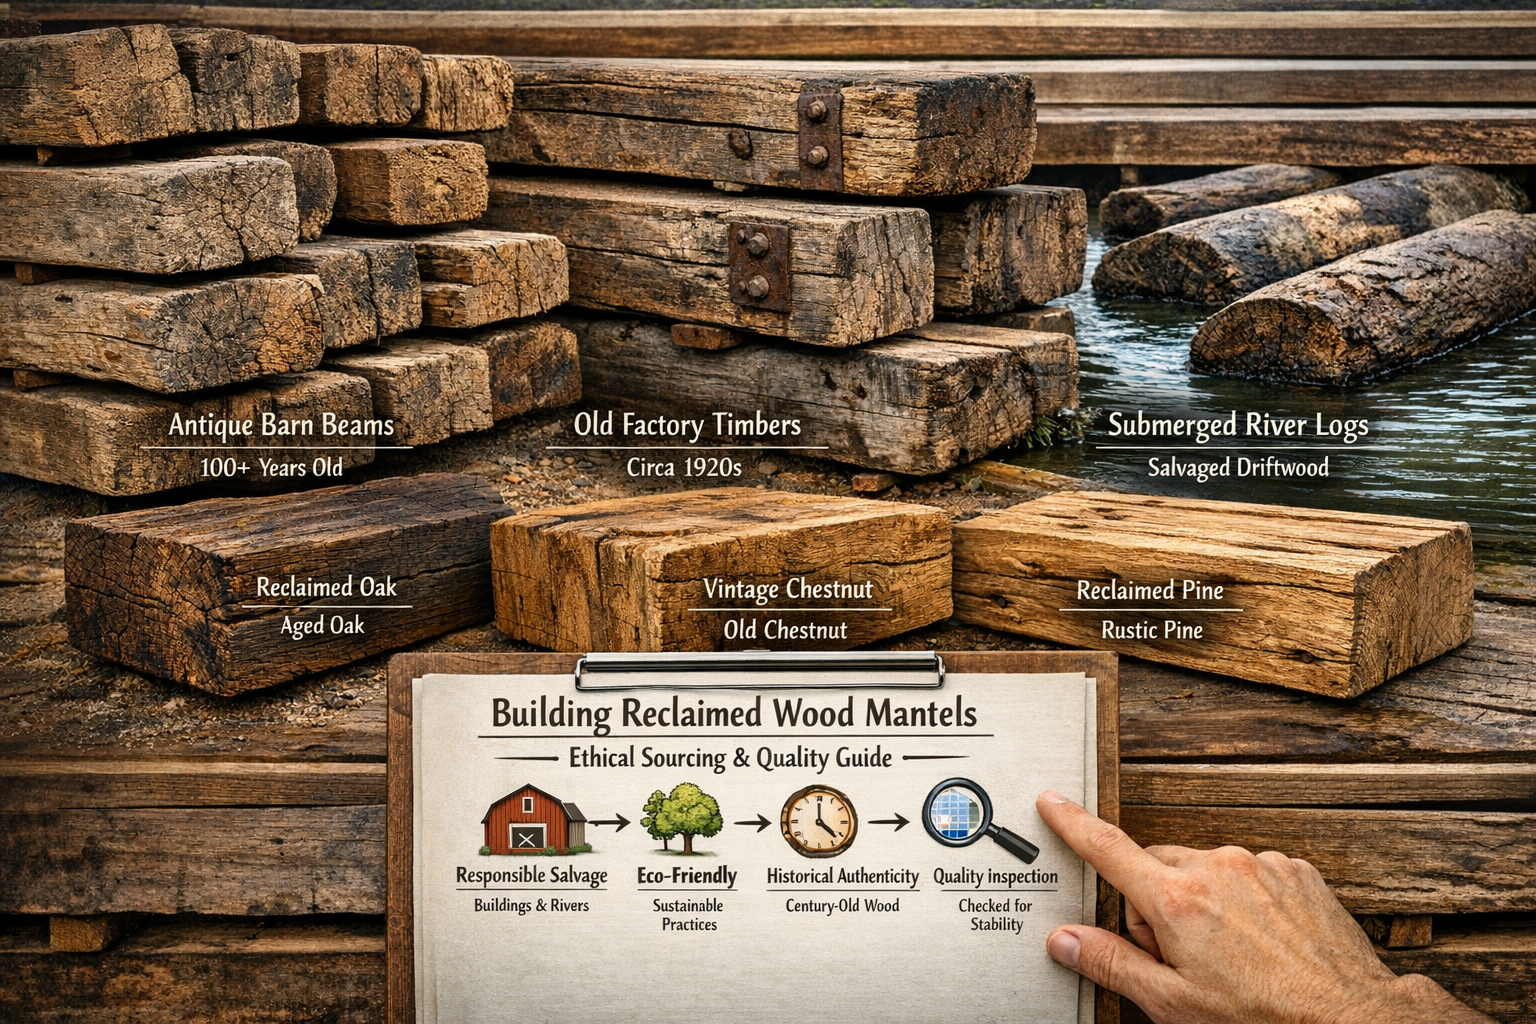
- Old Barns and Agricultural Structures: Often yielding large, hand-hewn beams of oak, chestnut, or pine, these timbers frequently exhibit a rustic charm with original axe marks, nail holes, and a weathered patina. The wood is typically air-dried over many decades, making it incredibly stable.
- Industrial Buildings and Factories: Demolished factories can provide dense, sturdy timbers from species like Douglas fir, longleaf pine, and maple. These often have a more “industrial” aesthetic, with bolt holes, iron stains, and a rich, dark patina from years of oil and grime.
- Underwater Salvage (River Logs): Logs submerged for decades or even centuries in rivers, lakes, or swamps can be incredibly dense and rich in color due to mineral absorption and lack of oxygen. Cypress, longleaf pine, and oak are common. These “sinker logs” are prized for their unique coloration and stability.
- Old Houses and Historic Buildings: Structural timbers, joists, and rafters from older homes can also be repurposed. These often offer a glimpse into specific architectural styles and construction methods of previous eras.
Key Considerations When Sourcing
When evaluating potential reclaimed timbers, several factors are crucial for ensuring a successful project.
Species and Characteristics: Different wood species react differently to moisture, finishing, and structural stresses.
- Oak (Red & White): Very durable, strong, and has a prominent grain. White oak is particularly resistant to rot.
- Pine (Longleaf, Heart Pine): Known for its rich color (often reddish-amber), dense grain, and incredible strength dueates to slow growth in old-growth forests.
- Douglas Fir: Strong, relatively lightweight, and has a distinctive straight grain.
- Chestnut: Rare due to blight, highly prized for its character and warm tones.
- Walnut: Luxurious, dark, and hard. Consider the aesthetic you want – the deep, rich tones of antique pine or walnut, or the robust character of a weathered oak beam.
Moisture Content: This is perhaps the most critical factor. Reclaimed wood, especially from barns or outdoor structures, can have high moisture content. Green wood or wood with inconsistent moisture can lead to significant checking, warping, or twisting after installation as it dries. Ideally, the timber should be kiln-dried or air-dried to a stable moisture content of 6-9% for interior use. Always use a moisture meter to check. If the wood is still wet, it will need to be properly dried, which can take a significant amount of time and effort.
Structural Integrity:
- Rot and Decay: Inspect for soft spots, fungal growth, or insect damage. While some surface rot can be removed, deep decay compromises the beam’s strength.
- Large Checks and Cracks: Small, stable checks (cracks) add character. However, large, deep, or actively spreading cracks could indicate structural weakness or future splitting.
- Pest Infestation: Look for evidence of wood-boring insects (small holes, sawdust trails). If present, the wood will require treatment before it can be used indoors.
Size and Dimensions: Ensure the beam is large enough for your desired mantel length, depth, and thickness, allowing for some material removal during restoration. Oversized dimensions provide flexibility. Remember that cutting down a very large beam will require specialized tools.
Aesthetic and Character: This is highly subjective but vital. Look for features that appeal to you:
- Patina: The natural aging and coloring of the wood.
- Hand-hewn vs. Saw-milled: Hand-hewn beams have distinctive axe marks; saw-milled timbers will have visible saw blade patterns.
- Original Markings: Nail holes, bolt holes, mortise and tenon joints, and unique stains tell a story.
- Live Edges: The natural, un-sawn edge of the tree.
Where to Find Reclaimed Wood
- Specialty Reclaimed Wood Dealers: These businesses specialize in salvaging, processing, and selling reclaimed timber. They often have kiln-drying facilities and can provide history and species information. This is often the most reliable source for high-quality, stable material.
- Architectural Salvage Yards: Similar to specialty dealers, but often with a broader range of salvaged materials. Inventory can be more unpredictable.
- Demolition Contractors: Sometimes, you can directly purchase beams from contractors dismantling old structures. This can be more cost-effective but requires careful inspection and usually involves “as-is” condition.
- Online Marketplaces: Websites like Craigslist or local classifieds can occasionally yield finds from individuals. Buyer beware – thorough inspection is crucial.
- Sawmills: Some sawmills will process salvaged logs or have a stock of reclaimed timbers.
When sourcing, do not hesitate to ask questions about the wood’s origin, treatment history, and moisture content. Ethical sourcing also means ensuring the wood was salvaged legally and safely.
Restoration Techniques for Reclaimed Wood Mantels
Once the perfect beam is acquired, the next phase in Building Reclaimed Wood Mantels: Sourcing, Restoration, and Installation Techniques involves careful restoration. The goal is not to make the wood look new, but to clean, stabilize, and enhance its existing character while preparing it for its new life as a mantel. This process requires patience, attention to detail, and the right tools.
Initial Cleaning and Preparation
Reclaimed wood often arrives with decades of dirt, dust, grime, and sometimes even animal remnants.
- Rough Cleaning: Begin by using a stiff brush, a scraper, and compressed air to remove loose debris, cobwebs, and large dirt accumulations. A shop vacuum is also invaluable here.
- Pressure Washing (with caution): For very dirty or heavily soiled beams, pressure washing can be effective.
- Use a wide spray pattern and keep the nozzle moving to avoid damaging the wood fibers.
- Use plain water; avoid harsh detergents that could strip the patina or introduce chemicals.
- Allow the wood to dry thoroughly after pressure washing (which may take several days or weeks, depending on the environment and initial moisture content).
- Scraping and Wire Brushing: After initial drying, stubborn grime, paint, or loose fibers can be removed with a paint scraper or a wire brush. A rotary wire brush attachment on an angle grinder can speed this up, but use it gently to avoid aggressive material removal that alters the wood’s character.
Stabilizing and Repairing the Timber
Reclaimed wood often comes with natural imperfections that contribute to its charm. However, some issues need to be addressed for stability and longevity.
- Pest Treatment: If any evidence of active pest infestation is found, the wood must be treated. This could involve professional fumigation, heat treatment (kiln drying often achieves this), or chemical treatments. Consult with a pest control expert or your wood supplier for recommendations.
- Structural Repairs:
- Filling Large Cracks and Voids: Small, stable checks can be left as-is. For larger cracks or voids that might collect dust or splinter, epoxy resin or wood filler mixed with sawdust from the same beam can be used. This should be a structural repair, not merely cosmetic.
- Loose Sections: If parts of the wood are loose or splintering, they may need to be secured with wood glue and clamps, or carefully removed if beyond repair.
- Stabilizing Soft Spots: Areas of incipient rot or soft spots can sometimes be hardened using a wood consolidant. This soaks into the wood fibers and strengthens them, preventing further deterioration.
Shaping and Dressing (Optional)
Many prefer to keep a reclaimed mantel as rough-hewn as possible, but some shaping might be necessary for fit or aesthetics.
- Squaring Ends: Use a miter saw or circular saw with a guide to square the ends of the beam. This provides a clean finish and allows for accurate measurements during installation.
- Flattening the Top Surface: For practical use (e.g., placing decor), the top surface of the mantel can be flattened. This can be done with a planer (if the beam fits and is free of metal), a router sled, or hand planes. Be cautious with planers, as hidden metal can severely damage blades. Metal detectors can be useful here.
- Removing Sharp Edges: While retaining a rustic feel, extremely sharp or splinter-prone edges can be gently eased with a sander or a block plane.
Finishing the Reclaimed Wood Mantel
The finishing process protects the wood, enhances its natural beauty, and contributes significantly to the mantel’s final appearance. The choice of finish depends on the desired aesthetic and level of protection. For a deeper dive into techniques, explore “reclaimed wood finishing techniques – Wood Craft Wiz” https://woodcraftwiz.com/reclaimed-wood-finishing-techniques/.
Types of Finishes
- Oil Finishes (Linseed Oil, Tung Oil, Danish Oil): These penetrate the wood, bringing out its natural color and grain while offering a soft, matte, and natural look. They are easy to apply and repair but offer less protection against moisture and abrasion than film finishes. For a natural aesthetic, consider “natural wood finishing techniques – Wood Craft Wiz” https://woodcraftwiz.com/natural-wood-finishing-techniques/.
- Wax Finishes: Often applied over oil for added protection and a subtle sheen. Waxes provide a very soft, tactile finish but are not highly durable.
- Polyurethane or Varnish: These are film-building finishes that create a durable, protective layer on the surface of the wood. They come in various sheens (matte, satin, gloss) and offer excellent protection against moisture, scratches, and heat. However, they can sometimes make the wood look less “natural.” When applying, ensure proper conditions; see “Applying Polyurethane in High Humidity: Tips & Techniques – Wood Craft Wiz” https://woodcraftwiz.com/applying-polyurethane-in-high-humidity-tips-and-techniques/.
- Stains: If a specific color adjustment is desired, stains can be used before a topcoat. However, with reclaimed wood, many prefer to let the natural patina shine through. If a rustic look is preferred, consider “rustic wood finishing techniques – Wood Craft Wiz” https://woodcraftwiz.com/rustic-wood-finishing-techniques/.
Application Steps
- Sanding: Even if a rough look is desired, light sanding (100-150 grit) prepares the surface for the finish to adhere properly. For a truly smooth surface, progress through finer grits (up to 220).
- Dust Removal: Thoroughly clean off all sanding dust using a tack cloth or compressed air.
- Pre-Conditioning (Optional): For some wood species, a pre-stain conditioner can help achieve a more even stain absorption, though often less critical for aged reclaimed timber.
- Stain Application (if desired): Apply stain evenly, wiping off excess according to product instructions.
- Finish Application: Apply thin, even coats of your chosen finish. Follow the manufacturer’s instructions for drying times between coats and light sanding (e.g., 220-grit) if recommended between coats for better adhesion. Typically, 2-3 coats are sufficient.
- Curing: Allow the finish to fully cure before heavy use or placing objects on the mantel. This can take several days or even weeks, depending on the product.
Installation Techniques for Building Reclaimed Wood Mantels

The final, and arguably most critical, stage of Building Reclaimed Wood Mantels: Sourcing, Restoration, and Installation Techniques is secure installation. Given the significant weight of most reclaimed timbers, safety and structural integrity are paramount. Improper installation can lead to serious hazards.
Assessing the Wall Structure
Before selecting an installation method, it’s vital to understand what’s behind your drywall or plaster.
- Locate Studs: Use a stud finder to locate wall studs. Mark their centers precisely.
- Determine Stud Material: Most modern homes have wooden 2×4 or 2×6 studs. Older homes might have thicker, denser lumber, or even lath and plaster over studs.
- Check for Obstructions: Be aware of electrical wiring, plumbing, or HVAC ducts. If unsure, consult an electrician or plumber.
Types of Walls
- Drywall over Wood Studs: The most common scenario. Offers good anchorage points.
- Drywall over Metal Studs: Metal studs are typically not strong enough to support heavy mantels directly. Additional blocking within the wall may be required, which involves opening the wall.
- Masonry (Brick, Stone, Concrete): These walls offer excellent structural support but require specialized drilling and fasteners.
- Tile/Stone Veneer: Installation over these surfaces often means drilling through the veneer into the structural backing.
Common Mantel Installation Methods
The weight of the mantel and the type of wall dictate the best installation method.
1. Floating Mantel Brackets (Concealed Brackets)
This is the most popular method for a clean, minimalist look where the mantel appears to float.
- Description: Heavy-duty steel rods or plates are anchored securely into the wall studs. Corresponding holes are drilled into the back of the mantel beam, allowing it to slide onto the rods.
- Advantages: Invisible hardware, strong, aesthetically pleasing.
- Disadvantages: Requires precise drilling into both wall and mantel. Mantel must be thick enough to accommodate the bracket depth. Can be challenging for very heavy, long mantels.
- Steps:
- Mark Level Line: Determine the desired mantel height and use a long level to draw a perfectly horizontal line on the wall.
- Mark Studs: Mark the center of each stud that will be used for mounting along the level line.
- Install Brackets: Attach the steel floating mantel brackets (often L-shaped or long rods) to the studs using heavy-duty lag screws. Ensure they are perfectly level and spaced appropriately for the mantel’s length. The number of brackets depends on the mantel’s weight and length (typically 2-4).
- Drill Mantel: Carefully measure and mark the exact locations for drilling holes into the back of the mantel beam to match the bracket rods. Use a drill press for accuracy if possible, or a hand drill with a drill guide to ensure straight, level holes. The holes should be slightly larger than the rod diameter for an easier fit.
- Test Fit: Dry-fit the mantel onto the brackets. Adjust as needed.
- Secure Mantel (Optional but Recommended): For added security, some brackets allow for set screws from the top or bottom of the mantel into the rods, or the mantel can be adhered with construction adhesive to the rods.
2. Lag Screws Directly into Studs
Suitable for lighter mantels or when a slightly less concealed approach is acceptable.

- Description: Long, heavy-duty lag screws are driven through the back of the mantel beam directly into the wall studs.
- Advantages: Relatively simple, strong for lighter mantels.
- Disadvantages: Screw heads are visible (though they can be counter-sunk and plugged).
- Steps:
- Mark Mantel Location: Hold the mantel in place, ensure it’s level, and mark the stud locations on the back of the mantel.
- Pilot Holes: Drill pilot holes through the mantel and into the studs. The pilot hole in the mantel should be slightly larger than the screw shaft (clearance hole), while the pilot hole in the stud should match the screw’s core diameter.
- Drive Screws: Drive lag screws through the mantel and into the studs. Counter-sink the screw heads if desired and fill with wood plugs or filler.
3. French Cleat
A simple and strong method, particularly good for heavy items that need to be easily removable or for walls with limited stud access.
- Description: A wooden cleat with a 45-degree bevel is attached to the wall studs. A matching cleat, with an opposing 45-degree bevel, is cut into or attached to the back of the mantel. The mantel then “hooks” onto the wall cleat.
- Advantages: Very strong, easy to hang and remove, no visible fasteners if routed into the mantel.
- Disadvantages: Adds thickness to the mantel, requires precise angled cuts.
- Steps:
- Prepare Cleats: Cut two pieces of strong hardwood (e.g., oak, maple) with opposing 45-degree bevels.
- Attach Wall Cleat: Securely attach one cleat to the wall studs, ensuring it’s perfectly level, using heavy-duty screws.
- Attach Mantel Cleat: Attach the second cleat to the back of the mantel, ensuring its bevel matches and is oriented correctly to interlock with the wall cleat. For a truly concealed look, a router can be used to create an integrated cleat channel directly in the mantel.
- Hang Mantel: Carefully lift the mantel and hook its cleat onto the wall cleat.
4. Post and Beam (Corbels)
For a more traditional or rustic aesthetic, corbels (decorative brackets) can provide both support and visual interest.
- Description: Wooden or metal corbels are securely attached to the wall studs, and the mantel beam rests directly on top of them, often screwed down for security.
- Advantages: Visually appealing, very strong, can support extremely heavy mantels.
- Disadvantages: Corbels are visible, can protrude significantly into the room.
- Steps:
- Install Corbels: Securely attach the corbels to the wall studs at the desired spacing and height, ensuring they are perfectly level and plumb. Use heavy-duty lag screws or through-bolts for maximum strength.
- Place Mantel: Carefully set the mantel beam onto the corbels.
- Secure Mantel: Screw the mantel down into the top of the corbels from above (counter-sink and plug holes) or use hidden L-brackets on the underside.
Safety Precautions
- Always have help: Reclaimed mantels are heavy. Never attempt to lift or install one alone. Use multiple people or lifting equipment.
- Wear appropriate PPE: Gloves, safety glasses, and hearing protection are essential.
- Measure twice, cut/drill once: Accuracy is crucial for a secure and aesthetically pleasing installation.
- Don’t over-tighten: While lag screws need to be snug, over-tightening can strip threads or crack the wood.
- Consider fire codes: Ensure the mantel is installed at a safe distance from the fireplace opening, adhering to local building codes regarding combustible materials. The National Fire Protection Association (NFPA) generally recommends a minimum of 6-12 inches clearance above the firebox opening, depending on the mantel’s projection.
Maintenance and Care for Your Reclaimed Wood Mantel
Once installed, a reclaimed wood mantel requires minimal maintenance, but proper care will ensure its beauty lasts for generations.
- Regular Cleaning: Dust with a soft, dry cloth. For more stubborn grime, a slightly damp cloth can be used, followed immediately by drying. Avoid harsh chemical cleaners.
- Protection from Heat and Moisture: While reclaimed wood is stable, direct, prolonged exposure to excessive heat from a fireplace can cause drying and cracking. Maintain recommended clearances. Avoid placing wet items directly on the mantel.
- Re-finishing: Depending on the type of finish and wear, the mantel may benefit from re-oiling or re-waxing every few years to refresh its look and protection. Film finishes like polyurethane are more durable and may only need touch-ups if scratched. For advanced “antique wood finishing techniques – Wood Craft Wiz” https://woodcraftwiz.com/antique-wood-finishing-techniques/, refer to our detailed guide.
- Humidity Control: Maintaining stable indoor humidity levels (ideally 35-55%) is beneficial for all wood furniture, including your mantel, to prevent excessive expansion and contraction.
Conclusion

Building Reclaimed Wood Mantels: Sourcing, Restoration, and Installation Techniques is a rewarding endeavor that culminates in a stunning and unique focal point for any home. From the thrill of discovering a centuries-old beam to the careful process of bringing its inherent beauty to the forefront, and finally, to its secure installation, each step contributes to creating a piece that is both functional art and a testament to sustainable design. In 2026, as homeowners increasingly seek character, authenticity, and eco-consciousness, a meticulously crafted reclaimed wood mantel stands as a powerful statement.
By prioritizing ethical sourcing, employing thoughtful restoration techniques that honor the wood’s history, and ensuring a robust and safe installation, woodworkers and homeowners can confidently embark on this project. The resulting mantel will not only elevate the aesthetic of a space but also become a cherished heirloom, rich with stories and timeless appeal.
Actionable Next Steps:
- Research Local Suppliers: Begin by identifying reputable reclaimed wood dealers in your area and inquire about their inventory, wood species, and moisture content.
- Plan Your Design: Sketch out your desired mantel dimensions and consider how it will complement your existing decor.
- Gather Tools and Materials: Ensure you have the necessary tools for cleaning, restoration, and installation, or plan to rent specialized equipment if needed.
- Consult a Professional: If unsure about structural assessments or complex installation, consider consulting a general contractor or a skilled carpenter.
- Embrace the Process: Enjoy the journey of transforming a piece of history into a magnificent feature in your home.
References
- National Fire Protection Association (NFPA). (2023). NFPA 211: Standard for Chimneys, Fireplaces, Vents, and Solid Fuel-Burning Appliances. NFPA.
- Hoadley, R. B. (2000). Understanding Wood: A Craftsman’s Guide to Wood Technology. The Taunton Press.
SEO Meta Title: Reclaimed Wood Mantels: Sourcing, Restoring & Installing in 2026 SEO Meta Description: Master building reclaimed wood mantels in 2026. Learn sourcing, restoration, and secure installation techniques for stunning, rustic-chic fireplace focal points.
