

In the quest for organized and aesthetically pleasing living spaces, the humble magazine rack often gets overlooked. Yet, a thoughtfully designed and meticulously crafted magazine rack can transform clutter into a statement piece, adding both functionality and sophisticated style to any room. For the aspiring woodworker and seasoned artisan alike, Crafting Magazine Racks: Wall-Mounted and Freestanding Designs with Hidden Fasteners offers a rewarding project that combines practical utility with the elegance of seamless construction. This article delves into the art of creating these beautiful storage solutions, focusing on beginner-friendly techniques that yield professional, high-profit potential results, particularly when using premium woods and sleek finishes perfect for discerning living rooms and bustling craft markets in 2026.
Key Takeaways
- Premium Materials & Finishes: Selecting high-quality woods like walnut, cherry, or maple, combined with refined finishing techniques, elevates magazine racks into desirable home decor items.
- Hidden Fasteners for a Clean Look: Techniques such as dowel joinery, biscuit joints, dominoes, or strategically placed pocket holes (filled and sanded) are crucial for achieving a sleek, professional appearance without visible hardware.
- Design Versatility: Magazine racks can be adapted into both space-saving wall-mounted units and more substantial freestanding designs, offering varied solutions for different interior needs.
- Beginner-Friendly Approaches: Even without advanced tools, careful planning and execution with common woodworking tools can produce stunning results, making this an accessible project for new woodworkers.
- High Profit Potential: Well-crafted magazine racks with superior finishes and invisible joinery can command higher prices in craft markets, making them a lucrative venture for woodworking enthusiasts.
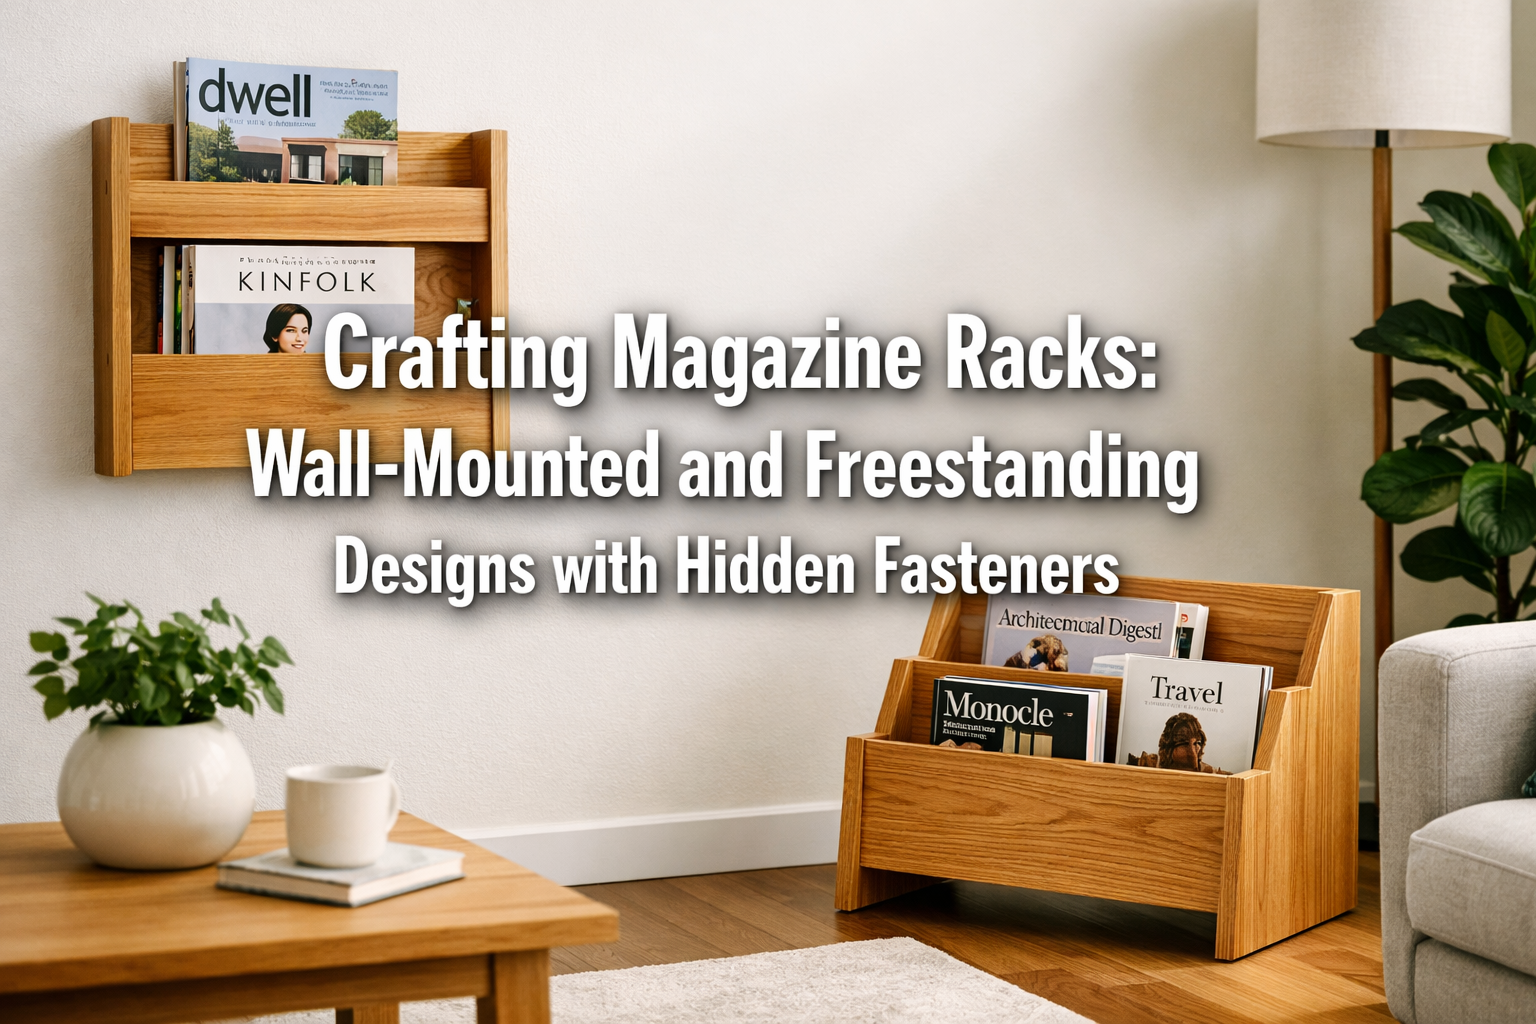
The Art of Seamless Joinery: Crafting Magazine Racks with Hidden Fasteners
[[CONTENT_IMAGE_1]]

The cornerstone of a truly elegant magazine rack lies in its construction, specifically the joinery. Visible screws, nails, or obvious hardware can detract from the overall aesthetic, especially when aiming for a high-end look suitable for a modern living room or a competitive craft market. This is where the mastery of hidden fasteners comes into play. For woodworkers in 2026, embracing methods that conceal joints not only enhances beauty but also signifies a commitment to quality and craftsmanship.
Why Hidden Fasteners Matter
Hidden fasteners create a continuous, unbroken surface, allowing the natural beauty of the wood grain to shine through. This “invisible” construction lends an air of sophistication and a perception of higher quality, which is crucial for items intended to be focal points in a home or sold at a premium.
- Aesthetic Appeal: A clean, unblemished surface draws attention to the wood itself, not the method of assembly. This is particularly important when working with premium woods known for their beautiful grain, such as walnut, cherry, or figured maple.
- Durability and Strength: Many hidden fastening methods, like mortise and tenon or dovetails, inherently create stronger joints than simple butt joints fastened with screws. While some hidden fasteners are primarily aesthetic, others offer superior structural integrity.
- Professional Finish: The absence of visible hardware is a hallmark of professional-grade furniture. This elevates your magazine rack from a DIY project to a piece of handcrafted furniture.
- Market Value: In craft markets, items with superior finish and joinery often command higher prices. Customers appreciate the extra effort and skill demonstrated by invisible construction.
Beginner-Friendly Hidden Fastener Techniques
While traditional joinery like mortise and tenon can be intimidating for beginners, several accessible techniques allow for hidden fasteners without requiring a full workshop of specialized tools.
1. Dowel Joinery
Dowel joints are a classic, strong, and easy-to-learn method for joining two pieces of wood. They involve drilling corresponding holes in mating pieces and inserting fluted wooden dowels with glue.
- How it Works:
- Precisely mark the locations for dowel holes on both pieces.
- Use a doweling jig to ensure perfectly aligned holes.
- Drill holes to the appropriate depth.
- Apply wood glue to the dowels and into the holes.
- Assemble the joint, clamping firmly until the glue dries.
- Benefits: Strong, completely hidden, requires minimal specialized tools (a good drill and a doweling jig).
- Considerations: Accuracy in drilling is key for tight joints.
2. Biscuit Joints
Biscuit joints use small, oval-shaped wooden “biscuits” inserted into crescent-shaped slots cut into the mating edges of wood pieces. When glue is applied, the biscuit swells, creating a very strong, tight joint.
- How it Works:
- Mark the joint lines on both pieces of wood.
- Use a plate joiner (biscuit joiner) to cut slots into the edges.
- Apply glue into the slots and around the biscuit.
- Insert the biscuit into one slot, then align and press the second piece of wood onto the biscuit.
- Clamp the joint until dry.
- Benefits: Fast, strong, excellent for panel glue-ups and carcase construction. Allows for slight adjustments during assembly.
- Considerations: Requires a plate joiner.
3. Domino Joinery (Advanced but User-Friendly)
While a Festool Domino joiner is a significant investment, it is renowned for making mortise and tenon joinery incredibly fast, precise, and beginner-friendly. If you have access to one, it’s a game-changer.
- How it Works: The Domino machine cuts perfectly sized mortises, and a corresponding “Domino” tenon (a flattened dowel) is glued into the mortises.
- Benefits: Extremely strong, precise, fast, and completely hidden.
- Considerations: High tool cost.
4. Pocket Hole Joinery with Plugs
While pocket holes are typically visible, they can be effectively hidden with wooden plugs and careful finishing, creating a surprisingly sleek look. This is an excellent beginner-friendly alternative to traditional hidden fasteners.
- How it Works:
- Drill pocket holes on the back or underside of a component where they won’t be easily seen.
- Assemble with pocket hole screws.
- Insert wooden pocket hole plugs (often available in matching wood species) into the holes.
- Glue the plugs in place, then trim flush and sand smooth.
- Benefits: Very strong, quick to assemble, accessible with an affordable pocket hole jig.
- Considerations: Requires careful trimming and sanding of plugs for a truly invisible finish. Consider using pre-made plugs for the specific wood you’re working with to ensure a good match.
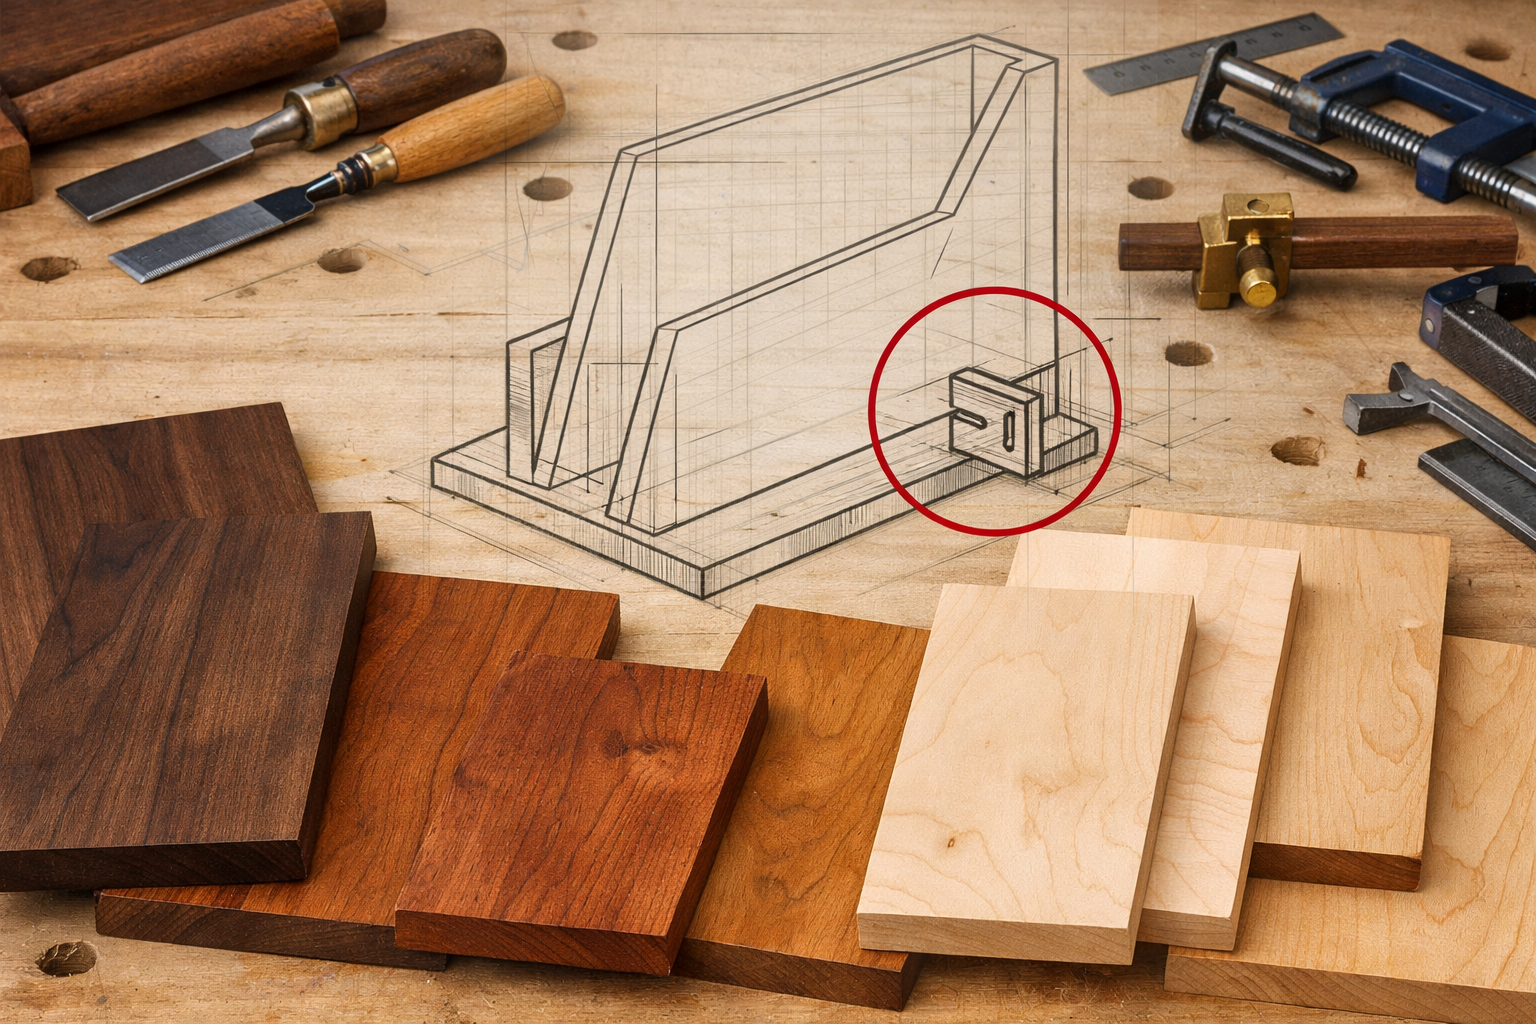
Material Selection: Premium Woods for a Polished Look
The choice of wood greatly influences the final appearance and perceived value of your magazine rack. For high-profit potential and a sleek finish, consider these premium options:
- Walnut: Known for its rich, dark brown color and beautiful grain patterns, walnut exudes luxury. It finishes exceptionally well.
- Cherry: Cherry wood offers a warm, reddish-brown hue that deepens with age. It’s relatively easy to work with and takes finishes beautifully.
- Maple: A lighter, fine-grained wood that can be stained or left natural for a clean, modern aesthetic. Hard maple is very durable.
- Oak (Red or White): While a classic, oak’s prominent grain can be both a feature and a challenge. White oak offers a more subdued grain and is excellent for projects requiring strength and durability.
For structural components where hidden fasteners are crucial, such as back panels or shelves, consider using high-quality plywood. For insights into selecting the right plywood, refer to our guide on “1/2 Plywood for Cabinets: Strength, Durability & Design Considerations – Wood Craft Wiz”.
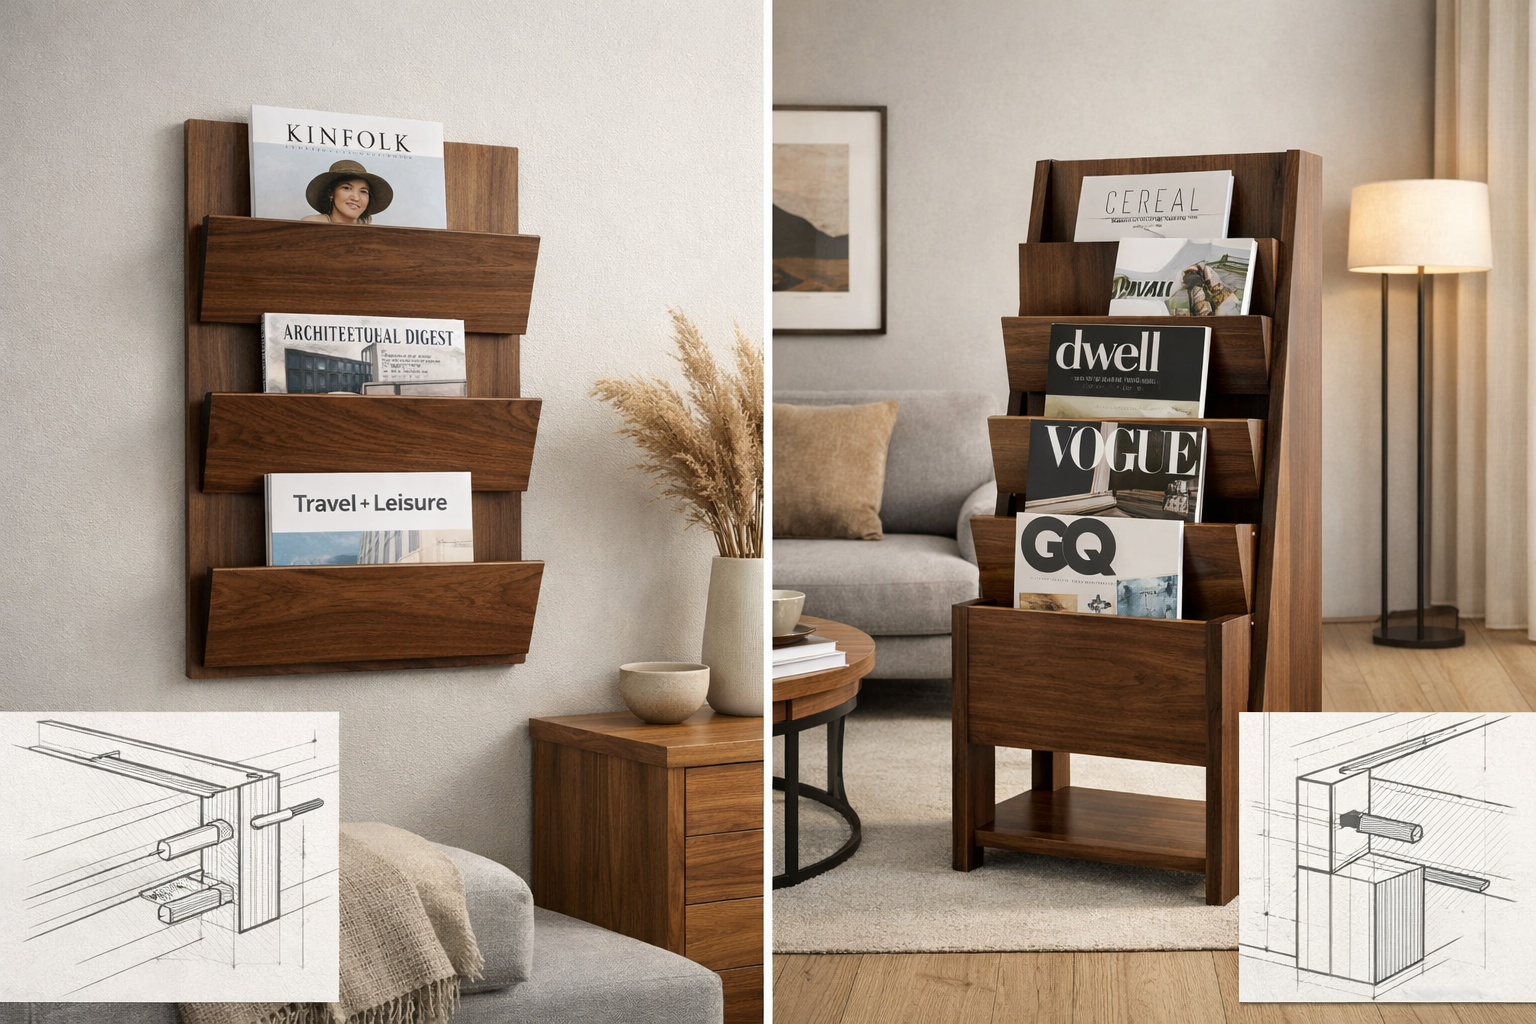
Wall-Mounted vs. Freestanding: Designs for Every Space
[[CONTENT_IMAGE_2]]
The design of your magazine rack will largely depend on the available space and desired aesthetic. Both wall-mounted and freestanding designs offer distinct advantages, and both can benefit immensely from the application of hidden fasteners to achieve a refined, bespoke look.
Wall-Mounted Magazine Racks
Wall-mounted designs are perfect for smaller spaces or for creating a minimalist, floating aesthetic. They keep floors clear and can become an architectural feature on a blank wall.
Advantages:
- Space-Saving: Ideal for compact living areas, hallways, or even bathrooms where floor space is at a premium.
- Modern Aesthetic: A floating design often looks contemporary and sleek, enhancing minimalist decor.
- Customizable Height: Can be mounted at any desired height, making magazines easily accessible or placing them out of reach of small children.
- Hidden Mounting Hardware: Just as internal fasteners are hidden, external mounting hardware can be concealed for a truly seamless installation. French cleat systems or keyhole slots are excellent choices. For more on how hidden support structures can be integrated into your designs, check out “Unlock the Secrets of Brackets Woodworking: A Comprehensive Guide – Wood Craft Wiz”.
Design Considerations:
- Weight Capacity: Must be securely anchored to wall studs, especially if designed to hold a significant number of heavy magazines.
- Visibility: Because they are at eye level, the craftsmanship and finish are highly visible, emphasizing the importance of hidden fasteners and a flawless finish.
- Depth: Keep the depth appropriate to prevent magazines from drooping or appearing bulky. A slight angle can help hold magazines upright.
Popular Wall-Mounted Designs:
- Slatted Design: Vertical or horizontal slats create pockets for magazines. Hidden dowel or biscuit joints can connect the slats to the side supports.
- Pouch/Pocket Design: A solid back panel with one or more angled front panels creating a pocket. Fasteners can be hidden from the back or with pocket hole plugs on the inside surfaces.
- Shelf-Style: Simple shelves with a front lip to prevent magazines from sliding off. Mortise and tenon or biscuit joints can secure shelves to vertical uprights.
Freestanding Magazine Racks
Freestanding designs offer flexibility in placement and often provide more storage capacity. They can be moved as needed and can serve as a substantial piece of furniture in a living room, office, or waiting area.

Advantages:
- Portability: Can be easily repositioned within a room or moved to a different space.
- Greater Capacity: Often designed with multiple tiers or larger compartments, accommodating more magazines, books, or even small decorative items.
- Statement Piece: A well-crafted freestanding rack can be a significant addition to a room’s decor.
- Structural Versatility: Allows for more complex joinery and design elements, like angled legs or integrated side tables.
Design Considerations:
- Footprint: Requires dedicated floor space.
- Stability: Must be designed with a wide enough base or sufficient weight to prevent tipping, especially if tall.
- Joint Strength: Given their often larger size and potential to hold more weight, robust hidden joinery (e.g., mortise and tenon, through dowels) is paramount for longevity.
Popular Freestanding Designs:
- A-Frame Style: Two angled side panels joined at the top, with horizontal slats or fabric creating the magazine pockets. Hidden dowel or biscuit joints can connect the cross-members.
- Tiered Shelf Design: Multiple shelves supported by vertical posts, often with a slight angle or front lip. This design is highly adaptable and benefits from robust hidden joinery.
- Basket/Bin Style: A wooden frame enclosing a fabric or wooden bin. The frame elements can be joined with pocket holes and plugs, or dowels for a clean exterior. For inspiration on larger furniture pieces that utilize strong joinery, consider guides like “Craft Your Dream Farmhouse Dining Table: The Ultimate 2025 DIY Guide 🏡✨ – Wood Craft Wiz”.
Regardless of the chosen design, always prioritize the integration of hidden fasteners. This commitment to detail will differentiate your handmade magazine rack, making it a desirable piece for both personal use and for sale in craft markets.
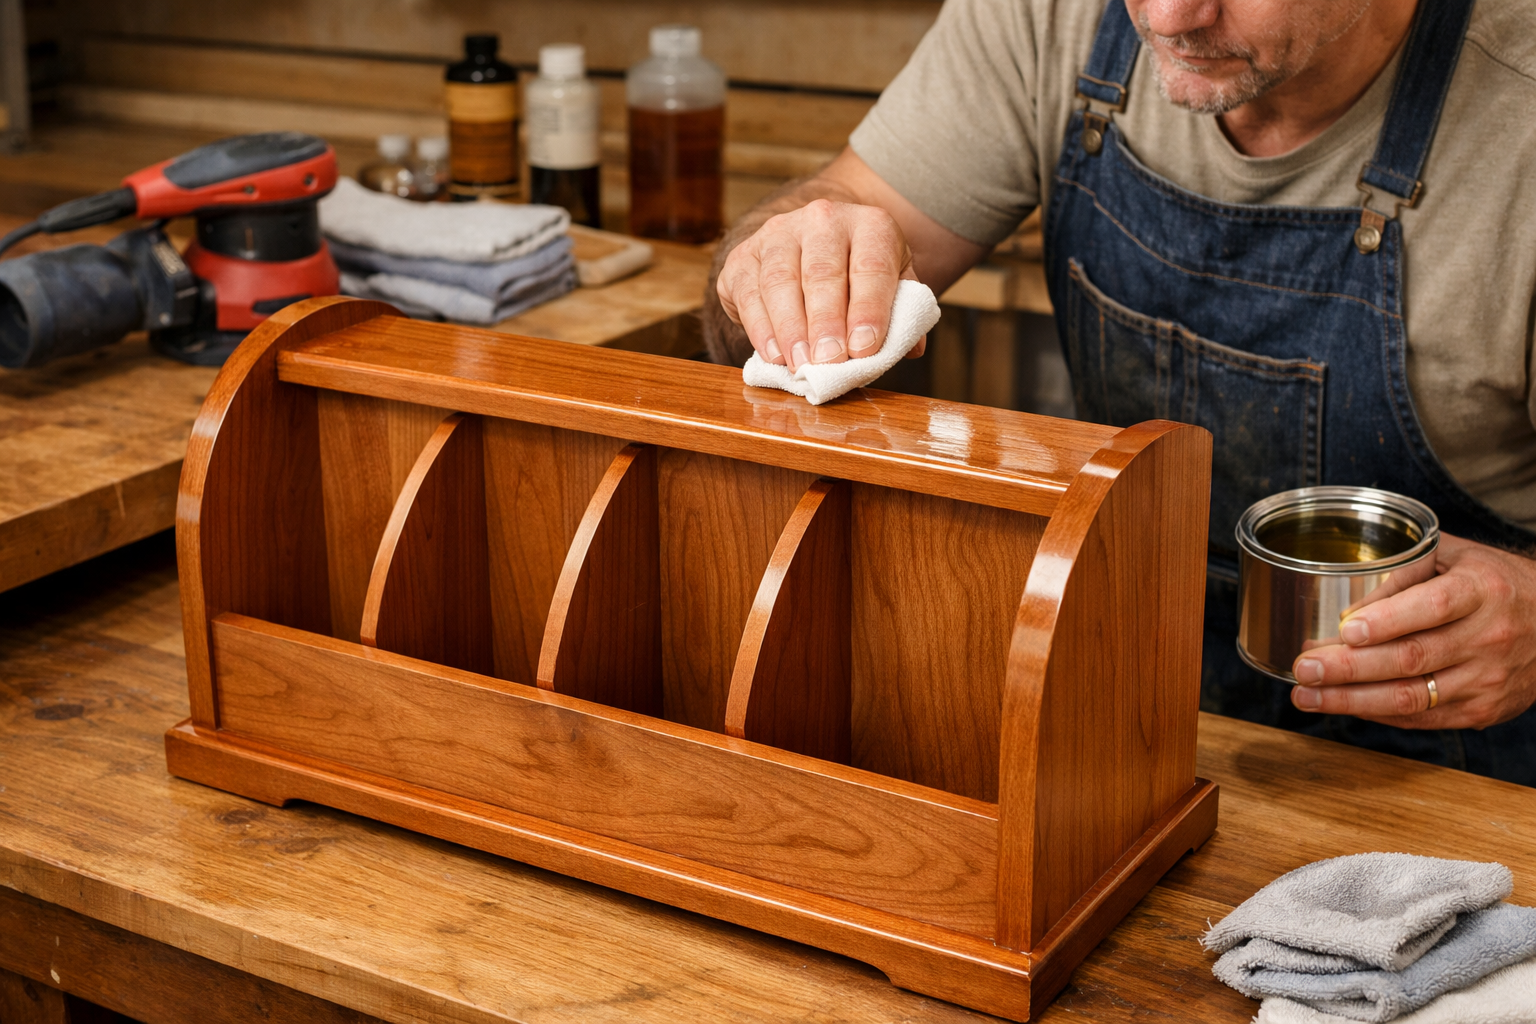
Achieving a Professional Finish and Maximizing Market Potential
[[CONTENT_IMAGE_3]]
Once the joinery is complete and the structure of your magazine rack is solid, the final finishing touches are what truly elevate it from a raw wooden piece to a finished, marketable product. A smooth, durable, and beautiful finish, coupled with the invisible joinery, makes these projects highly desirable, offering excellent profit potential for craftspeople in 2026.
The Importance of Sanding and Surface Preparation
Before any finish is applied, meticulous sanding is non-negotiable. It removes tool marks, smooths the wood grain, and prepares the surface to accept the chosen finish evenly.
- Grit Progression: Start with a coarser grit sandpaper (e.g., 80-100 grit) to remove major imperfections, then progressively move to finer grits (120, 150, 180, 220). For an exceptionally smooth surface, especially on premium woods, you might even go up to 320 or 400 grit.
- Even Pressure: Apply even pressure and sand with the grain to avoid cross-grain scratches.
- Dust Removal: After each grit, thoroughly remove all sanding dust using a vacuum, compressed air, or a tack cloth. Remaining dust can get trapped under the finish, creating a rough texture.
- Water Popping: For certain finishes, lightly dampen the wood surface with a clean, damp cloth after the final sanding. This raises the grain, which can then be lightly sanded again with the finest grit (e.g., 220 or 320). This “water popping” technique helps achieve a smoother final finish by preventing grain from raising after the finish is applied.
Selecting the Right Finish for Your Magazine Rack
The finish protects the wood, enhances its natural beauty, and contributes significantly to the overall aesthetic. For a sleek, high-end look that appeals to modern tastes and fetches good prices at craft markets, consider these options:
- Clear Lacquer or Polyurethane (Water-Based):
- Benefits: Dries quickly, offers excellent durability, and provides a clear, protective layer that highlights the wood’s natural color. Water-based options are low-odor and easy to clean up.
- Application: Apply thin, even coats with a sprayer or brush, lightly sanding between coats with fine-grit sandpaper (e.g., 320-400 grit) to achieve a glass-smooth surface.
- Sleek Factor: Delivers a modern, clean look without altering the wood’s inherent beauty.
- Oil Finishes (Danish Oil, Tung Oil, Linseed Oil):
- Benefits: Penetrates the wood, enhancing its natural luster and providing a rich, “hand-rubbed” feel. These finishes are easy to repair if scratched.
- Application: Apply with a clean cloth, allowing it to soak in, then wipe off excess. Multiple coats build up protection and depth of color.
- Sleek Factor: Creates a soft, warm sheen that feels luxurious to the touch. For more on oil finishes, explore “Danish Oil vs. Boiled Linseed Oil: Understanding Wood Oils” or “natural wood finishing techniques – Wood Craft Wiz”.
- Shellac:
- Benefits: A traditional, natural finish that provides a beautiful, warm glow. It’s often used as a sealer before other finishes. Garnet shellac, for example, can add a beautiful depth to pine, as discussed in “Garnet Shellac Pine: Benefits, Application, and Maintenance Tips”.
- Application: Applied in thin coats with a brush or pad.
- Sleek Factor: Can be buffed to a high sheen or left with a satin look, adding a classic touch.
Finishing for Living Rooms & Craft Markets
When aiming for high-profit potential, the finish must be flawless. Any drips, dust nibs, or uneven areas will reduce perceived value.
- Dust-Free Environment: Finishing should ideally be done in a clean, dust-free area.
- Thin Coats: Multiple thin coats are always better than one thick coat, as they dry more evenly and reduce the risk of imperfections.
- Curing Time: Allow adequate time for the finish to fully cure before handling or packaging the magazine rack.
Marketing Your Crafted Magazine Racks
With your beautifully crafted magazine racks, featuring premium woods, sleek finishes, and invisible joinery, you’re ready to tap into the market.
- High-Quality Photography: Showcase your magazine racks with professional, well-lit photos that highlight the wood grain, the seamless construction, and how they complement a modern living space.
- Emphasize Craftsmanship: In your product descriptions, clearly state the type of premium wood used, the hidden fastening techniques employed, and the meticulous finishing process. Educate your customers about why these details make your product superior.
- Target Audience: Position your magazine racks as premium home decor items for individuals seeking high-quality, handcrafted furniture that combines functionality with sophisticated design. Craft fairs, online marketplaces (Etsy, Shopify), and local boutiques are excellent venues.
- Customization Options: Offer options for different wood species, finishes, or even custom dimensions to cater to specific customer needs. This adds value and can justify higher pricing.
- Storytelling: Share the story behind your craftsmanship. People connect with the artisan and the passion behind their work.
By focusing on these details, from the initial wood selection and hidden joinery to the final, professional finish, your crafted magazine racks will stand out, becoming not just storage solutions but true pieces of art that enhance any living room and capture the attention of discerning buyers in 2026.
Conclusion
Crafting Magazine Racks: Wall-Mounted and Freestanding Designs with Hidden Fasteners offers a truly rewarding woodworking journey. By embracing premium materials and mastering the art of invisible joinery, woodworkers can create pieces that are not only highly functional but also exquisitely beautiful. Whether designing a space-saving wall-mounted unit or a substantial freestanding rack, the commitment to a sleek, professional finish, free from visible hardware, elevates these items into desirable home decor.
In 2026, the demand for handcrafted, high-quality items with a minimalist aesthetic remains strong. Projects like these magazine racks, built with care and an eye for detail, hold significant profit potential in craft markets and online sales. They demonstrate a woodworker’s skill, dedication, and ability to blend utility with elegant design.
Actionable Next Steps
- Choose Your Design: Decide between a wall-mounted or freestanding design based on your space and aesthetic preference. Sketch out your ideas.
- Select Premium Wood: Invest in a high-quality wood like walnut, cherry, or maple. Consider the grain and color that best suits your vision.
- Master Hidden Joinery: Practice a hidden fastening technique such as dowel joints, biscuit joints, or pocket holes with plugs. Precision is key.
- Prioritize Surface Preparation: Dedicate ample time to sanding through progressive grits to achieve a perfectly smooth surface before finishing.
- Apply a Professional Finish: Choose a clear lacquer, water-based polyurethane, or oil finish that enhances the wood’s natural beauty and protects it.
- Showcase Your Work: Take high-quality photos and clearly articulate the craftsmanship and premium features of your magazine rack if you plan to sell it.
By following these steps, you’ll not only create a stunning and practical addition to your home but also develop skills that can open doors to new woodworking opportunities and craft market success.

