
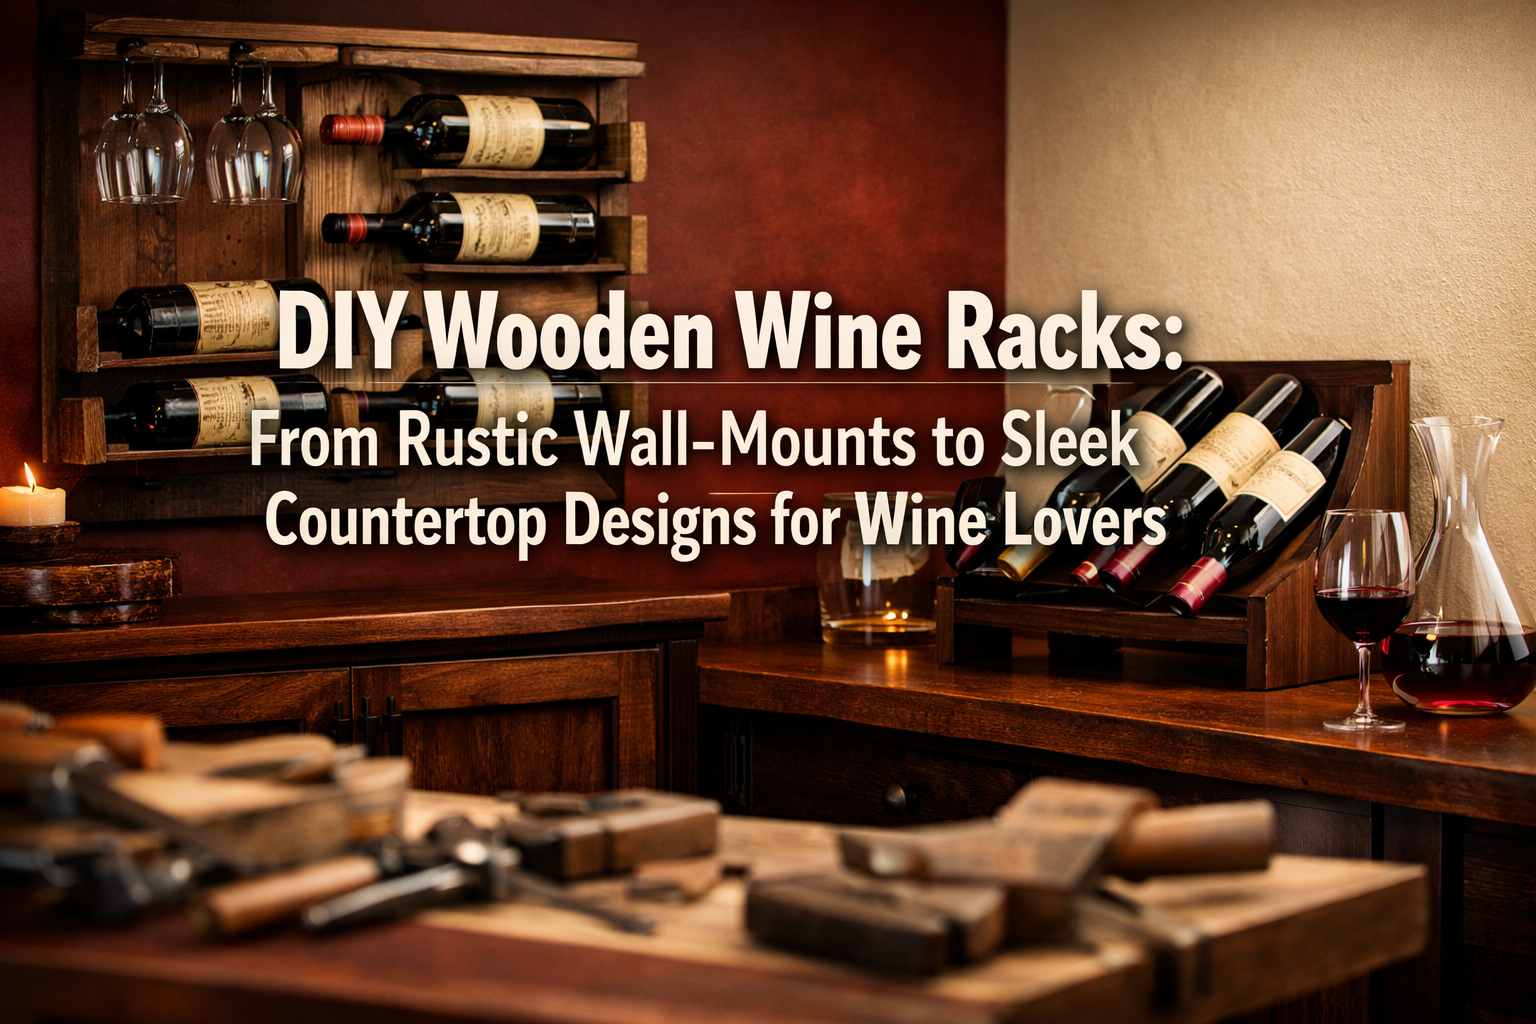

The art of collecting and savoring wine has seen a significant resurgence, leading many enthusiasts to seek stylish and practical ways to store their cherished bottles. As home bars and dedicated wine nooks become increasingly popular, the desire for custom storage solutions grows. Enter the world of DIY Wooden Wine Racks: From Rustic Wall-Mounts to Sleek Countertop Designs for Wine Lovers. Building your own wine rack not only offers a cost-effective alternative to pre-made options but also allows for unparalleled personalization, ensuring your wine storage perfectly complements your home décor and specific collection needs. This comprehensive guide will explore how even beginners can craft beautiful, functional wooden wine racks using affordable hardwoods and basic joinery, complete with power tool guides and finishing tips for a truly professional look.
Key Takeaways
- Customization is Key: DIY wine racks offer complete control over size, style, and finish, perfectly matching your home and wine collection.
- Accessible for All Skill Levels: With basic tools and straightforward plans, even woodworking novices can create impressive wine racks.
- Affordable Hardwoods: Utilize readily available and budget-friendly woods like pine, oak, or poplar to keep project costs down.
- Variety of Designs: From space-saving wall-mounted units to elegant countertop displays, there’s a design for every wine lover.
- Professional Finishes: Proper finishing techniques elevate a DIY project to a refined piece of furniture, protecting the wood and enhancing its beauty.
The Allure of DIY Wooden Wine Racks: Customization for Every Collector
The appeal of crafting your own wine storage goes beyond mere functionality. It’s about infusing a piece of your personality into your home, creating a unique focal point that celebrates your passion for wine. In 2026, with the growing trend of personalized home spaces, a DIY wooden wine rack stands out as a rewarding project. Whether you envision a sprawling display for a growing collection or a compact, elegant holder for a few special bottles, the DIY approach provides the flexibility to bring your vision to life.

Why Choose DIY for Your Wine Rack?
- Tailored to Your Space: Unlike off-the-shelf options, a DIY rack can be precisely measured to fit awkward corners, narrow wall sections, or specific countertop dimensions. This ensures maximum storage efficiency and seamless integration into your existing layout.
- Cost-Effective: Often, the raw materials for a wooden wine rack are significantly less expensive than purchasing a pre-fabricated unit of comparable quality and style. This allows you to invest more in your wine collection!
- Personalized Aesthetics: Do you prefer the raw, unrefined charm of a rustic farmhouse look, or the clean lines and polished surface of a modern, minimalist design? With DIY, you dictate every aesthetic detail, from wood species to finishing techniques.
- Sense of Accomplishment: There’s immense satisfaction in admiring a piece of furniture you’ve built with your own hands. Each time you select a bottle, you’ll appreciate the craftsmanship and effort invested.
- Quality Materials: You have control over the type and quality of wood used. This means you can choose durable hardwoods that will last for years, providing a stable and safe home for your valuable wines.
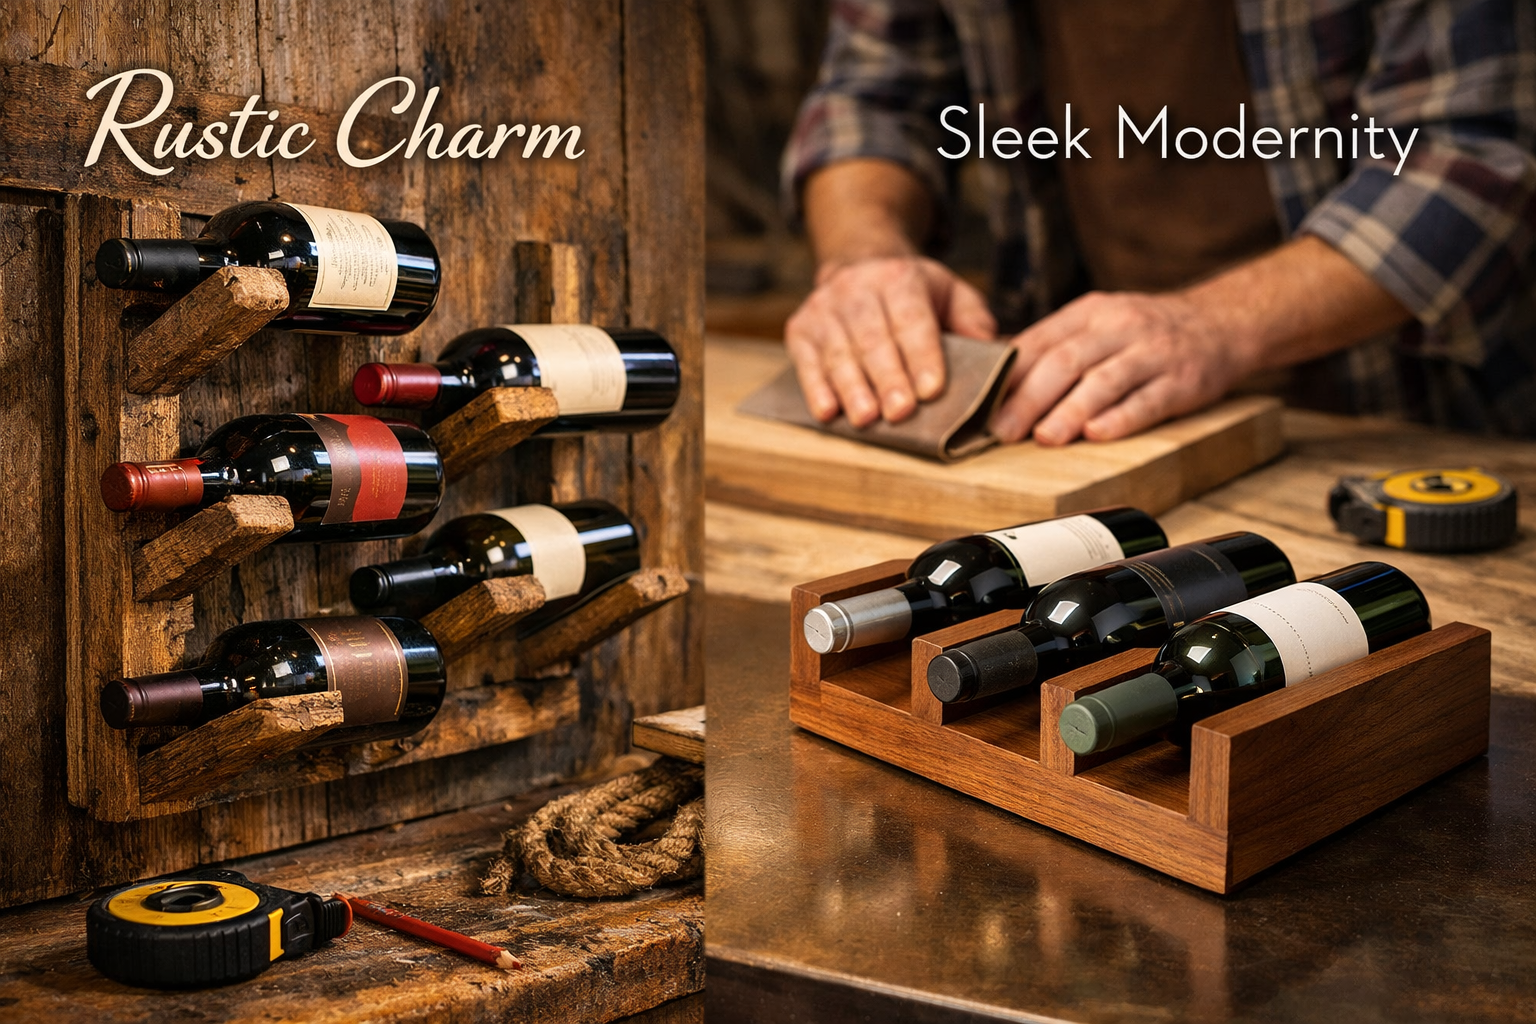
Popular Design Styles for DIY Wooden Wine Racks
The beauty of building your own lies in the freedom to explore diverse styles. Here are some of the most sought-after designs that cater to various tastes and spaces:
Rustic Wall-Mounted Racks:
- Description: These designs often feature distressed wood, visible fasteners, and a somewhat rugged aesthetic. They are excellent for saving floor space and adding character to a kitchen or dining area.
- Materials: Reclaimed barn wood, rough-sawn pine, or cedar.
- Storage: Bottles are typically stored horizontally in individual cubbies or on angled slats.
- Best For: Cozy, country, or industrial-style interiors.
Sleek Countertop Designs:
- Description: Characterized by clean lines, smooth finishes, and minimalist forms. These racks are perfect for displaying a small selection of wines in a modern kitchen or bar area.
- Materials: Maple, walnut, or birch plywood for a refined look.
- Storage: Often designed for 3-6 bottles, stored horizontally or at a slight angle.
- Best For: Contemporary, minimalist, or urban décor.
Modular & Expandable Systems:
- Description: These allow you to build individual sections that can be stacked or joined together as your wine collection grows.
- Materials: Plywood (consider 1/2 Plywood for Cabinets: Strength, Durability & Design Considerations for structural integrity) or hardwood planks.
- Storage: Highly versatile, accommodating dozens or even hundreds of bottles over time.
- Best For: Serious collectors with fluctuating inventory.
Floating Wine Shelves:
- Description: Invisible mounting hardware gives the illusion that bottles are floating on the wall. These are exceptionally modern and space-efficient.
- Materials: Solid hardwood planks (oak, maple) for strength.
- Storage: Individual bottles are often cradled in routed out sections or held by hidden pegs.
- Best For: Ultra-modern spaces where minimalism is key.
When planning your DIY wooden wine rack, consider the ambient conditions of its location. Wine should be stored in a cool, dark place with stable temperatures and humidity to preserve its quality. Ensure your design accounts for proper air circulation around bottles if storing for extended periods.
Building Your DIY Wooden Wine Rack: Step-by-Step for Beginners
Creating a beautiful and functional wine rack doesn’t require advanced woodworking skills. With the right tools, materials, and a clear plan, beginners can achieve impressive results. This section will guide you through the process, from selecting your wood to basic assembly.
Essential Tools and Materials
Before you begin, gather your supplies. For most simple DIY wine rack projects, you won’t need an elaborate workshop.
Basic Hand Tools:
- Measuring tape 📏
- Pencil
- Speed square or combination square
- Hand saw (if not using power saws)
- Clamps (essential for holding pieces during glue-up)
- Sandpaper (various grits from 80 to 220)
- Screwdriver or impact driver
Power Tools (Recommended for Efficiency and Precision):
- Miter Saw: Excellent for making accurate crosscuts for your rack components. For setup tips, check out our guide on Miter Saw Table Height: Importance, Guidelines, and Tips.
- Drill: For pilot holes and driving screws.
- Orbital Sander: Speeds up the sanding process significantly.
- Jig Saw: Useful for cutting curves or unique shapes if your design calls for them.
Materials:
- Wood: Choose a hardwood like oak, maple, poplar, or even stained hemlock for durability and aesthetic appeal. Softwoods like pine are more affordable but can be prone to dents.
- Wood Glue: High-quality wood glue for strong joints.
- Screws or Dowels: Depending on your joinery method.
- Wood Filler: To fill any gaps or imperfections.
- Finishing Supplies: Stain, paint, polyurethane, or oil (covered in the next section).
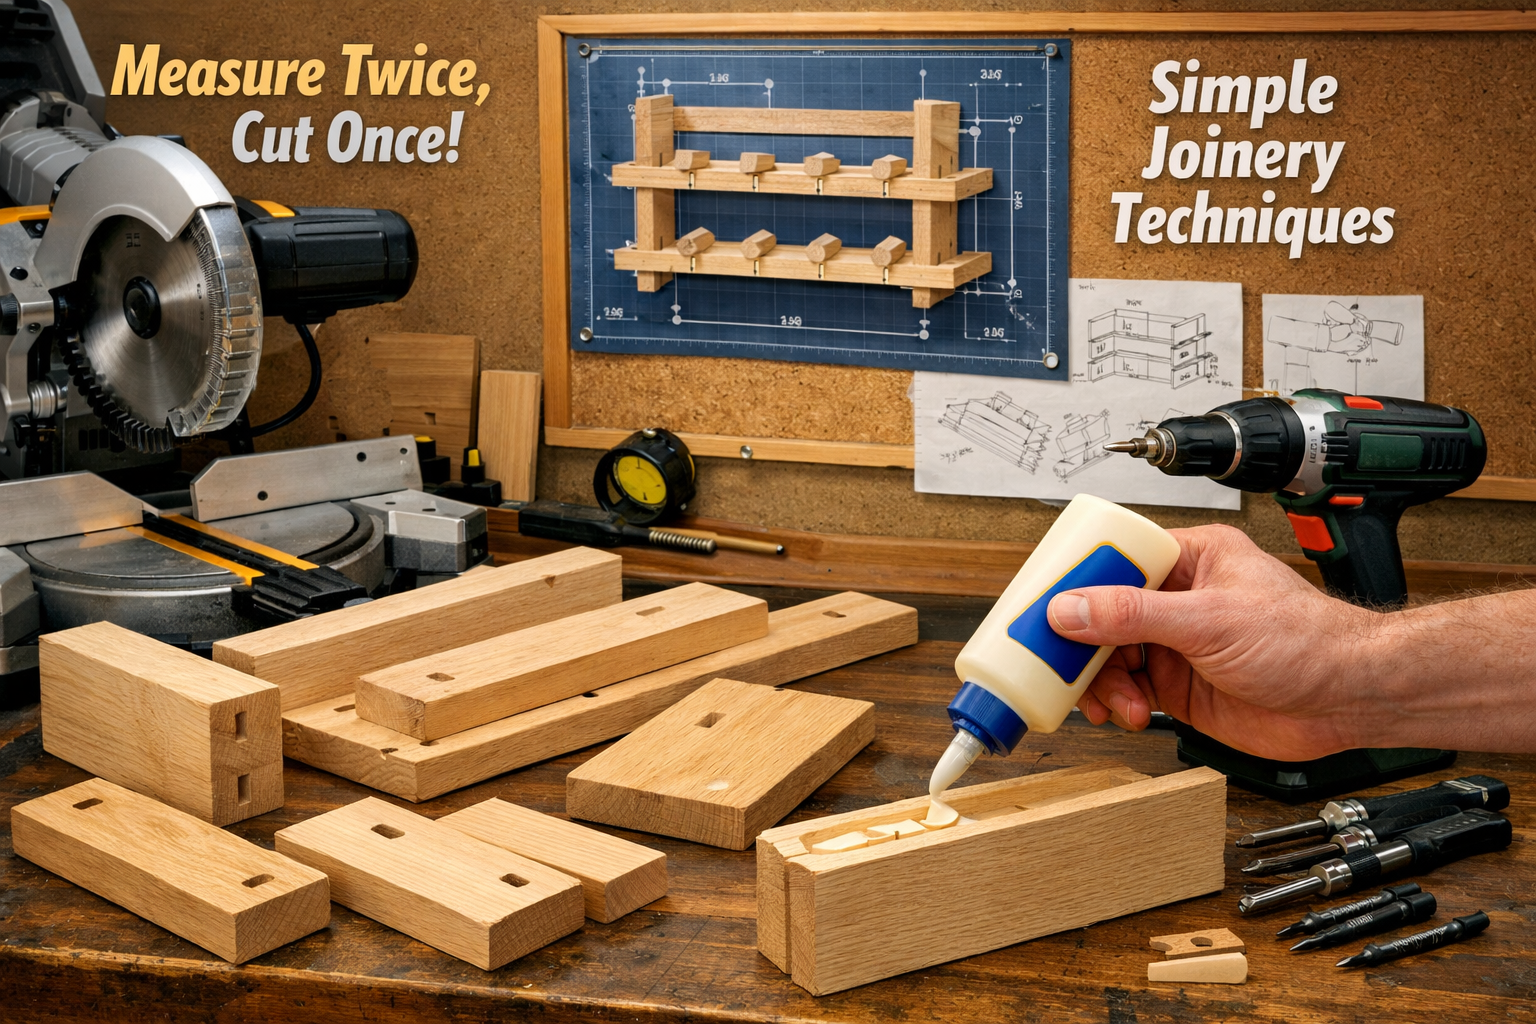
Step-by-Step Construction Guide (Example: Simple Wall-Mounted Rack)
Let’s walk through building a straightforward wall-mounted wine rack designed to hold 6-9 bottles horizontally.
Phase 1: Planning and Cutting
- Design and Measure: Sketch out your design. Decide on the number of bottles and overall dimensions. A common bottle diameter is around 3 inches, so ensure your cradles or holes are slightly larger (e.g., 3.25-3.5 inches).
- For a 6-bottle rack (two rows of three), you might need:
- 2 side pieces (e.g., 24″ x 5.5″)
- 3 horizontal shelves/supports (e.g., 12″ x 5.5″)
- 6-9 bottle cradles/dowels (length dependent on design)
- For a 6-bottle rack (two rows of three), you might need:
- Select Your Wood: Opt for straight, knot-free pieces of your chosen hardwood. For a rustic look, some imperfections can add character.
- Cut Components: Using your miter saw, carefully cut all your pieces to the exact measurements. “Measure twice, cut once” is the golden rule here.
- Pro Tip: For precise cuts, ensure your saw blade is sharp and properly aligned.
Phase 2: Joinery and Assembly
- Create Bottle Cradles/Holes:
- Method A (Drilled Holes): If using a design where bottles slide into holes, mark the center points for each bottle on your horizontal supports. Use a large Forstner bit (e.g., 3.25″ or 3.5″) in your drill press (or with extreme care using a hand drill) to bore half-round or full-round holes. Ensure the holes are deep enough to cradle the bottle securely without tipping.
- Method B (Slats/Dowels): For a simpler approach, you can create two parallel slats per bottle space, angled slightly upward to hold the bottle. Or use wooden dowels projecting from a backer board.
- Prepare Joints: For a strong rack, consider using simple joinery techniques like butt joints reinforced with screws and glue, or dado joints for shelves. Pocket hole joinery is another excellent, beginner-friendly option for strong, hidden connections.
- Dry Fit: Before applying any glue, assemble all pieces without fasteners to ensure everything fits together correctly. Make any necessary adjustments now.
- Glue and Clamp: Apply a thin, even layer of wood glue to all mating surfaces. Assemble the rack, ensuring all corners are square. Clamp the pieces tightly together and wipe away any excess glue with a damp cloth. Let the glue dry completely (refer to glue manufacturer’s instructions, typically 24 hours).
- Reinforce (Optional): Once the glue is dry, you can add screws for extra strength. Countersink the screw heads for a cleaner finish, filling the holes later with wood filler.
Phase 3: Sanding
- Rough Sanding: Begin with 80-100 grit sandpaper to remove any saw marks, glue residue, or major imperfections.
- Medium Sanding: Move to 120-150 grit to smooth the surface and prepare it for finer sanding.
- Fine Sanding: Finish with 180-220 grit sandpaper for a silky-smooth surface, essential for a professional finish. Sand with the grain of the wood. Remove all sanding dust before proceeding to finishing.
Quote: “The beauty of woodworking isn’t just in the final product, but in the journey of transforming raw material into something truly unique and functional.”
For those interested in exploring different joinery methods, our article on Unlock the Secrets of Brackets Woodworking: A Comprehensive Guide might offer some additional insights into structural support.
Finishing Your DIY Wooden Wine Rack: Achieving a Professional Look
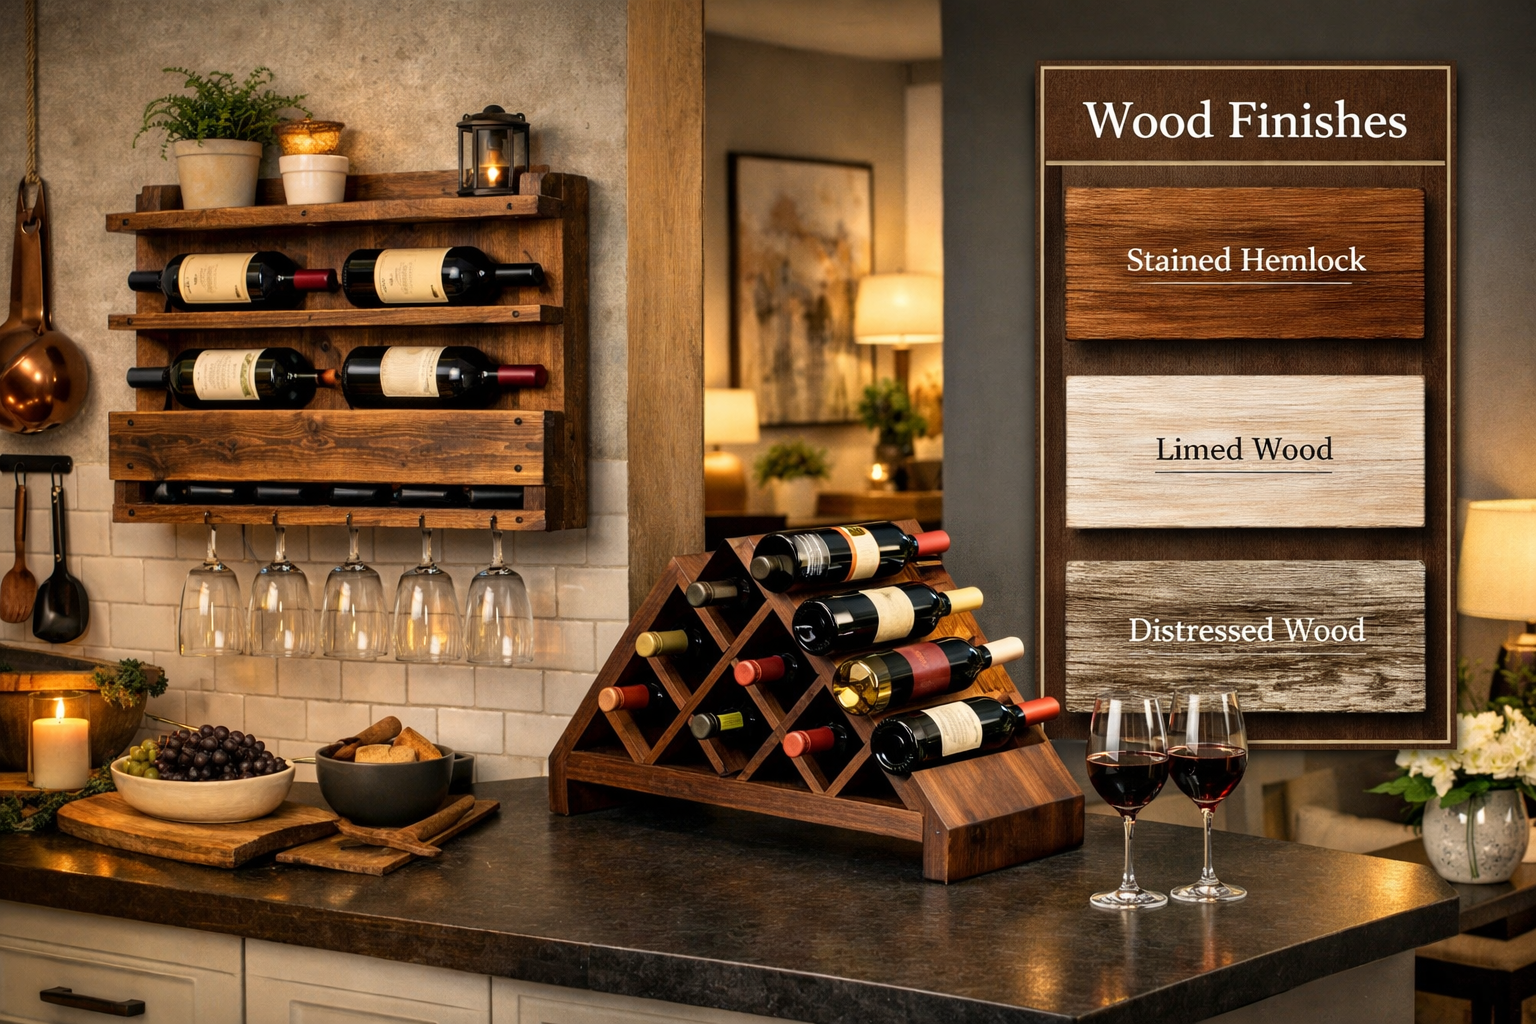
The finish you apply to your DIY wooden wine rack is crucial. It not only protects the wood from moisture, spills, and wear but also dramatically enhances its aesthetic appeal. A professional finish can transform a simple woodworking project into a piece of art that looks store-bought.
Choosing the Right Finish for Your Style
The type of finish you choose should align with your desired aesthetic and the wood species you’ve used.
For Rustic Designs:
- Wood Stain: A rich, dark stain like walnut or espresso can deepen the wood’s natural tones and accentuate grain patterns. Consider Stained Hemlock Wood: Basics, Process, Types, and More for specific guidance on staining.
- Distressed Finish: Techniques that intentionally age the wood, such as wire brushing, sanding through paint layers, or applying a wash. Learn more about distressed wood finishing techniques to achieve this look.
- Wax or Oil: For a more natural, subtle finish that allows the wood’s texture to shine through, a paste wax or tung oil can be excellent.
For Sleek & Modern Designs:
- Clear Coat (Polyurethane, Lacquer, Shellac): These finishes offer excellent protection while letting the natural beauty of the wood’s grain and color show through. Polyurethane is very durable and comes in various sheens (matte, satin, gloss).
- Paint: For a truly contemporary or minimalist look, painting your rack a solid color (e.g., black, white, gray, or a bold accent color) can make a striking statement.
- Ebonized Wood: For an ultra-sleek, dramatic look, ebonizing wood creates a deep black finish. While beautiful, always consider if the finish is safe for its intended use, as discussed in Is Ebonized Wood Food Safe? Expert Recommendations.
For Unique Effects:
- Explore cool wood finishing techniques or unique wood finishing techniques for ideas like liming wax, Shou Sugi Ban (charred wood), or even metallic accents.
- If you’re interested in mimicking other wood types, faux wood finishing techniques can open up creative possibilities.
Application Techniques for a Flawless Finish
No matter which finish you choose, proper application is key to a professional result.
Prepare the Surface (Crucial!):
- Ensure your rack is completely clean and dust-free after sanding. Use a tack cloth or a vacuum cleaner with a brush attachment.
- For open-grain woods (like oak), a pre-stain conditioner can help achieve a more even stain absorption and prevent blotchiness.
Stain/Paint Application:
- Apply stain with a clean cloth or foam brush, wiping off excess according to manufacturer instructions. Work in sections, applying with the grain.
- For paint, use a high-quality brush or roller. Multiple thin coats are always better than one thick coat to prevent drips and ensure even coverage. Lightly sand with 220-grit sandpaper between coats for adhesion.
Topcoat Application (Polyurethane, Lacquer, Oil):
- Polyurethane: Apply with a quality natural-bristle brush (for oil-based) or synthetic brush (for water-based). Apply thin, even coats, brushing with the grain. Allow adequate drying time between coats (check manufacturer’s label). Lightly sand with 220-400 grit sandpaper between coats to ensure good adhesion and a smooth finish, then wipe clean with a tack cloth. Typically, 2-3 coats are recommended.
- Oil Finishes (e.g., Tung Oil, Linseed Oil): Apply generously, allow it to penetrate for a specified time, then wipe off all excess. Repeat multiple times for deeper protection and sheen.
- Spray Finishes: For a very smooth, factory-like finish, consider spray polyurethane. This can be more challenging for beginners to apply evenly but yields excellent results.
| Finish Type | Key Benefit | Application Method | Best For |
|---|---|---|---|
| Wood Stain | Enhances natural grain, alters wood color | Wipe-on, brush | Rustic, traditional, enhancing natural wood |
| Clear Polyurethane | Durable protection, preserves natural look | Brush, spray | Modern, sleek, high-traffic areas |
| Paint | Opaque color, versatile aesthetic | Brush, roller, spray | Contemporary, bold statements, hiding flaws |
| Distressing | Aged, weathered appearance | Various techniques (sanding, brushing) | Farmhouse, vintage, rustic |
| Wax/Oil | Natural feel, easy to repair, subtle sheen | Wipe-on | Natural, artisanal, less durable protection |
After your final coat has dried and cured (this can take several days to weeks depending on the finish), your DIY wooden wine rack is ready for display and use. Congratulations on creating a functional and beautiful piece for your wine collection!
Conclusion
Embarking on the journey to build your own DIY Wooden Wine Racks: From Rustic Wall-Mounts to Sleek Countertop Designs for Wine Lovers is a deeply rewarding experience. From the initial spark of an idea to the final brushstroke of a perfect finish, each step allows you to infuse your personal style and craftsmanship into a functional piece of art. We’ve explored the compelling reasons to choose DIY, from cost savings and perfect customization to the sheer satisfaction of creation. We’ve also walked through the step-by-step process, equipping you with the knowledge to select materials, master basic joinery, and apply a professional-grade finish.
Whether you’re a seasoned woodworker or a curious beginner, the accessible nature of these projects means that a stunning, bespoke wine rack is well within your reach in 2026. Imagine proudly showcasing your wine collection in a rack you built yourself—a true conversation starter and a testament to your creativity.

Actionable Next Steps
- Choose Your Design: Browse inspiration online, sketch out your ideas, and decide whether a rustic wall-mount, a sleek countertop, or a modular system best fits your needs and space.
- Gather Your Tools & Materials: Make a shopping list based on your chosen design and budget. Visit your local hardware store or lumberyard for quality hardwoods.
- Start Small: If you’re new to woodworking, consider beginning with a smaller, simpler countertop design to build confidence before tackling a larger wall-mounted unit.
- Embrace the Process: Don’t be afraid to make mistakes—they are part of the learning curve. Take your time, enjoy the crafting, and remember that imperfections can often add character to a handmade piece.
- Share Your Creation: Once complete, proudly display your DIY wooden wine rack and enjoy the fruits of your labor with a perfectly stored bottle of wine! 🍷
