


The allure of live edge furniture lies in its ability to bring the raw, organic beauty of nature directly into our living spaces. Each slab tells a unique story, characterized by its distinctive grain, natural edges, and often fascinating imperfections. However, transforming a rough, raw piece of timber into a stunning, durable table or island surface is a complex process demanding expertise in Live Edge Slab Selection and Milling: From Raw Wood to Finished Surfaces for Tables and Islands. This comprehensive guide delves into the technical nuances of selecting the perfect slab, the precision involved in milling, and the critical steps to achieve a professional, lasting finish.
Understanding the journey from a felled tree to a show-stopping furniture piece is essential for anyone looking to undertake a live edge project in 2026. This process ensures not only aesthetic appeal but also the structural integrity and longevity of the final product.

Key Takeaways
- Careful Slab Selection is Paramount: Prioritize species suitability, natural character, structural integrity (checking for cracks, rot), and proper drying for a successful project.
- Milling Requires Precision and Safety: Utilize appropriate tools like chainsaw mills, band saws, or router sleds for flattening and dimensioning, always emphasizing safety and accurate cuts.
- Drying is Non-Negotiable: Air-drying followed by kiln-drying is crucial to prevent warping, cracking, and movement in the finished piece, ensuring long-term stability.
- Finishing Enhances Beauty and Durability: Proper surface preparation, bark preservation, void filling (e.g., epoxy), and applying a high-quality, durable finish are essential for aesthetic appeal and protection.
- Durability and Maintenance: Consider the intended use (e.g., high-traffic kitchen island) when choosing finishes and understand ongoing care to preserve the surface.
The Art of Live Edge Slab Selection: Choosing Your Foundation 🌳
The journey to a magnificent live edge table or island begins long before any cuts are made—it starts with the discerning selection of the raw wood slab itself. This initial stage dictates the character, stability, and ultimately, the success of your project. Disregarding critical factors here can lead to significant issues down the line, from warping and cracking to premature wear. For a general overview of the entire process, consider exploring “Live Edge Wood Slabs: Forest to Finished Furniture | 2026 Gu” for broader context.
Understanding Wood Species and Characteristics
Different wood species offer distinct aesthetics and working properties. When engaging in Live Edge Slab Selection and Milling: From Raw Wood to Finished Surfaces for Tables and Islands, consider:
- Walnut (Black Walnut): Highly prized for its rich, dark brown color, beautiful grain patterns, and excellent workability. It’s dense and stable, making it ideal for high-end furniture.
- Maple (Hard Maple, Ambrosia Maple): Known for its light color, fine grain, and impressive hardness. Ambrosia maple, with its unique streaking from ambrosia beetle activity, offers distinctive visual appeal.
- Oak (White Oak, Red Oak): Durable and strong with prominent, open grain. White oak is particularly resistant to moisture, making it suitable for kitchen islands.
- Cherry: Features a beautiful reddish-brown hue that deepens with age. It has a finer, more subdued grain compared to oak.
- Cypress/Redwood: Often chosen for their natural resistance to decay and insect infestation, especially for outdoor or semi-outdoor applications, though less common for indoor dining tables due to softness.
For more detailed information on species selection, check out “Premium Wood Selection for 2026 Projects: Walnut, Cherry, an”.
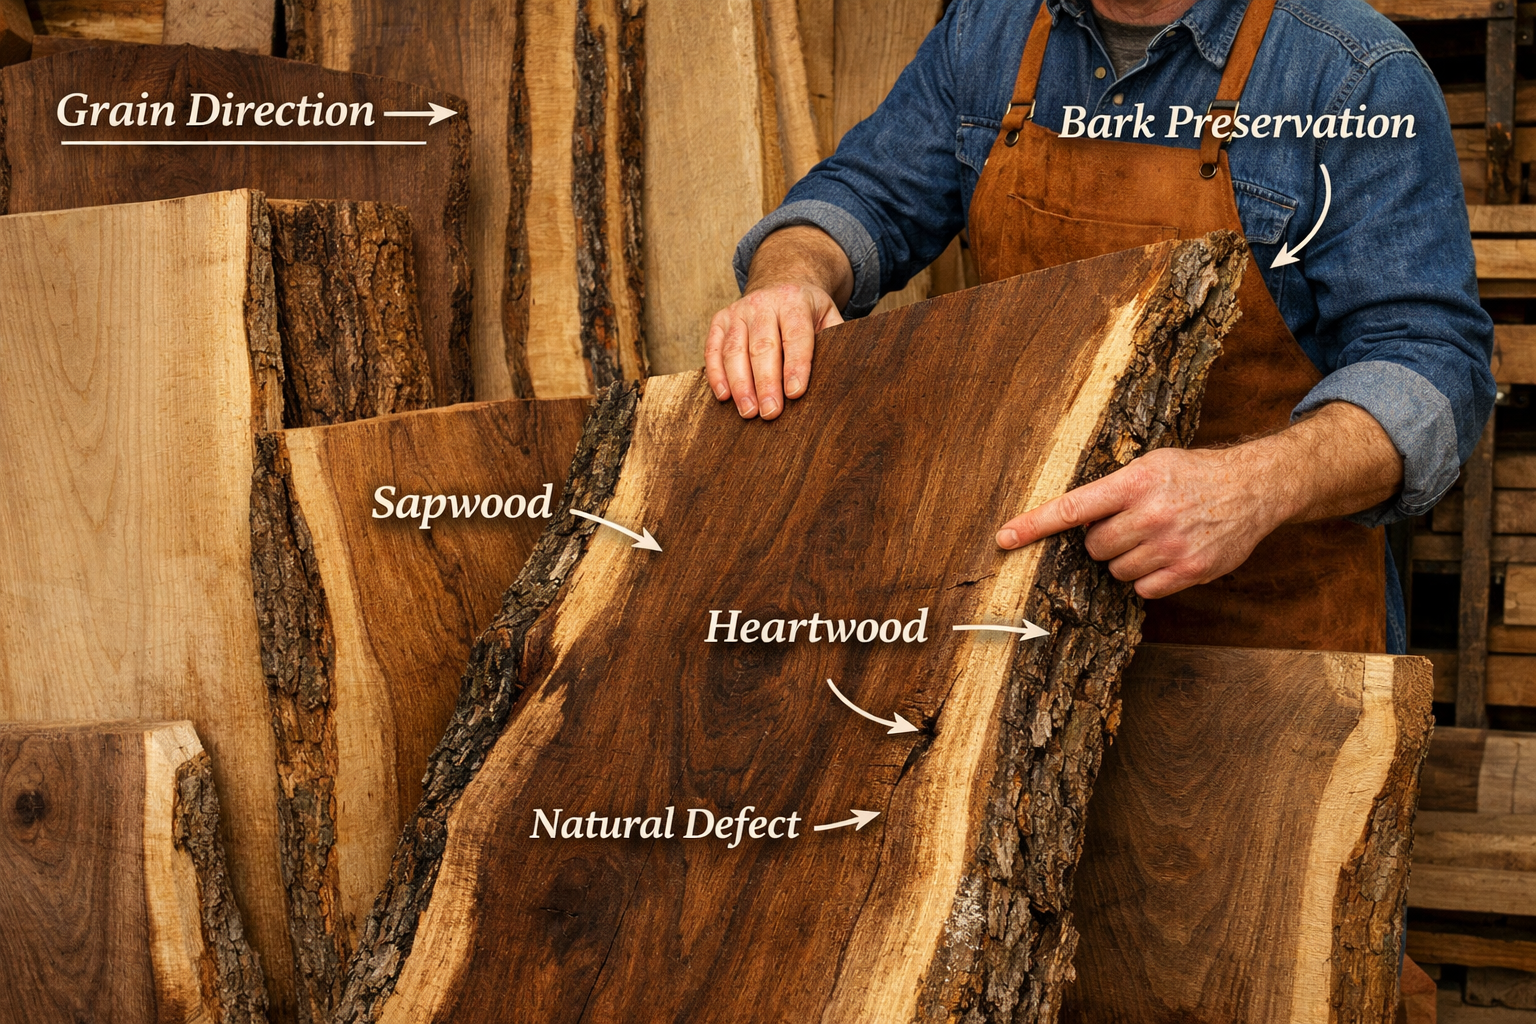
Assessing the Raw Slab: What to Look For
When examining a raw live edge slab, a meticulous inspection is crucial:
- Moisture Content (MC): This is perhaps the most critical factor. Raw slabs must be dried to an appropriate MC, typically 6-8% for interior furniture. High MC will lead to warping, cracking, and movement as the wood dries in your home. A moisture meter is indispensable.
- Grain Direction and Stability: Observe the grain. Straight, consistent grain generally indicates more stability. Areas with wild, swirling grain (burl, crotch wood) are beautiful but can be prone to movement and cracking during drying and milling.
- Presence of Defects:
- Cracks and Checks: Small surface checks are common but deep cracks running through the slab can compromise structural integrity. These may need epoxy filling or bracing.
- Voids and Pith: Large voids are often filled with epoxy to create stunning river tables or natural inclusions. The pith (center of the tree) is highly unstable and should ideally be avoided or carefully considered.
- Rot and Insect Damage: Avoid slabs with significant rot. Minor insect trails (like those in Ambrosia Maple) can add character but ensure the insects are no longer active.
- Bark Integrity: For a true “live edge,” the bark is a key feature. Assess if the bark is well-adhered or loose. Loose bark will need to be removed to prevent future detachment. Stable bark can be preserved and sealed.
- Dimensions and Thickness: Ensure the slab is sufficiently thick for its intended use (e.g., 2-3 inches for a substantial table or island). Consider its length and width relative to your project dimensions, allowing for trimming and flattening.
“The selection of the raw slab is not just about aesthetics; it’s about predicting the wood’s behavior and ensuring long-term stability. A stunning piece of wood chosen poorly can become a source of endless frustration.”
Precision Milling and Drying: Shaping the Slab 📏
Once the ideal slab is selected, the next phase involves transforming the rough timber into a workable, flat surface. This process of milling and drying is where precision, patience, and proper technique are paramount in Live Edge Slab Selection and Milling: From Raw Wood to Finished Surfaces for Tables and Islands.
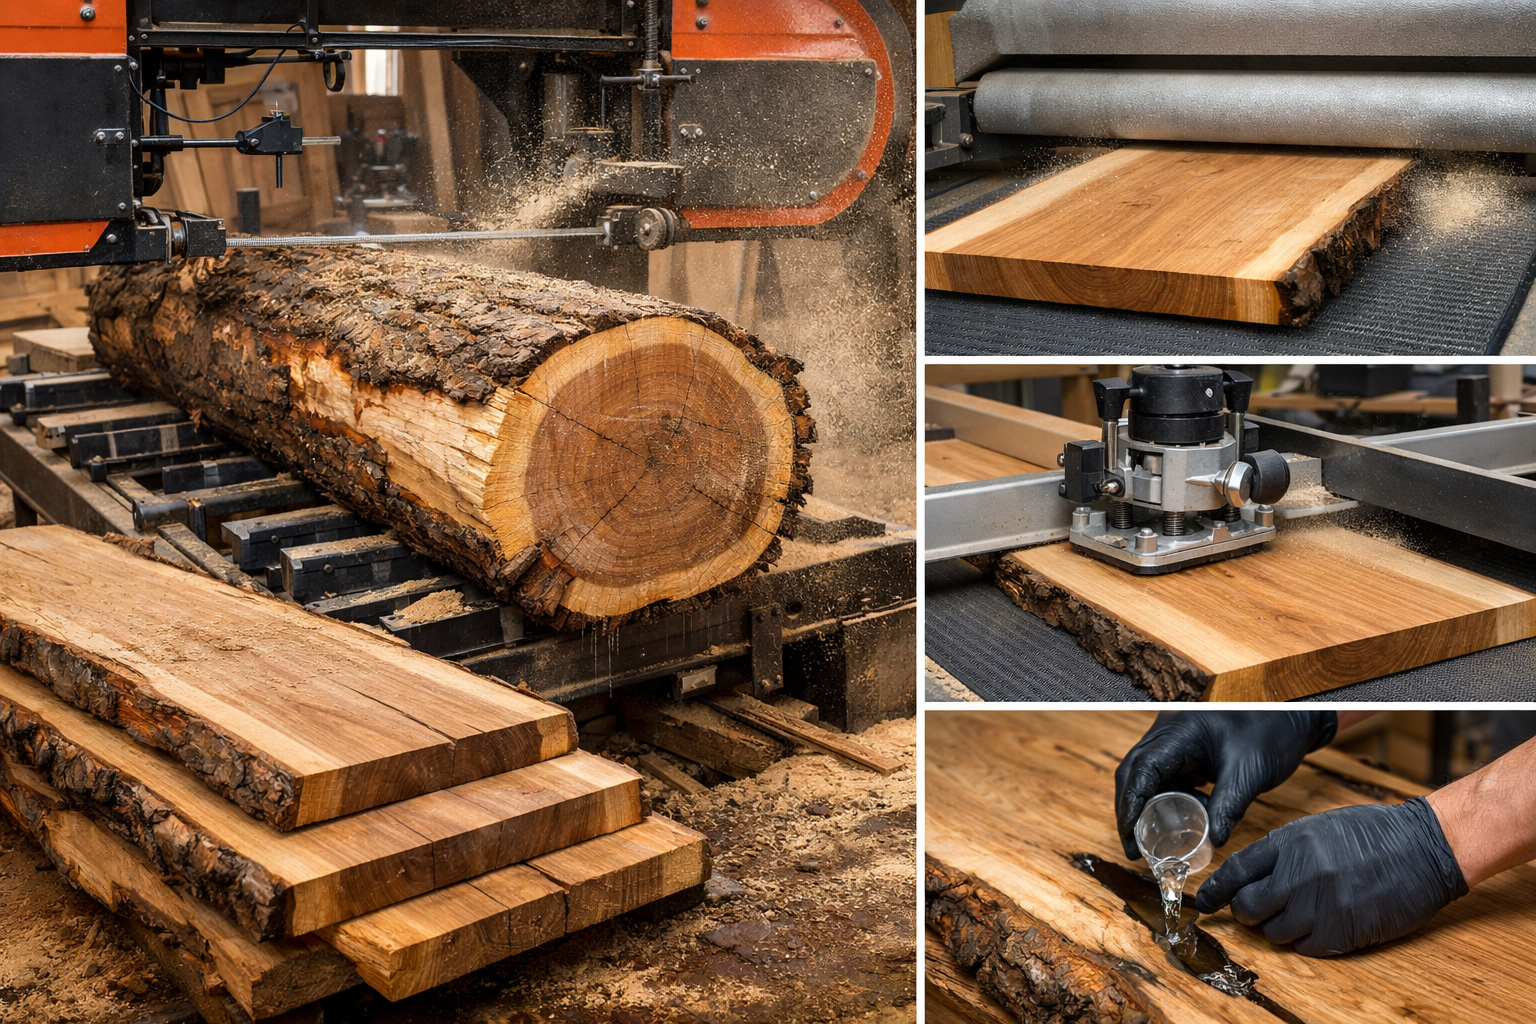
Initial Milling: From Log to Slab
If starting from a log, the first step is often to use a chainsaw mill or a large band saw to cut the log into slabs of desired thickness. This requires careful planning to maximize yield and highlight the wood’s natural features.
Flattening and Dimensioning
Raw slabs, even those professionally cut, will rarely be perfectly flat. They often exhibit twists, bows, and cups due to internal wood stresses and drying. Achieving a perfectly flat surface is critical for a stable and functional table or island.
Here are common methods for flattening:
- Router Sled: This is a popular and effective method for individual woodworkers. A large router is mounted to a sled that runs on rails, allowing it to systematically plane down the high spots of the slab. This requires careful setup to ensure accuracy.
- Wide Belt Sander: For larger shops, a wide belt sander can flatten slabs efficiently. These machines are costly but offer exceptional speed and precision.
- Jointer and Planer (for smaller slabs or jointed edges): While not typically used for full slab flattening, a jointer is essential for creating a straight edge if you plan to join multiple slabs or refine a single edge. A thickness planer can then bring down the thickness of narrower pieces evenly.
- Hand Planing (for traditionalists): Skilled woodworkers can flatten slabs using hand planes, a labor-intensive but deeply satisfying method that connects the artisan directly to the wood.
After flattening, the slab can be dimensioned to its final length and width. This often involves squaring one edge (while preserving the live edge on the other) and trimming the ends.
The Critical Role of Drying
Proper drying is perhaps the most overlooked yet most critical step. Wood, being a hygroscopic material, constantly exchanges moisture with its environment. If a slab is not dried correctly, it will continue to move and crack after it’s been made into furniture, leading to catastrophic failure.
The ideal process often involves:
- Air-Drying: Slabs are stacked with spacers (stickers) to allow air circulation. This slow, natural process can take years (roughly one year per inch of thickness for hardwoods). It’s crucial to seal the end grain to prevent rapid moisture loss, which causes severe checking.
- Kiln-Drying: After air-drying to around 15-20% MC, slabs are often moved to a kiln. Kiln-drying accelerates the process and brings the MC down to the stable 6-8% range required for indoor furniture. It also sterilizes the wood, killing any remaining insects or fungi.
Table: Importance of Moisture Content
| Moisture Content (MC) Range | Condition | Implications for Furniture |
|---|---|---|
| >20% | Green/Wet | High risk of warping, cracking, fungal growth. Unsuitable for furniture. |
| 10-20% | Air-Dried | Still prone to movement indoors. Needs further drying. |
| 6-8% | Kiln-Dried/Equilibrium MC | Stable for indoor use. Minimal movement expected. Ideal for furniture. |
| <5% | Over-Dried | Can become brittle, absorb moisture too quickly, and still move. |
Achieving this low moisture content is non-negotiable for producing high-quality, stable live edge furniture. For DIY enthusiasts looking to build a stable workspace, considering “The ultimate guide to wooden work tables: choosing, building, and maintaining your perfect workspace 🛠️” might provide useful insights into structural stability.

Finishing and Durability: Bringing the Slab to Life ✨
With the slab selected, milled, and dried, the focus shifts to bringing out its inherent beauty and ensuring its longevity. This involves careful surface preparation, thoughtful bark preservation, expert void filling, and the application of a durable finish, all essential elements of Live Edge Slab Selection and Milling: From Raw Wood to Finished Surfaces for Tables and Islands.
Surface Preparation
Before any finish is applied, the slab needs meticulous preparation:
- Sanding: Start with a coarse grit (e.g., 80-100 grit) to remove milling marks and gradually move to finer grits (e.g., 180-220 grit) for a smooth, even surface. Ensure all sanding marks from previous grits are removed before moving to the next.
- Dust Removal: Thoroughly clean the surface with compressed air or a tack cloth after each sanding stage to remove all dust, which can contaminate the finish.
- Water Pop (Optional): Lightly dampen the surface with water, let it dry, then do a final light sanding with the finest grit. This raises wood fibers that might cause a rough feel after the finish is applied.
Bark Preservation
If the slab has stable bark, preserving it adds to the live edge aesthetic.
- Cleaning: Carefully remove any loose debris, dirt, or insect remnants from the bark. A wire brush can be useful.
- Stabilizing: Apply a penetrating finish, like a thin epoxy or a hardening oil, to the bark to stabilize it and prevent future flaking. Ensure good adhesion without obscuring the natural texture. If the bark is too loose or compromised, it’s often best to remove it and sand the natural cambium layer smooth.
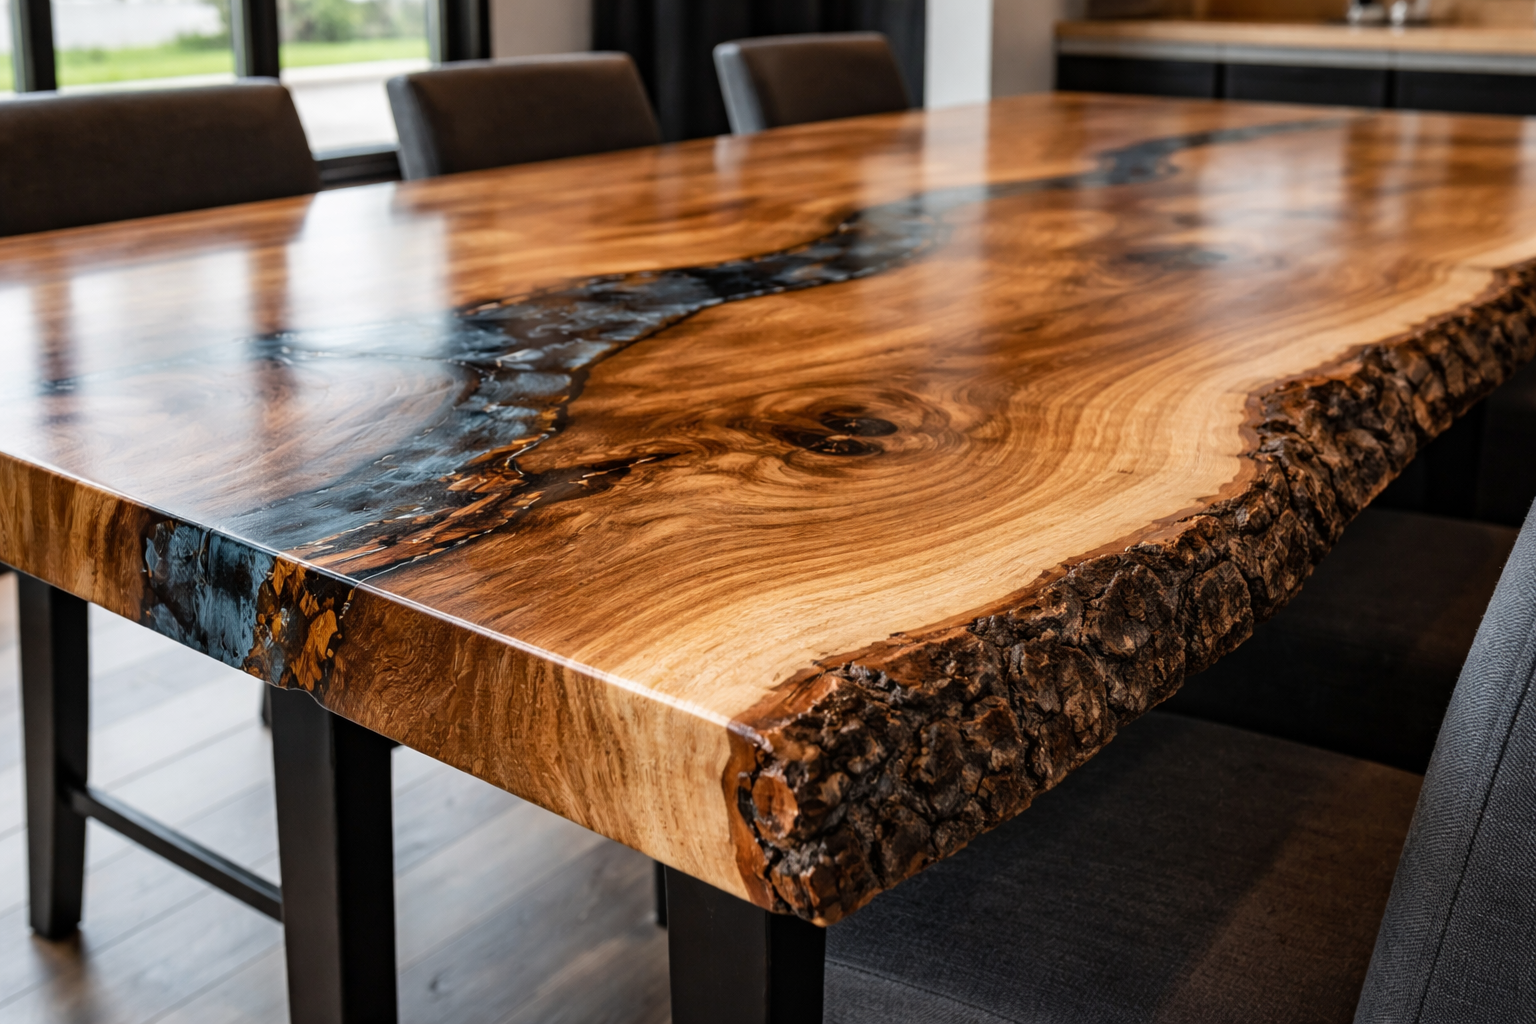
Void Filling and Epoxy Work
Many live edge slabs feature natural voids, cracks, or checks that can be filled to create a smooth, functional surface while highlighting the wood’s unique character.
- Epoxy Resin: Two-part epoxy resin is the most common material for filling voids.
- Preparation: Clean the void thoroughly. Tape off the underside to prevent leaks.
- Mixing: Mix the epoxy carefully according to manufacturer instructions, ensuring correct ratios. Add pigments if desired.
- Pouring: Pour the epoxy slowly into the void, allowing it to self-level. Multiple pours may be necessary for deep voids. Use a heat gun or torch to remove bubbles.
- Curing and Finishing: Allow ample time for the epoxy to cure fully. Once cured, it can be sanded flush with the wood surface. For more on this, see “Live Edge Wood Projects: From Design to Execution for Home C”.
Selecting and Applying a Durable Finish
The choice of finish is crucial, especially for high-traffic surfaces like dining tables and kitchen islands. It must protect the wood, enhance its beauty, and withstand daily use.
- Polyurethane: A highly durable, synthetic finish available in oil-based or water-based formulas. It provides excellent protection against scratches, moisture, and heat. Water-based polyurethanes are clear and low-VOC, while oil-based versions impart a slight amber tone. For detailed insights into polyurethane, refer to https://woodcraftwiz.com/best-polyurethane-for-live-edge-wood-a-comprehensive-guide/.
- Varnish: Offers good durability and moisture resistance. Marine varnishes are particularly robust.
- Conversion Varnish: A professional-grade, extremely durable finish, often used in commercial applications. Requires specialized equipment and ventilation. For troubleshooting, see https://woodcraftwiz.com/troubleshooting-sherwin-williams-conversion-varnish-problems/.
- Hardwax Oils (e.g., Osmo, Rubio Monocoat): These finishes penetrate the wood, offering a more natural look and feel while providing good protection. They are often repairable in sections, unlike film-building finishes.
- Oil Finishes (e.g., Tung Oil, Linseed Oil): Penetrating oils enhance the natural color and grain but offer less surface protection than film-building finishes. They require more frequent reapplication.
Application Techniques:
- Apply finishes in a dust-free environment.
- Follow manufacturer instructions for cure times between coats.
- Apply multiple thin coats rather than one thick coat for better durability and appearance.
- For optimal results, consider spraying water-based polyurethane. See https://woodcraftwiz.com/spraying-water-based-poly-benefits-techniques-and-tips/.
- Slightly scuff sand (e.g., with 320-400 grit) between coats for better adhesion, especially with film-building finishes.
Maintenance for Longevity
Even the most durable finish requires maintenance. Advise clients on:
- Cleaning: Use mild soap and water or specialized wood cleaner. Avoid harsh chemicals.
- Protection: Use coasters, trivets, and placemats, especially for hot items or liquids.
- Reapplication: Depending on the finish and usage, reapplication may be needed every few years (for oils) or longer (for film finishes).
Conclusion
The creation of a live edge slab table or island is a deeply rewarding process, bridging the raw beauty of nature with refined craftsmanship. From the initial, meticulous Live Edge Slab Selection and Milling: From Raw Wood to Finished Surfaces for Tables and Islands to the precise milling, careful drying, and artful finishing, each step is critical to developing a piece that is not only visually stunning but also structurally sound and durable for years to come.
By understanding the unique characteristics of different wood species, diligently assessing slab quality, mastering flattening and drying techniques, and expertly applying protective finishes, woodworkers can transform rough timber into heirloom-quality furniture. As you embark on your own live edge projects in 2026, remember that patience, attention to detail, and a respect for the material are your greatest tools. The result will be a truly unique surface that brings warmth, character, and a touch of the wild into any home.
Actionable Next Steps:
- Invest in Quality Slabs: Prioritize properly dried slabs from reputable suppliers to avoid future issues.
- Master Flattening Techniques: Practice with a router sled or invest in professional milling services for perfectly flat surfaces.
- Choose the Right Finish: Select a finish that matches the intended use and desired aesthetic for optimal durability and appearance.
- Educate on Maintenance: Provide clear care instructions to ensure the longevity and beauty of the finished live edge piece.
