


Unlock the full potential of your router table with advanced techniques for creating complex joinery, custom molding profiles, and intricate details that elevate your woodworking projects. While many woodworkers start with simple edge treatments, the router table is a powerhouse capable of far more. This comprehensive guide will take you beyond the basics, helping you achieve a new level of precision and artistry in your craft in 2026. Mastering the router table means transforming raw stock into sophisticated components, essential for high-quality furniture, cabinetry, and decorative items.
Key Takeaways

- Precision Joinery: The router table excels at creating strong, accurate, and repeatable joints like dadoes, rabbets, cope and stick, and mortise and tenon.
- Custom Profiles: With the right bits and techniques, you can design and produce unique molding, trim, and decorative edges for bespoke projects.
- Advanced Jigging: Specialized jigs and sleds are crucial for safely and accurately cutting complex shapes and joinery that handheld routers cannot achieve.
- Optimal Setup & Safety: Proper fence alignment, bit selection, feed direction, and safety practices are paramount for achieving professional results and preventing accidents.
- Versatility: The router table’s ability to create both functional joinery and aesthetic profiles makes it an indispensable tool for advanced woodworking.
Elevating Your Joinery with Router Table Precision
The router table is a formidable tool for joinery, offering unmatched precision and repeatability compared to a handheld router. Beyond simple dadoes and rabbets, it enables the creation of interlocking joints that are both strong and aesthetically pleasing. Achieving this requires understanding advanced setups and bit selections.
Advanced Joinery Techniques and Their Applications
Moving past basic slots, consider the following techniques to significantly upgrade your joinery:
- Cope and Stick Joints: These are fundamental for frame-and-panel construction, commonly used in cabinet doors. A specialized cope and stick bit set allows for creating perfectly matching profiles on the rails and stiles, ensuring a tight, professional fit. This technique is invaluable when building custom kitchen cabinetry or furniture. For those looking to dive deeper into cabinet construction, exploring techniques for Mastering Dovetail Drawers for Cabinets: Hand-Cut and Router can further enhance your projects.
- Lock Miter Joints: A fantastic alternative to traditional miter joints, the lock miter bit creates an interlocking profile that offers significantly increased gluing surface area and automatic alignment. This results in much stronger and easier-to-assemble mitered corners, perfect for boxes, columns, or larger carcases.
- Mortise and Tenon Joints: While often associated with traditional hand tools, the router table can produce incredibly accurate mortise and tenon joints, especially when paired with a mortising jig or a dedicated tenoning jig. This is excellent for creating robust furniture frames or door constructions.
- Finger Joints (Box Joints): These attractive and strong joints are a hallmark of fine box construction. Using a dedicated box joint jig with your router table allows for consistent, perfectly spaced fingers, resulting in beautiful and durable assemblies.
Key Considerations for Precision Joinery:
- Router Bit Quality: Invest in high-quality carbide bits. Sharp, well-balanced bits reduce tear-out and ensure clean, accurate cuts.
- Fence Accuracy: A straight, precisely aligned fence is non-negotiable. Any deviation will translate directly to your joints. Consider upgrading to a micro-adjustable fence for ultimate control.
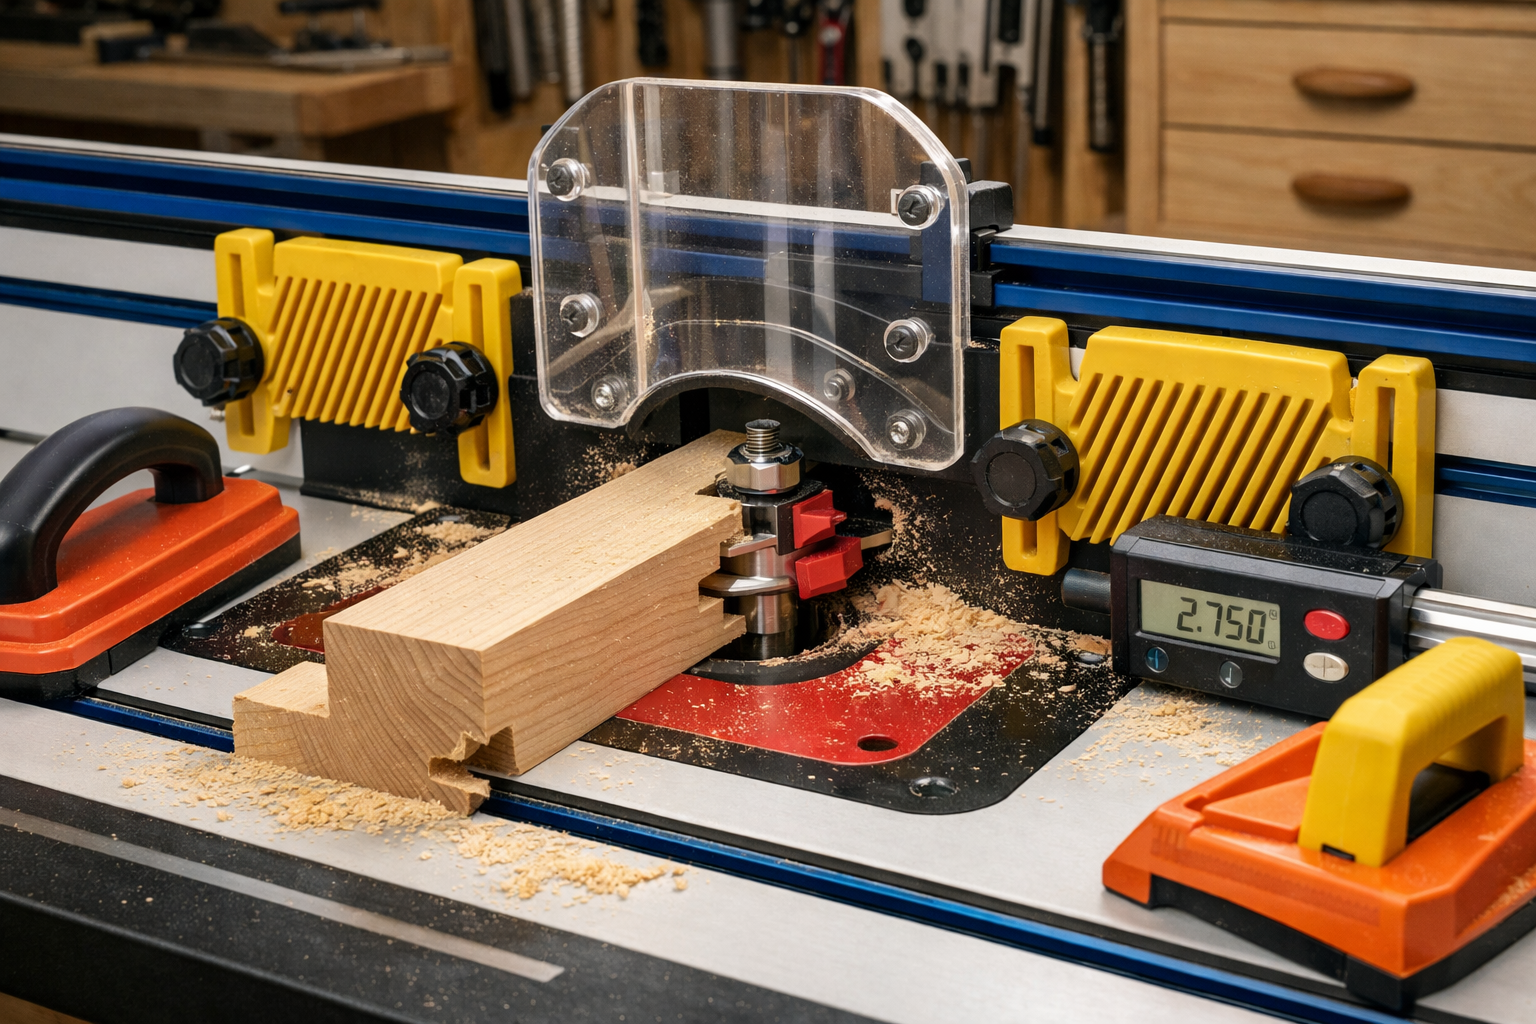
- Featherboards and Hold-downs: These accessories are critical for maintaining consistent pressure on the workpiece against the fence and table, preventing chatter and ensuring uniform cuts.
- Test Cuts: Always perform test cuts on scrap material of the same thickness and species before cutting your final pieces. This allows for fine-tuning fence and bit height settings.
| Joinery Type | Router Bit(s) Needed | Common Applications | Advantages |
|---|---|---|---|
| Cope & Stick | Matched Pair (Cope & Stick Set) | Cabinet doors, frame-and-panel | Strong, decorative, easy alignment |
| Lock Miter | Single Lock Miter Bit | Boxes, columns, mitered carcases | High glue surface, self-aligning, strong |
| Mortise & Tenon | Straight Bit (with jig) | Furniture frames, doors | Very strong, traditional aesthetic |
| Finger (Box) Join | Straight Bit (with box joint jig) | Drawers, boxes, decorative casework | Strong, attractive, easy to cut with jig |
Enhancing Stability and Control
For truly precise joinery with a router table, enhancing workpiece stability and control is crucial. This often involves using specialized jigs and fixtures.
- Sliding Sleds: A simple crosscut sled, adapted for the router table, can be invaluable for cutting tenons or the cheeks of a box joint. This provides better support and keeps the workpiece square to the bit.
- Precision Mitre Gauges: While a table saw excels at miters, a well-tuned mitre gauge on your router table can handle smaller, more delicate mitered cuts for trim or small boxes with excellent accuracy.
- Stop Blocks: For repeatable cuts, especially for mortises or tenons of identical length, stop blocks clamped to your fence are indispensable.
“The difference between good and great woodworking often lies in the precision of the joints. A well-tuned router table is a craftsman’s secret weapon for achieving that greatness.”
Crafting Custom Molding and Decorative Profiles
The router table’s ability to shape wood goes far beyond simple round-overs or chamfers. With an expansive array of router bits, it becomes a miniature molding machine, allowing you to create unique profiles for virtually any project. This is where Mastering the Router Table: Beyond Basic Edges for Precision Joinery and Custom Profiles truly shines, enabling bespoke designs that set your work apart.
Expanding Your Bit Collection for Bespoke Designs
To unlock the world of custom profiles, you’ll need to venture beyond the basic bit sets. Here’s a look at specialized bits that can transform your projects:
- Classical & Ogee Bits: These bits create elegant, flowing curves often seen in traditional architecture and furniture. They are perfect for chair rails, crown molding, or decorative edge treatments on tabletops.
- Cove & Roman Ogee Bits: Coves create concave curves, while Roman Ogees combine a cove and a round-over, offering a sophisticated S-curve profile. These are excellent for baseboards, picture frames, or custom door trim. Consider using them for projects like Mastering Wooden Napkin Holders: Foldable Designs with Brass to add a refined touch.
- Fluting & Reeding Bits: These bits create parallel decorative grooves (fluting) or ridges (reeding) on a workpiece. Often used on columns, pilasters, or furniture legs, they add texture and visual interest.
- Panel Raising Bits: Specifically designed for frame-and-panel construction, these large bits create the decorative profile on the edge of a solid wood panel, allowing it to fit into the groove of the frame.
- Stair Nosing & Handrail Bits: For more ambitious projects, specialized bits exist to create the precise profiles needed for stair treads, nosings, and handrails, ensuring safety and beauty.
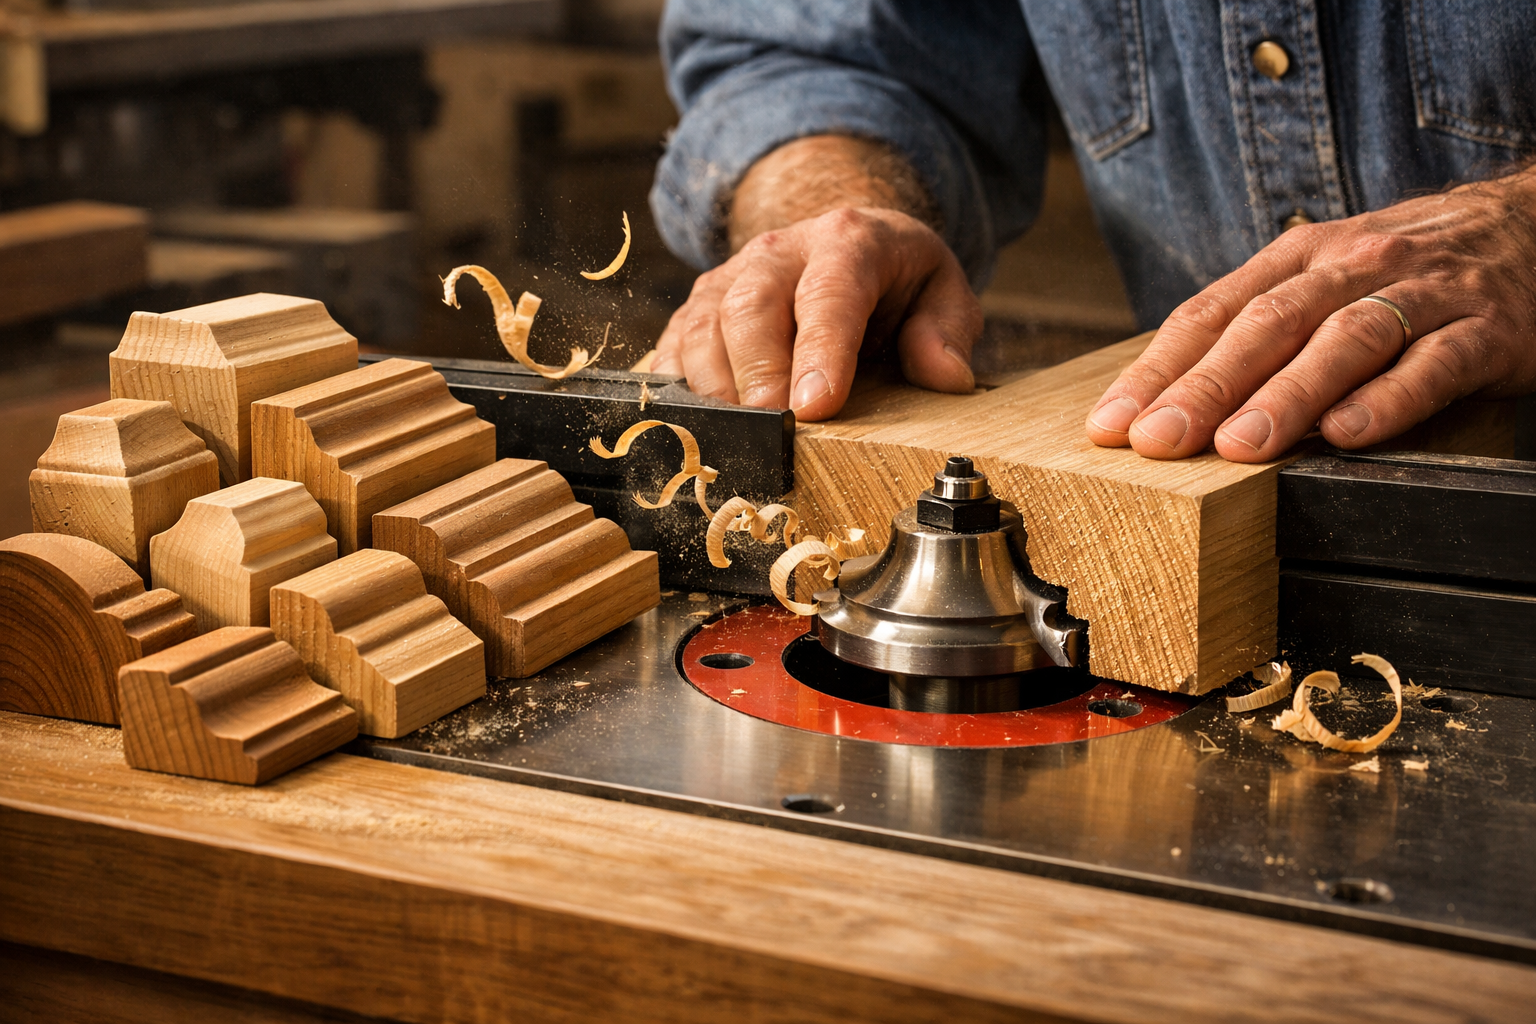
Tips for Working with Profile Bits:
- Multiple Passes: Especially with larger profile bits or harder woods, take several shallow passes instead of one deep cut. This reduces strain on the router, minimizes tear-out, and results in a cleaner finish.
- Feed Rate: Maintain a consistent, moderate feed rate. Too fast and you risk tear-out or a rough finish; too slow and you might burn the wood.
- Backer Board: When routing across end grain, use a sacrificial backer board to prevent tear-out at the exit point of the cut.
- Dust Collection: Profile bits create a lot of chips and dust. Effective dust collection is essential for visibility, safety, and a cleaner workspace.
Designing Your Own Profiles
While off-the-shelf bits offer a wide range, true mastery comes from envisioning and sometimes even customizing profiles.
- Sketching: Draw out the profile you want to achieve. Experiment with combinations of existing bit profiles. Many woodworking software programs allow you to design profiles digitally.
- Stacking Bits: Sometimes, a complex profile can be created by combining cuts from two or more different standard router bits. For instance, a small cove bit followed by a small round-over bit can create a unique edge.
- Template Routing: For incredibly intricate or non-linear profiles, a template and a flush trim bit or pattern bit are your best friends. This allows you to duplicate a shape precisely. This technique is invaluable for custom elements in projects like a DIY Live Edge Dining Table: Step-by-Step Build for 2026 Tren.
Advanced Router Table Jigs and Accessories

To truly push the boundaries of what your router table can do, you’ll need to embrace advanced jigs and accessories. These tools provide the safety, support, and precision required for complex tasks, taking your woodworking beyond basic edges into intricate joinery and custom shaping.
Essential Jigs for Enhanced Functionality
Expanding your jig collection is paramount for mastering the router table. Here are some essential additions:
- Box Joint Jigs: As mentioned, these are crucial for creating strong and visually appealing finger joints. Many variations exist, from simple shop-made sleds to commercially available precision jigs. They ensure perfectly even spacing and depth for each finger.
- Dovetail Jigs: While often associated with handheld routers, some dovetail jigs can be adapted for the router table, offering a controlled environment for cutting both through and half-blind dovetails. This is a game-changer for drawer construction and fine casework.
- Raised Panel Jigs/Sleds: When using large, vertical panel-raising bits, a dedicated sled holds the panel vertically and securely against the fence, preventing tipping and ensuring a consistent profile along the entire edge.
- Coping Sleds: For cutting the “cope” profile on the end grain of rails in frame-and-panel construction, a coping sled holds the workpiece safely at 90 degrees to the fence, preventing dangerous kickback and ensuring a clean cut.
- Mortising Jigs: While drill presses with mortising attachments are common, a good mortising jig for your router table can create precise, clean mortises with a spiral up-cut bit. These are ideal for door and furniture construction.
- Router Table Extension Wings: For working with larger panels or long stock, extending your router table surface with outfeed and infeed supports or dedicated extension wings significantly improves stability and safety.
Building Your Own Custom Jigs
Many advanced woodworking tasks benefit from custom-made jigs tailored to specific project needs.
- Shop-Made Circle Jigs: Create perfect circles or arcs with a simple jig that pivots the workpiece around a central pin. This is ideal for round tabletops, clock faces, or decorative inlays. For those interested in DIY Wooden Wall Clocks: Analog and Modern Faces with Precisi, a circle jig is indispensable.
- Flush Trim Templates: For non-standard shapes, create a template from MDF or plywood, attach it to your workpiece, and use a flush trim bit with a bearing to perfectly replicate the template’s profile. This allows for intricate decorative elements or custom cutouts.
- Pattern Routing Setups: Similar to flush trimming, pattern routing involves using a template and a bearing-guided bit to follow a specific path, excellent for replicating identical parts or creating unique designs.
Safety First: Always Prioritize Protection
When working with advanced jigs and techniques, especially with large bits, safety becomes even more critical.

- Eye and Ear Protection: Non-negotiable for every operation.
- Push Blocks and Sticks: Never use your bare hands near the spinning bit. Always use appropriate push devices.
- Proper Bit Installation: Ensure bits are seated correctly and tightened securely in the collet.
- Router Speed: Always use the correct speed for the bit size and wood type. Larger bits generally require slower RPMs. Consult your bit manufacturer’s recommendations.
Conclusion
Mastering the router table goes far beyond simple edge treatments; it’s about unlocking a new realm of precision joinery, custom profiles, and intricate details that will elevate your woodworking projects to a professional standard in 2026. By investing in quality bits, understanding advanced setups, and confidently utilizing specialized jigs and accessories, you transform this versatile machine into a true powerhouse of your workshop.
The journey to Mastering the Router Table: Beyond Basic Edges for Precision Joinery and Custom Profiles is continuous. Each new bit, jig, or technique learned opens doors to more complex and rewarding projects. Take the time to practice on scrap wood, prioritize safety, and meticulously set up your equipment. The precision and beauty you’ll achieve in your joinery and custom moldings will speak volumes about your craftsmanship, making your work stand out.
Actionable Next Steps:
- Invest in a Quality Joinery Bit Set: Start with a cope and stick set or a lock miter bit to immediately upgrade your cabinet and box construction capabilities.
- Build or Buy a Box Joint Jig: This accessible jig provides instant gratification for creating strong, attractive joints for drawers and boxes.
- Experiment with Profile Bits: Purchase a classical or ogee bit and practice creating custom moldings on scrap, taking multiple passes to understand their capabilities.
- Prioritize Router Table Upgrades: Consider a micro-adjustable fence, improved dust collection, or a router lift to enhance precision and ease of use.
- Explore Custom Jig Construction: Start with a simple circle-cutting jig to understand the principles of template routing and build confidence in creating your own solutions.
