
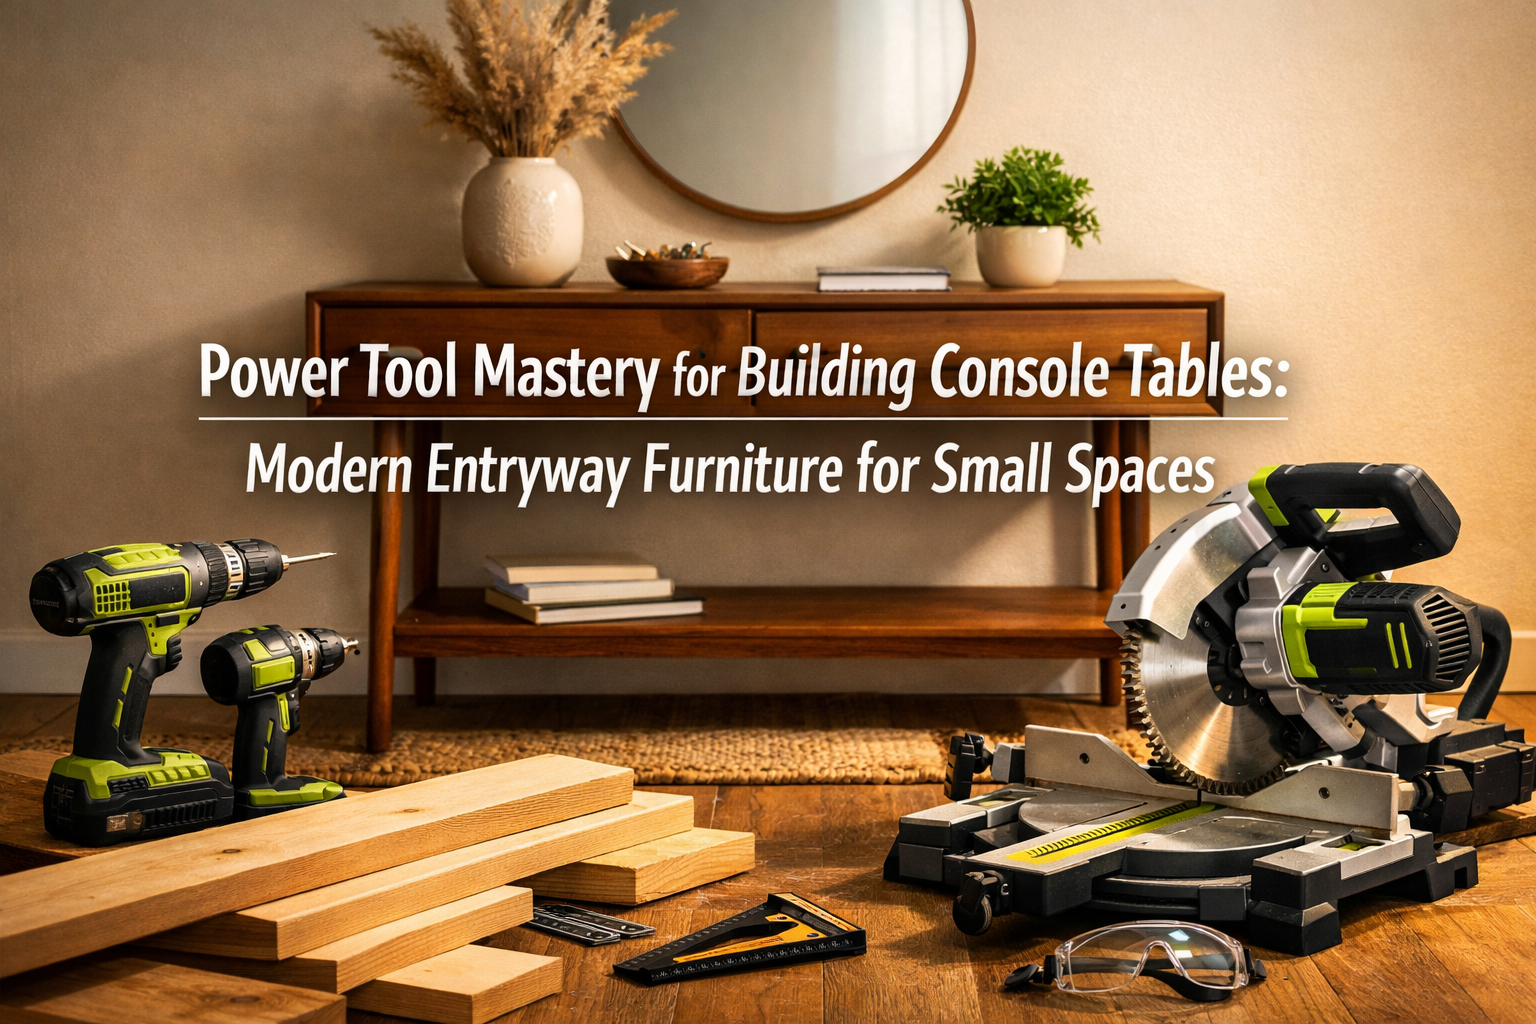

Transforming a raw piece of lumber into a functional and aesthetically pleasing piece of furniture can be one of the most rewarding DIY projects. For those looking to add a touch of modern elegance to their home, building a console table offers both a practical storage solution and a statement piece, especially for compact entryways. This comprehensive guide will walk you through the essential techniques and tools required for achieving Power Tool Mastery for Building Console Tables: Modern Entryway Furniture for Small Spaces. We will focus on efficient construction using pocket hole and dowel joinery with cordless tools, perfect for quick assembly even in apartment settings, along with clever dimensional lumber hacks and stylish finishing touches to achieve that coveted mid-century modern look.
Console tables, with their slim profiles and versatile designs, are ideal for adding functionality without overwhelming tight spaces. They provide a dedicated spot for keys, mail, or decorative accents, instantly elevating the aesthetics of an entryway. By mastering a few key power tools and woodworking techniques, even beginners can confidently tackle this project, creating bespoke furniture that perfectly complements their home’s style and maximizes utility in small areas.

Key Takeaways
- Cordless Tools for Efficiency: Leverage cordless drills, drivers, and saws for portability and quick, hassle-free assembly, especially in limited spaces like apartments.
- Master Pocket Hole Joinery: Utilize pocket hole jigs for strong, concealed joints that are fast to make and ideal for the clean lines of modern console tables.
- Embrace Dowel Joinery: Incorporate dowel jigs for added strength and alignment, particularly beneficial for legs and structural components.
- Dimensional Lumber Hacks: Learn how to select and prepare readily available dimensional lumber to achieve a high-quality finish and structural integrity, resembling more expensive hardwoods.
- Achieve Mid-Century Modern Aesthetics: Discover finishing techniques and design considerations that impart the timeless style of mid-century modern furniture, perfect for contemporary small spaces.
Essential Power Tools and Setup for Console Table Construction
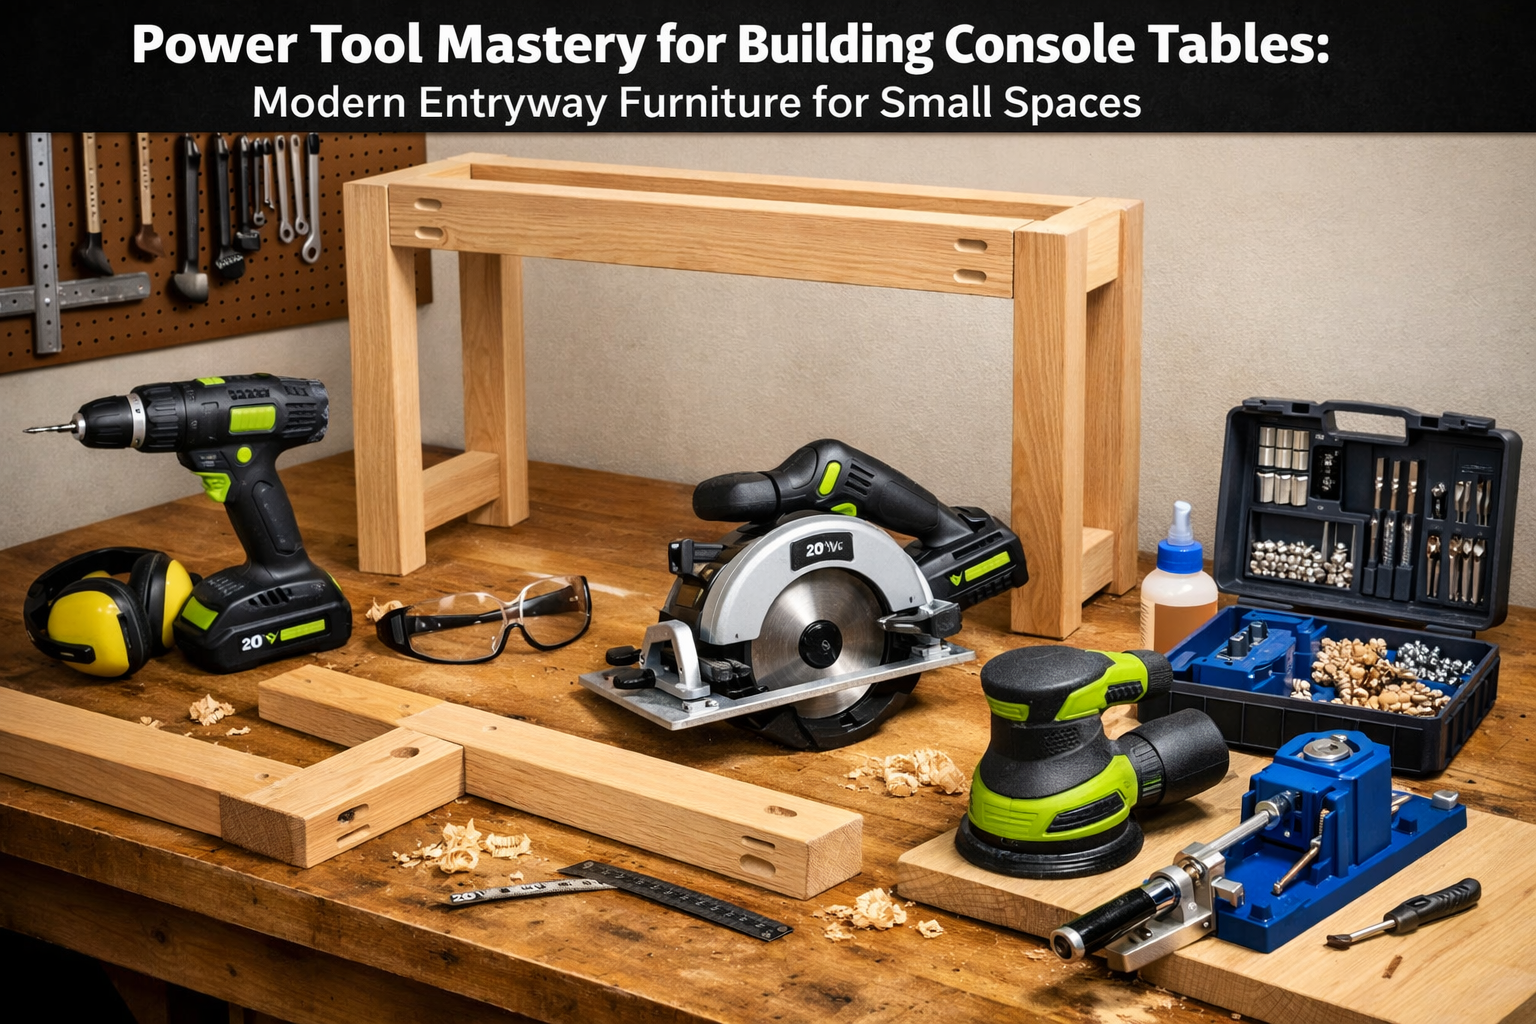
Embarking on a furniture-building project requires a foundational understanding of the tools involved. For constructing modern entryway furniture like console tables, particularly with an emphasis on speed and efficiency in smaller workspaces, selecting the right power tools is paramount. Cordless tools have revolutionized DIY woodworking, offering unparalleled portability and convenience, making them ideal for apartment dwellers or those with limited workshop space. This section delves into the essential power tools and their effective setup, ensuring your journey into Power Tool Mastery for Building Console Tables: Modern Entryway Furniture for Small Spaces is smooth and productive.
The Cordless Revolution: Portability and Precision
The advent of powerful, long-lasting cordless tools has transformed woodworking. No longer tethered by cords, users can move freely around their project, setting up workstations wherever convenient. For console table construction, this translates to less clutter, fewer tripping hazards, and the flexibility to work outdoors if weather permits.
Key Cordless Tools for Your Console Table Project:
Cordless Drill/Driver: This is arguably the most indispensable tool.
- Function: Drilling pilot holes, driving screws (especially pocket hole screws), and even light sanding with attachments.
- Selection Tip: Look for models with good torque, variable speed settings, and a comfortable grip. A brushless motor offers better efficiency and lifespan.
- Application: Essential for all joinery, attaching hardware, and assembly.
Cordless Circular Saw:
- Function: Making straight, accurate cuts in dimensional lumber and sheet goods. While a miter saw offers more precision for angle cuts, a circular saw with a good guide can handle most straight cuts for a console table.
- Selection Tip: Opt for a model with a sharp blade suitable for fine woodworking and a sturdy base plate.
- Application: Cutting lumber to length for table legs, aprons, and tabletops. For enhanced accuracy, consider using a cutting guide or a speed square.
Cordless Random Orbital Sander:
- Function: Essential for achieving a smooth, professional finish. Removes saw marks, prepares surfaces for stain or paint, and eliminates minor imperfections.
- Selection Tip: Variable speed control is a plus, allowing for coarser sanding to fine finishing. Dust collection systems are highly recommended.
- Application: Smoothing all surfaces of your console table components before assembly and finishing.
Pocket Hole Jig Kit: While not a power tool itself, it’s a critical accessory that works in conjunction with your cordless drill.
- Function: Creates strong, angled holes (pocket holes) that allow you to join pieces of wood with specialized screws, hiding the fasteners for a clean look.
- Selection Tip: Kreg jigs are widely popular and come in various models, from basic to advanced. Choose one that suits your project scale and budget.
- Application: The backbone of quick and strong joinery for modern console tables, especially for attaching aprons to legs and securing the tabletop.
Setting Up Your Workspace for Success
Even in a small apartment, an efficient workspace is achievable.
- Portable Work Table: A sturdy, foldable workbench provides a stable surface for cutting, drilling, and assembly. Consider one with clamps or dog holes for securing your workpiece. For insights into choosing and building the perfect workspace, read “The Ultimate Guide to Wooden Work Tables: Choosing, Building, and Maintaining Your Perfect Workspace 🧰 – Wood Craft Wiz” on our site.
- Good Lighting: Adequate lighting is crucial for accuracy and safety.
- Dust Management: A shop vac with a dust separator can keep your workspace clean and reduce airborne particles, especially important indoors.
- Safety Gear: Always wear safety glasses, hearing protection, and appropriate gloves.
Understanding Dimensional Lumber for Console Tables
Dimensional lumber (e.g., 2x4s, 1x4s) is readily available and affordable, making it an excellent choice for DIY furniture. However, it often comes with rounded edges and can sometimes be slightly warped.
Hacks for High-Quality Results:
- Careful Selection: When purchasing, take the time to pick straight boards with minimal knots and defects.
- Jointing and Planing (Optional but Recommended): For truly square and flat pieces, a jointer and planer can transform dimensional lumber. While these are larger tools, many makerspaces or local woodworking shops offer access. For smaller projects or without a jointer, carefully selecting straight boards and sanding down rounded edges can yield good results.
- Rip Cuts for Square Edges: Use your circular saw with a straight edge guide to rip the rounded factory edges off dimensional lumber. This creates cleaner, sharper edges that are easier to join and provide a more refined aesthetic, crucial for achieving that mid-century modern look.
By mastering these essential tools and preparing your materials properly, you lay the groundwork for a successful and enjoyable console table building experience. The efficiency and precision gained through these techniques will significantly contribute to your Power Tool Mastery for Building Console Tables: Modern Entryway Furniture for Small Spaces.
Joinery Techniques: Pocket Holes, Dowels, and Strong Connections
The strength and appearance of your console table largely depend on the joinery techniques employed. For modern entryway furniture, especially in small spaces, clean lines and robust connections are paramount. This section delves into two highly effective and DIY-friendly joinery methods: pocket hole and dowel joinery, providing you with the skills for Power Tool Mastery for Building Console Tables: Modern Entryway Furniture for Small Spaces. We will also discuss how to prepare dimensional lumber to look more refined, aligning with mid-century modern aesthetics.
Pocket Hole Joinery: The Fast and Strong Method
Pocket hole joinery, popularized by Kreg jigs, is a fantastic choice for DIY furniture makers. It’s fast, strong, and produces concealed joints, which are perfect for maintaining the sleek look of modern designs.
How Pocket Hole Joinery Works:
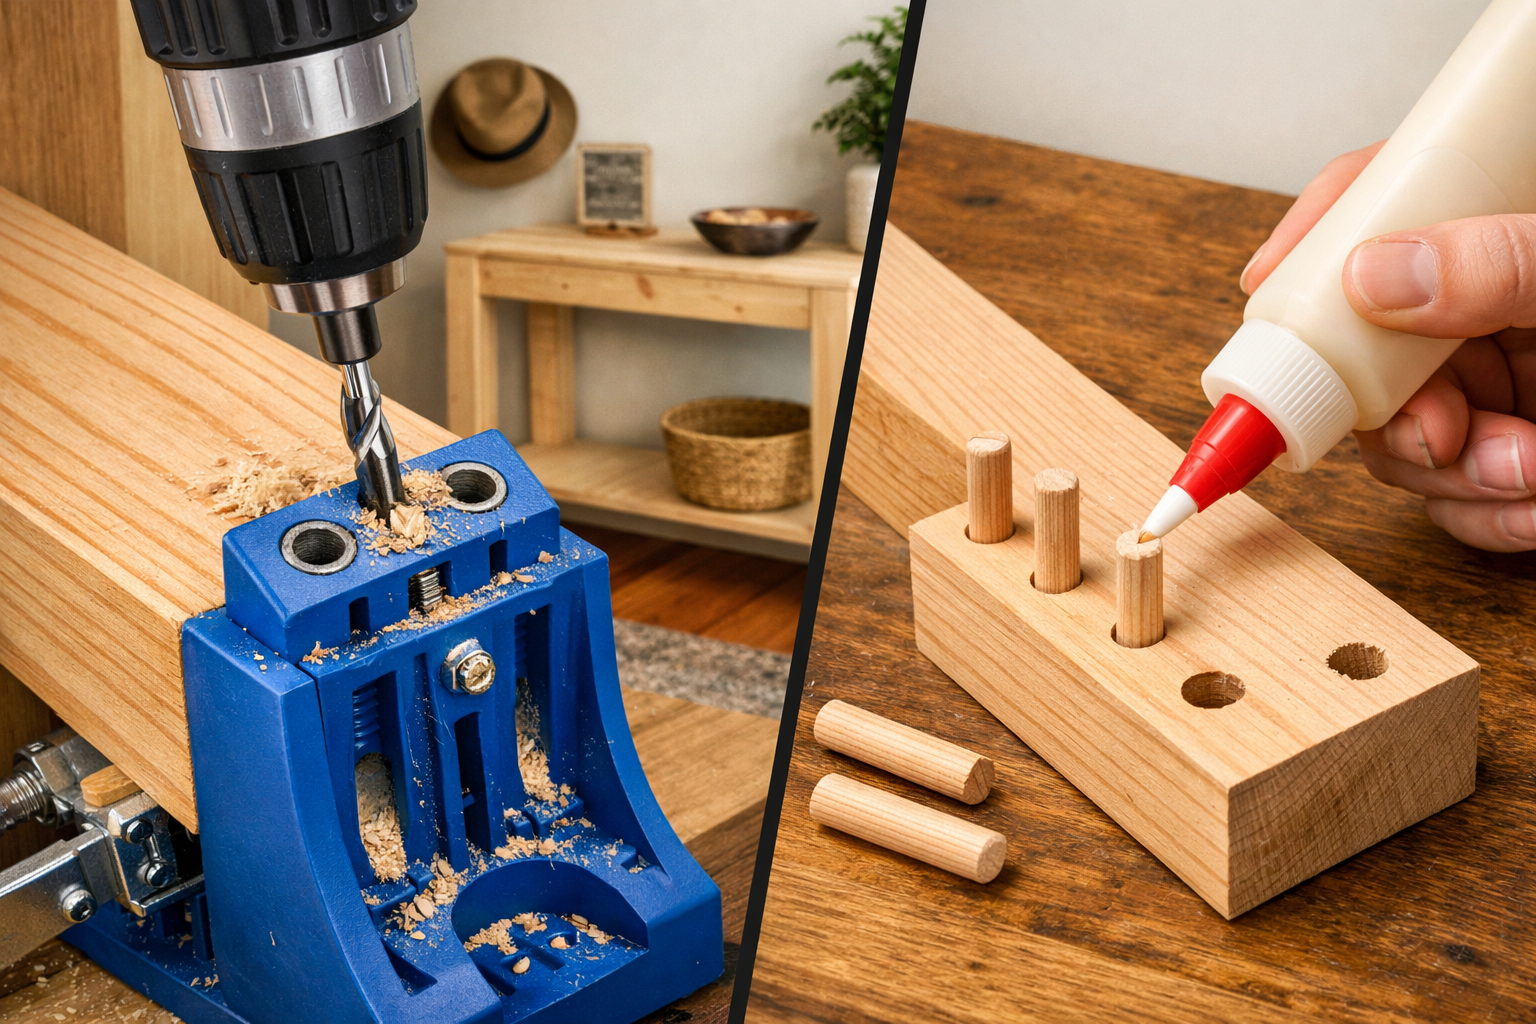
Drilling the Pocket Holes:
- Using a pocket hole jig and a cordless drill, specific angled holes are drilled into one workpiece. The jig guides the drill bit to create a stepped pilot hole, leaving a flat-bottomed recess for the screw head.
- Tip: Always set the collar on the drill bit according to the material thickness specified by your jig to ensure proper hole depth and screw engagement.
- For a visual guide on drilling, consider looking into guides on using a drill press for consistent results, though a cordless drill with a jig is perfectly suitable for this application. You can explore relevant tools like the Ryobi DP100 Drill Press for different drilling needs.
Assembly:
- The two workpieces are clamped together, ensuring they are flush and square.
- Special pocket hole screws are then driven through the pocket holes and into the mating piece, pulling the joint tight.
- Screw Selection: Use coarse-thread screws for softwoods (like pine) and fine-thread screws for hardwoods. The length of the screw also needs to match the thickness of the mating material.
Advantages for Console Tables:
- Speed: Significantly faster than traditional mortise and tenon or dovetail joints.
- Strength: Creates a remarkably strong joint, especially when combined with wood glue.
- Concealment: The screws are hidden on the underside or inside of the joint, providing a clean exterior.
- Versatility: Ideal for joining frame components, attaching tabletops, and securing shelves.
Dowel Joinery: Precision and Added Strength
Dowel joinery uses small wooden dowel pins to align and reinforce joints. While slightly more involved than pocket holes, it offers excellent strength and can be completely concealed, resulting in a very clean finish.
How Dowel Joinery Works:

Marking and Drilling:
- A dowel jig is used to accurately mark and drill holes on the edges or faces of both mating pieces.
- Tip: Precision is key here. Ensure your jig is securely clamped and your drill is perpendicular to the workpiece to avoid misaligned holes.
- Consider investing in a good doweling jig for repeatable accuracy. “Doweling Jigs: A Comprehensive Guide to Types, Setup, Techniques, and Best Practices – Wood Craft Wiz” offers an in-depth look.
Assembly:
- Wood glue is applied to the dowel holes and the mating surfaces.
- Dowel pins are inserted into one piece, and the second piece is carefully aligned and pressed onto the dowels.
- Clamps are then applied to hold the joint securely while the glue dries.
Advantages for Console Tables:
- Alignment: Dowels excel at perfectly aligning components, crucial for table legs and aprons.
- Strength: When properly executed with glue, dowel joints are incredibly strong and resistant to racking.
- Aesthetics: Completely hidden, offering a flawless exterior appearance.
- Complementary: Can be used in conjunction with pocket holes for maximum joint integrity, or on its own for specific connections like attaching table legs to aprons for a truly refined look.
Combining Joinery for Optimal Results
For the typical console table, a combination of these techniques often yields the best results.
- Frame Assembly: Use pocket holes to join the short aprons to the long aprons, forming the rectangular frame that sits beneath the tabletop. This is quick and strong.
- Leg Attachment: For the strongest leg connections, consider using dowel joinery to attach the legs to the apron frame. This provides excellent resistance to lateral forces. Alternatively, pocket holes can be used, driving screws from the inside of the apron into the top of the legs.
- Tabletop Attachment: Pocket holes are ideal for attaching the tabletop from underneath, hiding all fasteners and allowing for wood movement if needed.
| Joinery Type | Best Use Case for Console Tables | Pros | Cons |
|---|---|---|---|
| Pocket Hole | Frame, Top Attachment | Fast, strong, concealed, simple | Requires specialized screws, jig can be bulky |
| Dowel | Leg Attachment, Structural | Very strong, completely concealed, good alignment | Requires precision, slower than pocket holes |
Dimensional Lumber Hacks for Mid-Century Modern Appeal
As mentioned earlier, readily available dimensional lumber can be transformed into beautiful, mid-century modern furniture with a few clever techniques. The key is to overcome its rough-sawn appearance and rounded edges.
- Squaring Up Edges: Use your circular saw with a guide to rip a small amount off each factory edge. This creates crisp, 90-degree corners that mimic the look of more expensive, milled lumber. This is particularly important for visible edges and joints.
- Laminating for Thickness: If you desire thicker components (e.g., a chunky tabletop or robust legs), laminate two or more pieces of dimensional lumber together using wood glue and clamps. This creates a solid, stable piece that can then be planed or sanded to your desired thickness.
- Sanding, Sanding, Sanding: This cannot be overstressed. Start with a coarser grit (e.g., 80 or 100) to remove saw marks and imperfections, then progressively move to finer grits (150, 220) for a silky-smooth finish. A random orbital sander is your best friend here. For achieving a truly professional wood finish, consult “wood finishing techniques – Wood Craft Wiz” for comprehensive guidance.
By mastering these joinery techniques and lumber preparation hacks, you are well on your way to achieving Power Tool Mastery for Building Console Tables: Modern Entryway Furniture for Small Spaces that are not only functional but also exquisitely designed to fit modern aesthetic preferences.
Finishing Touches: Achieving a Mid-Century Modern Aesthetic
The construction of your console table is just one part of the journey; the finishing touches are what truly bring it to life, transforming it into a piece of modern entryway furniture that enhances small spaces. Achieving a mid-century modern aesthetic involves careful consideration of wood species, stain colors, and protective finishes. This section will guide you through these crucial steps, ensuring your console table embodies the timeless style and durability associated with quality craftsmanship, further cementing your Power Tool Mastery for Building Console Tables: Modern Entryway Furniture for Small Spaces.
Embracing Mid-Century Modern Design Principles
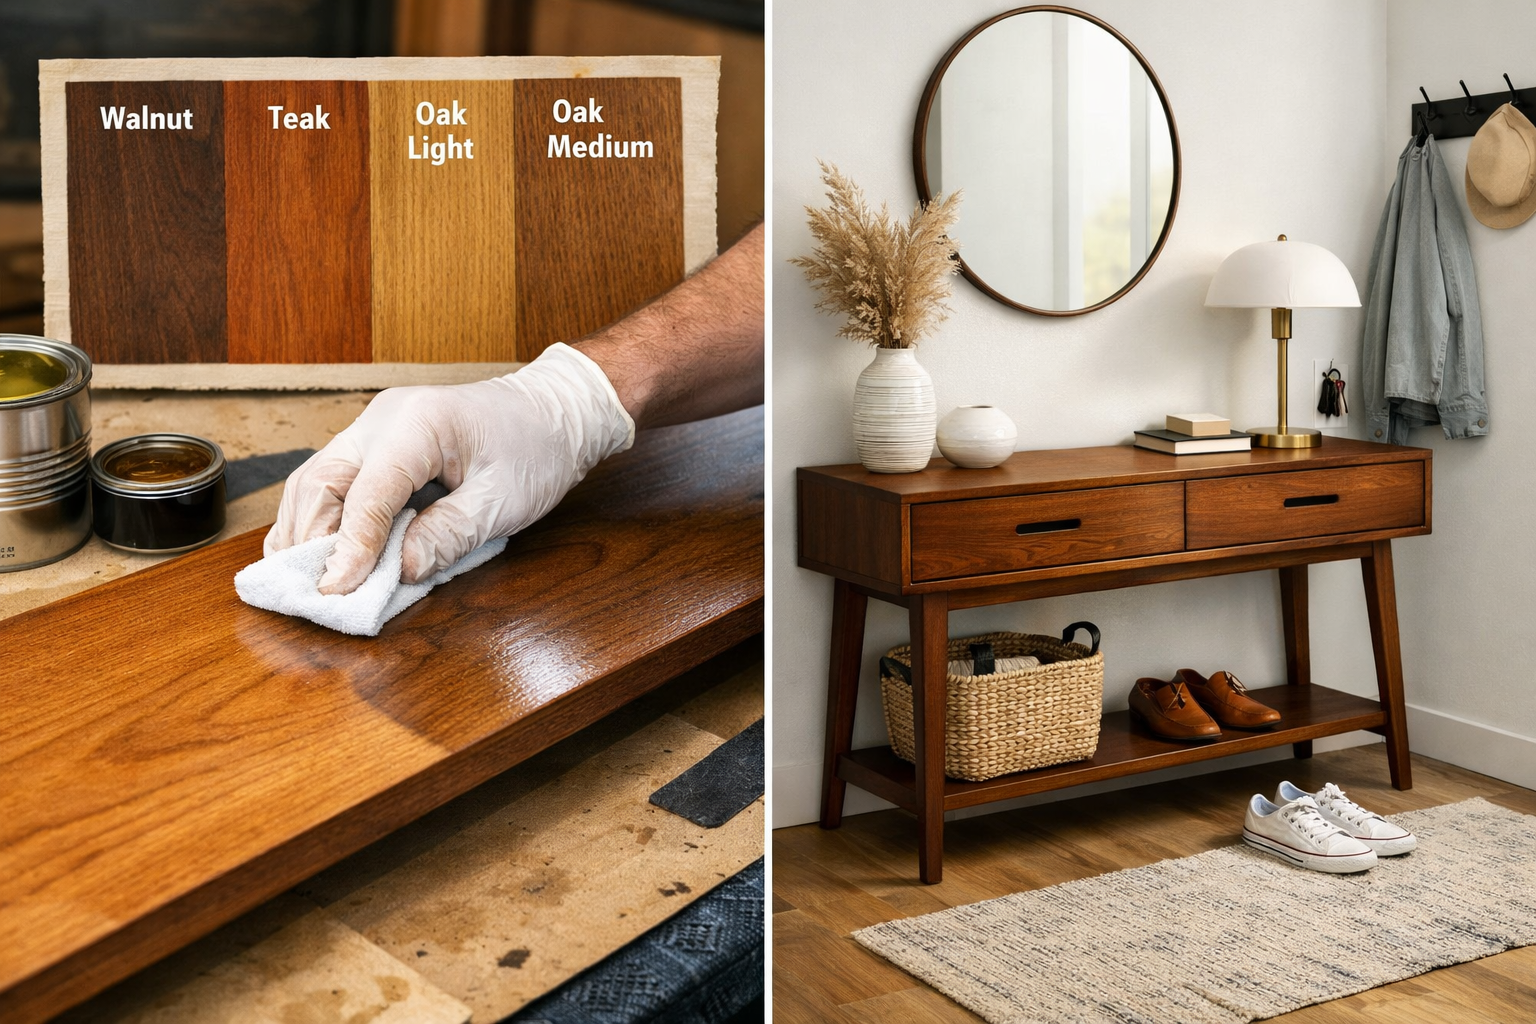
Mid-century modern (MCM) design, popular from the mid-1940s to the late 1960s, is characterized by clean lines, organic curves, minimalist forms, and a focus on functionality. Key materials often included teak, walnut, oak, and rosewood, celebrated for their rich, natural grains.
Elements to Incorporate:
- Tapered Legs: A hallmark of MCM design. Legs that subtly narrow towards the bottom create a sense of lightness and elegance. This can be achieved using a circular saw or a table saw with a tapering jig.
- Simple Forms: Avoid overly ornate details. The beauty lies in the wood itself and the understated design.
- Floating Appearance: Sometimes, the tabletop or cabinet sections appear to “float” above the base, achieved through strategic joinery and leg placement.
- Rich Wood Tones: Mimicking the natural beauty of favored MCM hardwoods is key.
Wood Selection and Stain Colors
While original MCM pieces often used exotic hardwoods, you can achieve a similar look with more accessible dimensional lumber, particularly pine, poplar, or even birch plywood for tabletops.
- Pine/Poplar: These readily available woods take stain well. To emulate MCM aesthetics:
- Walnut Tones: Use a dark walnut or classic pecan stain. These stains penetrate softwood beautifully, creating a deep, rich brown that closely resembles actual walnut.
- Teak Tones: A warm, golden-brown stain can mimic teak. Experiment with amber or honey-toned stains.
- Oak Tones: For a lighter, more golden-brown look, choose an oak-specific stain.
- Birch Plywood: Often used for tabletops or shelves, birch has a subtle grain and takes stain evenly. It’s an excellent canvas for achieving a consistent color.
Staining Tips:
- Pre-Conditioning: Softwoods like pine can absorb stain unevenly, leading to blotchiness. Always apply a wood conditioner before staining to ensure a more uniform finish.
- Test Swatches: Before applying stain to your entire piece, test it on scrap pieces of the same wood to ensure you achieve the desired color.
- Application: Apply stain with a clean cloth or foam brush, working in the direction of the grain. Allow it to penetrate for the recommended time, then wipe off excess. Repeat coats for deeper color.
Protective Finishes for Durability
A durable finish is essential to protect your console table from daily wear and tear, especially in a high-traffic area like an entryway. It also enhances the wood’s natural beauty and adds to the overall refined look.
- Polyurethane: A highly popular and durable choice.
- Types: Available in oil-based (more amber tone, good durability) and water-based (dries clear, faster drying, lower VOCs). For ease of application and quick drying, especially in small living spaces, water-based sprayable polyurethane is an excellent option. For a detailed guide, see “Sprayable Water Based Polyurethane: A Step-by-Step Guide – Wood Craft Wiz”.
- Application: Apply thin, even coats with a brush, roller, or sprayer. Lightly sand between coats with fine-grit sandpaper (220-320) for optimal adhesion and smoothness. Typically 2-3 coats are sufficient for indoor furniture.
- Oil Finishes (e.g., Danish Oil, Tung Oil): These penetrate the wood, offering a more natural, hand-rubbed look. They provide good protection and are easy to repair, but may require more frequent reapplication than polyurethane. For a comparison, refer to “Danish Oil vs Boiled Linseed Oil: Understanding Wood Oils”.
- Lacquers: Provide a very hard, smooth finish but can be challenging for beginners to apply evenly without specialized spray equipment.
Finishing Schedule Example:
- Thorough Sanding: Progress from 80-grit to 220-grit. Wipe away all dust.
- Wood Conditioner (if using softwood): Apply, let dry.
- Stain: Apply 1-2 coats until desired color is achieved. Let dry completely (24-48 hours).
- First Coat of Polyurethane: Apply thinly. Let dry according to manufacturer’s instructions.
- Light Sanding: Use 220-320 grit sandpaper to knock down any raised grain. Wipe clean.
- Second Coat of Polyurethane: Apply. Let dry.
- Optional Third Coat: For extra durability, repeat sanding and apply a third coat.
By meticulously applying these finishing techniques, your DIY console table will not only stand strong thanks to your joinery prowess but will also exhibit the sophisticated elegance of true mid-century modern design. This final stage is where your Power Tool Mastery for Building Console Tables: Modern Entryway Furniture for Small Spaces truly shines, creating a durable and beautiful piece for your home.

Project Spotlight: A Tapered Leg Console Table Design
Let’s put the concepts of Power Tool Mastery for Building Console Tables: Modern Entryway Furniture for Small Spaces into practice with a popular design: a sleek, tapered leg console table. This design is highly adaptable for various small entryways and perfectly encapsulates the mid-century modern aesthetic.
Proposed Dimensions:
- Overall: 36″ (Length) x 10″ (Depth) x 30″ (Height)
- Tabletop: 36″ x 10″ x 3/4″ (or 1.5″ laminated)
- Legs: 1.5″ x 1.5″ square stock (tapered)
- Aprons: 3/4″ x 2″ stock
Material List (Example using Pine Dimensional Lumber)
| Component | Quantity | Dimensions (approx.) | Notes |
|---|---|---|---|
| Legs | 4 | 1.5″ x 1.5″ x 30″ | Can be ripped from 2x4s or purchased as nominal 2×2. |
| Long Aprons | 2 | 3/4″ x 2″ x 33″ | Connects front and back legs. Ripped from 1×4. |
| Short Aprons | 2 | 3/4″ x 2″ x 7″ | Connects side legs. Ripped from 1×4. |
| Tabletop | 1 | 3/4″ x 10″ x 36″ | Could be edge-glued pine boards, birch plywood, or a laminated panel. |
| Hardware/Supplies | – | – | Wood glue, 1.25″ pocket hole screws, sandpaper (80-220 grit), wood conditioner, stain, polyurethane |
Step-by-Step Construction Plan
Phase 1: Material Preparation and Cutting
- Cut all components to rough length using a cordless circular saw. Ensure cuts are square. For consistent height in your cuts, consider guides related to miter saw table height, such as “Miter Saw Table Height: Importance, Guidelines, and Tips – Wood Craft Wiz”.
- Square up all dimensional lumber edges: Use a circular saw with a straight edge guide to rip off the rounded factory edges, ensuring crisp 90-degree corners.
- Plane or sand to final thickness (optional): If you have access to a planer, mill your lumber to exact dimensions. Otherwise, thorough sanding will suffice.
- Taper the legs:
- Create a simple tapering jig for your circular saw or table saw.
- Mark the taper on each leg: start the taper about 4-6 inches from the top of the leg, tapering down to about 1″ x 1″ at the bottom.
- Carefully cut the taper on two adjacent faces of each leg.
Phase 2: Joinery and Assembly (Focus on Cordless Tools)
- Drill Pocket Holes:
- On the inside face of each apron piece, drill 2-3 pocket holes on each end.
- On the underside of the long aprons, drill pocket holes every 6-8 inches along the top edge for attaching the tabletop. Repeat for the short aprons if they will also contact the tabletop.
- For attaching the legs to the apron frame: Drill 2 pocket holes on the inside face of each apron, aimed into the leg. (Alternatively, for dowel joinery, mark and drill dowel holes on the ends of the aprons and the inside faces of the legs).
- Assemble Leg-Apron Frames:
- Apply wood glue to the ends of the short aprons.
- Using a cordless drill, attach the short aprons to two legs using 1.25″ pocket hole screws (or dowel pins and clamps). Ensure the assembly is square. Repeat for the other pair of legs and short apron.
- Tip: Use clamps to hold pieces flush while driving screws.
- Assemble the Full Base:
- Apply wood glue to the ends of the long aprons.
- Attach the long aprons to the two assembled leg-short apron units using pocket hole screws (or dowel pins).
- Ensure the entire base frame is square and plumb. Allow glue to dry completely before proceeding.
- Attach Tabletop:
- Center the tabletop on the assembled base.
- Using the pre-drilled pocket holes on the aprons, drive pocket hole screws up into the underside of the tabletop. Avoid over-tightening to allow for slight wood movement.
Phase 3: Sanding and Finishing
- Final Sanding: Using your cordless random orbital sander, progressively sand all surfaces of the assembled console table, starting with 120-grit, then 150-grit, and finally 220-grit. Pay close attention to any glue squeeze-out, as stain will not penetrate glue.
- Clean: Thoroughly wipe down the entire piece with a tack cloth or lint-free cloth to remove all dust.
- Wood Conditioner: Apply wood conditioner if using softwood like pine. Let dry.
- Stain: Apply your chosen mid-century modern stain (e.g., dark walnut) according to manufacturer instructions. Wipe off excess. Allow to dry completely.
- Protective Finish: Apply 2-3 thin coats of water-based polyurethane, lightly sanding with 220-320 grit sandpaper between coats.
This project outlines how to leverage your Power Tool Mastery for Building Console Tables: Modern Entryway Furniture for Small Spaces from initial cuts to the final finish, creating a functional and stylish piece perfectly suited for your home.
Conclusion: Your Journey to Furniture Crafting Excellence
The journey into Power Tool Mastery for Building Console Tables: Modern Entryway Furniture for Small Spaces is an incredibly rewarding one. This comprehensive guide has equipped you with the knowledge and techniques to not only construct beautiful and functional console tables but also to truly understand the power and precision offered by modern cordless tools and effective joinery methods. By focusing on pocket hole and dowel joinery, strategic use of dimensional lumber, and meticulous finishing, you can create bespoke pieces that perfectly fit your home’s aesthetic and spatial requirements, particularly for compact entryways seeking a touch of mid-century modern elegance.
Remember, the key to success lies in careful planning, precise execution, and a commitment to safety. Every cut, every joint, and every stroke of the sander contributes to the final masterpiece. The console table is an ideal project to hone your woodworking skills, providing a tangible example of your craftsmanship that will be appreciated for years to come.
Actionable Next Steps:
- Plan Your Project: Sketch out your console table design, considering its dimensions and how it will fit into your specific entryway.
- Gather Your Tools: Ensure you have the essential cordless drill/driver, circular saw, random orbital sander, and a pocket hole jig kit.
- Source Your Materials: Carefully select straight, high-quality dimensional lumber, paying attention to grain and defects.
- Practice Joinery: If new to pocket holes or dowels, practice on scrap pieces to gain confidence before working on your final project lumber.
- Start Building: Follow the outlined steps, taking your time and enjoying the process of bringing your design to life.
- Experiment with Finishes: Don’t be afraid to test different stains and protective finishes on scrap wood to find the perfect mid-century modern look.
Your console table is more than just a piece of furniture; it’s a testament to your creativity, skill, and the fulfilling satisfaction of building something with your own hands. Embrace the process, learn from each step, and enjoy the beautiful, functional furniture you create!
SEO Meta Title: Power Tool Mastery: Build Modern Console Tables for Small Spaces SEO Meta Description: Master power tools and joinery to build stunning, modern console tables for your entryway in 2026. Perfect for small spaces with DIY hacks.
