

Working from home has become a cornerstone of modern professional life, making a comfortable and efficient workspace more critical than ever. In 2026, many are still seeking ways to optimize their home offices for productivity and well-being. This comprehensive guide will explore the profound benefits of DIY Home Office Ergonomics: Building Custom Wooden Monitor Stands and Keyboard Trays. By crafting personalized wooden solutions, you can achieve an ergonomically sound setup that prevents discomfort, boosts focus, and adds a touch of natural elegance to your workspace.
Key Takeaways
- Prevent Strain: Custom monitor stands and keyboard trays help align your posture, reducing neck, back, and wrist strain.
- Personalized Fit: DIY allows for precise adjustments tailored to your body and existing desk setup, unlike generic store-bought options.
- Aesthetic Appeal: Natural wood adds warmth and sophistication, enhancing the overall look of your home office.
- Cost-Effective: Building your own solutions can be more economical than purchasing high-end ergonomic furniture.
- Skill Development: It’s a rewarding project that builds woodworking skills and confidence.
Understanding Home Office Ergonomics: Why Custom Solutions Matter
Ergonomics is the science of designing and arranging workspaces to fit the user. In a home office, poor ergonomics can lead to a host of problems, including musculoskeletal disorders, eye strain, and reduced productivity. A common issue is a monitor placed too low, forcing users to hunch, or a keyboard positioned awkwardly, leading to wrist pain. This is where DIY Home Office Ergonomics: Building Custom Wooden Monitor Stands and Keyboard Trays offers a superior solution.

The Pillars of Ergonomic Design:
- Monitor Height: The top of your monitor screen should be at or slightly below eye level. This prevents neck craning and keeps your spine in a neutral position.
- Keyboard and Mouse Position: Your forearms should be parallel to the floor, and your wrists straight, not bent up or down. A keyboard tray can achieve this ideal height and depth.
- Chair and Desk Height: Ensure your feet are flat on the floor (or on a footrest) and your knees are at a 90-degree angle. Your desk should allow for comfortable arm placement.
Investing in custom wooden solutions offers unparalleled flexibility. You can choose the exact height, width, and depth to match your specific needs, desk, and body measurements. This personalization is often missing from mass-produced items. Moreover, wood offers durability and a timeless aesthetic that can elevate any workspace. For those interested in working with different wood types, exploring wood species selection for visible joinery can provide valuable insights into materials that best suit your design goals.
{{IMG_SLOT_1}}
Benefits of a Well-Designed Ergonomic Setup:
- Reduced Pain: Less neck, back, and wrist pain.
- Improved Posture: Encourages a neutral spine alignment.
- Increased Productivity: Fewer distractions from discomfort mean more focus.
- Enhanced Comfort: A more pleasant work experience overall.
- Long-Term Health: Prevents chronic issues associated with poor posture.
Essential Tools and Materials for Your Wooden Ergonomic Projects
Before you begin building your custom wooden monitor stands and keyboard trays, gathering the right tools and materials is crucial. Safety should always be your top priority, so ensure you have proper eye protection, hearing protection, and gloves.
Tools You’ll Need:
| Tool Category | Specific Tools | Purpose |
|---|---|---|
| Measuring & Marking | Tape Measure, Ruler, Pencil, Combination Square | Accurate measurements and precise marking of cuts. |
| Cutting | Miter Saw, Circular Saw, Jigsaw, Hand Saw | For straight cuts, cross-cuts, and curves. A miter saw is highly recommended for accuracy. |
| Drilling | Power Drill, Drill Bits (various sizes), Countersink Bit | Creating pilot holes and assembling components. |
| Sanding | Orbital Sander, Sandpaper (various grits), Sanding Blocks | Smoothing surfaces and preparing for finishing. |
| Clamping | Wood Clamps (bar clamps, C-clamps) | Holding pieces securely during gluing and assembly. |
| Finishing | Paintbrushes, Rags | Applying stains, varnishes, or oils. |
Materials List:
- Wood: Plywood, solid hardwoods (oak, maple, walnut), pine. Choose a type that matches your desired aesthetic and budget. For a rustic look, consider sourcing reclaimed and salvaged wood.
- Fasteners: Wood screws, small nails (optional for decorative purposes).
- Adhesive: Wood glue.
- Finishing Supplies: Wood stain, polyurethane, Danish oil, or wax. (Consider maple wood finishing techniques or oak wood finishing techniques for specific wood types).
- Hardware (for keyboard trays): Drawer slides (full extension slides are best).
- Optional: Rubber feet (for monitor stand stability), felt pads (to protect desk surface).
Always start with a clear plan and precise measurements. Remember, “measure twice, cut once!” 📏
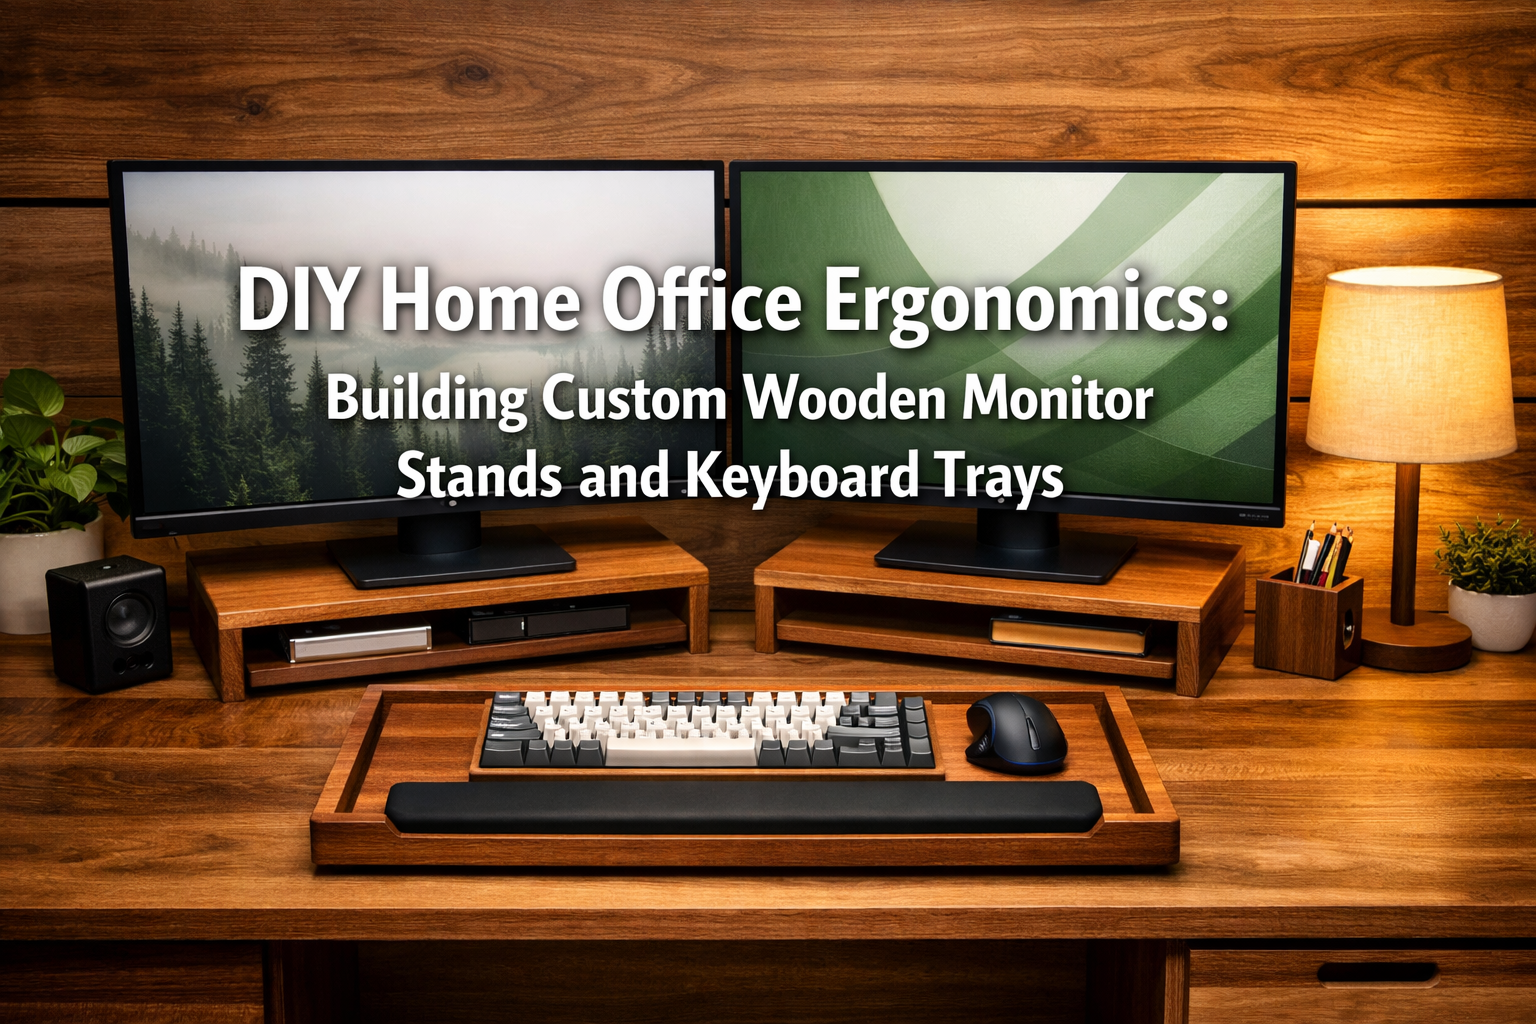
Designing and Building Your Custom Wooden Monitor Stands
A custom wooden monitor stand is more than just a riser; it’s a statement piece that brings your screen to the ideal ergonomic height while potentially adding storage or cable management features. DIY Home Office Ergonomics: Building Custom Wooden Monitor Stands and Keyboard Trays truly begins here.
Step-by-Step Monitor Stand Construction
Measure and Plan:
- Monitor Height: Sit at your desk with good posture. The top of your monitor screen should be at eye level. Measure the distance from your desk surface to your desired monitor base height. This is your target stand height.
- Monitor Width and Depth: Measure the base of your monitor (or monitors, if building for a dual setup) to determine the necessary platform size. Add a few inches for stability and aesthetics.
- Leg Placement: Decide if you want solid side panels or individual legs. Individual legs offer a lighter look and more open space underneath.
- Design Sketch: Draw a simple sketch with dimensions. Consider adding shelves or drawers for extra storage.
“A custom monitor stand isn’t just about height; it’s about integrating form and function seamlessly into your personal workspace.”
Cut the Wood:
- Carefully transfer your measurements to your chosen wood.
- Use a circular saw or miter saw for straight, clean cuts for the top platform and side panels/legs.
- If adding shelves, cut these pieces to size.
Assemble the Base/Legs:
- For solid side panels: Attach the side panels to the underside of the top platform using wood glue and screws. Predrill pilot holes to prevent splitting.
- For individual legs: Attach the legs to the corners of the platform. You can use corner braces for added stability, or simple butt joints with glue and screws.
- Ensure all joints are square and secure. Clamps are invaluable here to hold pieces while glue dries.
Add Optional Features:
- Shelves: If incorporating a shelf, attach it between the side panels or legs at your desired height using glue and screws.
- Drawers: For drawers, you’ll need to build a simple box drawer and install drawer slides within the stand structure. This is a more advanced step.
Sanding:
- Start with a medium-grit sandpaper (100-120 grit) to smooth out any rough edges or imperfections.
- Move to a finer grit (180-220 grit) for a silky smooth finish.
- Wipe down with a damp cloth to remove dust.
Finishing:
- Apply your chosen finish (stain, oil, polyurethane). Follow the product instructions for application and drying times. Multiple thin coats are usually better than one thick coat.
- Consider adding rubber feet to the bottom to prevent sliding and protect your desk surface.
Example Wood Species for Monitor Stands:
- Pine: Affordable, easy to work with, good for staining.
- Oak: Durable, attractive grain, takes stain well.
- Maple: Hard, smooth, light color, excellent for clear finishes.
{{IMG_SLOT_2}}
Crafting Custom Wooden Keyboard Trays and Standing Desk Converters
Beyond monitor stands, custom wooden keyboard trays and standing desk converters are excellent additions to a fully ergonomic home office. They ensure your keyboard and mouse are at the optimal height and depth, promoting healthy wrist and arm posture.
Building a Sliding Keyboard Tray
A sliding keyboard tray brings your keyboard closer to your body, allowing you to maintain a more relaxed shoulder and arm position.
Measure Your Desk and Body:
- Desk Clearance: Measure the underside of your desk to determine how much space you have for the tray and its slides.
- Keyboard & Mouse Dimensions: Measure your keyboard and mouse, adding extra space for comfortable use and movement.
- Height: When seated, your forearms should be parallel to the floor, and your wrists straight. The tray should allow for this position.
- Depth: Determine how far you want the tray to extend from the desk edge.
Select Drawer Slides:
- Full-extension drawer slides are ideal as they allow the tray to pull out completely. Choose slides rated for the weight of your keyboard and mouse.
Cut Wood for the Tray Box:
- You’ll need a bottom piece (the main tray surface) and four side pieces to create a shallow box for the keyboard and mouse.
- Consider cutting a slight lip on the front edge to prevent items from sliding off.
- For specific wood choices, you might consider insights from wood species selection for visible joinery.
Assemble the Tray Box:
- Use wood glue and small screws or brad nails to assemble the box. Ensure all corners are square.
Attach Drawer Slides:
- Attach one part of the drawer slide mechanism to the sides of the tray box.
- Attach the other part of the slide mechanism to mounting blocks or directly to the underside of your desk, ensuring they are level and parallel. This can be tricky, so precise measurements are key.
- Test the slide mechanism to ensure smooth operation. For guidance on sturdy connections, refer to our guide on mastering woodworking screws.
Sanding and Finishing:
- Sand all surfaces smooth, starting with medium grit and finishing with fine grit.
- Apply your desired stain or finish to match your desk or monitor stand.
Designing a Simple Standing Desk Converter
A standing desk converter allows you to alternate between sitting and standing, which is excellent for health and energy levels. While complex converters can involve adjustable mechanisms, a simple wooden version involves building a two-tiered platform.

Determine Desired Heights:
- Standing Monitor Height: When standing, the top of your monitor should still be at eye level.
- Standing Keyboard Height: Your forearms should be parallel to the floor, wrists straight.
- Measure the difference between your sitting and standing ergonomic heights.
Design a Two-Tiered Structure:
- The top tier will hold your monitor(s) and be higher.
- The lower tier will hold your keyboard and mouse.
- The design can be a simple box-on-box, or a more elegant stepped design.
- Ensure the base is wide and stable enough to prevent tipping.
Cut and Assemble:
- Cut the wood for both platforms and the support structure that connects them.
- Use strong joinery (e.g., dado joints, pocket screws, or reinforced butt joints) to ensure stability, especially if supporting multiple monitors.
- Glue and screw all components together. Consider the principles of building sturdy structures, similar to crafting profitable wooden benches.
Finishing Touches:
- Sand thoroughly and apply a durable finish.
- Add rubber feet to the bottom to protect your desk and prevent the converter from sliding.
{{IMG_SLOT_3}}
Quick Tip: For both keyboard trays and standing desk converters, consider using plywood for the main structure as it’s stable and strong. For visible surfaces, you can edge-band with solid wood or use a higher-grade plywood for a cleaner look.
Conclusion
Embracing DIY Home Office Ergonomics: Building Custom Wooden Monitor Stands and Keyboard Trays is a rewarding journey that blends craftsmanship with personal well-being. In 2026, a tailored home office setup is no longer a luxury but a necessity for sustained comfort and productivity. By following these guidelines, you can create ergonomic solutions that not only fit your body perfectly but also enhance the aesthetic appeal of your workspace with the timeless beauty of wood.
Taking on these projects allows you to control every aspect of your ergonomic setup, from the precise dimensions to the choice of wood and finish. The result is a personalized, durable, and attractive solution that far surpasses generic alternatives. So, gather your tools, unleash your creativity, and transform your home office into a haven of ergonomic excellence. Your neck, back, and wrists will thank you!
Next Steps:
- Measure Your Space: Take accurate measurements of your current desk and yourself to determine ideal heights and dimensions.
- Sketch Your Design: Draw simple plans for your monitor stand and keyboard tray, incorporating any desired features.
- Source Materials: Purchase your chosen wood, fasteners, and hardware.
- Start Building: Tackle one project at a time, focusing on precision and safety.
- Enjoy Your Ergonomic Workspace: Sit back, relax, and experience the difference a custom-built setup makes.
References
- Occupational Safety and Health Administration (OSHA). (2000). Ergonomics: The Study of Work. U.S. Department of Labor.
- Pheasant, S., & Haslegrave, C. M. (2016). Bodyspace: Anthropometry, Ergonomics and the Design of Work. CRC Press.
- Grandjean, E. (1988). Fitting the Task to the Man: A Textbook of Occupational Ergonomics. Taylor & Francis.
