

The modern woodworker often faces a singular challenge: the constraints of space. Whether it’s a compact urban backyard or the necessity of on-site repairs, a permanent, sprawling workshop is rarely an option. This is where the ingenuity of Building a Collapsible Outdoor Workbench: Portable Solutions for Backyard and On-Site Woodworking shines. It represents a liberation from static workspaces, offering the freedom to pursue woodworking projects wherever inspiration (or necessity) strikes, transforming any suitable outdoor area into a functional workshop with minimal effort.
Key Takeaways

- Collapsible workbenches are essential for woodworkers with limited space or those needing portable solutions.
- Key design considerations include stability, weight, weather resistance, and ease of assembly/disassembly.
- Material selection profoundly impacts a workbench’s durability, portability, and weather resistance.
- Effective clamp integration and tool storage are crucial for maximizing workbench functionality.
- Thoughtful design allows for quick setup and teardown, making outdoor and on-site projects feasible.
Understanding the Need for a Portable Workbench in 2026
The demand for adaptable workspaces has never been higher. With increasing urbanization and a growing appreciation for DIY projects, woodworkers frequently find themselves without a dedicated, indoor shop. A collapsible outdoor workbench directly addresses this by providing a stable, reliable surface that can be erected and dismantled with ease. This portability allows projects to move from a cluttered garage to a sunny patio, or from a home workshop to a client’s site for installations or repairs.
Benefits of a Collapsible Outdoor Workbench
The advantages of investing time in Building a Collapsible Outdoor Workbench: Portable Solutions for Backyard and On-Site Woodworking are manifold:
- Space Saving: When not in use, it folds down, occupying minimal storage space. Ideal for apartments, small homes, or shared garages.
- Versatility: Facilitates working on projects outdoors, reducing sawdust and fumes indoors. Perfect for larger projects that require more room or better ventilation.
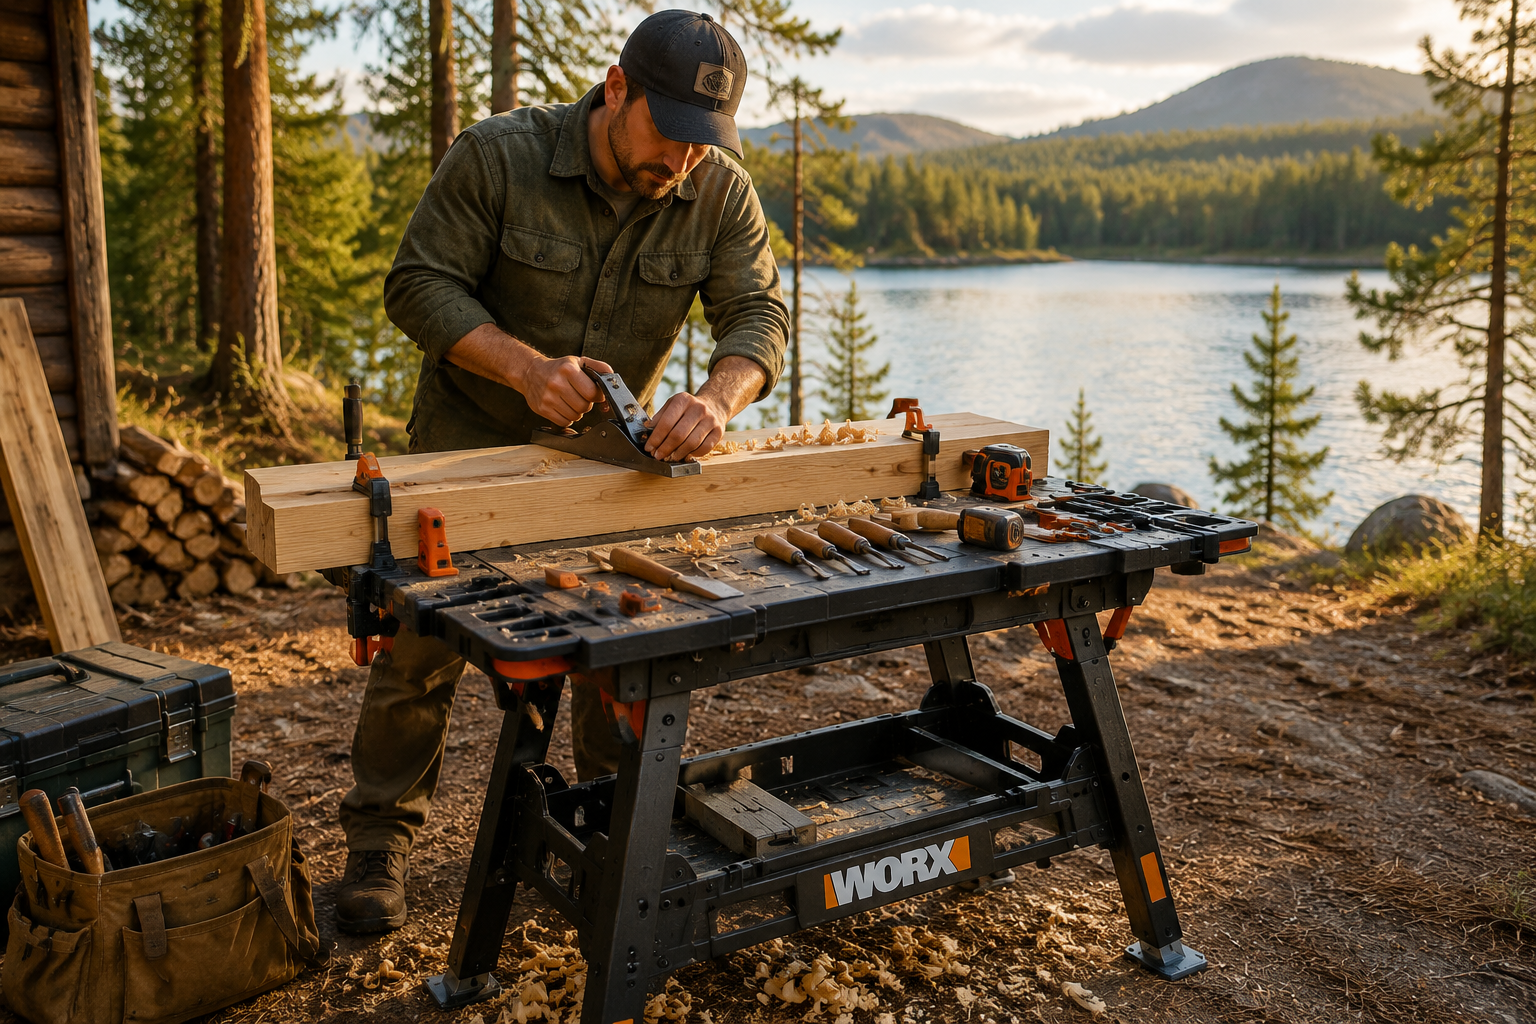
- On-Site Work: Essential for professionals or hobbyists who need to perform tasks at different locations, such as installing custom shelving or repairing outdoor furniture.
- Protection for Indoor Spaces: Keeps messy or dusty tasks outside, protecting interior floors and surfaces.
- Ergonomics: Provides a dedicated, ergonomically sound working height, preventing back strain often associated with makeshift setups.
The ability to quickly set up a sturdy workspace outdoors means you can tackle projects like building custom wooden key holders or even smaller, profitable items without cluttering your main living areas.
Essential Design Considerations for Building a Collapsible Outdoor Workbench
Before diving into construction, it’s vital to consider the core requirements that differentiate a truly effective portable workbench from a flimsy stand.
- Stability: Despite its collapsible nature, the workbench must be rock-solid when assembled. Wobble is not just inconvenient; it’s a safety hazard.
- Weight vs. Portability: A lighter workbench is easier to transport, but might sacrifice some stability. A balance must be struck based on typical project needs.
- Weather Resistance: Since it’s an outdoor workbench, materials and finishes must withstand sun, rain, and humidity without warping, rotting, or rusting.
- Ease of Assembly/Disassembly: The “collapsible” aspect means it should be quick and intuitive to set up and take down, ideally by one person.
- Work Surface Area: Adequate space for tools and materials is crucial. Consider how much clamping surface is needed.
Workbench Design Concepts and Material Selection
The heart of Building a Collapsible Outdoor Workbench: Portable Solutions for Backyard and On-Site Woodworking lies in its design and the choice of materials. These two elements dictate its functionality, durability, and ultimate portability.
Popular Collapsible Workbench Designs
Several design approaches can achieve the desired collapsibility while maintaining stability:
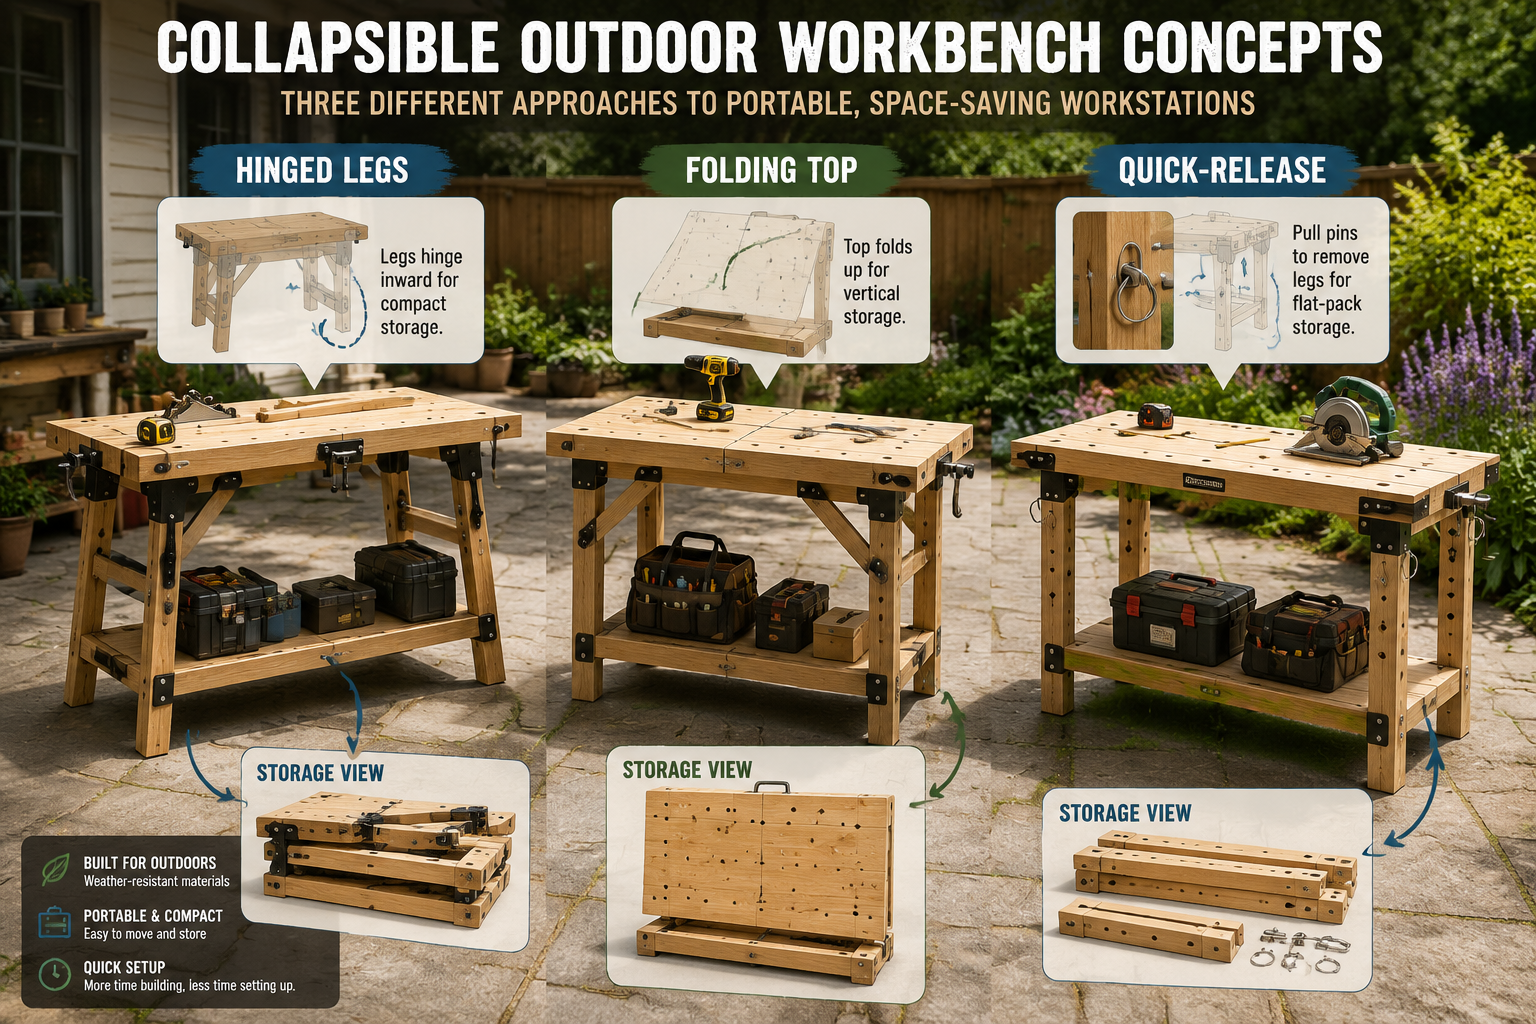
- Hinged-Leg Design: This is perhaps the most common and straightforward. Legs are attached to the workbench top with heavy-duty hinges, folding inward for storage. Locking braces or chains secure the legs in the open position.
- Pros: Simple to build, robust when locked.
- Cons: Can be bulky even when folded, hinges need to be strong.
- Folding Top Design: The workbench surface itself splits and folds, often with a central hinge, while the legs may also fold or detach.
- Pros: Extremely compact storage.
- Cons: Seam in the middle of the work surface can be a minor inconvenience.
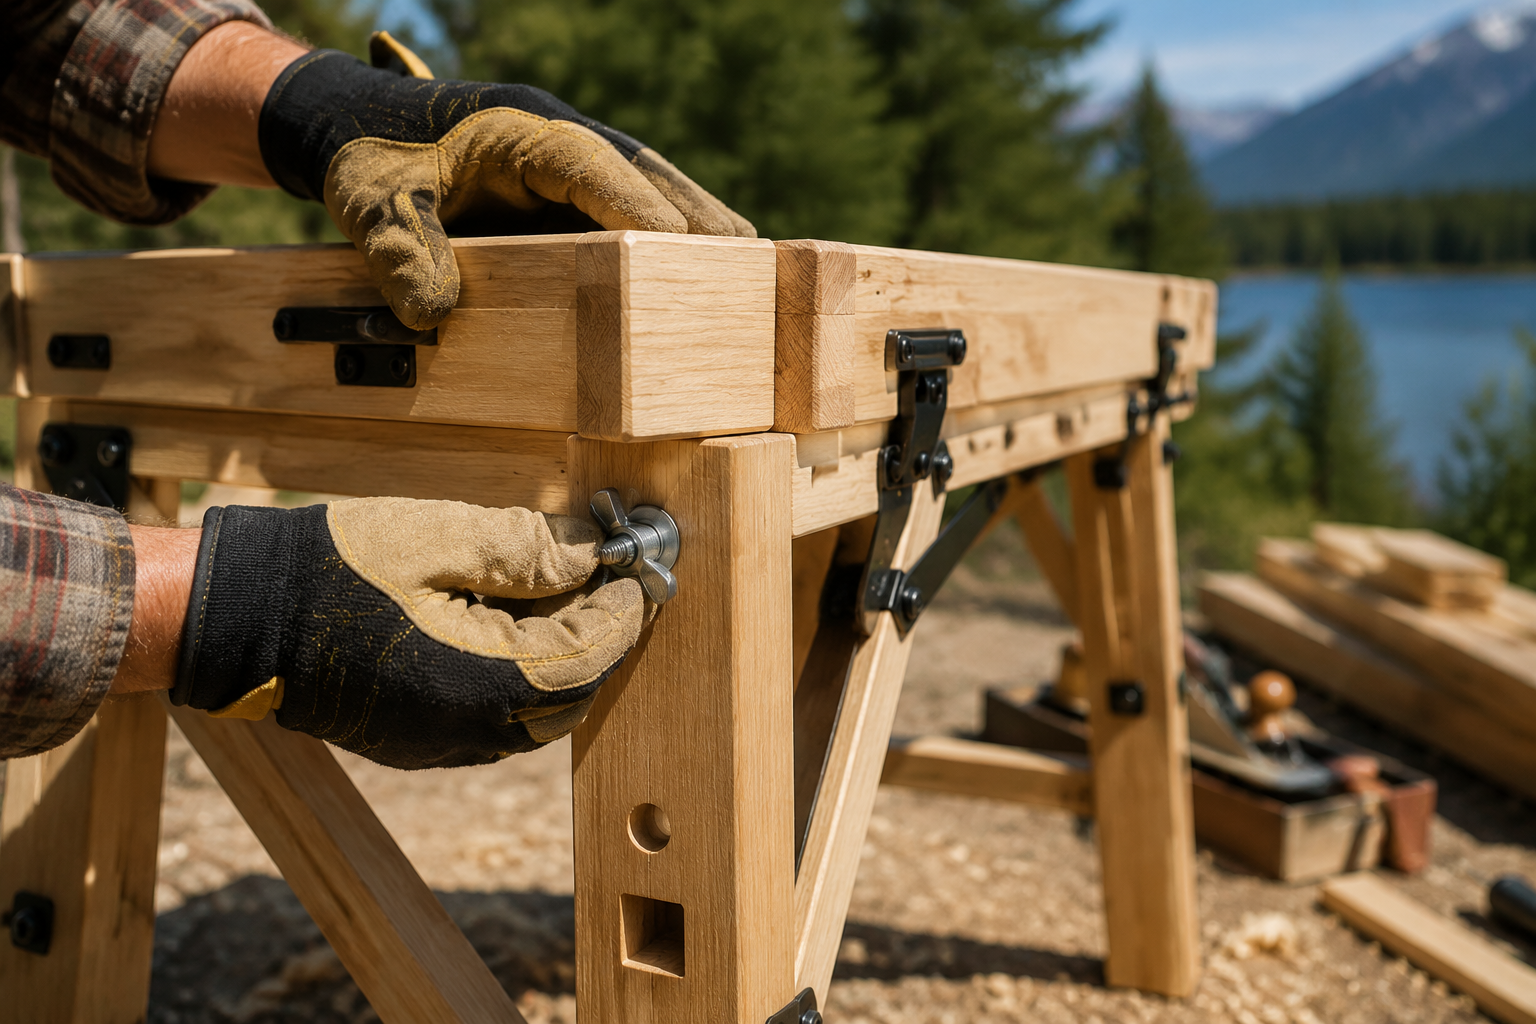
- Quick-Release Pin/Bolt Systems: Legs or support structures can be quickly attached and detached from the main workbench top using pins, bolts, or hand knobs.
- Pros: Very strong connections, can allow for modular height adjustments.
- Cons: Small parts can be lost, requires careful alignment during assembly.
- Sawhorse-Style Base: Some designs utilize two heavy-duty folding sawhorses as the base, with a separate, attachable workbench top.
- Pros: Sawhorses are multi-functional, good stability.
- Cons: Two separate components to transport.
For inspiration on joinery and construction techniques, exploring resources like Mastering the Woodworking Box Lid can provide valuable insights into building sturdy and precise connections, even for a portable unit.
Material Selection for Outdoor Durability and Portability
Choosing the right materials is paramount for an outdoor workbench. They must withstand the elements while remaining manageable in weight.
Workbench Top Materials:
- Exterior-Grade Plywood (Marine or Treated): Excellent choice for the top. Plywood offers stability, a smooth surface, and can be sealed effectively against moisture. Marine-grade plywood is specifically designed for wet conditions.
- Solid Hardwood (Weather-Resistant Species): Woods like cedar, teak, or white oak are naturally rot-resistant. They offer superior durability and aesthetic appeal but are heavier and more expensive. Consider sourcing reclaimed and salvaged wood for a sustainable and characterful top.
- Composite Decking Material: Extremely weather-resistant and requires minimal maintenance. Can be used for the top, though it might lack the rigidity or workholding characteristics of wood for certain tasks.
Frame and Leg Materials:
- Treated Lumber: Pressure-treated lumber is resistant to rot and insects, making it a good choice for outdoor frames and legs. However, it can be heavy.
- Exterior-Grade Hardwoods: As with the top, cedar or white oak are excellent for the frame due to natural resistance.
- Aluminum Square Stock: Lightweight, rust-proof, and strong. Can be an excellent, though more expensive, option for the frame, especially for connections that use quick-release pins.
- Steel (Powder-Coated or Galvanized): Very strong and durable, but also heavy. Requires proper finish to prevent rust.
Hardware Considerations:
- Stainless Steel or Galvanized Hardware: All screws, bolts, hinges, and braces must be rust-proof. This is non-negotiable for an outdoor workbench.
- Heavy-Duty Hinges: For hinged-leg designs, choose robust, large hinges that can bear the load and resist racking.
- Wing Nuts and Quick-Release Pins: These are excellent for tool-free assembly and disassembly.
- Toggle Clamps/Holdfasts: Integrate ways to secure workpieces. Bench dog holes are a must, and a built-in vise is a huge bonus.
Building and Customizing Your Portable Workbench
The actual construction process involves precise cuts, strong joinery, and thoughtful integration of features that enhance portability and utility.
Step-by-Step Construction Overview (General Principles)
While specific plans will vary based on your chosen design, the general steps for Building a Collapsible Outdoor Workbench: Portable Solutions for Backyard and On-Site Woodworking typically include:
- Design and Planning: Sketch out your workbench, noting dimensions, materials, and collapse mechanisms. Account for ergonomic working height (usually 34-36 inches).
- Cut Materials: Precisely cut all components (top, legs, frame pieces) according to your design.
- Assemble Workbench Top: Create the main work surface. If using multiple pieces, join them securely.
- Construct Leg/Frame Assemblies: Build the individual leg units or frame sections that will support the top. Ensure these are square and sturdy.
- Integrate Collapsible Mechanisms: This is the critical step.
- Hinged Legs: Attach hinges to the legs and the underside of the workbench top. Install locking mechanisms (e.g., folding braces, tension rods, or detachable cross-braces).
- Quick-Release Systems: Drill precise holes for pins or bolts. Reinforce these areas for longevity.
- Add Workholding Features:
- Bench Dog Holes: Drill a grid of 3/4-inch holes in the workbench top for bench dogs and clamps.
- Vise Integration: If possible, include a small, easily detachable or fold-away woodworking vise.
- Clamp Racks: Incorporate simple racks or hooks for easy access to clamps when the bench is in use.
- Apply Weather-Resistant Finish: This is crucial. Use an exterior-grade sealant, marine varnish, or oil finish that protects against UV rays and moisture. For example, spar urethane offers excellent outdoor protection. Apply multiple coats, especially to end grain.
Enhancing Functionality: Storage, Mobility, and Customization
A basic collapsible workbench is good, but a customized one is great.
- Integrated Tool Storage:
- Under-top Shelf/Tray: A lightweight, removable shelf or canvas sling underneath the workbench top can hold frequently used hand tools, keeping them accessible but out of the way.
- Magnetic Strips: Attach strong magnetic strips to the side of the workbench for holding metal tools like chisels or screwdrivers.
- Pegboard Panels: Small, collapsible pegboard panels can be added to the sides for hanging lighter tools.
- Caster Wheels: While potentially hindering stability, locking caster wheels can make moving the assembled workbench around a patio much easier. Ensure they are heavy-duty and have robust locking mechanisms. For true portability for on-site use, the bench should be light enough to carry without casters.
- Adjustable Height: Some designs allow for legs to be set at different heights using multiple pinholes, adapting to various tasks or uneven terrain.
- Leveling Feet: For working on uneven ground, integrate adjustable leveling feet into the bottom of the legs.
- Integrated Clamping Surfaces: Beyond dog holes, consider adding T-track channels to the workbench surface for versatile clamping options.
- Portability Aids: Add handles or carrying straps to the workbench when it’s folded for easier transport.
For advanced woodworking projects that often require an outdoor setup, such as creating DIY live-edge dining tables, having a stable, portable workbench is indispensable.
Maintaining Your Outdoor Workbench for Longevity
Even with the best materials and finishes, an outdoor workbench requires ongoing maintenance to ensure its longevity and performance.

Regular Cleaning and Inspection
- Clean After Each Use: Remove sawdust, grime, and any spills immediately. A stiff brush and a damp cloth are usually sufficient. For stubborn residue, use appropriate cleaners without harsh chemicals that could damage the finish.
- Inspect Hardware: Periodically check all hinges, bolts, pins, and locking mechanisms for signs of wear, rust, or loosening. Tighten or replace as needed. Pay particular attention to quick-release mechanisms, as they endure frequent use.
- Check for Damage: Look for cracks, splinters, or excessive wear on the workbench top and frame. Address small issues before they become major problems.
Refinishing and Protection
- Annual Re-coating: Depending on exposure to the elements, plan to re-apply a protective finish (varnish, spar urethane, or oil) every 1-2 years. Lightly sand the surface before applying new coats to ensure good adhesion. This prevents moisture ingress and UV damage.
- Cover When Not in Use: The simplest way to extend the life of your outdoor workbench is to cover it with a waterproof tarp or custom-fitted cover when not in use. This protects it from direct sun, rain, and snow.
- Indoor Storage (Seasonal): If possible, store the workbench indoors during the harshest weather months (winter, monsoon seasons). Even a garage or shed provides significant protection compared to continuous outdoor exposure.
Troubleshooting Common Issues
- Wobble: If the workbench develops a wobble, check all connections.
- Are the leg braces locked securely?
- Are all bolts and screws tight?
- Are the ground surfaces even? (Use leveling feet if installed).
- Could a joint have loosened over time? Disassemble and reinforce if necessary.
- Sticking Collapsible Mechanisms: Dirt or rust can cause hinges or pins to stick. Clean thoroughly and apply a dry lubricant (e.g., silicone spray) to moving parts.
- Warping Top: While good material and finish should prevent this, extreme environmental changes can cause some warping. If minor, clamping over time or selective re-wetting/drying might help. For severe warping, the top may need to be planed flat or replaced.
Proper maintenance ensures your investment in Building a Collapsible Outdoor Workbench: Portable Solutions for Backyard and On-Site Woodworking continues to pay dividends for many years, providing a reliable and adaptable workspace for all your creative endeavors.
Conclusion
Building a Collapsible Outdoor Workbench: Portable Solutions for Backyard and On-Site Woodworking is more than just a project; it’s an investment in your woodworking flexibility and productivity. By carefully considering design principles, selecting appropriate weather-resistant materials, and integrating smart functionalities, you can create a robust and reliable workspace that travels with you. This liberation from a static workshop empowers you to tackle projects anywhere, from your garden to a client’s site, reducing clutter indoors and embracing the freedom of outdoor craftsmanship.
The versatility offered by a well-designed portable workbench opens up new possibilities for your woodworking journey in 2026. Take the time to plan meticulously, build with precision, and maintain conscientiously, and your collapsible outdoor workbench will serve as an invaluable companion for countless projects to come.
Actionable Next Steps:
- Assess Your Needs: Determine the ideal size, weight, and features based on your typical projects and available storage.
- Choose a Design: Research different collapsible mechanisms (hinged legs, quick-release pins) and select the one that best suits your skills and requirements.
- Source Materials: Prioritize exterior-grade lumber, plywood, and rust-proof hardware.
- Plan Your Build: Draw detailed sketches and create a cut list.
- Build and Finish: Construct your workbench with care, paying close attention to stability and applying a durable, weather-resistant finish.
- Test and Refine: Practice setting up and taking down your workbench, and make any necessary adjustments for optimal functionality.
SEO Meta Title: Build a Collapsible Outdoor Workbench: Portable Woodworking SEO Meta Description: Learn to build a collapsible outdoor workbench for portable backyard and on-site woodworking projects in 2026. Maximize space & flexibility.
