


The commercial woodworking market, while vast, often falls short of meeting the truly unique aesthetic visions of individual crafters. Despite an estimated $23 billion market size for paints and coatings in 2024, off-the-shelf wood stains rarely offer the precise hue, depth, or nuanced effect that bespoke projects demand (Grand View Research, 2024). This limitation drives a compelling case for exploring DIY Wood Stains and Dyes: Crafting Custom Colors and Effects for Unique Wood Finishing. The ability to create your own color palette, whether from natural ingredients or custom pigment blends, unlocks an unparalleled level of personalization, allowing woodworkers to achieve finishes that truly enhance the natural beauty and character of their creations.
This article delves into the transformative world of homemade wood finishes, guiding you through the methods, materials, and artistic considerations involved in achieving truly unique results. From understanding the fundamentals of wood colorants to mastering application techniques and troubleshooting common issues, we will explore how to craft custom colors and effects that elevate your woodworking projects in 2026.

Key Takeaways
- Unleash Creativity: DIY stains and dyes offer limitless possibilities for custom colors and unique effects beyond commercial options.
- Natural Ingredients: Explore eco-friendly options like coffee, tea, and plant extracts for subtle, earthy tones.
- Pigment Blending: Learn how to combine universal pigments to achieve specific, vibrant, or nuanced color profiles.
- Preparation is Key: Proper wood preparation, including sanding and conditioning, is crucial for even and consistent color absorption.
- Master Application: Different techniques (brush, rag, spray) yield varied results; practice on scrap wood is essential.
Understanding the Fundamentals of DIY Wood Stains and Dyes: Crafting Custom Colors and Effects for Unique Wood Finishing
Achieving a custom wood finish begins with a solid understanding of what stains and dyes are, how they interact with wood, and the unique advantages of making them yourself. The distinction between a stain and a dye is fundamental to crafting desired effects.
Stains vs. Dyes: What’s the Difference?
While often used interchangeably, wood stains and dyes operate differently:
- Wood Stains: Typically composed of pigments suspended in a binder (oil, water, gel). Pigments are tiny, opaque particles that sit on or just below the wood surface, obscuring some of the wood grain while imparting color. They tend to be less vibrant but offer good UV resistance and can be easier to control regarding color intensity. Think of them as painting a translucent layer on the wood.
- Wood Dyes: Consist of colorants dissolved in a solvent (water, alcohol, or oil). Dyes penetrate deeper into the wood fibers, coloring the wood itself rather than just coating the surface. This allows the natural grain patterns to shine through more vividly, offering greater clarity and often more vibrant, transparent colors. However, dyes can be more prone to fading from UV exposure and can apply less evenly on certain wood types.
The choice between a stain and a dye, or a combination, depends on the desired final look. For projects where the grain is paramount, a dye might be preferred. For a more opaque, consistent color, a pigment-based stain could be ideal.
Advantages of DIY Wood Stains and Dyes
Beyond the sheer satisfaction of creating something unique, making your own wood finishes offers several tangible benefits:
- Custom Color Matching: This is the primary advantage. Commercial palettes are limited. DIY methods allow you to mix and match to achieve an exact shade to complement your decor or artistic vision. Need a precise shade of cerulean for a DIY Smart Home Integration with Custom Woodwork project? You can blend it.
- Cost-Effectiveness: Often, DIY ingredients are significantly cheaper than specialty commercial products, especially for larger projects.
- Control Over Ingredients: For those concerned about VOCs (Volatile Organic Compounds) or harsh chemicals, natural DIY options provide peace of mind. You know exactly what’s going into your finish. Learn more about sustainable finishes for reclaimed wood for eco-friendly options.
- Unique Effects: Homemade concoctions can produce effects not achievable with store-bought products, such as “fuming” with ammonia for a rich, dark oak, or creating subtle patinas with iron acetate.
- Artistic Expression: The process itself is a creative endeavor, allowing for experimentation and discovery.

Essential Tools and Materials
Before diving into recipes, gather these basic tools and materials:
- Measuring Cups and Spoons: For precise ingredient ratios.
- Mixing Containers: Glass jars, plastic containers, or old coffee cans.
- Stirring Sticks: Craft sticks, old spoons.
- Strainers/Cheesecloth: To remove undissolved particles from dyes.
- Applicators: Brushes, rags, foam brushes.
- Protective Gear: Gloves, eye protection, respirator (especially for solvent-based ingredients).
- Scrap Wood: Crucial for testing colors and application techniques on the same type of wood as your project.
- Wood Conditioner: To ensure even absorption on blotch-prone woods like pine or maple.
Crafting Custom Colors: Recipes and Techniques for DIY Wood Stains and Dyes
The heart of DIY Wood Stains and Dyes: Crafting Custom Colors and Effects for Unique Wood Finishing lies in the creation process. This section explores various approaches, from natural ingredients to universal pigments.
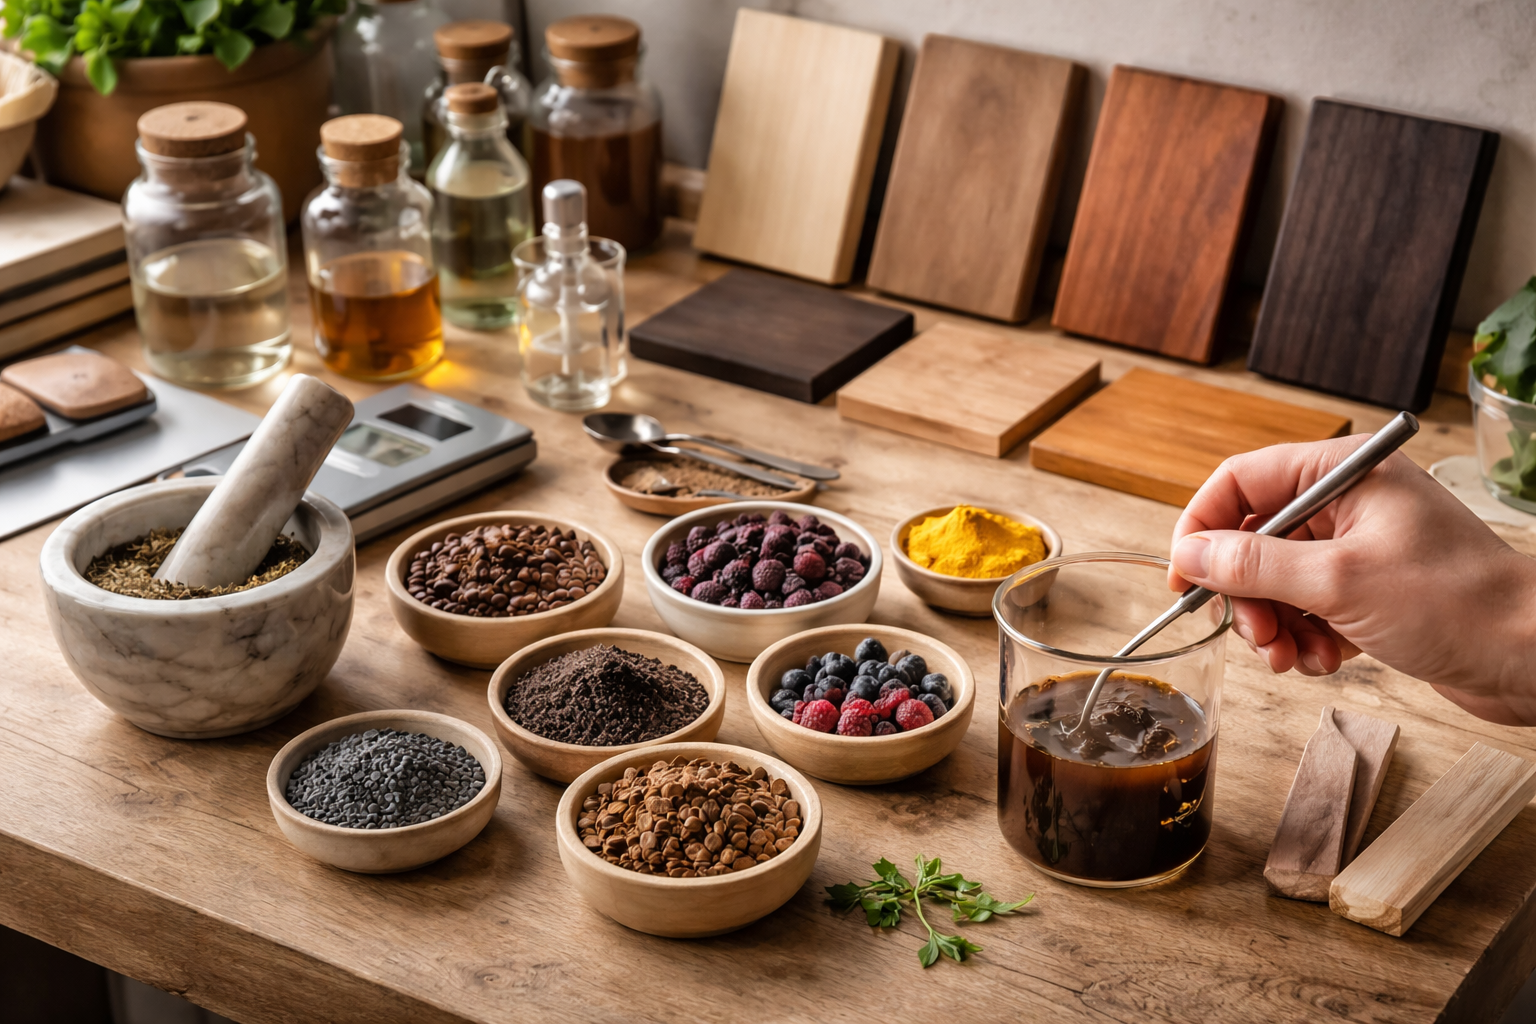
Natural Ingredient Dyes and Stains
Many everyday items and natural substances can yield beautiful, subtle wood colors. These are generally water-based and produce dye-like effects.
- Coffee and Tea:
- Colors: Browns, tans, and reddish-browns.
- Method: Brew strong coffee or tea (black tea, rooibos). The longer it steeps and the more concentrated it is, the darker the color. Apply multiple coats for deeper hues. Coffee grounds can also be rubbed directly for texture.
- Vinegar and Steel Wool (Iron Acetate):
- Colors: Reacts with tannins in wood to create grays, silvers, and deep browns/black. The color depends heavily on the wood species (e.g., strong reaction on oak, milder on pine).
- Method: Combine fine steel wool (0000 grade) with white vinegar in a jar. Let it sit for several days to a week, loosening the lid periodically to release gas. The steel wool will dissolve, creating iron acetate. Strain the liquid before applying. For woods low in tannins, pre-treat with strong black tea or tannic acid solution. This technique is fantastic for achieving a weathered wood finishing technique or a rustic wood finishing technique.
- Berry and Plant Extracts:
- Colors: Vary widely – blueberries for purplish-gray, blackberries for purples/blacks, onion skins for yellows/oranges, turmeric for vibrant yellow.
- Method: Crush berries or chop plant material, simmer in water for an hour or more to extract color. Strain thoroughly. These tend to be less lightfast than other options, so consider a UV-protective topcoat.
- Other Food Items: Red wine (reddish-browns), beet juice (pinkish-red, often fades), walnut hulls (dark browns).
Table: Natural DIY Dye Color Guide
| Natural Ingredient | Primary Colors Produced | Notes |
|---|---|---|
| Strong Black Coffee | Light Brown, Medium Brown | Deeper with multiple coats. |
| Black Tea | Tan, Golden Brown | Varies with steeping time and concentration. |
| Steel Wool & Vinegar | Gray, Silver, Black | Reacts with wood tannins; requires pre-testing. |
| Turmeric Powder | Vibrant Yellow | Can be strong; dilute for lighter shades. |
| Red Wine | Reddish-Brown | Subtle, may require multiple applications. |
| Walnut Hulls | Dark Brown | Excellent, rich color; crush fresh hulls. |
Universal Pigment and Dye Blending
For more precise and vibrant colors, universal tinting pigments or powdered wood dyes offer greater control.
- Universal Tinting Pigments: These concentrated liquid pigments are commonly used for tinting paints. They can often be added to clear water-based finishes (like polycrylic) or even thinned down with water to create custom pigment stains. Start with a tiny amount and add gradually to achieve your desired shade.
- Powdered Wood Dyes: Available in a wide spectrum of colors, these dyes dissolve in water, alcohol, or denatured alcohol (check product instructions). They offer excellent color saturation and transparency.
- Mixing: Dissolve the powdered dye in the recommended solvent. For water-soluble dyes, use warm water. Alcohol-soluble dyes dry faster but can raise the grain less.
- Custom Colors: Blend different colored powdered dyes (e.g., a touch of red with blue for purple, or yellow with blue for green). Always mix a small test batch first.
- Concentration: Adjust the powder-to-solvent ratio to control color intensity.
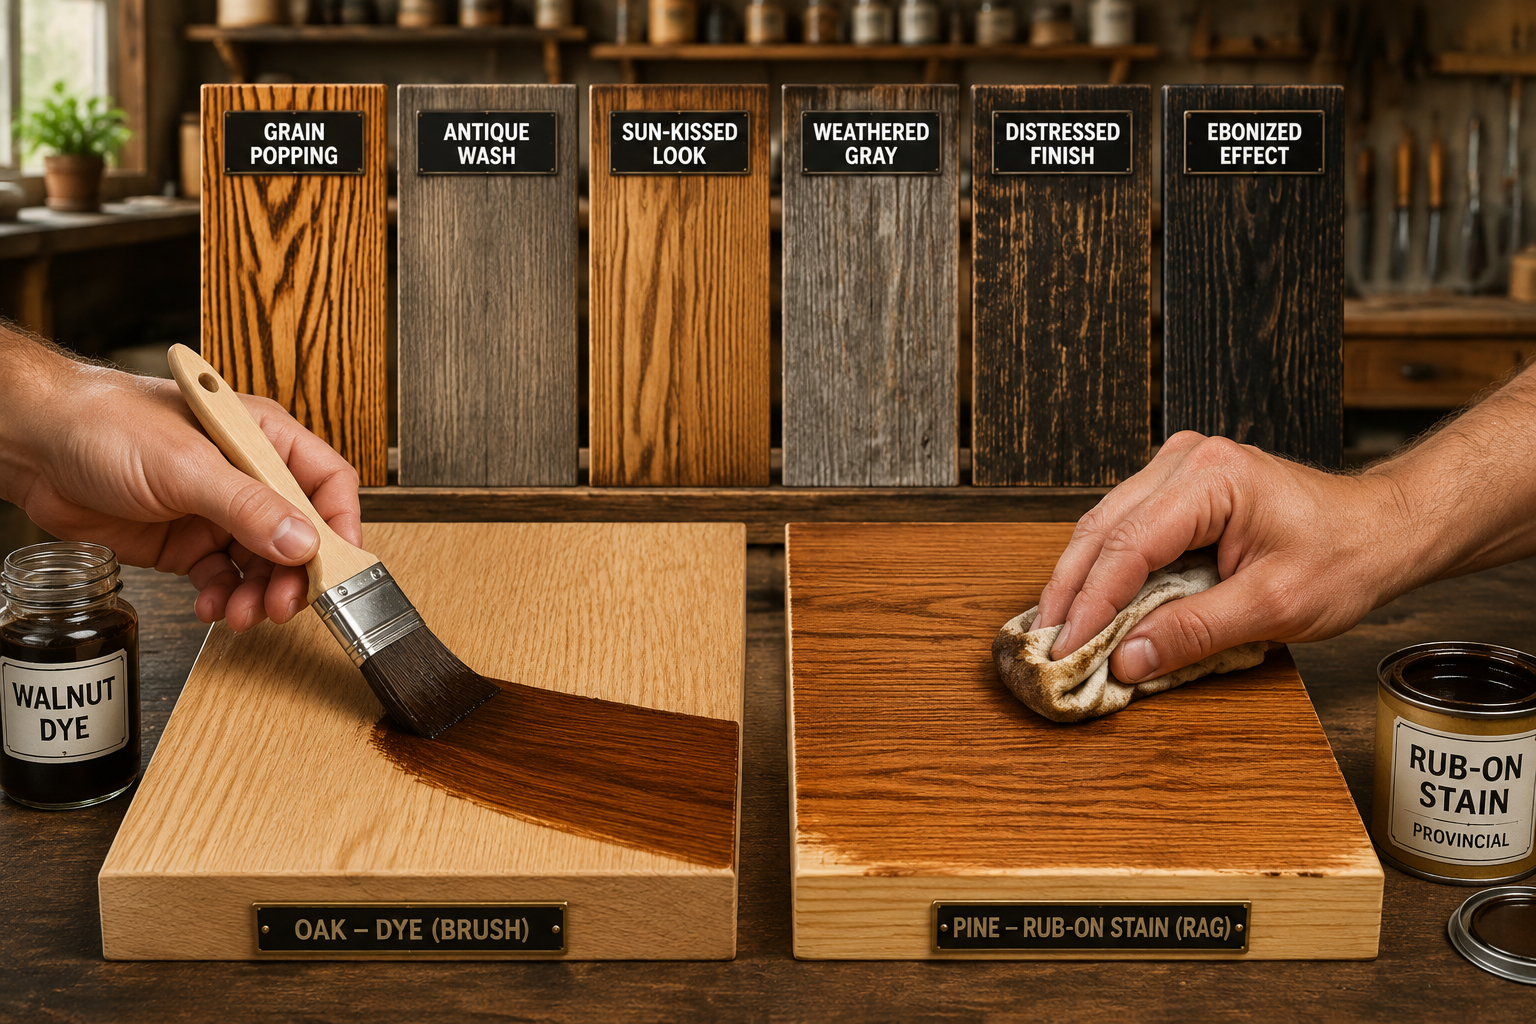
Enhancing Grain and Creating Effects
Beyond color, DIY finishes can create stunning visual effects.
- Grain Popping: Applying a water-based dye or even just dampening the wood with water before applying an oil-based stain can “pop” the grain, making it more pronounced. The water raises the grain fibers, which are then cut away with light sanding, leaving the deeper grain definition.
- Antiquing/Glazing: After applying a base stain or dye, a thin wash of a darker, contrasting color (often a thinned dark stain or glaze) can be wiped over the surface and then wiped off, leaving residue in the pores and recesses. This gives an aged, antiqued appearance.
- Two-Tone Effects: Apply a lighter dye as a base, then lightly sand and apply a different, darker stain over it. The second layer will grab more in the softer wood or sanded areas, creating depth.
- Sun-Kissed/Bleached Looks: While not strictly a “stain,” methods like using oxalic acid or commercial wood bleaches can lighten wood, creating a “sun-kissed” or bleached effect before applying a very light, translucent dye.

Application Techniques and Finishing Touches for Unique Wood Finishing
The application method significantly impacts the final appearance of your DIY Wood Stains and Dyes: Crafting Custom Colors and Effects for Unique Wood Finishing. Proper preparation and finishing are equally vital.
Wood Preparation: The Foundation of a Great Finish
A beautiful finish starts long before the stain or dye is applied.
- Sanding: Sand your project thoroughly and progressively through grits, typically up to 180 or 220 grit. Higher grits can sometimes “close off” the wood pores, leading to lighter stain absorption, while lower grits can leave scratches that the stain will highlight. Always sand with the grain.
- Dust Removal: After sanding, remove all dust using a vacuum, compressed air, and finally, a tack cloth or a rag dampened with mineral spirits. Dust can cause blotches and an uneven finish.
- Wood Conditioner: For blotch-prone woods like pine, birch, maple, and cherry, a pre-stain wood conditioner is essential. It helps the wood absorb the stain more evenly. Apply according to product directions and allow it to dry completely.
Application Methods
Different applicators yield different results:
- Brushing: Best for precise application, especially in corners or carved details. Use a high-quality natural bristle brush for oil-based products and synthetic for water-based.
- Wiping/Rag Application: Provides a smooth, even finish, often preferred for stains. Apply generously with a lint-free rag, allow it to penetrate, then wipe off excess with a clean rag before it dries.
- Foam Brush: Inexpensive and good for even application, especially with water-based dyes. Disposable, making cleanup easy.
- Spraying: For very large projects or achieving the most uniform coverage, spraying with an HVLP (High Volume Low Pressure) sprayer can be effective, particularly with thinned dyes. Requires proper ventilation and protective gear.
Step-by-Step Application Guide
- Test, Test, Test: Always test your custom stain or dye on a piece of scrap wood of the same species as your project. This is non-negotiable! The color will vary significantly depending on the wood.
- Apply Evenly: Work in sections, applying the stain or dye evenly and generously. Avoid drips and puddles.
- Allow Penetration: Let the finish penetrate for the recommended time (or based on your test results for desired depth of color).
- Wipe Off Excess: Crucial for stains. With a clean, lint-free cloth, wipe off all excess stain with the grain before it dries. If too much is left on, it can create a muddy, uneven, or sticky finish. For dyes, often less wiping is needed as they penetrate fully.
- Multiple Coats: For deeper, richer colors, allow the first coat to dry completely before applying a second. Lightly sand with very fine grit (320-400) between coats if needed, then remove dust.
Sealing and Topcoats
Once your custom color is achieved, protecting it with a durable topcoat is vital. The choice of topcoat can also subtly alter the final appearance.

- Polyurethane/Polycrylic: Extremely durable. Polyurethane is oil-based, dries slower, and can add a slight amber tint. Polycrylic is water-based, dries faster, clears, and has less odor.
- Varnish: Offers excellent protection, especially for outdoor pieces.
- Shellac: A natural finish that provides a beautiful amber glow and acts as a great sealer, preventing blotching if applied before a stain. It’s often used as an intermediate barrier coat.
- Oil Finishes (Danish Oil, Tung Oil): Penetrating oils that provide a natural, hand-rubbed look. They offer less surface protection than polyurethanes but are easy to repair. Ensure compatibility if using over a DIY dye. Refer to our guide on Danish Oil vs. Linseed: The Ultimate Wood Finishing Guide for more insights.
Troubleshooting Common Issues
Even experienced woodworkers encounter challenges.
- Blotching: Uneven color absorption, common on softwoods or figured woods. Prevent with wood conditioner and even application. If it occurs, you might need to sand back and reapply.
- Streaks/Lap Marks: Caused by uneven application or overlapping wet and dry areas. Work quickly and maintain a wet edge.
- Color Too Light/Dark:
- Too Light: Apply more coats, or create a more concentrated mixture.
- Too Dark: Sometimes light sanding can remove some color. Otherwise, you may need to strip and start over.
- Fading (Dyes): Many natural dyes and some synthetic dyes can fade over time with UV exposure. Use a UV-protective topcoat.
- Sticky Finish: Usually indicates too much stain was left on the surface and didn’t cure properly. Lightly wipe with mineral spirits (for oil-based) or sand gently and reapply a very thin coat of fresh stain.


Advanced Customization and Creative Exploration
Once the basics of DIY Wood Stains and Dyes: Crafting Custom Colors and Effects for Unique Wood Finishing are mastered, the real fun begins with pushing boundaries.
Layering and Glazing Techniques
Layering different colors and types of finishes can create incredible depth and complexity.
- Dye Under Stain: Apply a vibrant dye first to penetrate and pop the grain, then follow with a lighter, pigment-based stain. The stain will mute the dye slightly and add its own color, resulting in a rich, multi-dimensional finish. This is especially effective for dark wood finishing techniques.
- Glazing: A glaze is essentially a very thinned-down, often slightly opaque, colorant that is applied over a cured base coat. It’s wiped on and then partially wiped off, settling into grain patterns, recesses, and edges to create an aged or shaded effect. Glazes can be made by adding a small amount of universal tint or artist’s oil paint to a clear glaze medium.
- Pickling/Liming: For an antique, coastal, or farmhouse look, a white or off-white pickling stain can be applied over a darker base. The pickling wash settles into the grain, creating a stark contrast.
Creating Unique Patinas and Effects
Some DIY methods go beyond simple coloring to create unique chemical reactions or textural changes.
- Ammonia Fuming (Advanced/Caution!): This technique involves exposing oak (and other tannin-rich woods) to ammonia fumes in an enclosed, sealed environment. The ammonia reacts with the tannins to create a deep, rich, chocolate brown color that penetrates deeply. This is a hazardous process requiring extreme caution, proper ventilation, and personal protective equipment. It is generally not recommended for beginners.
- Tea Staining for Antiquing: As mentioned, black tea is rich in tannins. Applying strong black tea to wood can darken it directly or, more commonly, prepare the wood for a reaction with iron acetate, enhancing the graying or blackening effect.
- Burning (Shou Sugi Ban Inspired): While not a stain, controlled burning (e.g., with a propane torch) followed by brushing and sealing can create a dramatically charred and textured black finish, offering a unique visual and protective layer. This technique works well for furniture like Mastering Wooden Beer Caddy Builds.
Sourcing Materials and Sustainability
- Foraged Materials: Beyond common household items, explore local flora for dye possibilities (e.g., walnut hulls for deep browns, various barks and leaves). Always research safety and toxicity before using wild-foraged materials.
- Reclaimed Wood: When working with sourcing reclaimed and salvaged wood, DIY stains can be particularly effective. Reclaimed wood often has existing character, and a custom dye can highlight its unique history without obscuring it. Consider building live edge dining tables with reclaimed wood and personalizing them with custom finishes.
- Low VOC/Non-Toxic: Focus on water-based dyes, natural plant extracts, and mineral oil or beeswax finishes for the most eco-friendly and health-conscious approach.
Conclusion
The journey of DIY Wood Stains and Dyes: Crafting Custom Colors and Effects for Unique Wood Finishing is one of continuous learning and immense creative reward. By embracing homemade solutions, woodworkers gain unparalleled control over their projects’ aesthetics, moving beyond the limitations of commercial offerings to express a truly personal vision. From the subtle, earthy tones derived from natural ingredients like coffee and vinegar to the vibrant hues achieved through precise pigment blending, the possibilities are virtually limitless.
Remember that patience, experimentation on scrap wood, and a keen eye for detail are your most valuable tools. Each piece of wood reacts uniquely to a given finish, making the testing phase critical for success. As you explore these methods, you’ll not only create stunning, one-of-a-kind finishes but also deepen your connection to the craft of woodworking itself. In 2026, let your imagination guide your hands as you transform ordinary wood into extraordinary works of art, imbued with custom colors and effects that tell their own unique story. Start experimenting today and unlock a new dimension in your woodworking endeavors!
References
Grand View Research. (2024). Paints and Coatings Market Size, Share & Trends Analysis Report By Product (Waterborne, Solvent-borne), By Application (Architectural, Automotive), By Region (North America, Europe, APAC), And Segment Forecasts, 2024 – 2030.
