
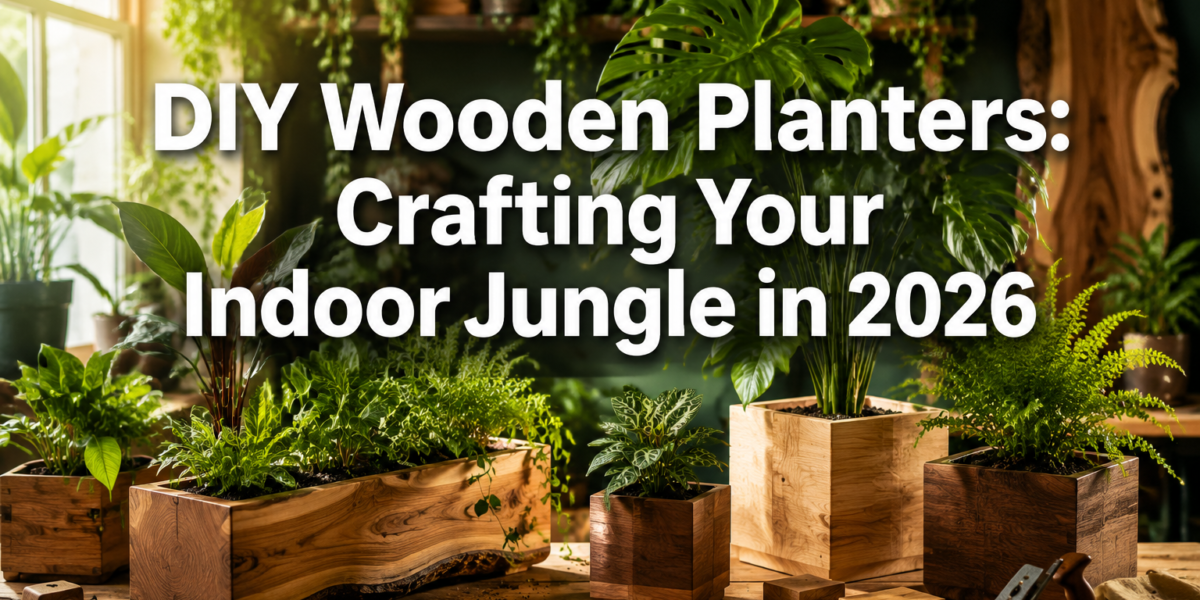

In 2026, as the “indoor jungle” trend continues its vigorous climb, homeowners are increasingly seeking unique, sustainable ways to integrate greenery into their living spaces. One of the most impactful and rewarding methods is through crafting DIY Wooden Planters for Indoor Jungles: From Simple Boxes to Live Edge Troughs. This hands-on approach not only allows for complete customization to fit specific plant needs and aesthetic preferences but also infuses a touch of natural warmth and artisanal charm that mass-produced alternatives simply cannot replicate. Embracing reclaimed wood, incorporating intelligent drainage, and applying the right finishes are pivotal to creating planters that are both beautiful and long-lasting, suitable for everything from a small shelf accent to a sprawling patio display.
Key Takeaways
- Customization is Key: DIY wooden planters offer unparalleled flexibility in size, shape, and design, perfect for any indoor jungle aesthetic or plant requirement.
- Material Matters: Reclaimed wood offers unique character and sustainability, while proper wood selection ensures durability against moisture.
- Essential Drainage & Lining: Effective drainage and a waterproof liner are critical for plant health and planter longevity, preventing rot and mold.
- Finishing for Durability: Applying appropriate sealants and finishes protects the wood from moisture, extending the life of your planter both indoors and on covered patios.
- Scalable Projects: From basic box designs for beginners to intricate live-edge troughs for advanced crafters, there’s a wooden planter project for every skill level.
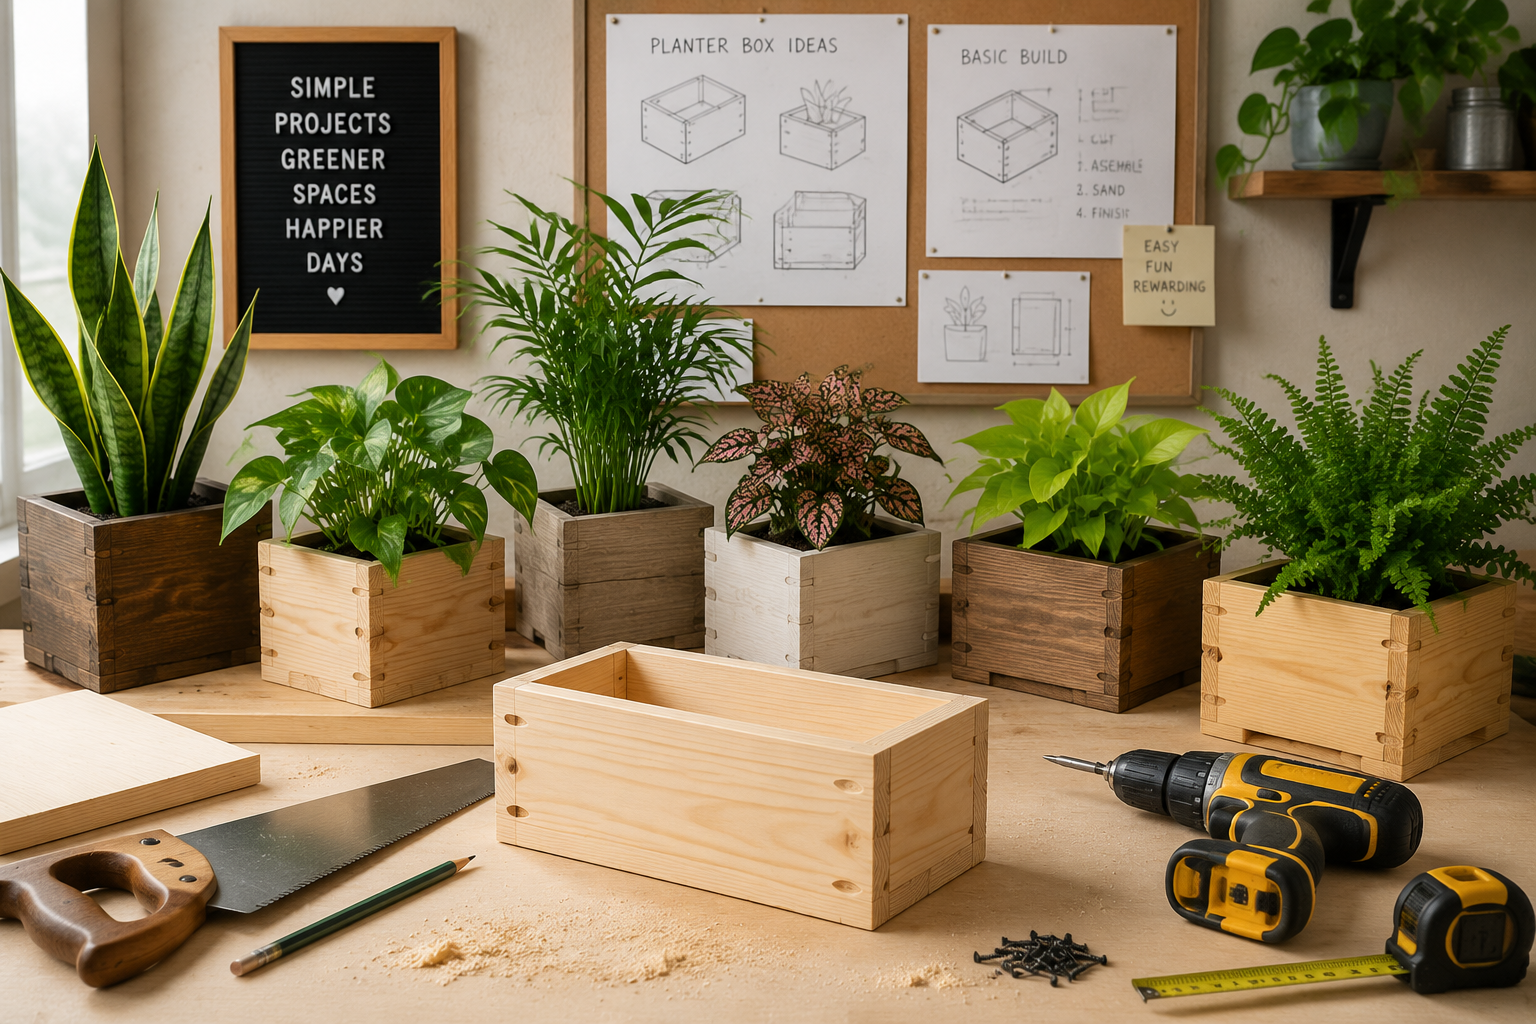
The Foundation: Simple Wooden Planter Boxes for Beginners
For those embarking on their woodworking journey, the simple wooden planter box is an ideal starting point. It teaches fundamental skills while providing a tangible, beautiful result. These basic boxes can house an array of popular indoor plants, from succulents and herbs to small philodendrons and pothos, instantly enhancing any shelf or tabletop.

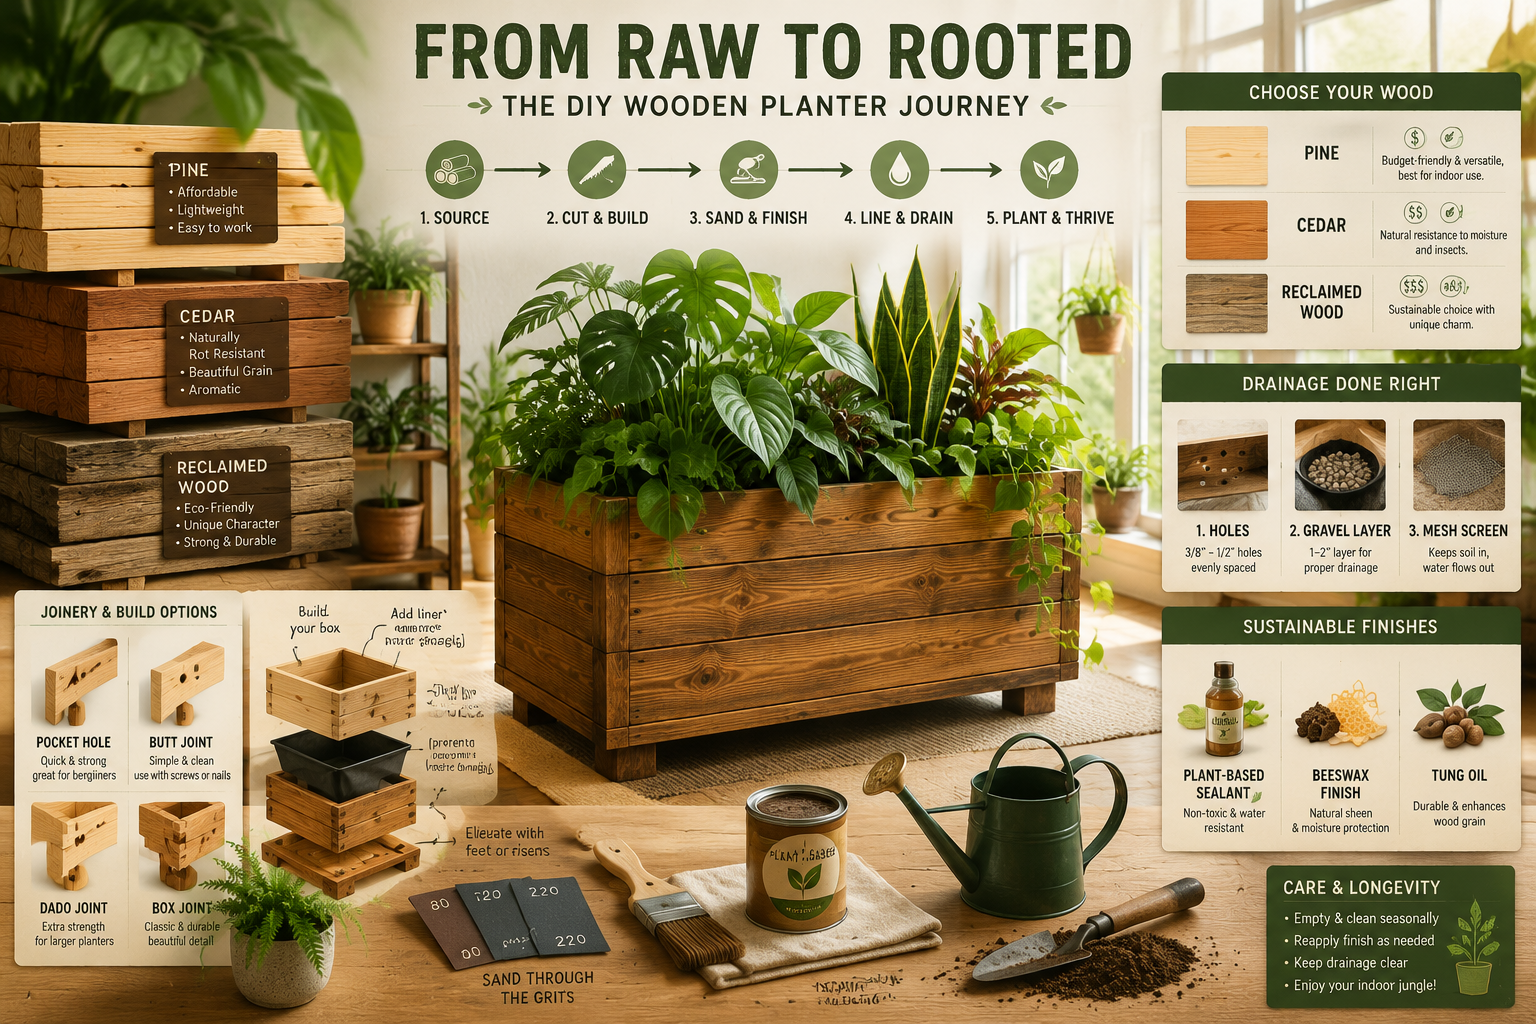
Choosing Your Wood and Tools
The success of any DIY project begins with material selection. For simple indoor planters, accessible and forgiving woods are best.
Recommended Wood Types:
- Pine: Affordable, easy to work with, and widely available.
- Cedar: Naturally rot-resistant and aromatic, though slightly more expensive.
- Poplar: Smooth grain, takes paint well, good for painted finishes.
- Reclaimed Pallet Wood: A sustainable and cost-effective option, offering rustic charm. Ensure pallets are heat-treated (HT stamp) and not chemically treated (MB stamp) for safety, especially for edible plants. Upcycling Old Pallets: Creative and Sustainable Woodworking Projects can provide more insights into sourcing and preparing pallet wood.
Essential Tools for Basic Planters:
- Hand Saw or Miter Saw: For accurate cuts.
- Drill: For pilot holes and drainage holes.
- Screwdriver or Impact Driver: For assembly.
- Measuring Tape and Pencil: For marking.
- Safety Gear: Gloves, eye protection.
Step-by-Step: Building a Basic Box Planter
Building a simple rectangular planter box is straightforward.
- Design and Measure: Determine the desired dimensions (length, width, height) based on your plant’s needs. A good rule of thumb is to make the planter slightly larger than the nursery pot.
- Cut Your Pieces:
- Two side pieces (length x height)
- Two end pieces (width x height)
- One bottom piece (length x width) Ensure all cuts are square for a snug fit.
- Assemble the Sides: Apply wood glue to the edges and secure the side and end pieces together using wood screws. Pre-drill pilot holes to prevent splitting. For stronger joints, consider exploring basic joinery techniques like butt joints reinforced with corner blocks. Our Beginner’s Guide to Essential Woodworking Joints can offer further guidance.
- Attach the Bottom: Place the assembled sides onto the bottom piece, ensuring it’s centered. Apply glue and secure with screws from the sides into the bottom.
- Drill Drainage Holes: Crucial for plant health, drill several 1/2-inch to 3/4-inch holes in the bottom of the planter. At least 3-5 holes are recommended for adequate drainage.
- Sanding: Smooth any rough edges with sandpaper (100-150 grit, then 220 grit).
Drainage and Lining Solutions for Simple Planters
Even the most basic planter needs proper drainage to prevent root rot.
- Drainage Layer: Place a layer of gravel, broken pottery, or lava rocks at the bottom of the planter before adding soil. This creates a reservoir for excess water.
- Lining: A non-permeable liner is essential to protect the wood from moisture.
- Plastic Sheeting: Heavy-duty trash bags or pond liner remnants work well. Staple them to the inside of the planter, ensuring they cover the sides and bottom. Punch holes in the liner where your drainage holes are.
- Landscape Fabric: While not waterproof, it can prevent soil from escaping through drainage holes and help retain moisture for certain plants. Use in conjunction with a plastic liner for waterproofing.
Elevating Your Craft: Live-Edge Troughs and Advanced Designs
For the experienced woodworker or ambitious beginner, creating live-edge troughs or multi-tiered planters offers a chance to showcase woodworking skills and create truly unique pieces. These advanced DIY Wooden Planters for Indoor Jungles: From Simple Boxes to Live Edge Troughs become focal points, celebrating the raw beauty of wood and the lushness of plant life.
Sourcing and Preparing Live-Edge Slabs
Live-edge wood, with its natural, untrimmed edges, brings an organic, sculptural element to any project.
- Sourcing: Look for slabs from local sawmills, specialty wood suppliers, or even fallen trees (if you have the tools to mill them). Species like black walnut, oak, maple, and cedar are popular for their beautiful grain and durability. Consider visiting local lumberyards for unique finds.
- Drying: Ensure the wood is properly kiln-dried or air-dried for at least a year per inch of thickness to prevent warping and cracking.
- Preparation:
- Debarking: Remove any loose bark with a chisel or wire brush.
- Flattening: Live-edge slabs are rarely perfectly flat. Use a planer or router sled to flatten both sides. For detailed guidance on power tool usage for professional finishes, refer to Power Tool Mastery for Decorative Wood Projects.
- Sanding: Start with coarse grit (80-100) and progressively move to finer grits (up to 220 or 320) to achieve a smooth finish.
Crafting Live-Edge Troughs
A live-edge trough planter involves hollowing out a slab or constructing a trough using live-edge pieces.
Method 1: Hollowing a Single Slab (Advanced)
- Marking: Outline the desired trough shape on a thick live-edge slab.
- Routing/Carving: Use a router with a large bit, chisels, and a mallet to gradually hollow out the center, leaving sufficient wall thickness. This requires patience and precision.
- Smoothing: Sand the inside of the trough smooth.
- Drainage: Drill drainage holes through the bottom of the hollowed-out section.
Method 2: Constructing with Live-Edge Panels
- Select Panels: Choose four live-edge panels for the sides and ends, and a flat piece for the bottom.
- Joinery: Use robust joinery techniques. Dovetail joints (as explored in Mastering Dovetail Drawers for Cabinets) or mortise and tenon joints provide excellent strength and aesthetic appeal. Biscuit joints or dowels can also work.
- Assembly: Glue and clamp the pieces, ensuring the live edges are strategically placed for visual impact.
- Bottom and Drainage: Attach a flat bottom, and drill ample drainage holes.
Incorporating Advanced Features
- Integrated Stands: Design the planter with integrated legs or a stand for better elevation and stability.
- Self-Watering Systems: Explore adding wicking systems or reservoirs for reduced watering frequency.
- Modular Designs: For larger indoor jungles, consider building several interlocking or stackable units. Building Modular Wood Storage Systems for Small Workshops offers principles that can be adapted to modular planter construction.
Waterproofing and Finishing for Longevity
Finishing is paramount, especially for planters exposed to moisture.
- Interior Sealing: Even with a liner, applying a waterproof sealant to the interior can provide an extra layer of protection. Epoxy resins or marine-grade sealants are excellent choices.
- Exterior Finishes:
- Oil Finishes: Penetrating oils (linseed, tung, or Danish oil) enhance the natural grain and provide a matte finish. They require reapplication.
- Polyurethane: Offers excellent water resistance and durability. Available in various sheens. Water-based polyurethane is easy to clean up. Sprayable Water-Based Polyurethane: A Step-by-Step Guide provides application insights.
- Spar Urethane: Specifically designed for outdoor use, offering superior UV and moisture protection, ideal for planters on covered patios.
- Wax: For a natural look and feel, wax can provide a subtle protective layer but is less durable against moisture than oils or polyurethanes.
Essential Considerations for All DIY Wooden Planters for Indoor Jungles
Regardless of complexity, several universal principles ensure your DIY wooden planter is successful and sustainable in 2026.
Wood Species and Durability
The type of wood significantly impacts the planter’s lifespan and aesthetic.

| Wood Type | Pros | Cons | Best For |
|---|---|---|---|
| Pine | Affordable, easy to work, takes paint/stain well. | Less durable against moisture, prone to rot. | Simple indoor boxes, painted finishes. |
| Cedar | Naturally rot-resistant, aromatic, lightweight. | Softer, can dent easily, moderate cost. | Indoor/covered patio, natural look. |
| Redwood | Highly rot and insect resistant, beautiful grain. | Expensive, can be harder to find. | Premium, long-lasting planters. |
| Teak | Extremely durable, naturally water-resistant. | Very expensive, often sustainably sourced. | High-end, heirloom-quality, wet environments. |
| Reclaimed Wood | Sustainable, unique character, cost-effective. | Varies in quality, requires careful prep. | Rustic, unique designs, budget-friendly. |
Proper Drainage and Airflow
Recalling the essential point, drainage is paramount.
- Raised Bottoms: Adding small feet or risers to the planter bottom improves airflow beneath it, preventing moisture buildup between the planter and the floor/shelf.
- Drainage Tray: Always place a drainage tray underneath to catch excess water and protect surfaces. Consider custom-fitting a wooden tray with a waterproof liner.
Interior Protection: Liners and Sealants
This dual approach maximizes the lifespan of your wooden planter.
- Pond Liner: For large troughs or live-edge designs, flexible pond liner (EPDM rubber) offers excellent, long-term waterproofing. It’s thick, durable, and can be easily cut to size and stapled.
- Rubberized Paint/Sealant: Products like flex seal or rubberized waterproof paint can be applied directly to the interior of the wood for a seamless, protective barrier.
- Ventilation: While lining is critical, ensure there’s still some air circulation around the outside of the liner within the planter if possible, to prevent trapped moisture.
Maintenance and Care
Even well-made wooden planters require some upkeep.
- Regular Cleaning: Wipe down the exterior with a damp cloth to remove dust and dirt.
- Reapplication of Finish: Depending on the finish used, reapply oil, wax, or sealant annually or as needed, especially for planters on covered patios or near humid areas.
- Inspect for Damage: Periodically check for any signs of rot, mold, or structural damage. Address issues promptly.
- Seasonal Rotation: If using your wooden planters outdoors, rotate them occasionally to ensure even sun exposure and moisture distribution.
By meticulously planning and executing these steps, from choosing the right wood to applying the perfect finish, anyone can create stunning and functional DIY wooden planters. These bespoke pieces will not only elevate your indoor jungle but also become cherished testaments to your craftsmanship, lasting for years to come.
Conclusion
Creating DIY Wooden Planters for Indoor Jungles: From Simple Boxes to Live Edge Troughs is a profoundly rewarding endeavor that marries the natural beauty of wood with the vibrant life of plants. Whether you’re a novice woodworker fashioning simple boxes or an experienced artisan carving intricate live-edge troughs, the principles of careful wood selection, meticulous drainage, and robust finishing remain constant. In 2026, embracing reclaimed wood not only adds character but also champions sustainability, making your projects even more impactful. By following the comprehensive guidance provided, you can craft planters that are not only aesthetically pleasing but also durable, fostering thriving indoor jungles that bring tranquility and a touch of bespoke craftsmanship into your home.
Actionable Next Steps:
- Assess Your Skill Level: Decide if a simple box or an advanced live-edge project aligns with your current woodworking abilities and available tools.
- Gather Materials: Source your chosen wood, ensuring it’s suitable for your desired finish and plant environment. Don’t forget fasteners, glue, and sandpaper.
- Prioritize Drainage: Select a reliable lining material (plastic sheeting, pond liner) and plan for ample drainage holes in your design.
- Choose Your Finish: Research and acquire the appropriate sealant or finish to protect your wood from moisture and enhance its natural beauty.
- Start Building! Take your time, focus on accuracy, and enjoy the process of bringing your vision to life.
