


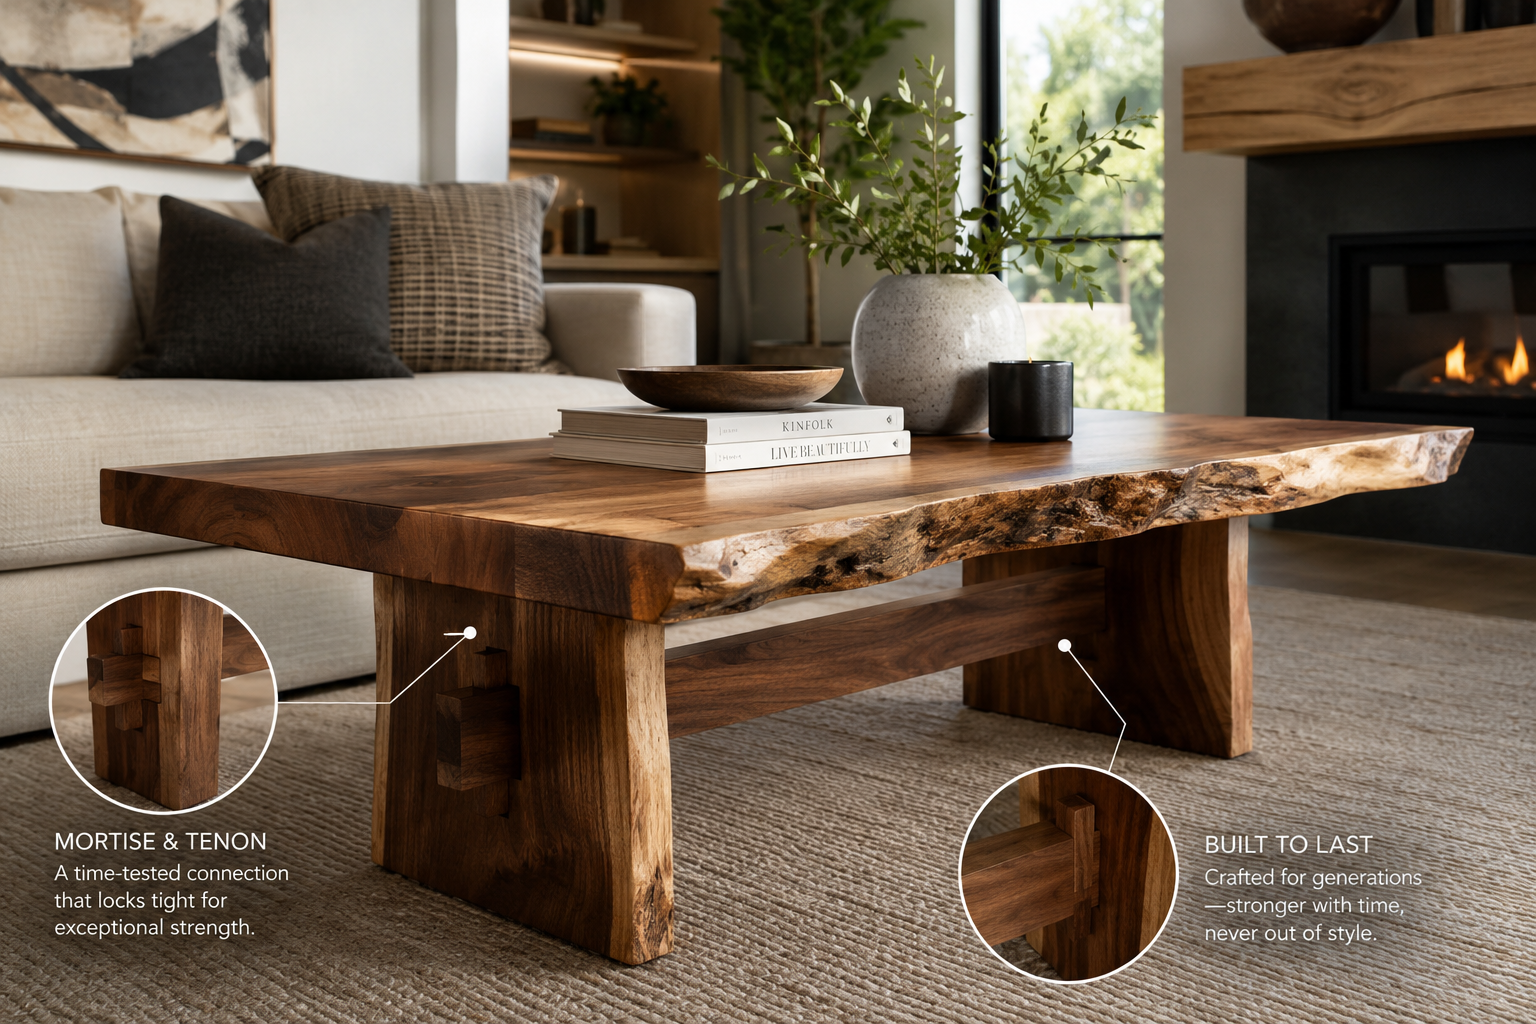
The average handmade live edge furniture piece boasts a lifespan exceeding 50 years when constructed with superior joinery. As demand for organic, durable, and unique pieces continues its upward trajectory in 2026, the venerable mortise and tenon joint stands as the bedrock of structural integrity and aesthetic harmony. This article delves into the essential techniques for mastering Mortise and Tenon Joinery for Live Edge Furniture, ensuring your creations are not only beautiful but also built to last for generations. We will explore both traditional hand tool methods and efficient power tool jigs, adapting age-old craftsmanship to the modern workshop, perfectly suited for the rough-hewn timber trends dominating today’s market.
Key Takeaways
- The mortise and tenon joint is crucial for the strength and longevity of live edge furniture.
- Understanding wood movement and grain direction is paramount when designing and cutting these joints.
- Both traditional hand tools and modern power tool jigs can achieve precise mortise and tenon joints, offering flexibility for different skill levels and workshop setups.
- Proper layout, accurate cutting, and careful fitting are essential steps for a successful joint.
- Refining and finishing the joints contribute significantly to both the structural integrity and the aesthetic appeal of live edge pieces.
Understanding Mortise and Tenon Joinery: The Foundation for Live Edge Furniture
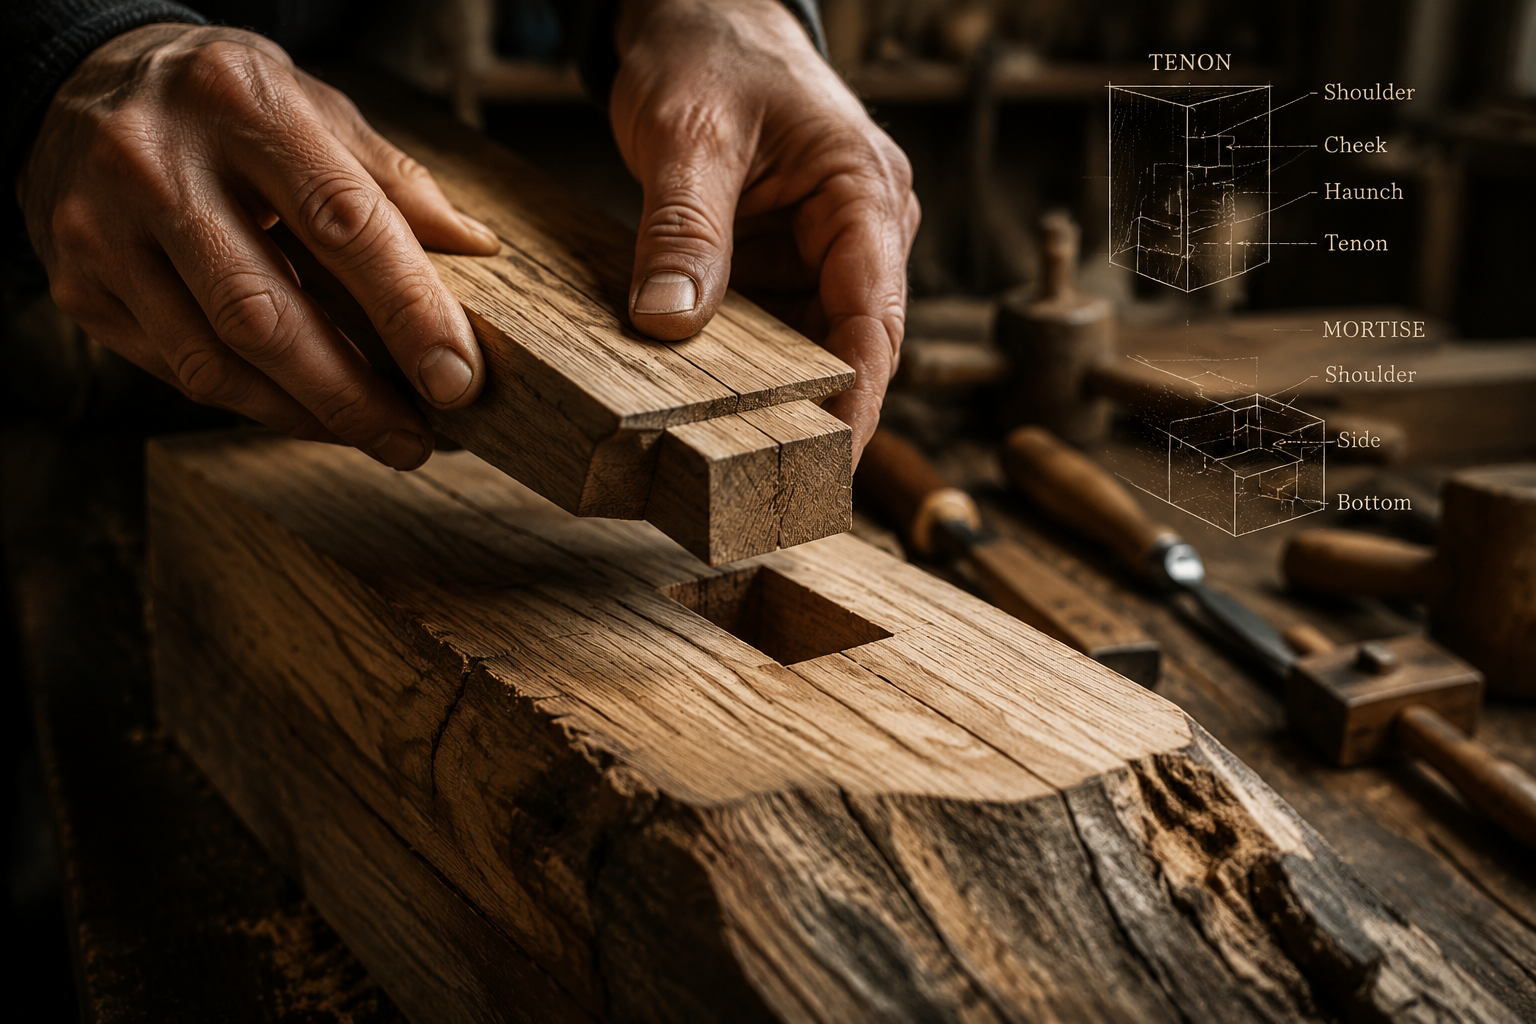
The mortise and tenon joint is a classic woodworking connection renowned for its strength, durability, and versatility. It consists of two primary components: the mortise (a cavity or hole) and the tenon (a projection that fits snugly into the mortise). This mechanical lock, often reinforced with glue, creates an exceptionally strong bond, making it ideal for the substantial loads and natural movement inherent in live edge slabs. For those looking to master fundamental connections, a Beginner’s Guide to Essential Woodworking Joints provides a broader context.

When working with live edge timber, the organic, often irregular shapes present unique challenges and opportunities. The rough-hewn nature of the material means that precise layout and careful consideration of grain direction are even more critical than with milled lumber. The inherent beauty of live edge wood often lies in its imperfections, and the joinery should complement, not detract from, this natural aesthetic.
Types of Mortise and Tenon Joints
While the basic principle remains constant, several variations exist, each suited for different applications in live edge furniture:
- Through Mortise and Tenon: The tenon passes completely through the mortise, often visible on the opposite side. This type is incredibly strong and can be pegged for added mechanical strength and visual appeal, perfectly complementing rustic or industrial live edge designs.
- Blind Mortise and Tenon: The tenon does not pass entirely through the mortise, leaving the exterior surface clean. This is often preferred for a cleaner, more refined look where the joinery is hidden.
- Haunched Mortise and Tenon: Features a shoulder (haunch) that fills the corner of the mortise, providing additional glue surface and preventing the tenon from twisting. Useful for wide rails connected to narrow legs.
- Staircase/Tusk Tenon: A through tenon secured by a wedge or ‘tusk’ on the outside, creating an exposed, decorative, and mechanically sound joint. This is particularly appealing in chunky live edge tables or benches.
The choice of joint type often depends on the desired aesthetic, structural requirements, and the thickness of the live edge material. For selecting and preparing these unique materials, refer to our guide on Live Edge Slab Selection and Preparation.
Essential Techniques for Cutting Mortise and Tenon Joints
Achieving precise mortise and tenon joints for live edge furniture requires careful planning and execution, whether you opt for traditional hand tools or modern power tool methods.
Hand Tool Techniques
Working with hand tools allows for exceptional control and a deeper understanding of the wood. This approach aligns beautifully with the artisanal spirit of live edge work.
- Layout and Marking: Accuracy starts here. Use a marking gauge to establish the shoulders of the tenon and the depth/width of the mortise. A square and pencil are indispensable for transferring measurements. Pay close attention to grain direction; tenons should be cut with the grain, and mortises across it for optimal strength.
- Cutting the Tenon:
- Shoulders: Use a sharp Beginner’s Guide to Japanese Hand Saws or a backsaw to cut the shoulders of the tenon. Cut slightly proud of your line and pare down to the exact line with a chisel.
- Cheeks: Saw down the cheek lines, again cutting just outside your marked lines.
- Refinement: Use a sharp chisel to pare the tenon cheeks down to the final thickness, ensuring a smooth, flat surface that will mate perfectly with the mortise.
- Cutting the Mortise:
- Drilling: Use an auger bit or a drill press to remove the bulk of the waste within the mortise, staying well within your marked lines.
- Chiseling: With a mortise chisel (or a bench chisel for shallower work), chop down the ends of the mortise, then work your way along the length, levering out waste. Ensure the chisel is held perpendicular to the surface. Repeatedly check the depth and ensure the sides are straight and square. For enhancing your hand tool skills, explore Hand Tool Mastery for Detail Work.
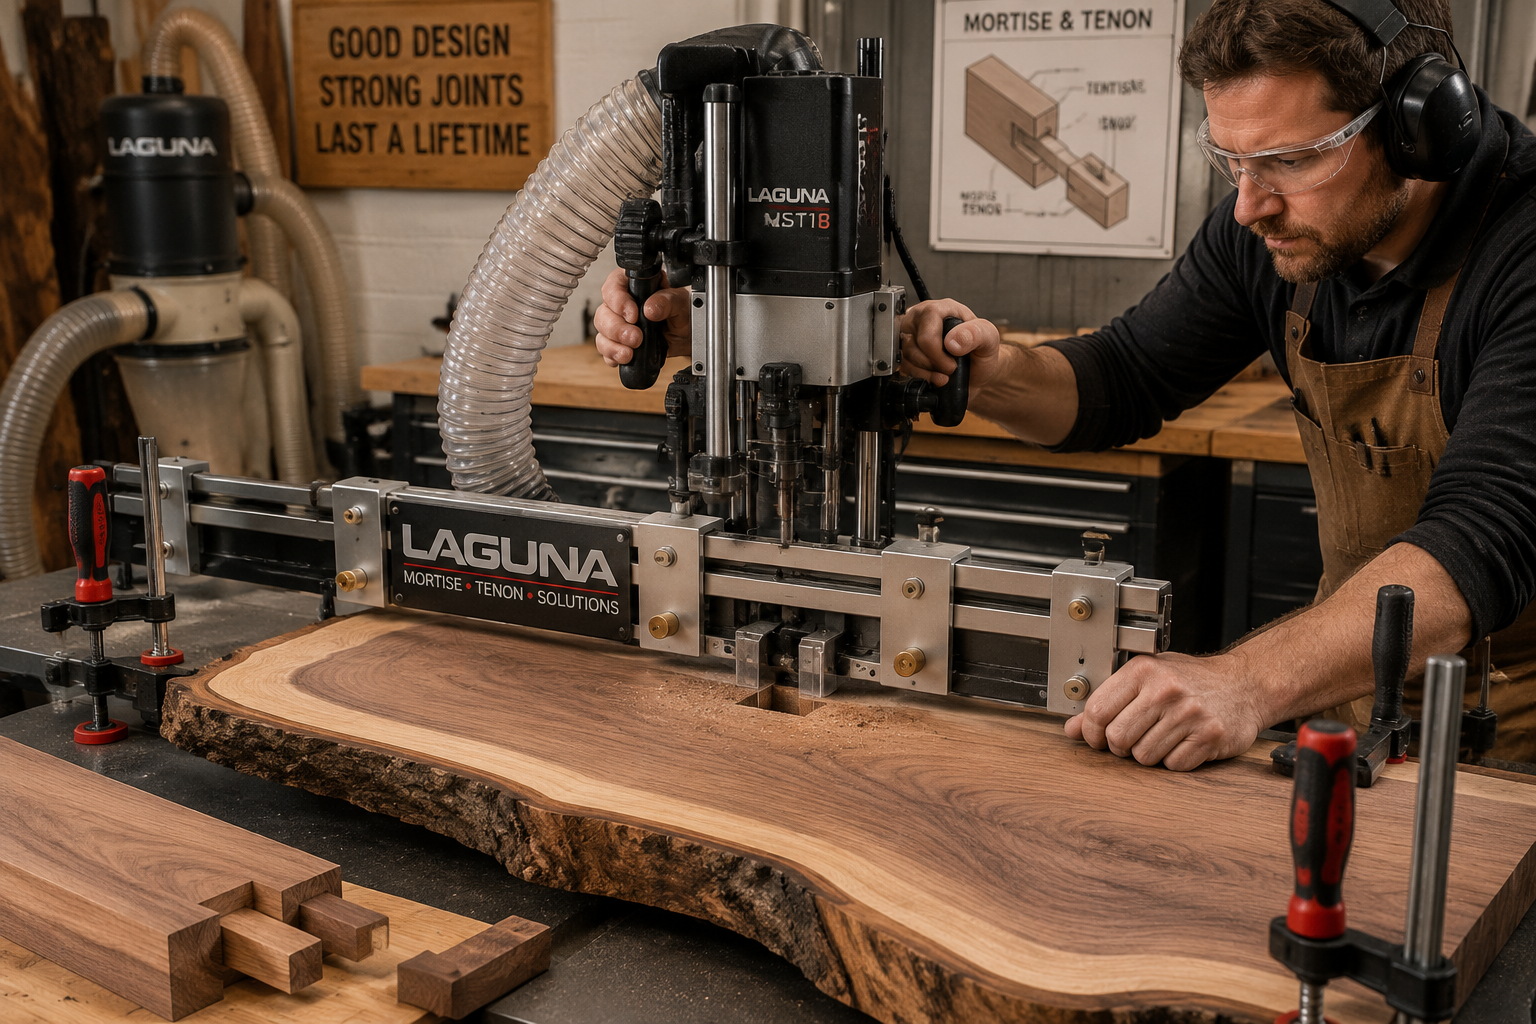
Power Tool Techniques and Jigs
Power tools offer speed and consistency, particularly beneficial for production work or for woodworkers adapting to the demands of 2026 projects.
- Router and Jig: A router is a versatile tool for cutting mortises.
- Mortising Jig: Build or purchase a dedicated mortising jig that clamps to your live edge piece. This jig guides the router (with a straight or up-cut spiral bit) to create a clean, consistent mortise. This is particularly useful for achieving deep, accurate mortises in thick live edge slabs. For more on router bits, see The Essential Guide to Router Bits.
- Tenoning Jig: For tenons, a table saw equipped with a Delta Tenoning Jig or a standard table saw tenoning jig can rapidly cut precise tenons. This method is incredibly efficient for creating repeatable, square tenons.
- Mortising Machine: A dedicated mortising machine (benchtop or floor standing) uses a hollow chisel and auger bit to cut square holes, ideal for repetitive, highly accurate mortises. This is a significant investment but invaluable for serious furniture makers.
- Bandsaw for Tenons: A bandsaw is excellent for roughing out tenons quickly, especially on irregularly shaped live edge stock. Follow up with a shoulder plane or chisel for final refinement. Learn more about its applications in Mastering the Band Saw.
Regardless of the method, remember that test cuts on scrap wood of the same species and thickness are crucial before cutting your final live edge pieces. This allows for fine-tuning tool setups and ensuring a perfect fit.
Fitting, Gluing, and Finishing Mortise and Tenon Joints
Once the individual components are cut, the real artistry comes in fitting them together seamlessly. This stage is critical for both the structural integrity and the aesthetic appeal of your live edge furniture.
Test Fitting and Adjustments
A perfectly cut mortise and tenon joint should fit snugly without excessive force, yet not be loose.
- Dry Fit First: Always dry-fit the joint before applying any glue. It should slide together with moderate hand pressure.
- Too Tight: If the joint is too tight, identify the high spots (often marked by friction during the dry fit) and carefully pare them down with a sharp chisel or block plane. Take off very thin shavings.
- Too Loose: A slightly loose joint can sometimes be remediated by adding thin shims of wood veneer or by applying thicker glue, but excessive looseness compromises strength. It’s always better to aim for slightly tight and pare down.
Gluing and Clamping
Glue selection and proper clamping are vital for a strong, long-lasting joint.
- Glue Application: Apply a thin, even coat of high-quality wood glue to both the tenon cheeks and the inside walls of the mortise. Ensure complete coverage, but avoid excessive squeeze-out.
- Assembly: Bring the pieces together, ensuring correct alignment.
- Clamping: Apply even clamping pressure to draw the joint tightly together. Use cauls (wooden pads) to protect the live edge surfaces from clamp marks. Wipe away excess glue squeeze-out immediately with a damp cloth or allow it to dry slightly and pare it off with a chisel. Ensure the joint remains square during clamping.
Finishing and Refinement for Live Edge Pieces
The finishing touches bring out the beauty of the live edge and highlight the craftsmanship of the joinery.
- Flush Trimming: If you’ve used a through mortise and tenon, flush-trim the protruding tenon with a flush-cut saw or a sharp chisel.
- Chamfers and Roundovers: Consider adding a slight chamfer or roundover to the exposed edges of the tenon or mortise to prevent splintering and give a more refined look, especially on rustic live edge pieces.
- Sanding: Thoroughly sand the entire piece, gradually working through grits, paying close attention to the area around the joints to ensure a smooth transition.
- Final Finish: Apply a durable finish that protects the wood and enhances its natural grain. For live edge furniture, oil-based finishes often deepen the natural colors and provide a tactile, natural feel.
For those venturing into building larger pieces with these joints, consider our guide on Building Statement Furniture Pieces. The integration of robust joinery is what truly elevates a live edge slab from a raw material to a cherished heirloom.
Conclusion
Mastering Mortise and Tenon Joinery for Live Edge Furniture: Essential Techniques is a cornerstone for any woodworker aspiring to create durable, beautiful, and valuable pieces in 2026. From the careful layout and precise cutting of the mortise and tenon, whether by hand or with power tools, to the meticulous fitting and finishing, each step contributes to a joint that embodies strength and elegance. This traditional joinery method, when applied thoughtfully to the organic beauty of live edge wood, creates furniture that not only stands the test of time but also tells a story of craftsmanship and connection to nature. Embrace these techniques, and you’ll be well on your way to crafting heirloom-quality live edge furniture that truly sells itself.

Actionable Next Steps:
- Practice on Scraps: Before touching your prized live edge slabs, practice cutting various mortise and tenon joints on scrap wood to refine your technique and achieve consistent fits.
- Invest in Quality Tools: Ensure your chisels are razor-sharp, your marking gauges accurate, and your power tools properly calibrated. Sharp tools are safer and produce cleaner results.
- Study Wood Movement: Deepen your understanding of how different wood species react to changes in humidity and temperature. This knowledge is crucial for designing joints that accommodate natural wood movement, especially in thick live edge pieces.
- Explore Different Joint Variations: Experiment with through-tenons, tusk tenons, or haunched tenons to see how they impact both strength and aesthetics in your designs.
- Document Your Process: Keep a journal of your joinery dimensions, tool settings, and lessons learned. This will be invaluable for future projects and continuous improvement.
References
- Schwarz, C. (2011). The Anarchist’s Tool Chest. The Lost Art Press.
- Tichy, T. (2016). Making Mortise-and-Tenon Joints. Taunton Press.
