
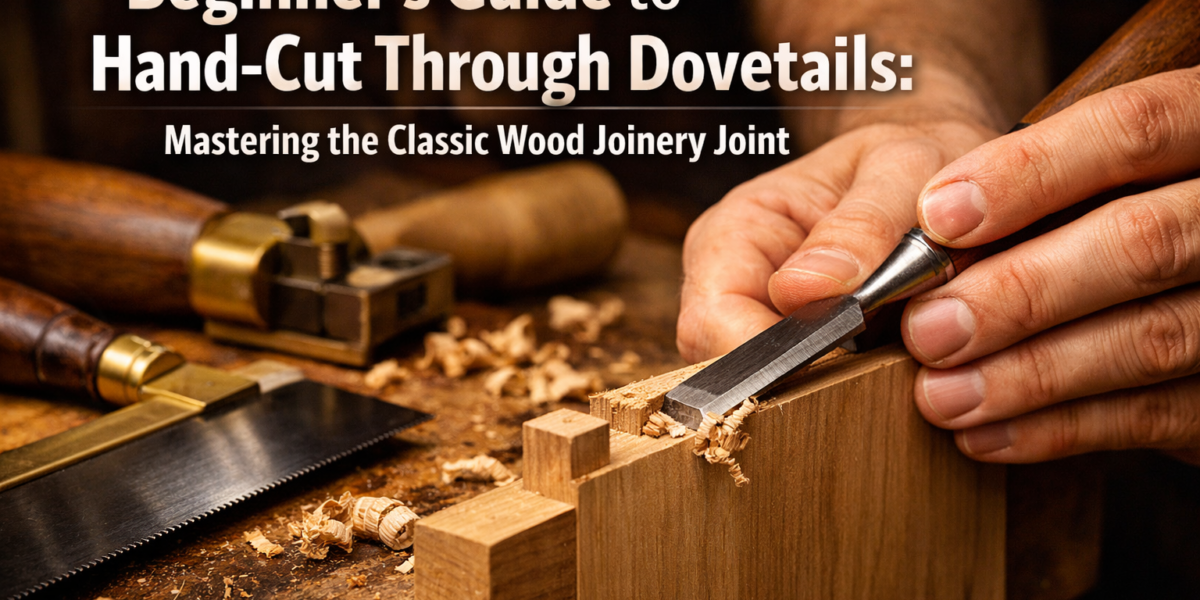

The average aspiring woodworker often struggles with achieving furniture-grade joinery, where gaps, misalignment, and weakness compromise the final product. While modern power tools offer shortcuts, the hand-cut through dovetail remains the pinnacle of traditional woodworking, celebrated for its unparalleled strength and aesthetic appeal. Mastering this classic joint by hand not only elevates your craftsmanship but also imparts a deep understanding of wood mechanics and precision. This beginner’s guide to hand-cut through dovetails will systematically walk you through the process, equipping you with the knowledge and techniques to achieve tight, beautiful joints that will stand the test of time, making your woodworking projects truly exceptional in 2026.
Key Takeaways
- Hand-cut through dovetails offer superior strength and aesthetic beauty compared to other joinery methods.
- Mastering this joint develops fundamental woodworking skills in precision, marking, and tool control.
- Success hinges on selecting the right tools, proper setup, and a systematic, step-by-step approach.
- Patience, practice, and attention to detail are more critical than raw speed when learning dovetails.
- This guide provides actionable steps to confidently execute your first successful hand-cut through dovetail joint.
Understanding the Hand-Cut Through Dovetail Joint
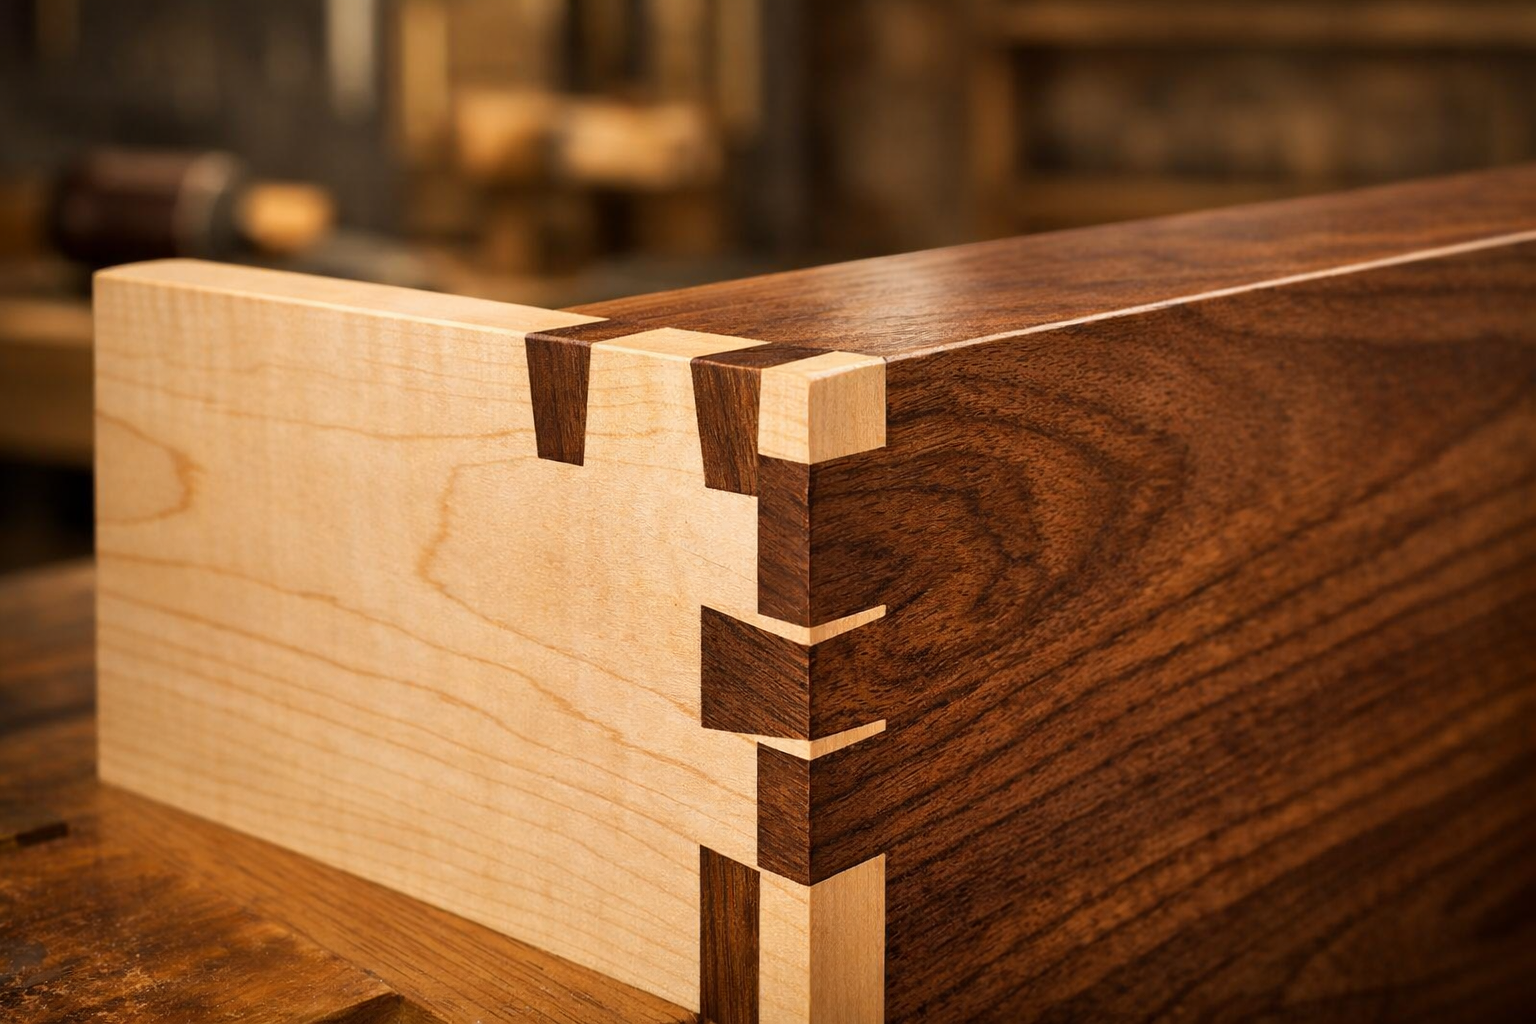
The dovetail joint, characterized by its interlocking ‘pins’ and ‘tails,’ is one of the strongest and most visually striking joints in woodworking. Its unique shape resists pulling forces, making it ideal for drawer boxes, carcases, and any application requiring robust corner construction. Among its variations, the through dovetail is the most fundamental and visible, exposing the end grain of both components.

Historically, dovetails were a hallmark of skilled craftsmanship, representing dedication to precision and structural integrity. In 2026, despite advancements in machinery, the ability to cut dovetails by hand remains a testament to a woodworker’s skill and commitment to traditional methods. Beyond its strength, a well-executed hand-cut dovetail is a beautiful design feature in itself, often left exposed to showcase the joinery.
Why Hand-Cut?
While dovetail jigs and routers can expedite the process, hand-cutting offers several advantages:
- Superior Aesthetics: Hand-cut dovetails can be deliberately spaced and sized to suit the project’s design, often featuring proportions that are more appealing than machine-made versions.
- Enhanced Strength: A hand-cut joint can be fitted with microscopic precision, often resulting in a tighter, stronger bond than many machine-cut alternatives, especially when a slight undercut is employed during chiseling.
- Skill Development: The process demands patience, precision, and a keen eye, honing essential hand-tool skills like sawing, chiseling, and marking. These skills translate to all aspects of woodworking.
- Therapeutic Process: Many woodworkers find the meditative rhythm of hand-cutting dovetails to be a deeply satisfying and rewarding experience.
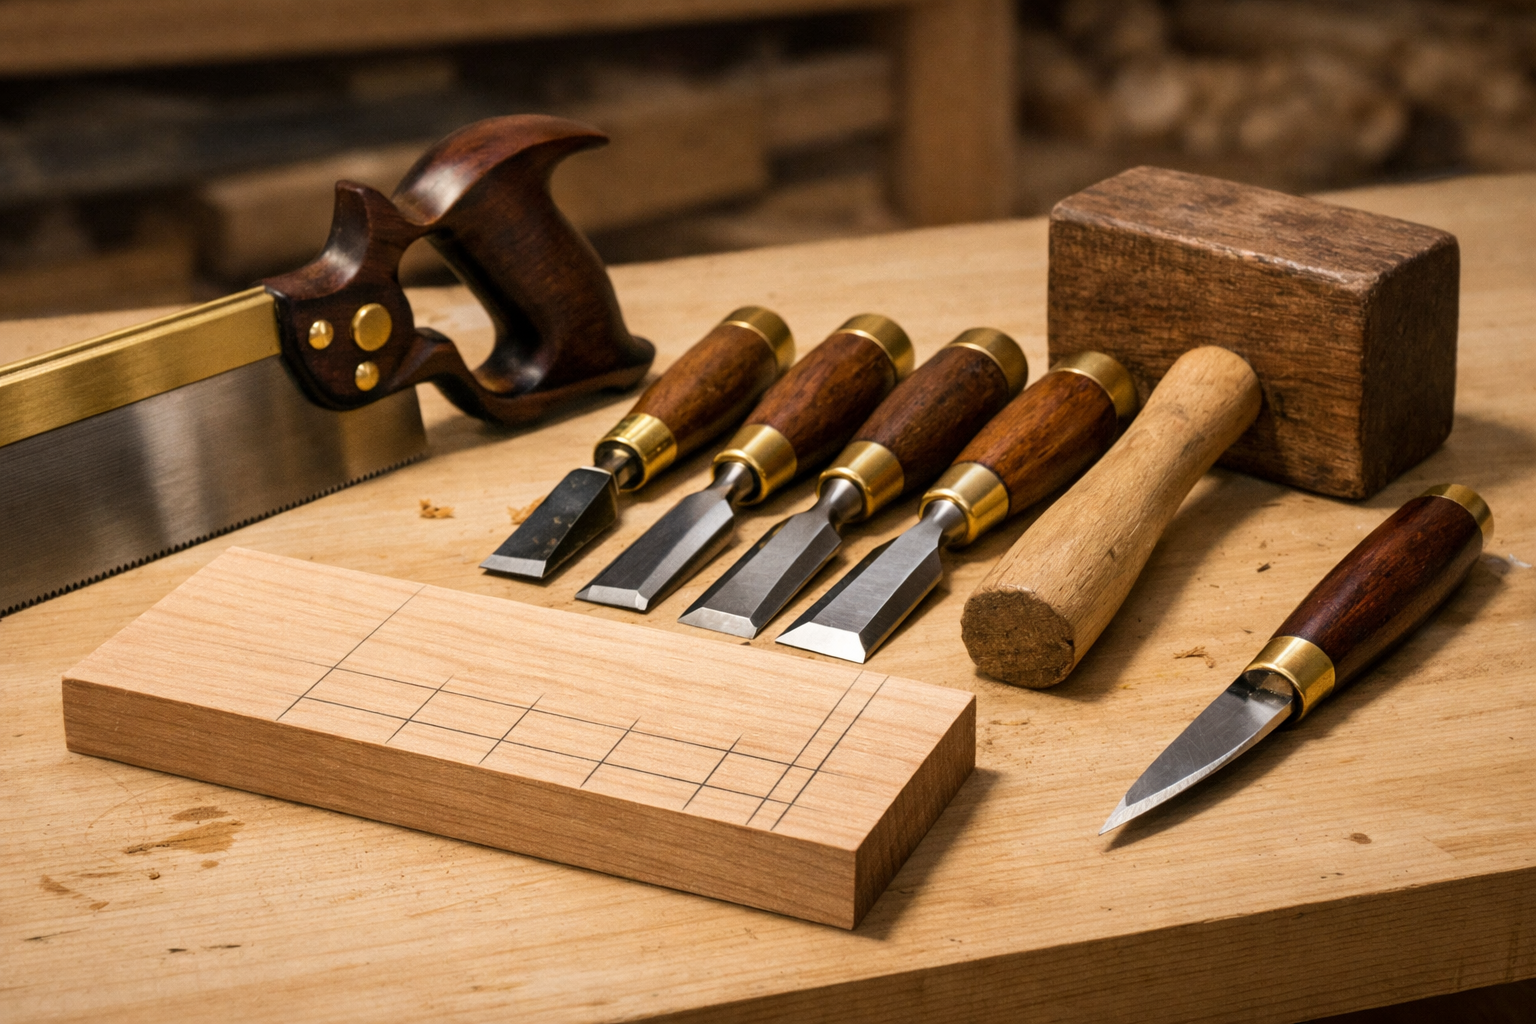
Essential Tools for Hand-Cut Through Dovetails
Before you begin, gather the right tools. Sharpness is paramount; dull tools will lead to frustration and poor results.
Marking Tools:
- Marking Gauge: Essential for marking shoulder lines and the thickness of the material. A precise marking gauge is invaluable.
- Dovetail Marker/Template (Optional but Recommended): Aids in consistently laying out the angle for tails. A common ratio is 1:6 for hardwoods and 1:8 for softwoods.
- Pencil and Ruler/Straightedge: For initial layouts and checking dimensions.
- Marking Knife: Crucial for precise, knife-wall lines that guide your saw and chisel. A sharp knife ensures crisp edges.
- Square: For checking squareness and transferring lines accurately. A small machinist’s square or a double square is very useful.
Cutting Tools:
- Dovetail Saw: A fine-toothed backsaw designed for precise cross-grain and rip cuts. The Japanese pull saw or a Western dovetail saw are popular choices.
- Chisels: A set of sharp bench chisels (1/4″, 1/2″, 3/4″ are a good start) and a dedicated paring chisel for fine adjustments.
- Mallet: For driving chisels and tapping joints together.
Workholding & Measurement:
- Bench Vise: A sturdy woodworking vise is essential for holding your work securely.
- Clamps: Various clamps for holding boards together during marking and assembly.
- Calipers/Rule: For accurate measurements.
For those interested in expanding their hand tool joinery skills, an excellent resource on Hand Tool Joinery for Visible Wood Joints: Dovetails, Mortise and Tenon, and Box Joints as Design Features in Furniture and Small Projects provides further insights.
Step-by-Step Guide to Cutting Through Dovetails
The process of cutting hand-cut through dovetails is typically divided into two main stages: cutting the tails, and then using the tails to mark and cut the pins. Consistency and accuracy at each step are crucial.
Step 1: Prepare Your Stock
Start with perfectly dimensioned and squared lumber. Any inaccuracy here will compound throughout the process. Ensure your boards are flat, square, and cut to their final length and width.
Step 2: Mark the Tails Board
This is typically the side (or drawer side) piece.
- Mark Thickness: Using your marking gauge, set it to the thickness of the pins board. Scribe a line on the end grain of the tails board, and continue it down the inside and outside faces. This is your shoulder line.
- Lay Out Tails: Decide on the number and width of your tails. Evenly space them across the width of the board. Use a dovetail marker or protractor to draw the angle for each tail, connecting the lines from the end grain down to your shoulder line. The common angle is 1:6 (hardwood) or 1:8 (softwood).
- Label Waste: Clearly mark the waste areas with an “X” or shading. This helps prevent cutting the wrong part.
Step 3: Cut the Tails
- Sawing: Secure the tails board vertically in your vise. Use your dovetail saw to cut precisely down the knife lines, angling carefully to stay on the waste side of the line. Cut down to, but not past, the shoulder line.
- Removing Waste: Once all angled cuts are made, use a coping saw or a fretsaw to remove the bulk of the waste between the tails.
- Paring to the Line: With chisels, carefully pare down to your shoulder line, ensuring the bottom of the tails are perfectly flat and square. Start by chiseling from one face, then flip and chisel from the other to prevent blowout.
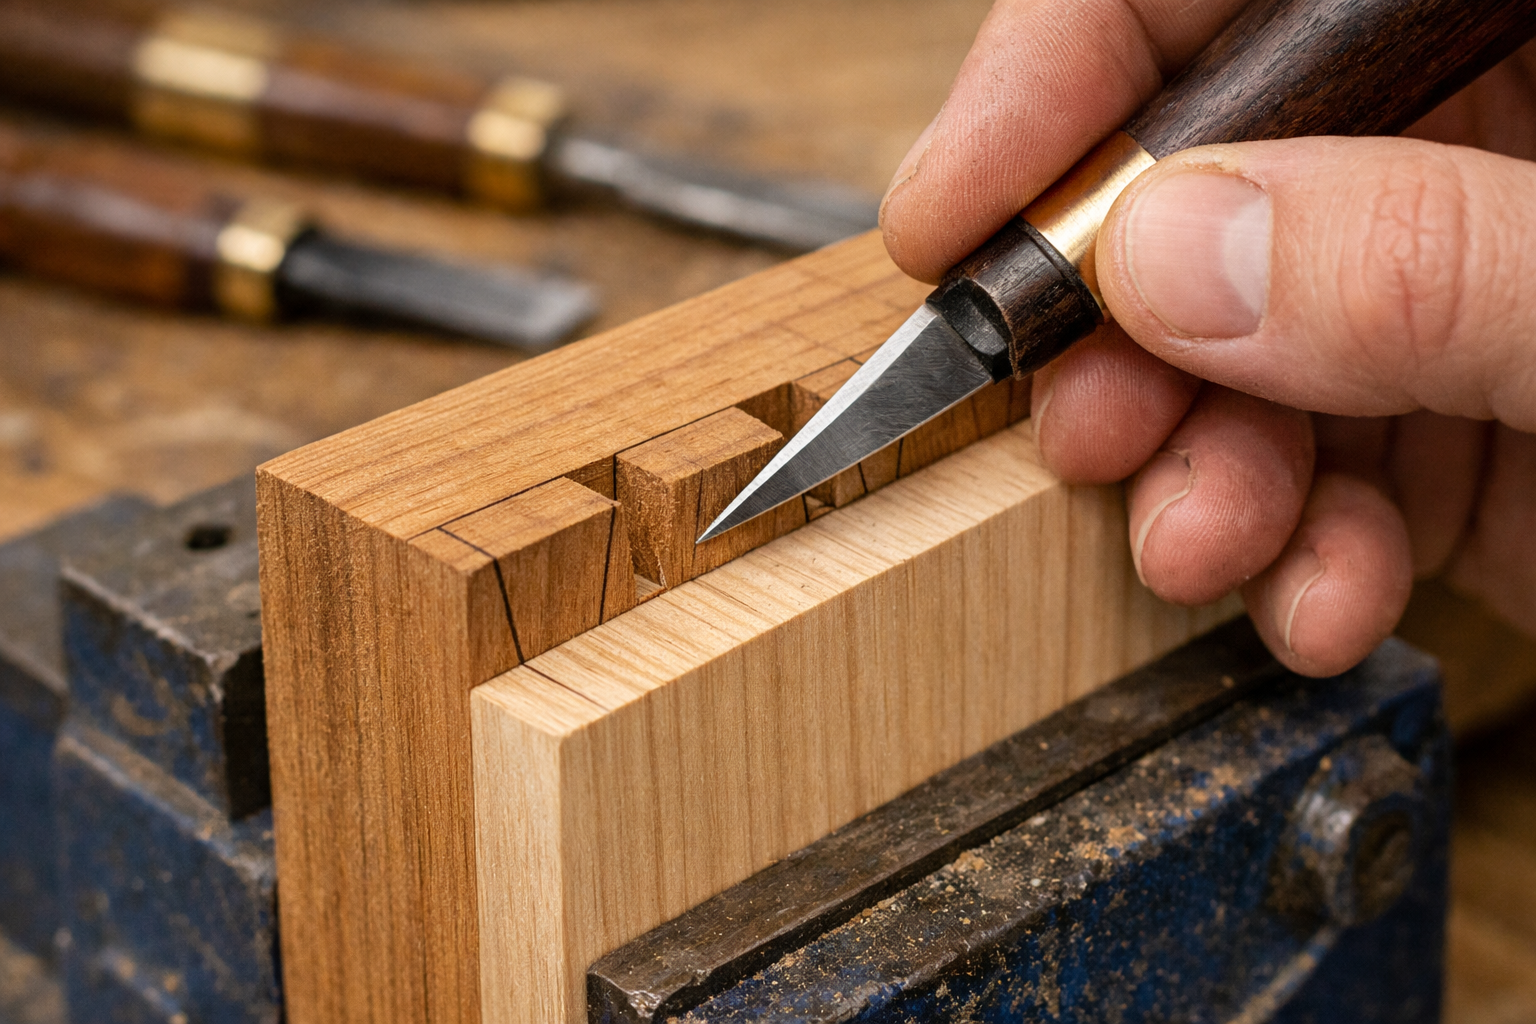
Step 4: Transfer Markings to the Pins Board
This is where the magic of hand-cut dovetails truly shines – using your perfectly cut tails as a template.
- Align and Clamp: Place the tails board squarely on top of the pins board, aligning the shoulder lines. Clamp them securely in place.
- Transfer with Knife: Using a sharp marking knife, carefully trace around each tail onto the end grain of the pins board. These knife lines will be your cutting guides for the pins.
- Extend Lines: Use a square and marking knife to extend these lines down the faces of the pins board to the shoulder line you previously marked (the thickness of the tails board).
- Label Waste: Again, clearly mark the waste areas for the pins.
Step 5: Cut the Pins
- Sawing: Secure the pins board vertically in your vise. Use your dovetail saw to cut down the knife lines for the pins, staying on the waste side. Again, cut down to, but not past, the shoulder line.
- Removing Waste: Use a coping saw to remove the bulk of the waste between the pins.
- Paring to the Line: This is the most critical step for a tight fit. With your chisels, carefully pare away the remaining waste. Take small, precise cuts. If possible, slightly undercut the inside edges of the pins (a very slight bevel on the inside face) to ensure the outside faces meet perfectly when assembled.
For complex projects like DIY Wooden Birdhouses: Advanced Designs with Precision Joinery, mastering this transfer method is essential.
Achieving a Perfect Fit and Finishing Touches
After cutting both the tails and pins, the moment of truth arrives: assembly. This stage demands patience and careful attention to detail.
Test Fitting
Gently attempt to bring the two boards together. They should start to engage without excessive force. If they bind:
- Identify High Spots: Use chalk or pencil on the pins/tails, then try to join them. The chalk will transfer to the binding areas.
- Pare Gradually: With a sharp chisel, remove minuscule amounts of wood from the identified high spots. The goal is an even fit, not force. Remember, you can always remove more wood, but you can’t put it back!
- Tap, Don’t Hammer: Use a mallet to gently tap the joint together. If it doesn’t go, stop and check for binding. Forcing it will damage the wood.
Glue Up
Once the dry fit is perfect, it’s time for glue.
- Apply Glue Sparingly: Apply a thin, even coat of woodworking glue to the mating surfaces of the pins and tails. Avoid excessive glue, which can create hydraulic pressure and prevent the joint from closing fully.
- Assemble and Clamp: Bring the boards together, tapping gently with a mallet if needed. Clamp the joint firmly but not excessively tight. Ensure the joint is square as you clamp.
- Clean Squeeze-Out: Immediately wipe away any glue squeeze-out with a damp cloth before it dries. Dried glue can hinder finishing.
Finishing the Joint
Once the glue has cured (check your glue’s instructions, typically 30 minutes to an hour for clamping, 24 hours for full cure):

- Flush Trim: Use a sharp block plane or sanding block to carefully flush the end grain of the pins and tails with the faces of the adjoining boards. Work gradually to avoid tear-out.
- Sanding: Sand the joint smooth, working through grits from coarse to fine, to prepare for your chosen finish.
Mastering this joint takes practice. Consider starting with practice pieces made from inexpensive pine or poplar before moving to your final project wood. The satisfaction of a perfectly hand-cut through dovetail is immense, and it’s a skill that will serve you well in many woodworking endeavors, from crafting a Mastering the Woodworking Box Lid to intricate Ultimate DIY End Tables: Versatile Designs with Dovetail Drawers.
“The true measure of a woodworker isn’t how few mistakes they make, but how well they fix them, and how much they learn from the process. Dovetails are a masterclass in this philosophy.”
Common Challenges and Troubleshooting
- Gaps: Gaps usually indicate that waste material wasn’t fully removed or that the angles weren’t cut precisely enough. Review your marking and paring techniques. Ensure your chisels are razor sharp.
- Binding: If the joint won’t go together, it often means the pins are too wide or the tails are too narrow. Don’t force it; find the high spots and pare them down incrementally.
- Tear-out: Dull tools or aggressive cutting can cause tear-out. Always use sharp tools and take light passes, especially when paring end grain. Cutting from both sides of a board when chiseling through helps prevent this.
- Non-Square Joint: Check your initial stock preparation and ensure your marking and sawing are consistently square to the faces. A good square is your best friend here.
Remember, every experienced woodworker started as a beginner. With patience and persistence, you too can master this classic wood joinery joint.
Conclusion
The hand-cut through dovetail is more than just a joint; it’s a foundational skill that opens the door to a deeper level of woodworking craftsmanship. This beginner’s guide to hand-cut through dovetails: mastering the classic wood joinery joint has walked you through the critical steps, from understanding the joint’s purpose and gathering essential tools to the precise execution of cutting tails and pins, and finally, achieving a perfect fit. In 2026, the demand for truly handcrafted items remains strong, and your ability to produce such enduring joinery will set your work apart.
The journey to mastering dovetails is one of continuous learning and refinement. Don’t be discouraged by initial imperfections; each joint you cut will improve your eye, your hand-tool control, and your confidence. Start with simple practice pieces, focus on accuracy over speed, and always ensure your tools are impeccably sharp. As you gain proficiency, you’ll find immense satisfaction in creating joints that are not only structurally sound but also exquisitely beautiful, a true testament to the timeless art of woodworking. Embrace the challenge, enjoy the process, and watch your craftsmanship flourish.
References
- Schwarz, C. (2011). The Anarchist’s Tool Chest. Lost Art Press.
- Tage Frid. (1979). Tage Frid Teaches Woodworking: Joinery, Tools and Techniques, Book 1. Taunton Press.
wood joinery, hand-cut dovetails, woodworking techniques, traditional woodworking, wood joints, craftsmanship, beginner woodworking, marking and cutting, through dovetails, hand tools, joinery guide, 2026 woodworking
