


The persistent ache in your neck and shoulders, coupled with a desk perpetually overflowing with cables and notebooks, isn’t just a minor annoyance—it’s a productivity drain and a health hazard. Many office workers overlook the profound impact of proper ergonomics and organization on their daily comfort and output. Elevate your home office setup with custom-built wooden desk risers and monitor stands, designed to improve ergonomics, reduce clutter, and add a touch of handcrafted style to your workspace. These DIY projects offer a tangible solution to common desk woes, transforming an ordinary workstation into an efficient, aesthetically pleasing command center. In 2026, the rise of remote work continues to highlight the need for personalized, functional home office environments, making DIY wooden desk risers and monitor stands an essential upgrade for enhancing ergonomics and organization in your home office.
Key Takeaways
- Improved Ergonomics: Custom risers position monitors at eye level, reducing neck and eye strain.
- Enhanced Organization: Integrated storage solutions within risers minimize desk clutter.
- Cost-Effective Customization: DIY projects allow for personalized designs and material choices at a fraction of retail cost.
- Aesthetic Appeal: Wooden risers add warmth and natural beauty, complementing various decor styles.
- Beginner-Friendly Woodworking: Many designs are simple, requiring only basic tools and woodworking skills.
The Ergonomic Advantage of DIY Wooden Desk Risers and Monitor Stands: Enhancing Ergonomics and Organization in Your Home Office
Working from home has become a cornerstone of professional life in 2026, making the optimization of our workspaces more critical than ever. One of the simplest yet most impactful upgrades you can make is integrating DIY wooden desk risers and monitor stands. These custom additions do more than just lift your screen; they fundamentally alter your posture and interaction with your workstation, leading to significant ergonomic benefits.

A properly positioned monitor is crucial for preventing common issues like neck pain, back strain, and headaches. The top of your monitor screen should be at or slightly below eye level, allowing you to view the entire screen without tilting your head up or down. Standard desks often place monitors too low, forcing users into uncomfortable positions. By crafting your own wooden desk riser, you gain precise control over this height, tailoring it perfectly to your individual needs and the dimensions of your specific monitor. This personalized approach to ergonomics is difficult to achieve with off-the-shelf solutions.
Consider the cumulative effect of poor posture over hours, days, and years. Studies consistently show a correlation between prolonged improper screen viewing angles and musculoskeletal disorders. A DIY monitor stand directly addresses this by bringing your monitor to the optimal height, promoting a neutral spine position, and reducing the strain on your cervical spine. This isn’t just about comfort; it’s about long-term health and sustainable productivity.
Furthermore, a custom wooden desk riser can also elevate your laptop, transforming it into a more ergonomic workstation when paired with an external keyboard and mouse. This setup prevents hunching over the laptop screen, encouraging better posture and reducing wrist and arm fatigue. When considering ergonomics for your workspace, also think about creating ergonomic workshop furniture in other areas of your home.
The benefits extend beyond just screen height. Some DIY designs incorporate a slight tilt, further optimizing the viewing angle and reducing glare, which can contribute to eye strain. The stability and solidity of a well-built wooden stand also inspire confidence, ensuring your expensive equipment is securely supported, unlike some flimsy plastic alternatives.
Ultimately, the ergonomic advantage of investing time in DIY wooden desk risers and monitor stands is profound. It’s a proactive step towards a healthier, more comfortable, and ultimately more productive home office environment, allowing you to focus on your work rather than discomfort.
Design and Customization for Enhanced Organization
Beyond ergonomics, the organizational benefits of DIY wooden desk risers and monitor stands are equally compelling. A cluttered desk is a common complaint for many home office users, leading to distractions and reduced efficiency. Custom-designed wooden risers can integrate smart storage solutions, transforming chaotic desktops into streamlined, orderly workspaces.

When designing your riser, think beyond a simple block of wood. The space created underneath the elevated monitor or laptop offers a prime opportunity for integrated storage. Here are some popular design ideas for enhancing organization:
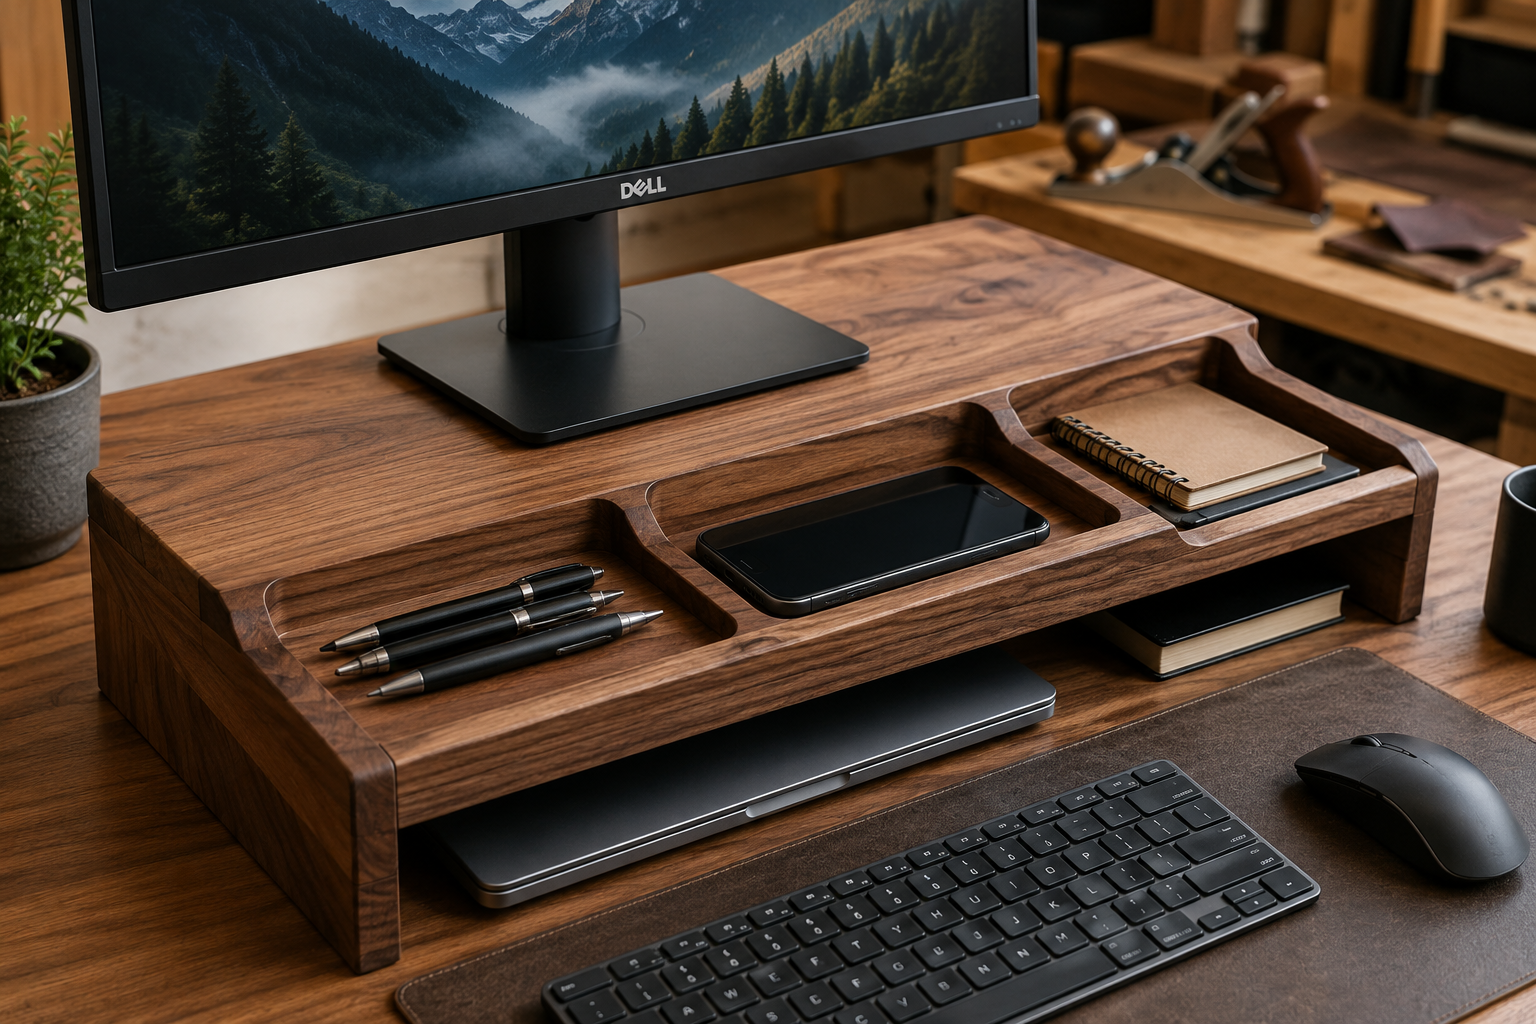
- Open Cubbies: Simple open spaces beneath the riser can neatly store keyboards, mice, notebooks, or external hard drives when not in use. This frees up valuable surface area on your desk.
- Integrated Drawers: Adding small, shallow drawers allows for discreet storage of pens, USB drives, paper clips, and other small office supplies that often contribute to desk clutter. For guidance on creating quality drawers, you might explore mastering dovetail drawers for cabinets.
- Cable Management Channels: Incorporate channels or cutouts at the back of the riser to guide and hide unsightly cables, maintaining a clean aesthetic and preventing tangles. This is crucial for a tidy look.
- Phone/Tablet Slots: Dedicated slots can keep your mobile devices upright and easily accessible, preventing them from lying flat and taking up unnecessary space.
- Modular Elements: Design your risers with modularity in mind, allowing you to add or rearrange components as your needs evolve. This concept is similar to building a modular home office desk system.
The beauty of DIY is the ability to select materials that complement your existing decor. From rich dark walnut to light, airy maple, or even reclaimed wood for a rustic charm, the wood choice significantly influences the aesthetic. You can also customize finishes—stains, paints, or clear coats—to match your office furniture or add a pop of contrasting color. This personalization adds a handcrafted touch that generic store-bought items simply cannot replicate.
Furthermore, integrating a riser can help define zones on your desk. The area beneath the monitor becomes a dedicated storage hub, while the space around it remains clear for active work. This psychological separation can enhance focus and reduce visual noise. For more ideas on organizing your workspace, consider DIY modular desk organizers.
In 2026, where home offices are often multi-functional spaces, the ability to maintain organization and a cohesive aesthetic is invaluable. DIY wooden desk risers and monitor stands are not just practical additions; they are design statements that reflect your personal style and commitment to an organized, efficient workspace.
Building Your Own DIY Wooden Desk Risers and Monitor Stands: Practical Steps
Embarking on a DIY project like wooden desk risers and monitor stands can be incredibly rewarding, even for those new to woodworking. The process is straightforward, requiring only basic tools and materials. Here’s a practical guide to help you get started on enhancing ergonomics and organization in your home office.
Materials You’ll Need:
- Wood: Choose a type of wood suitable for your aesthetic and budget. Common choices include pine, oak, maple, or plywood. The thickness will depend on the size and weight your stand needs to support, but 3/4 inch (19mm) is a good general purpose thickness. Consider sourcing sustainable wood for your project by reviewing options for sustainable wood sourcing for the modern woodworker.
- Wood Glue: Essential for strong joints. The ultimate guide to wood glue can help you select the right one.
- Screws or Dowels (Optional): For added strength, especially if you’re building a larger or more complex design.
- Wood Finish: Stain, paint, polyurethane, or oil to protect the wood and enhance its appearance.
- Sandpaper: Various grits (80, 120, 220) for smoothing surfaces.
Tools You’ll Need:
- Measuring Tape and Pencil: For accurate measurements and markings.
- Saw: A hand saw, circular saw, or miter saw for cutting wood to size.
- Drill: With appropriate drill bits for pilot holes and screws (if using).
- Clamps: To hold pieces together while glue dries.
- Square: To ensure cuts and joints are perfectly perpendicular.
- Safety Gear: Safety glasses and gloves are a must.
Step-by-Step Construction Guide:
Plan Your Design and Measurements:
- Determine the ideal height for your monitor. Sit at your desk and measure from the desk surface to your eye level, then subtract the height of your monitor. Aim for the top of your screen to be at or slightly below eye level.
- Measure the width and depth of your monitor base to ensure the top surface of the riser is adequate.
- Decide on any integrated storage features (cubbies, drawers, cable management) and incorporate their dimensions into your plan. Sketch out your design with all measurements.
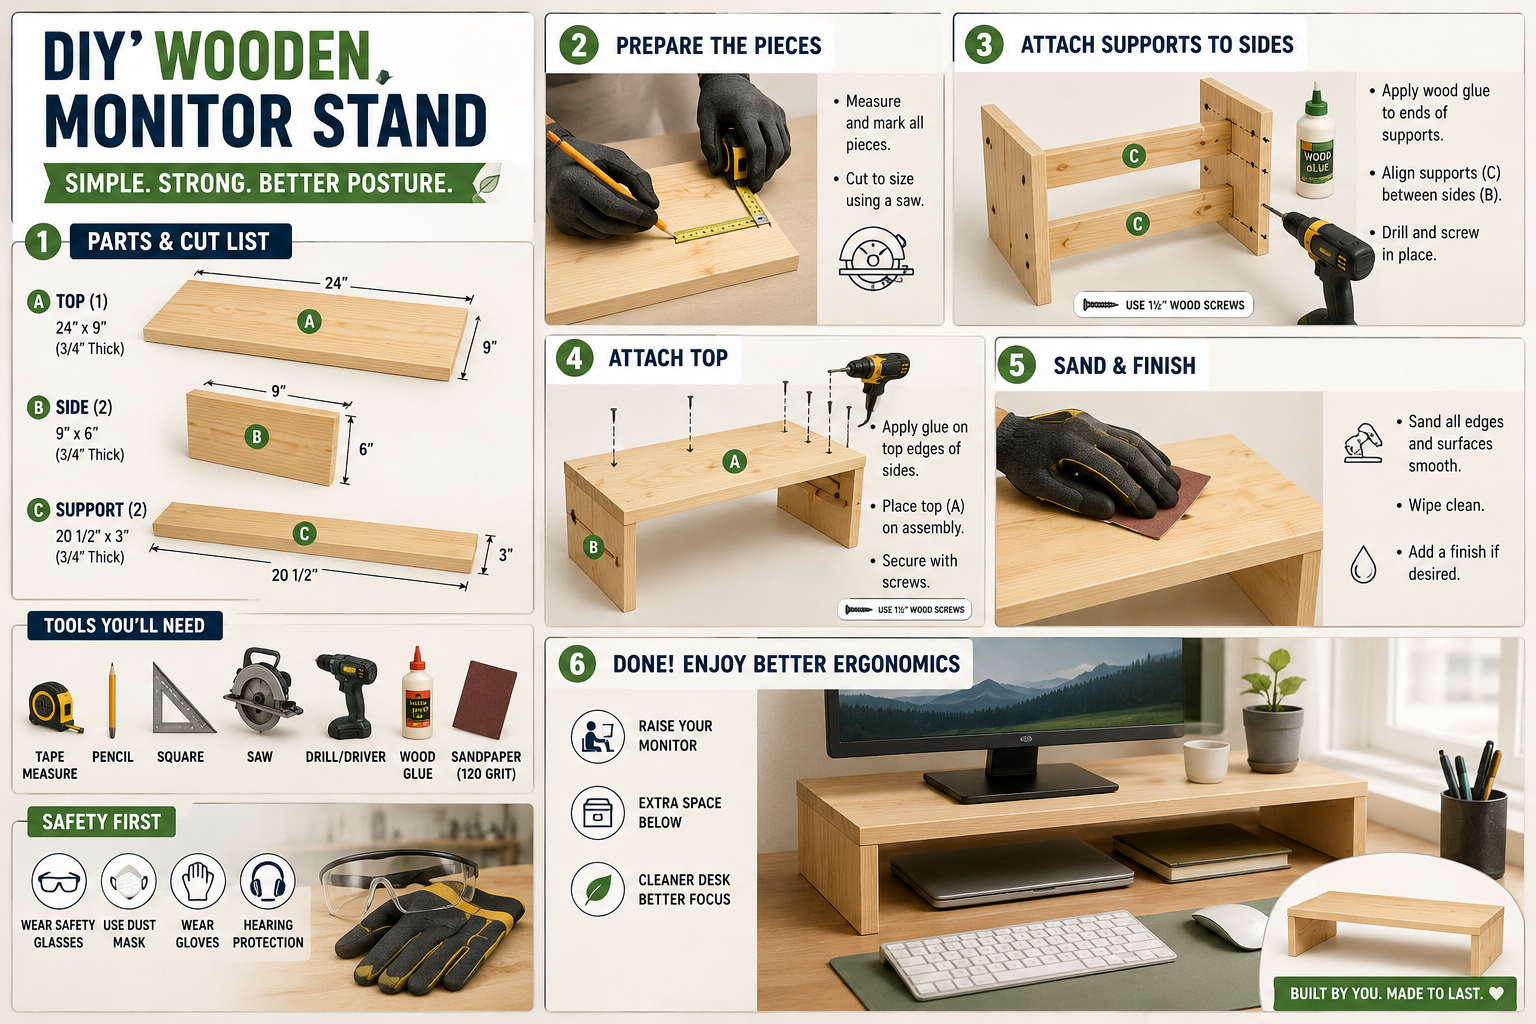
Cut Your Wood Pieces:
- Carefully measure and mark all your wood pieces according to your design.
- Using your chosen saw, make precise cuts. Accuracy here is key for a professional look. For instance, you might need:
- One top piece (for the monitor platform)
- Two side pieces (for height and support)
- One or more internal shelves/dividers (for cubbies or drawers)
Sand the Components:
- Before assembly, sand all cut edges and surfaces. Start with a coarser grit (80 or 120) to smooth any rough spots or saw marks, then move to a finer grit (220) for a smooth finish. This prepares the wood for finishing and makes handling easier.
Assemble the Riser:
- Apply wood glue to the mating surfaces of your pieces (e.g., where the side pieces meet the top).
- Carefully align the pieces and clamp them together. Ensure everything is square before the glue sets.
- If adding screws or dowels for extra strength, pre-drill pilot holes to prevent splitting the wood, then insert them. Wipe away any excess glue with a damp cloth immediately.
- Allow the glue to dry completely according to the manufacturer’s instructions, typically several hours or overnight.
Add Storage Features (If Applicable):
- If your design includes shelves or drawers, assemble and integrate these components now using glue and, if necessary, small nails or screws.
Final Sanding and Finishing:
- Once the glue is fully cured, do a final light sanding with 220-grit sandpaper over the entire assembled piece.
- Clean off any dust.
- Apply your chosen finish (stain, paint, polyurethane, or oil) according to the product instructions. You may need multiple coats, with light sanding between coats for a super smooth finish. Ensure proper ventilation during this step. For different finishes, consider exploring cool wood finishing techniques.
Enjoy Your New Riser:
- Once the finish is completely dry and cured, place your new DIY wooden desk riser or monitor stand on your desk. Position your monitor, keyboard, and other items, and revel in your enhanced ergonomic and organized workspace.
This project is an excellent entry point into woodworking, providing both practical benefits and the satisfaction of crafting something useful with your own hands.
Conclusion
In the evolving landscape of home office work in 2026, optimizing our workspaces for both comfort and efficiency has never been more vital. DIY wooden desk risers and monitor stands offer an accessible, customizable, and aesthetically pleasing solution to common ergonomic challenges and organizational woes. By elevating your monitor to the proper height, you can significantly reduce neck strain and promote healthier posture, directly impacting your long-term well-being and productivity.

Beyond ergonomics, these handmade additions unlock a world of organizational possibilities. From integrated drawers and cubbies to clever cable management, a custom wooden riser transforms a cluttered desk into a streamlined command center, fostering focus and reducing distractions. The ability to select your wood, design, and finish ensures that your desk accessory is not just functional but also a true reflection of your personal style and an enhancement to your home’s aesthetic.
Embarking on this woodworking project is a rewarding experience, even for beginners. With basic tools and a clear plan, you can craft a durable, beautiful piece that addresses your specific needs, far surpassing the limitations of mass-produced alternatives. Take the step to reclaim your desk, boost your comfort, and infuse your home office with the warmth and character of handcrafted wood. Your neck, your eyes, and your productivity will thank you.
SEO Meta Title: DIY Wooden Desk Risers: Ergonomic & Organized Home Office SEO Meta Description: Enhance your 2026 home office with DIY wooden desk risers and monitor stands. Improve ergonomics, reduce clutter, and add style with custom-built solutions.
