

The satisfying crackle of wood shavings falling to the floor, the rhythmic hum of a machine, and the gradual emergence of a beautiful, symmetrical object from a rough block of wood. This isn’t just a fantasy; it’s the accessible reality of DIY woodturning. Many aspire to create handcrafted items but are intimidated by the perceived complexity of a lathe. The truth is, with the right guidance, even absolute novices can master the fundamental skills required for DIY Woodturning for Beginners: Essential Lathe Techniques, Tool Selection, and First Projects for Bowls and Spindles. This comprehensive guide will demystify the process, empowering you to safely and confidently embark on your woodturning journey in 2026.
Key Takeaways
- Safety First: Always prioritize personal protective equipment (PPE) and understand your lathe’s operation before beginning.
- Lathe Basics: Learn essential components like the headstock, tailstock, and tool rest, and how to properly mount wood.
- Tool Fundamentals: Familiarize yourself with basic turning tools like gouges, scrapers, and parting tools, and their specific uses.
- Core Techniques: Practice roughing, shaping, and finishing cuts for both spindle and bowl turning to build proficiency.
- First Projects: Start with simple, rewarding projects such as small bowls, pens, or decorative spindles to gain confidence.
Essential Lathe Techniques for DIY Woodturning Beginners
Understanding your wood lathe and its core operations is the foundation of successful woodturning. A lathe is essentially a machine that rotates a workpiece along an axis, allowing you to shape it with stationary cutting tools. For beginners, focusing on safety and basic setup is paramount.

Understanding Your Lathe
Before making your first cut, take time to familiarize yourself with your specific lathe model. Key components include:
- Headstock: This is the motor side, containing the spindle where chucks, faceplates, or drive centers are mounted. It rotates the wood.
- Tailstock: Positioned opposite the headstock, the tailstock provides support to the workpiece, especially for spindle turning, using a live center.
- Tool Rest: This adjustable component provides a stable surface for bracing your turning tools against the rotating wood. Proper tool rest positioning is crucial for control and safety.
- Bed: The main frame of the lathe, along which the headstock, tailstock, and tool rest can be moved and locked into place.
- Speed Control: Lathes typically offer variable speed settings. Slower speeds are generally used for roughing out unbalanced wood, larger diameters, and initial cuts, while higher speeds are for finer cuts and finishing.
Mounting Wood on the Lathe
The method for mounting wood depends on the type of turning:
- Spindle Turning (between centers): This is ideal for longer, narrower pieces like table legs or pens. A drive center is installed in the headstock, and a live center in the tailstock. The wood blank is driven by the headstock and supported by the tailstock.
- Faceplate Turning (for bowls/platters): For wider, shorter pieces that will be hollowed out, a faceplate or a chuck is used. The wood is screwed to a faceplate, which then attaches to the headstock spindle. Alternatively, a scroll chuck grips the wood securely. Always ensure the mounting is solid to prevent the workpiece from flying off.
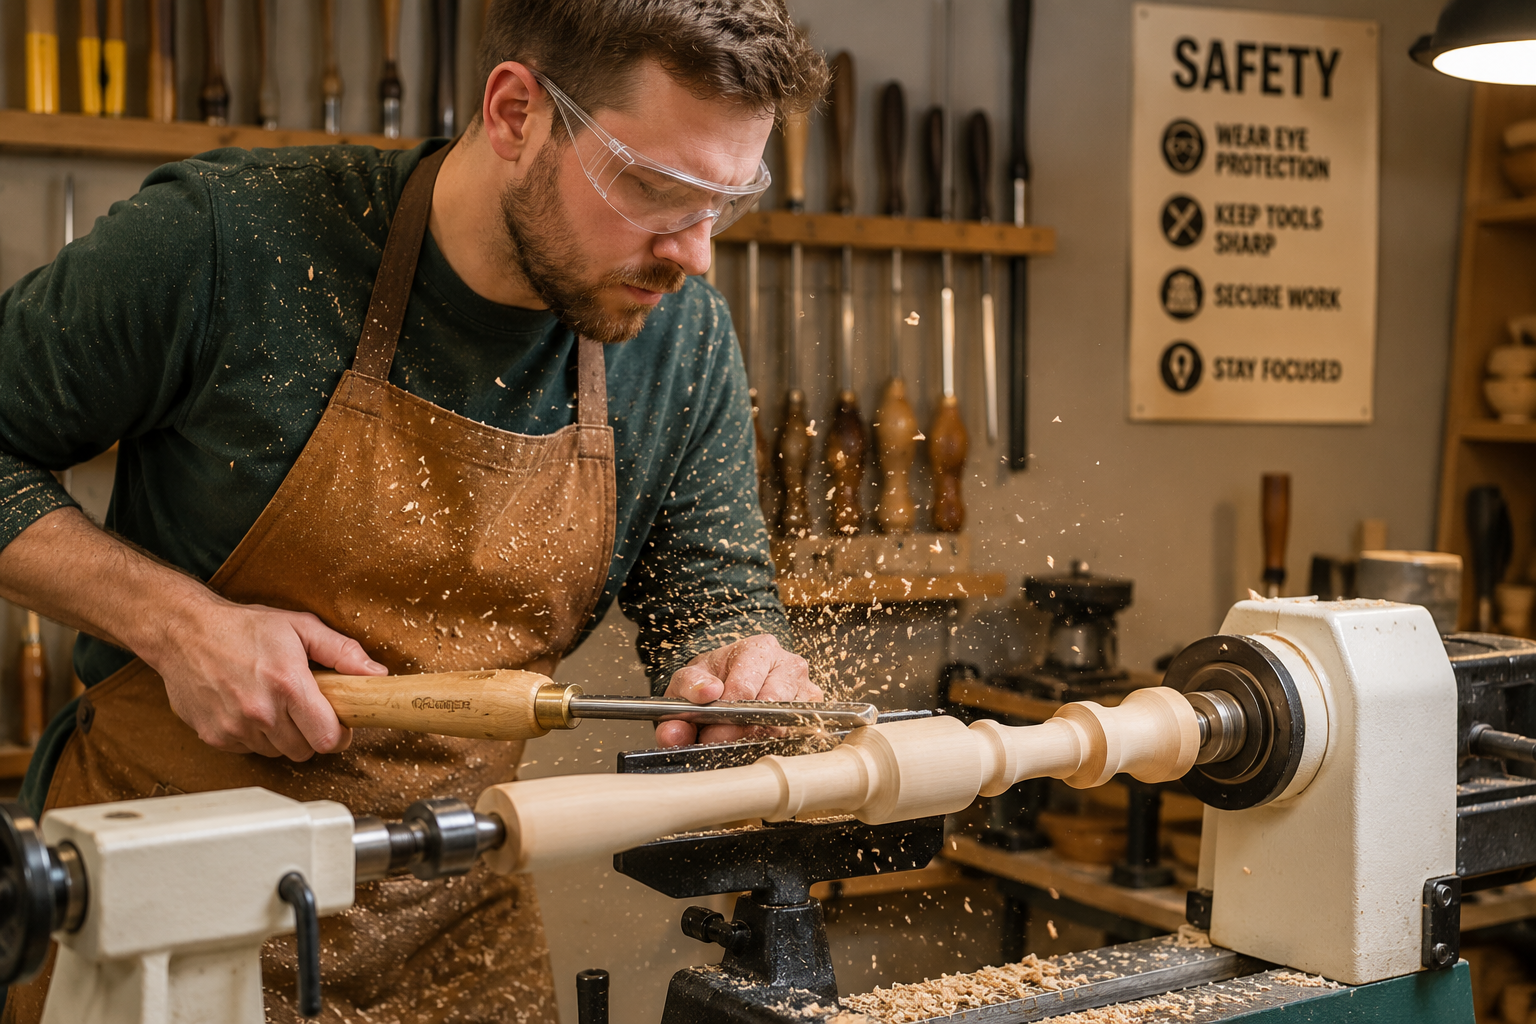
Basic Cutting Techniques
Once the wood is securely mounted and your safety gear (face shield, dust mask, hearing protection) is on, you can begin to learn the essential lathe techniques.
- Roughing: The initial process of taking a square or irregularly shaped blank and turning it round. A roughing gouge is commonly used for this. Take light cuts, keeping the tool rest close to the work.
- Shearing Cut: A smooth, controlled cut where the tool’s bevel rubs against the wood, guiding the cut and creating a clean surface. This is a fundamental technique for refining shapes.
- Scraping Cut: Using a tool (like a scraper) held flat on the tool rest, presenting the cutting edge directly to the wood. While effective for fine shaping and smoothing, it can leave a slightly torn grain and isn’t always as clean as a shearing cut.
- Forming Coves and Beads: Mastering these basic decorative elements is key. Coves are concave curves, often created with a spindle gouge. Beads are convex curves, also shaped with gouges or skew chisels. Practice consistent tool presentation and movement.
“Safety is not an option in woodturning; it’s a non-negotiable prerequisite. Always wear a full face shield, not just safety glasses, as flying debris can cause serious injury.”
For maintaining a clean and safe workspace, consider implementing a DIY smart workshop dust collection system to manage wood dust, which is both a respiratory hazard and a fire risk.
Tool Selection for DIY Woodturning Beginners: Essential Lathe Techniques
Choosing the right tools as a beginner can seem overwhelming, but a basic set of good quality tools will serve you well. Avoid cheap, low-quality tools, as they are harder to sharpen, dull quickly, and can be frustrating to use. Focus on acquiring a few essential types for your DIY Woodturning for Beginners: Essential Lathe Techniques, Tool Selection, and First Projects for Bowls and Spindles.
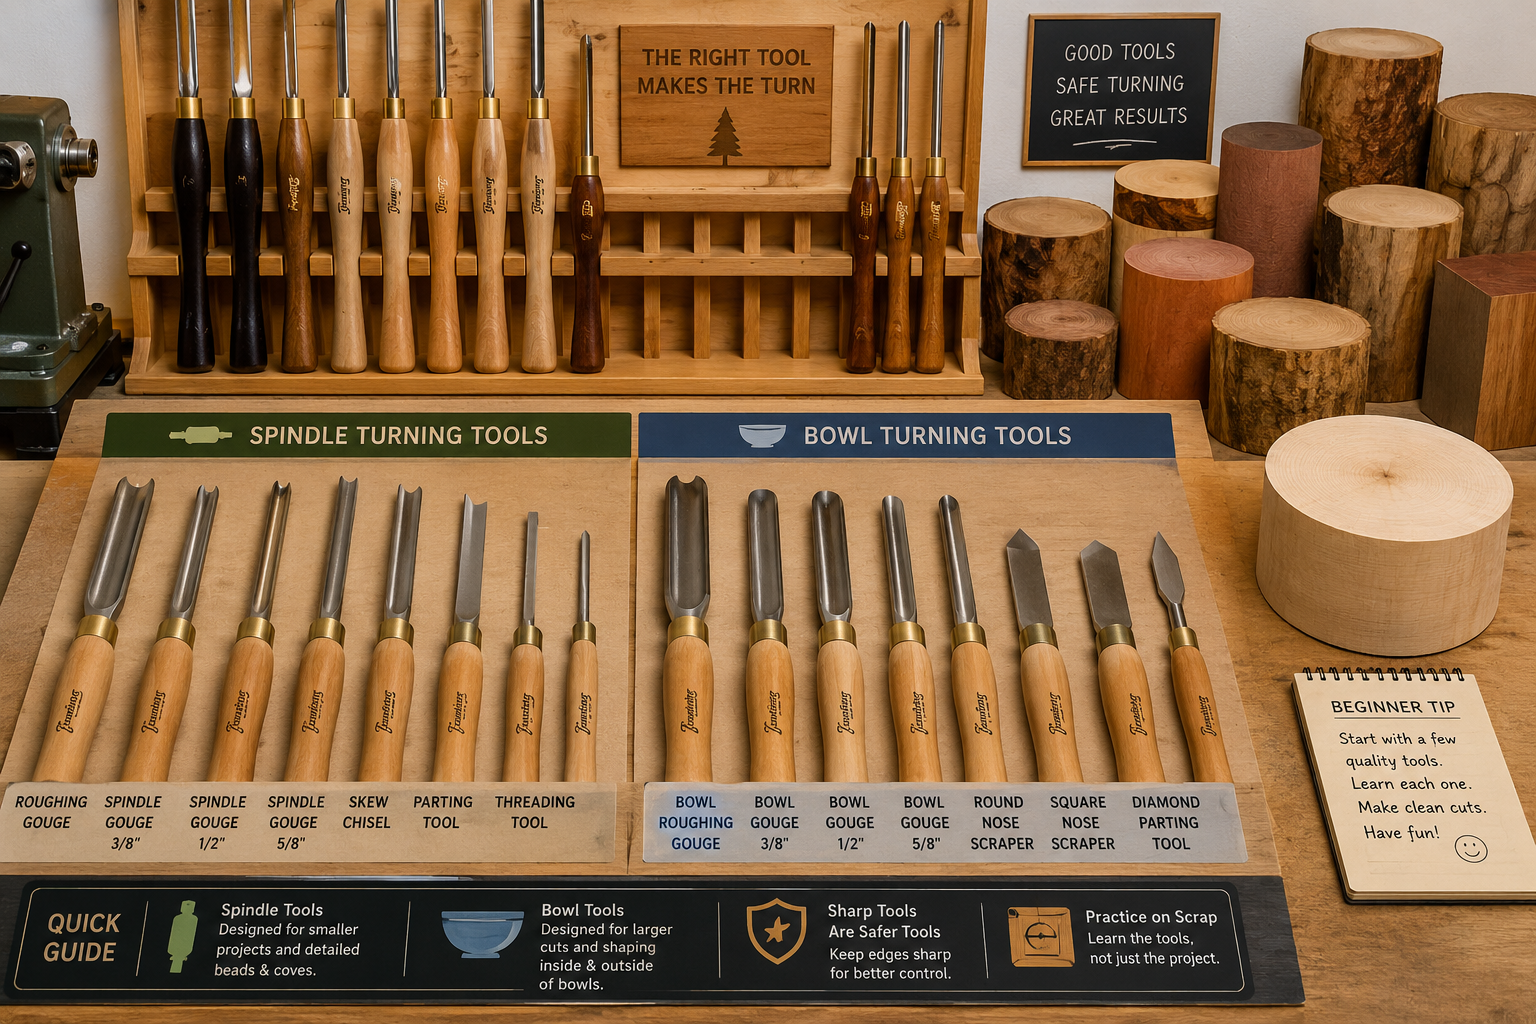
Essential Turning Tools
Here are the primary tools you’ll need:
- Roughing Gouge: Typically a large, U-shaped or V-shaped tool, designed for quickly turning square stock round. It’s not generally used for faceplate (bowl) turning.
- Spindle Gouge: A smaller, shallower fluted gouge used for shaping details on spindle work, such as coves, beads, and curves. It offers more control than a roughing gouge for finer work.
- Bowl Gouge: Specifically designed for hollowing out bowls and creating exterior curves on faceplate-mounted work. It has a deeper flute and thicker shaft than a spindle gouge, providing strength for aggressive cuts and reach into a bowl’s interior.
- Skew Chisel: A versatile tool with an angled cutting edge. It can create clean shearing cuts, beads, coves, and V-grooves. It has a steeper learning curve but is highly rewarding to master.
- Parting Tool: Used to cut off the workpiece from the waste stock or to create grooves and tenons. They come in various thicknesses.
- Scraper: Tools with a flat or slightly curved profile, used for refining surfaces and creating final shapes, particularly on bowls. They are often used with a scraping action and can leave a smooth surface when used correctly.
Sharpening Tools
Sharp tools are absolutely critical for safe and effective woodturning. Dull tools rip and tear the wood, require more force, and are more likely to catch.
- Grinder: A bench grinder with a fine-grit wheel (or a CBN wheel for superior performance) is essential for sharpening your turning tools.
- Jigs: Sharpening jigs help maintain consistent bevel angles, which is crucial for repeatable results and easier sharpening. Consider a basic sharpening system specifically designed for lathe tools.
Additional Essential Accessories
- Chucks and Faceplates: As mentioned, these are vital for holding your work. A good scroll chuck is a worthwhile investment for bowl turning.
- Centers: Drive centers and live centers for spindle turning.
- Measuring Tools: Calipers, dividers, and rulers for precise measurements.
- Sanding Supplies: A range of sandpaper grits (from 80 to 400 grit or higher) for smoothing your turned pieces.
- Finishes: Danish oil, shellac, wax, or lacquer to protect and enhance your finished projects. For inspiration on finishing techniques, explore options like rustic wood finishing techniques or others depending on your desired aesthetic.
Investing in quality tools and learning to sharpen them properly will make your woodturning experience much more enjoyable and productive.
First Projects for Bowls and Spindles: DIY Woodturning for Beginners
With your lathe set up and a basic understanding of your tools, it’s time to tackle some rewarding first projects. These beginner-friendly tasks are perfect for practicing essential lathe techniques and building confidence in DIY Woodturning for Beginners: Essential Lathe Techniques, Tool Selection, and First Projects for Bowls and Spindles.
Project 1: Turning a Simple Spindle (e.g., a Small Bud Vase or Pen Blank)
Spindle turning is often recommended for beginners because it involves working between centers, which is generally more forgiving than faceplate turning if a catch occurs.
Materials:
- A piece of straight-grained wood (e.g., maple, cherry, walnut) about 2″ x 2″ x 6-10″ long.
- A drive center and live center.
Steps:
- Prepare the Blank: Mark the centers on both ends of your wood blank.
- Mount on Lathe: Mount the blank between the drive center in the headstock and the live center in the tailstock. Ensure it’s secure.
- Rough to Round: With a roughing gouge, slowly bring the spinning square blank to a cylindrical shape. Take light cuts and adjust the tool rest as needed.
- Shape the Profile: Using a spindle gouge or skew chisel, begin to form a simple profile. Practice creating consistent coves and beads. You could aim for a small bud vase shape, narrowing the neck and flaring the base.
- Sand: Once the shape is complete, sand the piece while it’s still on the lathe, starting with coarse grit and progressing to fine grits.
- Finish: Apply your chosen finish, such as Danish oil, while the piece is still spinning at a slow speed.
- Part Off: Use a parting tool to cut the piece from the waste stock near the headstock and tailstock.
This project allows you to practice roughing, shaping, sanding, and finishing. For more advanced decorative elements, consider crafting engraved wooden coasters which often start as spindle-turned blanks.

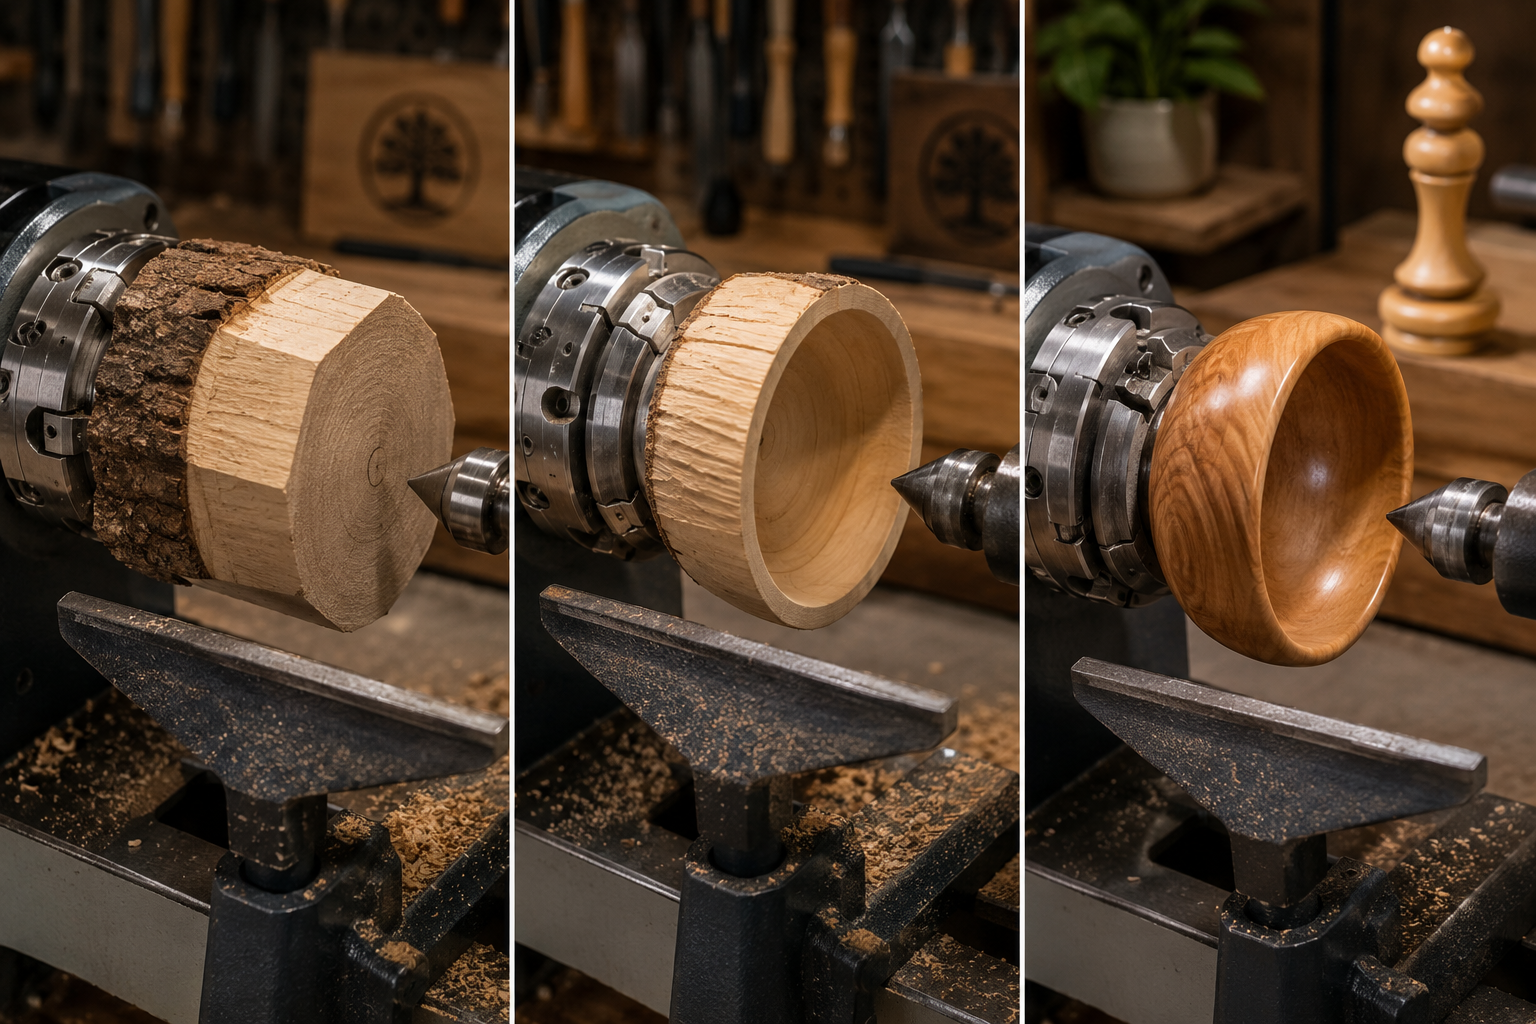
Project 2: Turning a Small Bowl
Bowl turning introduces the concept of faceplate or chuck mounting and hollowing. It’s a slightly more advanced beginner project but incredibly satisfying.
Materials:
- A round or square wood blank (e.g., maple, cherry, walnut) about 4-6″ in diameter and 2-3″ thick.
- A faceplate or a scroll chuck.
Steps:
- Prepare and Mount: If using a square blank, mark the largest possible circle. Securely attach the blank to a faceplate with screws, or grip it with a scroll chuck. Mount it onto the headstock.
- Shape the Exterior: With a bowl gouge, begin to shape the outside of the bowl. Start by making the bottom flat or slightly concave for stability. Gradually work towards the rim, creating a pleasing curve. Adjust your tool rest frequently to keep it close to your cutting edge.
- Create a Tenon or Recess: For easy re-mounting (to finish the bottom later), create a tenon (a raised ring) or a recess on the bottom of the bowl that your chuck can grip.
- Hollow the Interior: Flip the bowl (if you made a tenon/recess for chucking), or continue if using a suitable chuck. Use a bowl gouge to hollow out the interior, taking care to maintain an even wall thickness. Work from the rim towards the center.
- Sand and Finish: Sand the exterior and interior of the bowl, progressing through grits. Apply your desired finish.
- Part Off (if applicable): If you used a faceplate, carefully part the bowl from the waste wood. If using a tenon, remove the bowl, reverse it in the chuck using the tenon, and clean up the bottom.
Many resources for wooden fruit bowls start with these fundamental bowl turning techniques. Remember that patience and practice are your best tools for these projects. Don’t be afraid to make mistakes; they are part of the learning process.
Conclusion
Embarking on the journey of DIY woodturning is an incredibly rewarding endeavor, offering the unique satisfaction of transforming raw wood into beautiful, functional, and artistic creations. In 2026, the barrier to entry for this craft is lower than ever, with numerous resources and accessible equipment. By prioritizing safety, understanding the essential lathe techniques, making informed choices in tool selection, and starting with beginner-friendly projects like small bowls and spindles, you can confidently develop your skills. Remember that every master turner started as a beginner; patience, consistent practice, and a willingness to learn from each piece will be your greatest assets. Take the plunge, unleash your creativity, and discover the joy of bringing wood to life on the lathe.
Actionable Next Steps:
- Research Lathes: Investigate beginner-friendly wood lathes, considering features like variable speed and bed length.
- Acquire Basic Tools: Purchase a fundamental set of turning tools and a sharpening system.
- Prioritize Safety Gear: Ensure you have a full face shield, dust mask, and hearing protection before starting.
- Watch Demonstrations: Seek out online tutorials or local workshops to see techniques in action.
- Start Simple: Begin with easy spindle projects to build muscle memory and confidence before moving to bowls.
