


The average piece of reclaimed wood carries over a century of hidden stories, from its original life as a barn beam or factory floorboard to its rebirth in a modern home. For 2026, the focus in woodworking isn’t just about repurposing, but about carefully preserving and celebrating that history. The challenge lies in selecting finishes that protect the wood without masking its unique character. This article provides a step-by-step guide on Finishing Reclaimed Wood for 2026: Polishes That Highlight Texture and Story, covering oils, waxes, and polyurethanes, along with methods for testing durability in high-use areas.
Key Takeaways

- Natural oils and penetrating finishes are excellent for emphasizing the raw texture and inherent beauty of reclaimed wood.
- Waxes and shellac offer a softer, often more traditional look, adding a protective layer while allowing the wood’s story to shine through.
- Polyurethanes provide robust, long-lasting protection, ideal for high-traffic pieces, but application techniques must be adapted to maintain visual character.
- Surface preparation is crucial, involving careful cleaning and minimal sanding to preserve historical marks and patinas.
- Always perform patch tests with chosen finishes and implement durability checks, especially for furniture destined for heavy use.
Embracing Natural Penetrating Finishes: Oils for Authentic Character
When considering Finishing Reclaimed Wood for 2026: Polishes That Highlight Texture and Story, natural oils are often the first choice for woodworkers who want to celebrate the material’s inherent beauty. These finishes penetrate deep into the wood fibers, nourishing them and bringing out the rich grain patterns, knots, and historic imperfections without forming a thick surface film. This results in a finish that feels natural to the touch and allows the wood to breathe, deepening its patina over time.
The Appeal of Oils: Linseed, Tung, and Danish
Each type of oil offers distinct characteristics suitable for different reclaimed wood projects.
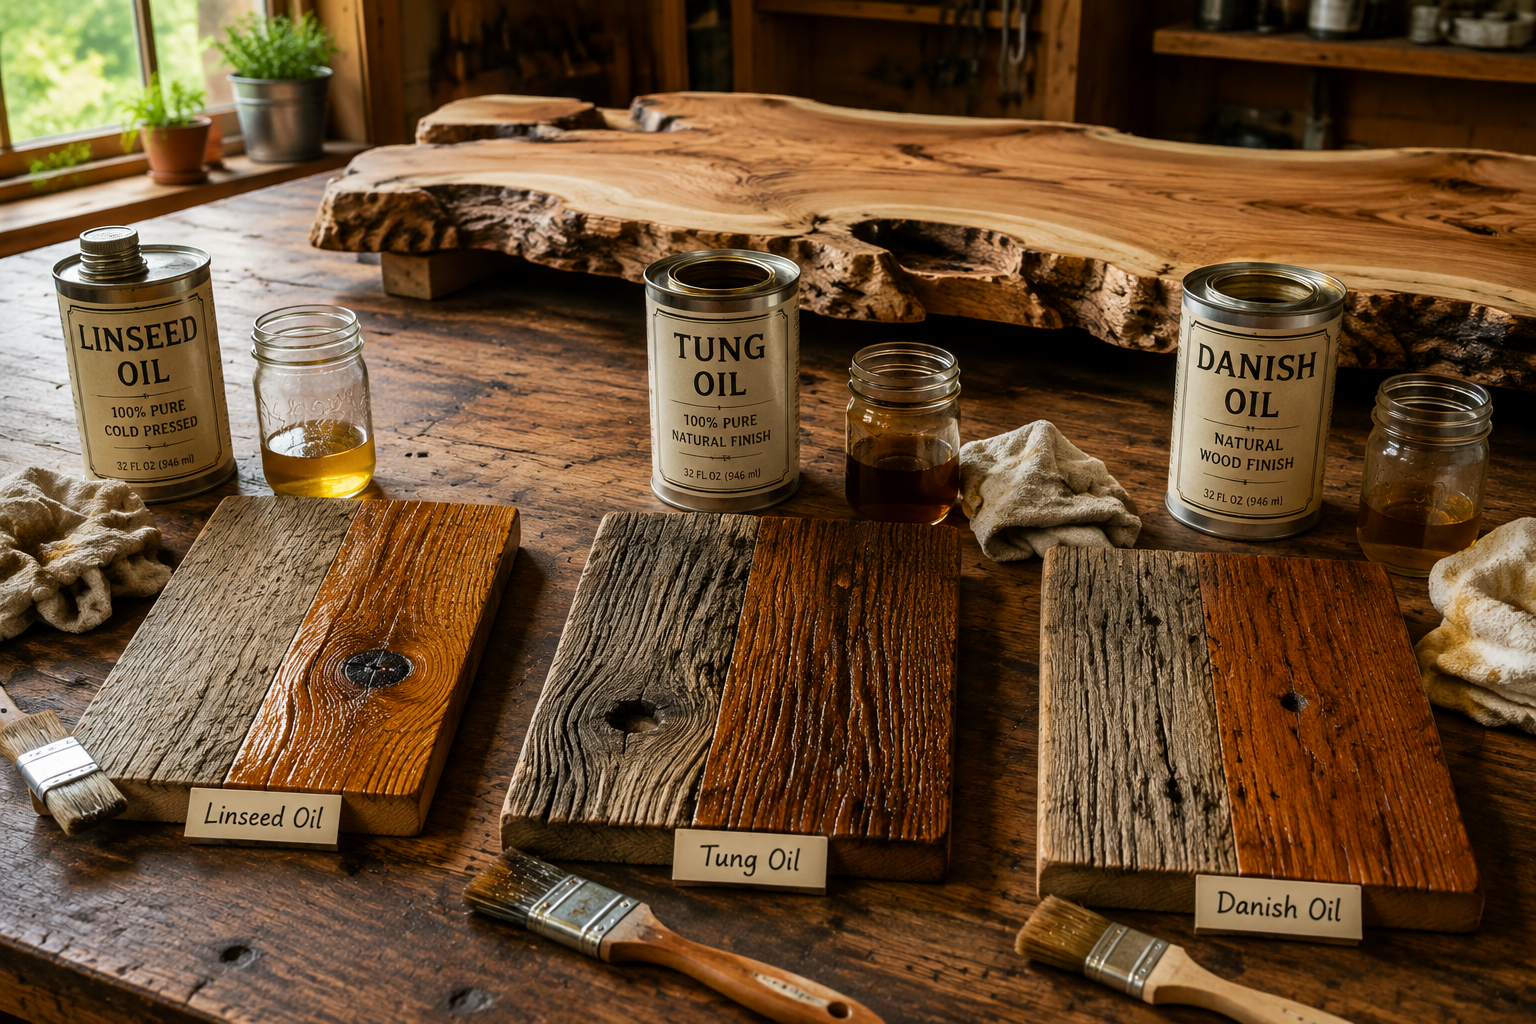
- Linseed Oil (Boiled Linseed Oil – BLO): A classic choice, BLO penetrates deeply, cures to a durable finish, and imparts a warm, amber glow. It’s excellent for enhancing the natural color of darker reclaimed woods like oak or heart pine. However, it cures slowly, often requiring several thin coats and ample drying time between applications.
- Tung Oil: Known for its water resistance and clear, hard finish, tung oil does not yellow as much as linseed oil. It’s ideal for pieces where you want a more natural, less ambered look. Pure tung oil is non-toxic and food-safe once cured, making it a good option for reclaimed wood kitchen islands or cutting boards. Like BLO, it requires multiple thin coats and patience.
- Danish Oil: Often a blend of oil (usually tung or linseed), varnish, and thinner, Danish oil offers a balance of protection and natural aesthetics. It penetrates well and builds a slightly more protective surface than pure oils, making it a popular choice for furniture. It’s relatively easy to apply and dries faster than pure oils.
Step-by-Step Application of Oil Finishes
- Preparation is Paramount: The most critical step in finishing reclaimed wood is preparation. Start by thoroughly cleaning the wood to remove dirt, debris, and any loose splinters. Use a stiff brush, compressed air, and a damp cloth. For truly authentic preservation, avoid aggressive sanding. Instead, gently sand only enough to create a smooth-to-the-touch surface, typically with 150-220 grit sandpaper. The goal is to retain saw marks, nail holes, and other signs of age. For advice on understanding wood movement to prevent future issues, refer to our guide on Understanding Wood Movement: How to Design and Build Furniture That.
- First Coat Application: Apply a generous first coat of your chosen oil with a brush or lint-free rag. Allow the oil to soak into the wood for 15-30 minutes. The wood will absorb the oil differently based on its porosity.
- Wipe Off Excess: After the dwell time, use a clean, lint-free rag to thoroughly wipe off all excess oil from the surface. This step is crucial to prevent a sticky, gummy finish. Always dispose of oil-soaked rags properly by laying them flat to dry or soaking them in water to prevent spontaneous combustion.
- Drying and Recoating: Allow the first coat to dry completely according to the manufacturer’s instructions (this can range from 12 hours to several days). Lightly scuff sand with 320-400 grit sandpaper if desired for a smoother finish, then wipe clean.
- Subsequent Coats: Apply 2-4 more thin coats, wiping off excess after each application and allowing full drying time in between. The more coats applied, the deeper the sheen and the more durable the finish.
Testing Durability for High-Use Areas
For items like coffee tables or dining surfaces made from reclaimed wood, where wear is expected, it’s vital to test your chosen finish for durability. Apply your finish schedule to a scrap piece of the same wood. Once cured, test its resistance to:
- Water Rings: Place a wet glass on the surface for an hour. Check for marks.
- Minor Scratches: Gently drag a fingernail or a blunt object across the surface.
- Heat Resistance: Place a warm (not hot) mug on the surface.
While oils provide moderate protection, they may require more frequent reapplication than other finishes, especially in high-traffic zones. For high-demand projects like those outlined in High-Demand Woodworking Projects for 2026: Coffee Tables, Wi, consider a hybrid approach or a more robust topcoat for ultimate longevity.
Enhancing Patina and Protection: Waxes and Shellac
For woodworkers seeking to impart a soft sheen and a traditional, time-worn aesthetic, waxes and shellac are excellent choices for Finishing Reclaimed Wood for 2026: Polishes That Highlight Texture and Story. These finishes offer a beautiful, natural look that enhances the wood’s existing patina without creating a plastic-like film. They allow the original character of the reclaimed timber, such as visible saw marks or natural discoloration, to remain prominent.
The Gentle Touch: Waxes
Wax finishes, typically beeswax or carnauba wax blends, provide a low-luster, natural feel. They offer some water resistance and a pleasing tactile quality.
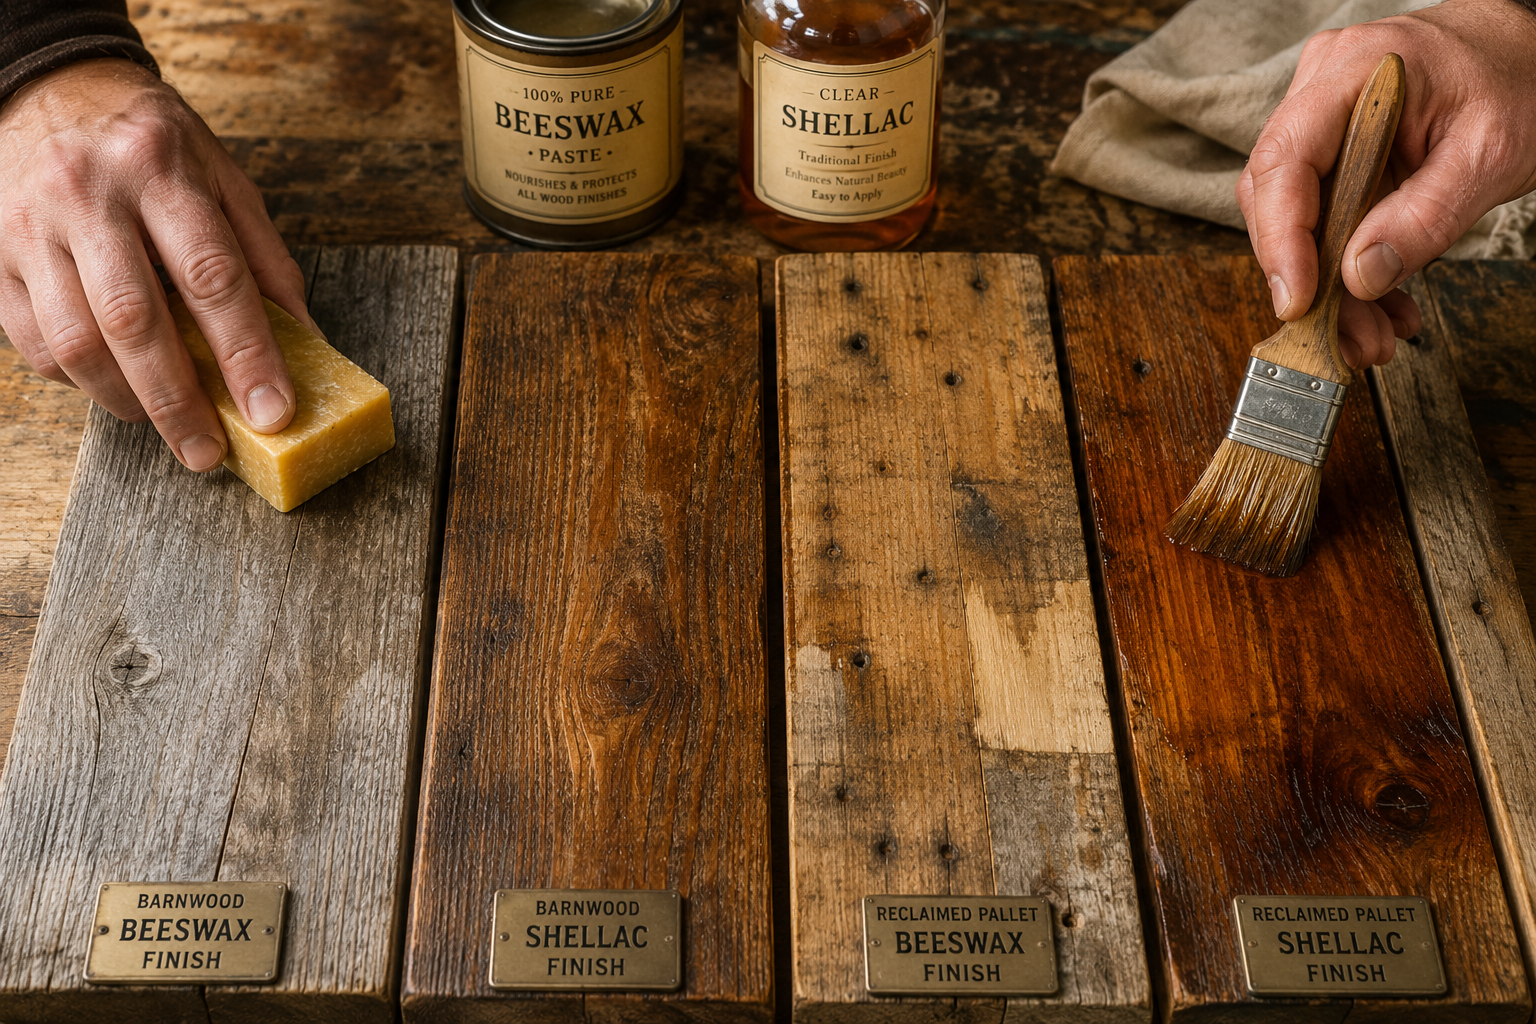
- Beeswax: A soft, natural wax that buffs to a silky sheen. It’s often used over an oil finish to add an extra layer of protection and depth. Beeswax is easy to apply and repair but offers less durability against heavy wear and spills than oils or harder finishes.
- Carnauba Wax: A harder wax, carnauba is often blended with beeswax or other oils to increase durability and create a higher sheen. It provides better scratch and water resistance than pure beeswax.
Applying Wax Finishes
- Clean and Prep: Ensure the wood is clean and dust-free. If applying over an oil finish, ensure the oil is fully cured.
- Apply Wax: Using a clean, lint-free cloth or steel wool (0000 grade), apply a thin, even layer of wax in the direction of the grain. Work in small sections.
- Buff: Allow the wax to haze over (usually 10-20 minutes), then buff vigorously with a clean, soft cloth until a desired sheen is achieved. Several thin coats, with buffing in between, will build up more protection.
The Traditional Sheen: Shellac
Shellac is a natural resin secreted by the lac bug, dissolved in denatured alcohol. It creates a thin, beautiful, and easily repairable finish.
- Properties: Shellac dries incredibly fast, making it excellent for projects requiring multiple coats in a short timeframe. It offers good resistance to oils, grease, and many common household chemicals. It’s also food-safe once cured. However, it has poor heat and alcohol resistance, which can be a consideration for certain applications.
- Enhancing Character: Shellac penetrates slightly and adds a warm, amber tone that beautifully highlights the grain and age of reclaimed wood. It creates a classic, hand-rubbed look without a heavy build.
Applying Shellac Finishes
- Preparation: As with all finishes, the wood must be clean and free of dust. Shellac can be applied over raw wood or oil-finished wood (after the oil is fully cured).
- Mixing (if using flakes): If using shellac flakes, mix them with denatured alcohol according to desired “pound cut” (e.g., 2 lbs of flakes per gallon of alcohol). Pre-mixed liquid shellac is also available.
- Application: Apply thin, even coats using a good quality natural bristle brush or a French polish pad. Shellac dries very quickly, so work efficiently to avoid brush marks.
- Multiple Coats: Apply 3-5 thin coats, allowing each to dry for about 30 minutes to an hour. Lightly scuff sand with 400-grit sandpaper between coats for a smoother build, then wipe clean. For restoring antique furniture, these traditional techniques are especially valuable, as detailed in Restoring Antique Wooden Furniture: Techniques for Repairing,.
Combining Waxes and Shellac
For an enhanced traditional finish, shellac can be used as a sealer and an initial build coat, followed by a final coat of wax. This combines shellac’s protective qualities and fast drying time with wax’s soft luster and feel. This approach is particularly effective for accentuating the character of reclaimed wood used in projects like Building Live-Edge Dining Tables with Reclaimed Wood: A 2026 Trend Guide for DIY Makers.
Durable Protection: Polyurethanes for High-Use Reclaimed Wood
While oils and waxes excel at preserving the raw character of reclaimed wood, some projects, especially those in high-traffic or moisture-prone areas, demand more robust protection. Polyurethane finishes offer superior durability against scratches, abrasion, and moisture. The key to Finishing Reclaimed Wood for 2026: Polishes That Highlight Texture and Story with polyurethane is to apply it in a way that protects the wood without obscuring its historical texture and visual narrative.
Understanding Polyurethane Options
Polyurethanes form a hard, clear plastic film on the surface of the wood. They come in various formulations:
- Oil-Based Polyurethane: Known for its exceptional durability and scratch resistance. It imparts a slight amber tint that darkens over time, which can enhance the warmth of reclaimed wood. It has a longer drying time and a stronger odor.
- Water-Based Polyurethane: Dries faster, has low VOCs (Volatile Organic Compounds), and is clear, leaving little to no color change on the wood. This makes it ideal for preserving the exact tone of lighter reclaimed woods. While generally durable, it might not be quite as scratch-resistant as oil-based versions.
- Satin/Matte Finishes: Crucially, for reclaimed wood, avoid high-gloss polyurethanes. Satin or matte finishes diffuse light, reducing glare and allowing the varied textures, saw marks, and imperfections of the reclaimed wood to be more visible and appreciated. They offer a softer, more natural appearance while providing maximum protection.
Step-by-Step Polyurethane Application for Reclaimed Wood
- Thorough Preparation: Clean the reclaimed wood meticulously. Sanding should be minimal—just enough to remove splinters and ensure adhesion, typically up to 220-grit. Remember, the goal is to keep the original character. For specific projects like mantels, consider our guide on Oversized Rough-Hewn Timber Mantels for 2026 Gas Fireplaces:.
- Sealer (Optional but Recommended): For very porous reclaimed wood, a thin coat of a sanding sealer or a thinned coat of the polyurethane itself can help prevent excessive absorption and provide a more even final finish. Allow to dry completely.
- First Polyurethane Coat: Apply a thin, even coat of polyurethane using a high-quality natural bristle brush (for oil-based) or a synthetic brush (for water-based). Avoid overworking the finish, as this can introduce bubbles. For rougher textures, a foam brush or pad can work well to ensure even coverage without pooling in crevices.
- Drying and Light Sanding: Allow the first coat to dry fully according to manufacturer instructions. This is typically 4-6 hours for water-based and 12-24 hours for oil-based. Lightly scuff sand with 320-grit or 400-grit sandpaper to remove any dust nibs or raised grain. Wipe clean with a tack cloth.
- Subsequent Coats: Apply 2-3 more thin coats, repeating the drying, light sanding, and cleaning steps between each. For very high-traffic surfaces, a fourth coat can provide extra durability. Always ensure thin coats, as thick coats are more prone to chipping and peeling.
Durability Testing for Polyurethane Finishes
Polyurethane’s primary advantage is its durability. After allowing the finish to cure for its full recommended period (often 7-30 days, even if touch-dry sooner), conduct rigorous tests on a scrap piece:
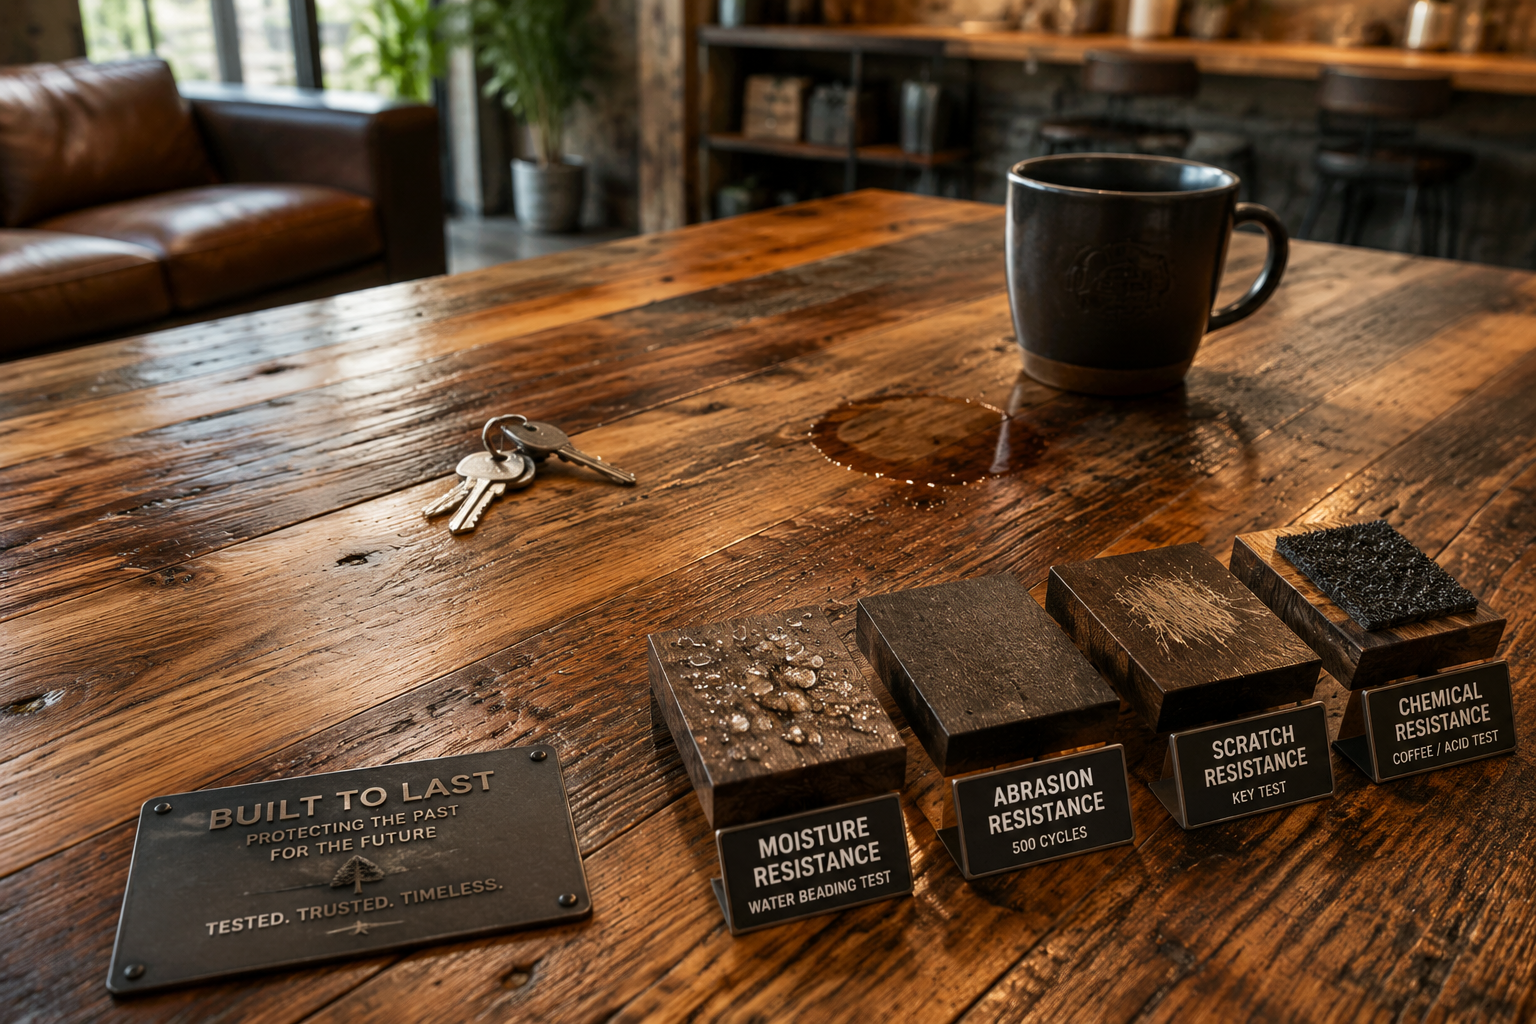
- Abrasion Test: Use a coin or a dull metal object to lightly scrape the surface. A good polyurethane should resist minor scratching.
- Liquid Spill Test: Spill water, coffee, or a mild cleaning solution and let it sit for 15-30 minutes. The finish should show no staining or penetration.
- Impact Test: Gently drop a small, blunt object from a short height. The finish should not chip easily.
For reclaimed wood furniture or structural elements like those described in Building Reclaimed Wood Mantels: Sourcing, Restoration, and Installation Techniques, opting for a satin or matte polyurethane can provide exceptional protection while maintaining the desired aesthetic of preserved history. The choice between oil-based and water-based will depend on environmental concerns, desired ambering, and drying time preferences, but both can successfully highlight the texture and story of reclaimed wood in 2026. For those prioritizing sustainability, exploring Sustainable Finishes for Reclaimed Wood: Low-VOC Recipes and Application Tutorials is highly recommended.
Conclusion
Finishing reclaimed wood effectively for 2026 goes beyond mere protection; it is an art of preservation, highlighting the intrinsic texture and the rich narrative embedded within each piece. Whether opting for the deep, natural enhancement of penetrating oils, the gentle luster and traditional feel of waxes and shellac, or the robust, long-lasting durability of polyurethane, the primary goal remains consistent: to celebrate the wood’s unique character while ensuring its longevity. Careful preparation, judicious application of thin coats, and thorough durability testing are indispensable steps. By understanding the properties of each finish and adapting application techniques to the wood’s storied past, woodworkers can create pieces that are not only functional and beautiful but also deeply resonant with history.

Next Steps for Your Reclaimed Wood Project:
- Assess Your Project’s Needs: Consider the intended use and expected wear of your reclaimed wood piece. A decorative wall hanging will have different finish requirements than a dining table.
- Choose Your Finish Wisely: Based on your aesthetic preference (natural feel vs. durable film) and protection needs, select the appropriate oil, wax, shellac, or polyurethane.
- Prioritize Preparation: Dedicate ample time to cleaning and gentle surface preparation to preserve the unique marks of the wood’s past.
- Always Test First: Apply your chosen finish schedule to a discreet area or a scrap piece of the same wood to ensure it achieves the desired look and performs as expected.
- Maintain Your Finish: Understand the maintenance requirements for your chosen finish to ensure your reclaimed wood piece continues to tell its story for years to come.
Meta Title: Finishing Reclaimed Wood for 2026: Highlight Texture & Story Meta Description: Learn how to finish reclaimed wood in 2026 with oils, waxes, and polyurethanes. Preserve character, enhance texture, and test durability for lasting beauty.
