

The average household in 2026 continues to navigate tighter living spaces, making furniture choices a critical component of functional design. Over 60% of urban dwellers report that space optimization is a primary concern when selecting new furnishings. For those with a burgeoning passion for woodworking, this presents an ideal project: building a custom piece that perfectly addresses spatial constraints. This article provides a step-by-step plan for creating a sturdy pedestal base, suitable for a compact Round Dining Table for Small Spaces: Building a Sturdy Pedestal Table with Simple Joinery, designed to be constructed in a small workshop using common tools.
Key Takeaways
- Round tables are inherently space-efficient for small dining areas, offering flexible seating and smoother traffic flow.
- A pedestal base eliminates obstructive leg interference, maximizing legroom and chair placement.
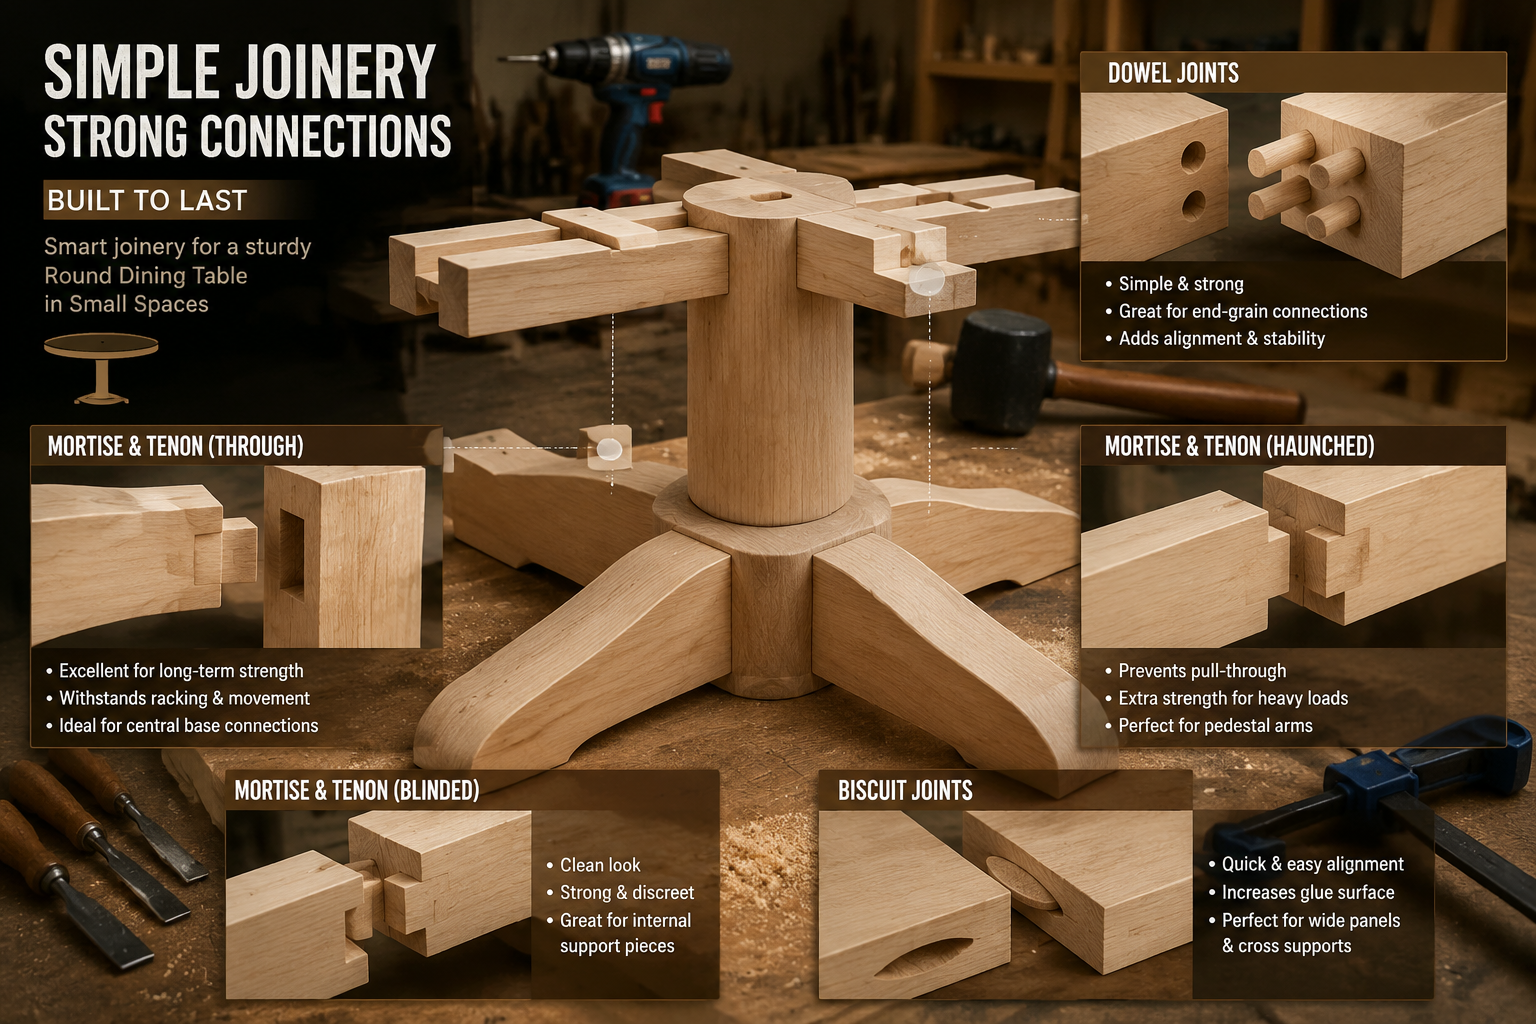
- Simple joinery techniques like dowels, mortise and tenons, and biscuits provide exceptional strength and are achievable with basic tools.
- Careful material selection and precise measurements are crucial for a durable and aesthetically pleasing outcome.
- This project is highly customizable, allowing for personal expression in design and finish while being built in a small workshop.
Understanding the Design: Why a Round Pedestal Table for Small Spaces?
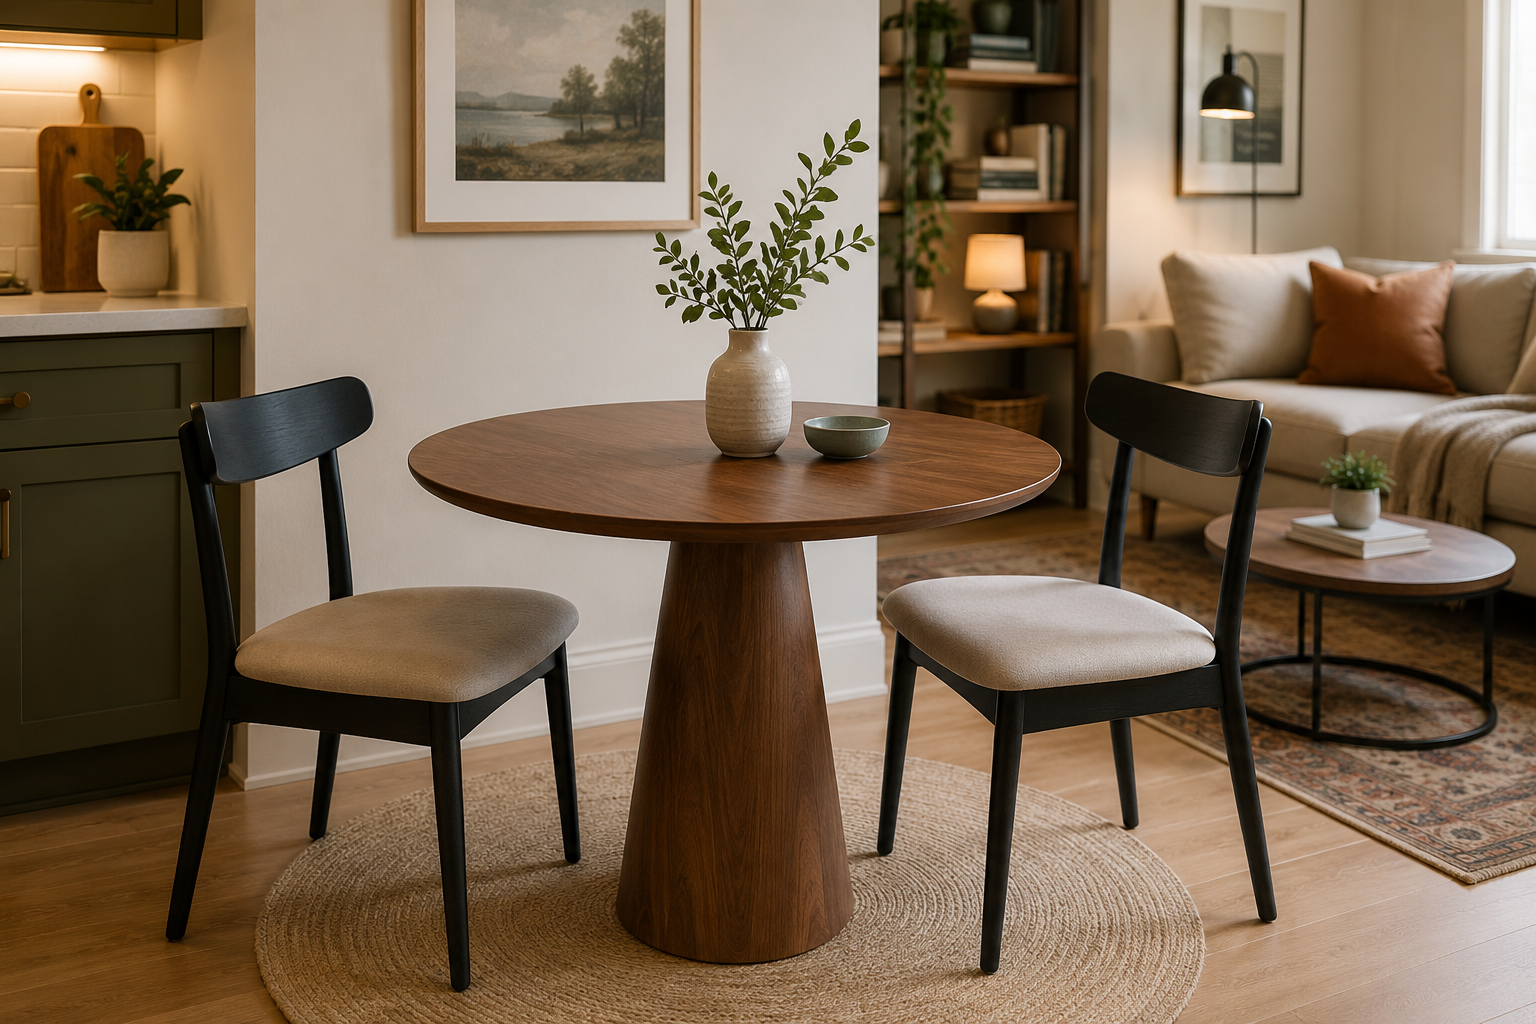
The appeal of a round dining table for small spaces is undeniable. Unlike square or rectangular tables, their lack of corners means they take up less visual and physical space, allowing for easier movement around them. This organic shape also promotes a more intimate dining experience, as everyone seated feels equally connected. The choice of a pedestal base further enhances this spatial efficiency. Traditional four-legged tables can be cumbersome in tight areas, often bumping into chairs or restricting legroom. A central pedestal, conversely, provides unobstructed space beneath the tabletop, allowing chairs to be tucked in more fully and offering greater comfort for diners.

The design philosophy behind this project centers on building a sturdy pedestal table with simple joinery that doesn’t require a fully equipped professional workshop. Many woodworking enthusiasts operate in garages, basements, or even dedicated corners of their homes. This plan accounts for that reality, focusing on techniques and tools readily available to most hobbyists. The emphasis on “simple joinery” does not imply weakness; rather, it refers to widely understood, effective methods that create strong, lasting connections without the need for complex machinery.
Benefits of a Pedestal Base
- Maximized Seating: No legs at the corners mean more freedom to place chairs.
- Improved Traffic Flow: Smooth edges and a central base make it easier to navigate around the table in a small room.
- Enhanced Aesthetics: A pedestal can be a sculptural element, adding elegance to the design.
- Stability: When properly designed and constructed, a pedestal base offers excellent stability for the tabletop.
Consider the visual impact as well. A single, well-designed pedestal can become a focal point, adding a touch of sophistication that a standard four-legged table might not. For ideas on different design aesthetics, explore articles like Warm Minimalism in Woodworking: Balancing Clean Design with Textured Natural Materials which can inspire the overall style of your table.
Essential Tools and Materials for Building a Sturdy Pedestal Table
Before embarking on the construction of your Round Dining Table for Small Spaces: Building a Sturdy Pedestal Table with Simple Joinery, gathering the right tools and materials is paramount. This project is designed to be accessible, meaning many items on this list are common in most home workshops.
Required Tools
- Circular Saw or Table Saw: For cutting the tabletop and base components accurately. A table saw, if available, will offer more precision for rip and cross-cuts.
- Router with Bits: Essential for shaping the tabletop edge, creating joinery like mortises, and potentially decorative profiles. Learning to effectively use this tool is covered in resources such as Mastering the Router Table: Essential Jigs, Safety, and Advanced Techniques for Precision Joinery and Edges.
- Drill (Corded or Cordless): For pre-drilling holes, creating dowel holes, and driving screws.
- Clamps (Bar Clamps, Parallel Clamps): Crucial for holding pieces securely during glue-up and assembly. You’ll need several of varying sizes.
- Measuring Tools: Tape measure, combination square, marking knife or pencil. Precision is key.
- Hand Planes and Chisels: Useful for refining joints and edges. For more on these, see Hand Tool Mastery for Detail Work: Chisels, Hand Planes, and Rasps for Refined Joinery and Finishing.
- Sander (Orbital or Belt): For surface preparation and finishing.
- Safety Gear: Safety glasses, hearing protection, dust mask. Always prioritize safety.
Material Selection
The choice of wood greatly influences both the aesthetics and durability of your table.
- Tabletop: For a sturdy, long-lasting surface, hardwoods like oak, maple, or walnut are excellent choices. Plywood with a hardwood veneer can also be a more cost-effective option, particularly if you’re building a larger diameter top. Aim for a thickness of 3/4 inch to 1 1/4 inches for stability.
- Pedestal Base: Match the wood to your tabletop or choose a complementary species. Solid hardwood is recommended for the pedestal to ensure maximum stability and resistance to tipping.
- Joinery Supplies:
- Wood Glue: High-quality PVA wood glue for strong, lasting bonds.
- Dowel Rods, Biscuits, or Mortise & Tenon Stock: Depending on your chosen joinery method.
- Screws/Hardware: For attaching the tabletop to the base, consider threaded inserts and machine screws for a strong, removable connection.
- Finishing Supplies: Sandpaper (various grits), wood filler, stain or paint, polyurethane or other durable topcoat. For guidance on finishes, explore our extensive resources on wood finishing techniques.
A typical tabletop diameter for a small space round dining table ranges from 30 to 42 inches. For two people, 30-32 inches is comfortable, while 36-42 inches can accommodate three to four people. The height of the table will typically be 29-30 inches from the floor to the tabletop surface.
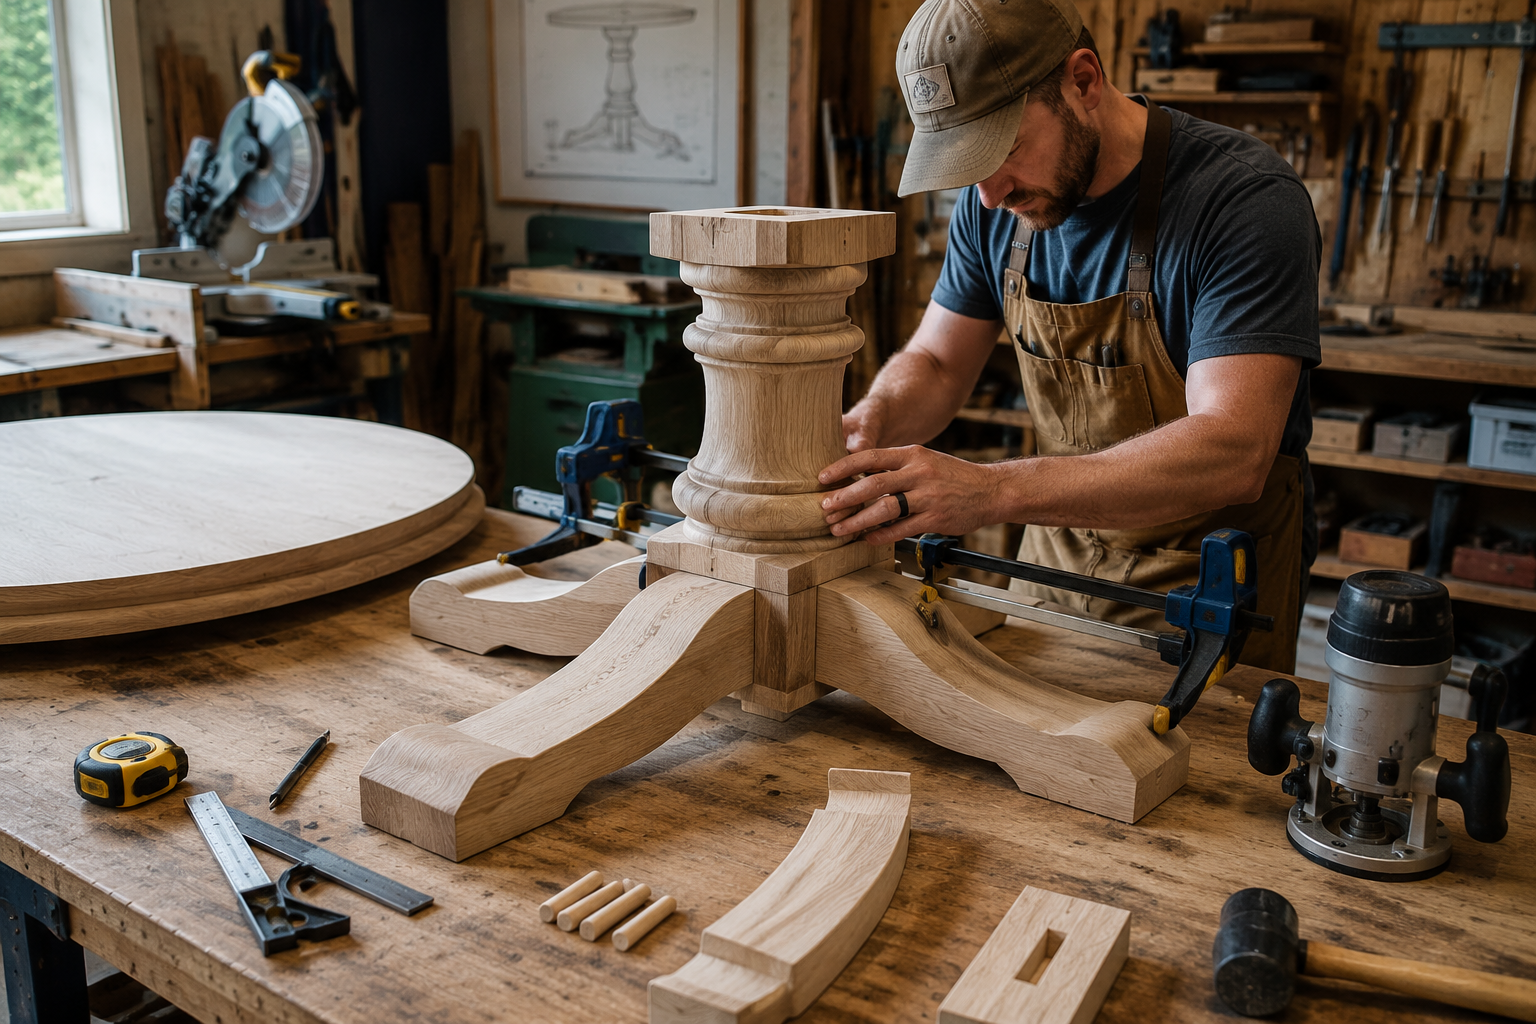
Constructing the Pedestal Base with Simple Joinery
The core of a stable Round Dining Table for Small Spaces: Building a Sturdy Pedestal Table with Simple Joinery lies in its base. This section outlines a practical approach to building a robust pedestal using accessible joinery. We’ll focus on a design that offers excellent stability and aesthetic appeal, even for those with limited woodworking experience.
Pedestal Base Design Overview
Our pedestal will consist of three main components:
- Central Column: The vertical support for the tabletop.
- Base Feet: Extending outwards to provide stability.
- Mounting Plate/Spreader: Connects the central column to the tabletop.
A common and sturdy design for the base feet involves either a simple cross-lap joint for two intersecting pieces or a more elaborate quad-leg design. For simplicity and strength, we’ll outline a cross-lap variation with additional vertical support.
Step-by-Step Construction Process
Cut the Components:
- Central Column: Cut a square or rectangular post to your desired height (e.g., 27 inches for a 29-inch finished table height, accounting for tabletop thickness and mounting plate).
- Base Feet: Cut two pieces of hardwood. These will form the “feet” of the table. Their length determines the footprint of your table. For a 36-inch tabletop, feet around 24-28 inches long and 4-6 inches wide provide good stability.
- Mounting Plate: Cut a sturdy piece of plywood or solid wood, roughly 16-20 inches square, or a circular piece of similar diameter. This will attach to the top of the central column and then to the tabletop.
Prepare the Joinery for the Base Feet: For strong, simple joinery, we will use a combination of half-lap joints and dowel pins or screws.
- Half-Lap Joint: Mark the center of each base foot piece. On one piece, mark out a half-lap joint that is half the thickness of your wood and spans the width of the piece. Do the same for the second piece. Cut these out using a circular saw with multiple passes, a router, or a hand saw and chisel, ensuring a snug fit when interlocked. This forms a strong ‘X’ shape.
- Reinforcement: Once the half-lap joint is dry-fitted, use dowel pins driven through pre-drilled holes, or counter-sunk screws, to permanently secure the joint. This greatly increases shear strength. Beginner’s Guide to Essential Woodworking Joints provides further details on these methods.
Attach Central Column to Base Feet:
- Mortise and Tenon (Recommended): For ultimate strength, cut a mortise into the bottom of your central column and a corresponding tenon on the assembled base feet (or vice-versa). This is arguably the strongest joint for this application.
- Dowel Joinery: Alternatively, use a dowel jig to drill precise holes in the bottom of the central column and the center of the assembled base feet. Apply generous wood glue and insert multiple dowel pins for a robust connection.
- Heavy-Duty Brackets/Screws: As a simpler alternative, use strong L-brackets or pocket-hole screws to attach the central column to the base. While less elegant, it can be surprisingly sturdy if done correctly. Ensure screws are long enough to penetrate deeply into both pieces without going through.
Attach Mounting Plate to Central Column:
- Center the mounting plate on top of the central column.
- Use screws driven from the underside of the mounting plate into the column, ensuring sufficient length for a secure hold. Predrill and countersink all screw holes to prevent splitting and allow for flush screw heads.
- For added strength, you could also use a smaller tenon on the top of the column that fits into a mortise in the mounting plate, then screw it down.
Construct the Round Tabletop:
- Panel Glue-Up: If using solid wood, glue several boards together edge-to-edge to achieve the desired width for your round top. Use biscuits, dowels, or tongue-and-groove joints to aid in alignment and increase glue surface area. Clamp firmly and allow glue to cure completely.
- Cutting the Circle: Once the panel is cured, find the center. Create a trammel or simple jig by screwing a pivot point (a nail or small screw) into the center. Attach a piece of scrap wood to the pivot, measure out your desired radius, and attach your router (with a straight bit) or circular saw to the scrap at that distance. Carefully rotate the tool around the pivot to cut a perfect circle.
- Edge Profile: Use a router with a decorative bit (e.g., round-over, ogee, or chamfer) to soften and beautify the edge of the tabletop.
Final Assembly:
- Place the finished tabletop upside down on a clean, protected surface.
- Center the completed pedestal base (with mounting plate attached) on the underside of the tabletop.
- Mark and predrill holes through the mounting plate into the tabletop.
- Use appropriate screws to attach the base firmly to the tabletop. For larger tables, consider using table fasteners that allow for wood movement, which can prevent cracking in solid wood tops over time.
Finishing and Maintenance for Your Custom Round Dining Table
Once your custom Round Dining Table for Small Spaces: Building a Sturdy Pedestal Table with Simple Joinery is assembled, the finishing process is crucial for both aesthetics and durability. A properly finished table will stand up to daily use and enhance the natural beauty of the wood.
Surface Preparation
- Sanding: This is perhaps the most critical step. Start with a medium-grit sandpaper (e.g., 100 or 120 grit) to remove any milling marks, glue squeeze-out, or imperfections. Gradually move to finer grits (e.g., 150, 180, 220). For hardwoods, you might even go up to 320 grit for an exceptionally smooth finish. Ensure you sand with the grain to avoid visible scratches.
- Dust Removal: After each sanding stage, thoroughly remove all dust using a vacuum, compressed air, and a tack cloth. Any dust left on the surface will be trapped under the finish.
- Wiping with Mineral Spirits (Optional): Wiping the wood with mineral spirits or denatured alcohol can reveal any remaining glue spots or imperfections that need further attention before finishing.
Choosing and Applying the Finish
For a dining table, durability is key. Options include:
- Polyurethane (Oil-based or Water-based): A popular choice for dining tables due to its excellent protection against scratches, moisture, and heat.
- Oil-based polyurethane offers a warmer, amber tone and is very durable. Apply thin coats with a brush or sprayer, allowing ample drying time between coats (typically 4-6 hours). Lightly scuff sand with 320-400 grit sandpaper between coats for better adhesion and a smoother final finish.
- Water-based polyurethane dries faster, has less odor, and typically maintains the natural color of the wood. Application is similar to oil-based.
- Varnish: Offers similar protection to polyurethane but is often considered more traditional. It can be more challenging to apply smoothly.
- Hardwax Oil: A modern finish that penetrates the wood, offering good protection while maintaining a very natural, matte feel. It’s often easier to repair than film-forming finishes. Apply according to manufacturer instructions, usually with a cloth or pad.
- Stain (Optional): If you wish to change the color of your wood, apply wood stain before the protective topcoat. Test the stain on a scrap piece of the same wood to ensure you achieve the desired color. Apply evenly and wipe off excess according to product instructions. Let it dry completely before applying any topcoat.
- Shellac: While not as durable for a dining surface on its own, shellac can be used as a sealing coat before varnish or polyurethane, offering excellent adhesion and stain blocking.
Apply at least 3-4 coats of your chosen topcoat for optimal protection, especially on the tabletop. Always follow the manufacturer’s instructions for drying times and recoating.
Ongoing Maintenance
- Regular Cleaning: Wipe spills immediately with a soft, damp cloth. Avoid harsh chemical cleaners, which can damage the finish. A mild soap solution is usually sufficient for cleaning.
- Protect from Heat and Moisture: Always use coasters under drinks and placemats under hot dishes to prevent rings and damage.
- Avoid Scratches: Use felt pads under decorative items and avoid dragging heavy or sharp objects across the surface.
- Re-finishing: Over time, if the finish shows significant wear, it can be sanded down and re-applied to restore its appearance and protection. For finishes like hardwax oil, spot repairs are often possible.
By taking care in both construction and finishing, your custom round dining table will serve as a beautiful and functional centerpiece in your small space for many years to come. This project, much like Crafting Profitable Wooden Benches: From Entryway Seats to Garden Perches, showcases how well-executed woodworking can produce both practical and aesthetically pleasing pieces for any home.
Conclusion
Building a custom round dining table with a sturdy pedestal base is a rewarding woodworking project that delivers significant functional and aesthetic benefits, especially for small living spaces. The ability to design and construct a piece that perfectly fits your specific needs and aesthetic preferences, all within the constraints of a home workshop, is incredibly empowering. By focusing on proven, simple joinery techniques, careful material selection, and a diligent finishing process, even intermediate woodworkers can achieve a professional-quality outcome.

The space-saving advantages of a round, pedestal-style table are undeniable in 2026’s increasingly compact homes, offering flexibility in seating and enhancing the flow of movement. Beyond the practicalities, there’s immense satisfaction in creating a piece of furniture that is not only beautiful but also robust and built to last. This project emphasizes accessible craftsmanship, proving that high-quality, durable furniture can be made without an arsenal of specialized tools. Embrace the challenge, enjoy the process, and soon you’ll be gathering around your meticulously crafted Round Dining Table for Small Spaces: Building a Sturdy Pedestal Table with Simple Joinery, a testament to your skill and vision.
Actionable Next Steps:
- Refine Your Design: Sketch out your table dimensions, considering your specific space and seating needs.
- Source Materials: Choose your preferred wood species for both the tabletop and pedestal, ensuring you have enough for your chosen dimensions.
- Gather Tools: Confirm you have all the necessary tools or plan to acquire/borrow any missing items.
- Practice Joinery: If new to specific joinery techniques, practice on scrap wood before cutting your primary pieces.
- Start Building: Follow the step-by-step guidance, prioritizing precision and safety throughout the construction process.
SEO Meta Title: Build a Sturdy Round Pedestal Dining Table for Small Spaces SEO Meta Description: Learn to build a sturdy round dining table with a space-saving pedestal base using simple joinery. Perfect for small spaces & DIY woodworkers in 2026.
