

The average home in 2026 sees entryways and hallways shrinking, demanding smarter furniture solutions that balance utility with style. A common challenge homeowners face is creating a functional and welcoming entry point without sacrificing precious square footage. This article details how to build a space-saving console table, exploring various design ideas and robust joinery techniques perfect for narrow entryways and hallways, ensuring both aesthetic appeal and lasting durability.
Key Takeaways
- Prioritize Design for Space: Choose console table designs like floating, wall-mounted, or narrow profiles with minimal depth to maximize floor space in compact areas.
- Embrace Functional Features: Integrate storage solutions such as shallow drawers, shelves, or hidden compartments to keep entryways clutter-free.
- Select Appropriate Materials: Hardwoods like oak, maple, or walnut offer durability and beauty, while plywood can provide a stable and cost-effective base for painted finishes.
- Master Essential Joinery: Utilize strong joinery techniques like mortise and tenon, dowel joints, or robust hidden fasteners to ensure stability and longevity for your console table.
- Consider Customization: Adapt designs to fit specific dimensions and aesthetic preferences, making the console table a unique and integral part of the home’s decor.
Design Ideas for a Space-Saving Console Table: Entryways and Hallways
When embarking on the journey of how to build a space-saving console table for entryways and hallways, the initial focus must be on innovative design that addresses the constraints of limited space without compromising on utility or visual appeal. The goal is to create a piece that serves as a functional landing strip for keys, mail, and small decorative items, while seamlessly blending into its surroundings.

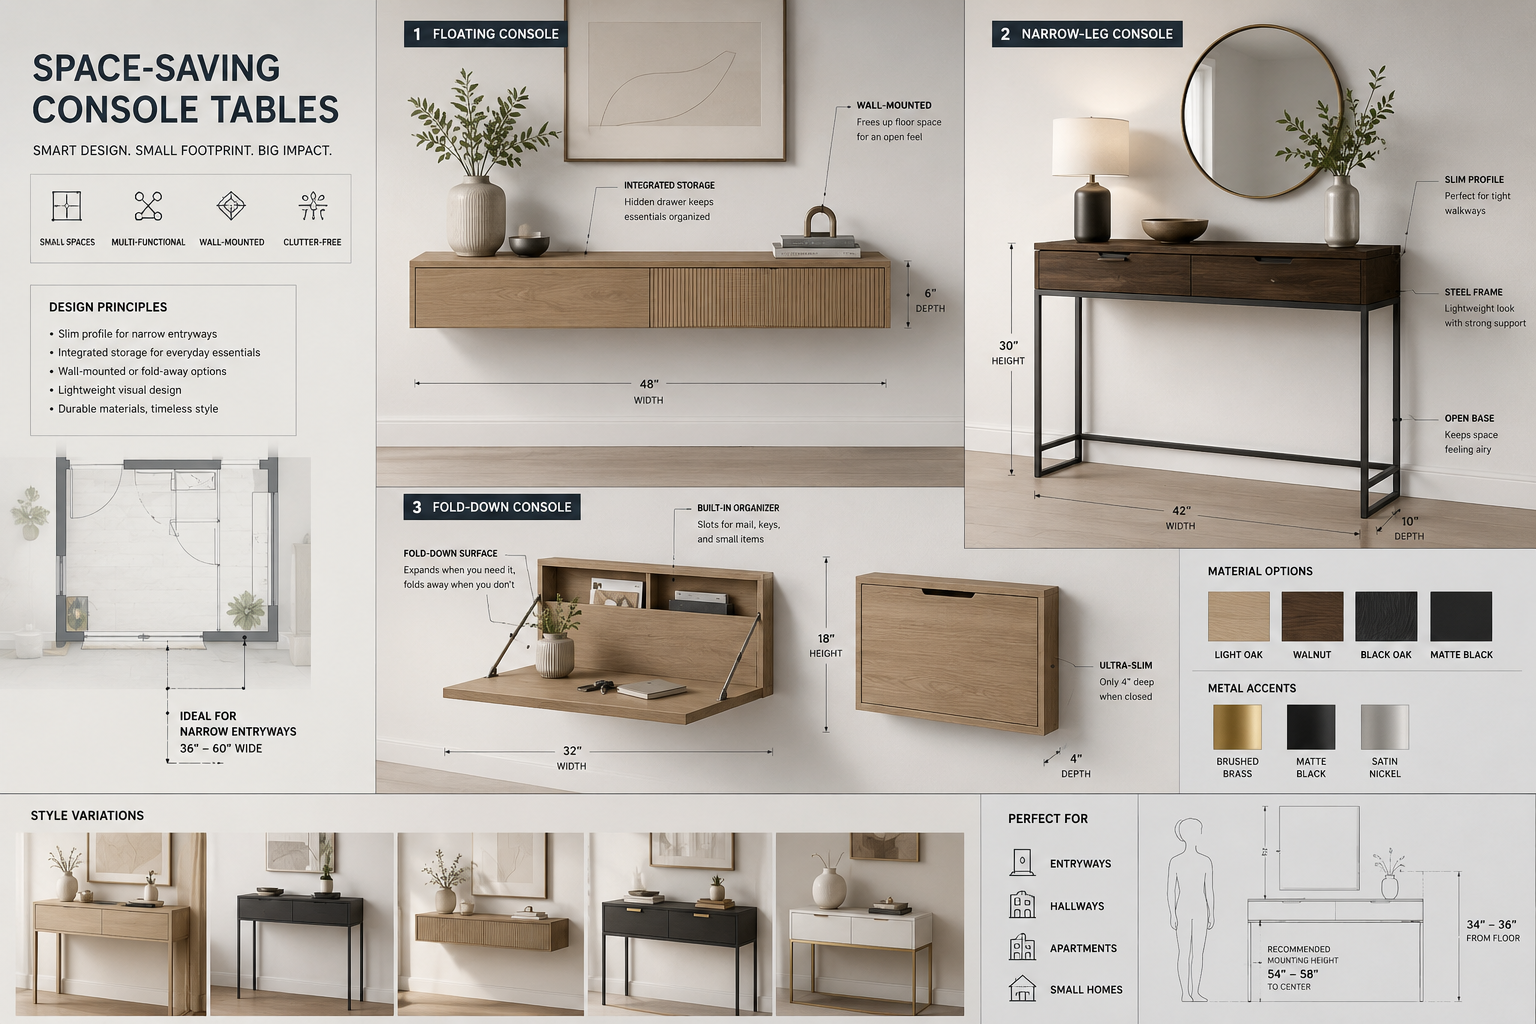
Floating Console Tables
A floating console table is arguably the ultimate space-saving solution. Mounted directly to the wall, it frees up floor space, giving the illusion of a larger area. This design is particularly effective in very narrow hallways where traditional four-legged tables would obstruct movement.
- Minimalist Aesthetic: Floating tables inherently offer a clean, contemporary look.
- Custom Height: You can mount it at any desired height, making it accessible for various needs or to align with existing wall decor.
- Integrated Storage: Some floating designs can incorporate shallow drawers or a hidden shelf underneath for discreet storage.
- Considerations: Requires secure wall mounting, often into studs, to bear weight. Material choice should be light yet sturdy, such as a high-quality plywood or solid hardwood for the top surface. For more advanced solutions, consider integrating smart home features to conceal charging stations or lighting.
Narrow-Profile Legged Tables
For those who prefer a freestanding unit, a narrow-profile legged console table is an excellent alternative. The key here is an exceptionally shallow depth, typically no more than 8-10 inches, combined with slender legs.
- Slim Design: Legs can be tapered or straight, keeping the overall footprint minimal.
- Open Base: An open design beneath the tabletop prevents the area from feeling too cluttered.
- Versatile Placement: Can be moved if needed, unlike wall-mounted options.
- Material Selection: Lighter woods or metallic legs can enhance the airy feel. When considering the wood, understanding wood movement is crucial to ensure the table’s longevity, especially for solid wood tops.
Fold-Down or Drop-Leaf Console Tables
For maximum flexibility, a fold-down or drop-leaf console table can be an ingenious solution. These designs allow the tabletop to expand when needed and retract to a much smaller profile when not in use.
- Dynamic Functionality: Perfect for occasional use, such as a temporary workspace or extra serving space.
- Compact Storage: Folds flat against the wall or reduces its surface area significantly.
- Design Variations: Can include a fixed central section with one or two hinged leaves.
- Hardware Importance: Requires high-quality hinges and support mechanisms to ensure smooth operation and durability.
Console Tables with Integrated Storage
Regardless of the primary design style, incorporating clever storage is paramount for a space-saving console table.
- Shallow Drawers: Ideal for keys, mail, pens, and other small items that often accumulate in entryways.
- Open Shelving: A lower shelf can hold small baskets for gloves, hats, or shoes, keeping clutter off the floor.
- Hidden Compartments: A false bottom or a pull-out panel can offer discreet storage.
- Hooks and Organizers: Integrating coat hooks or a mail slot into the back panel or side of a floating table can further enhance functionality. For more ideas on small space organization, explore DIY compact entryway organizers.
Essential Joinery for Building a Space-Saving Console Table
The longevity and stability of any console table, especially a narrow or floating design, rely heavily on robust joinery. When learning how to build a space-saving console table, selecting the right joinery method is as important as the design itself. It ensures the table can withstand daily use in busy entryways and hallways.
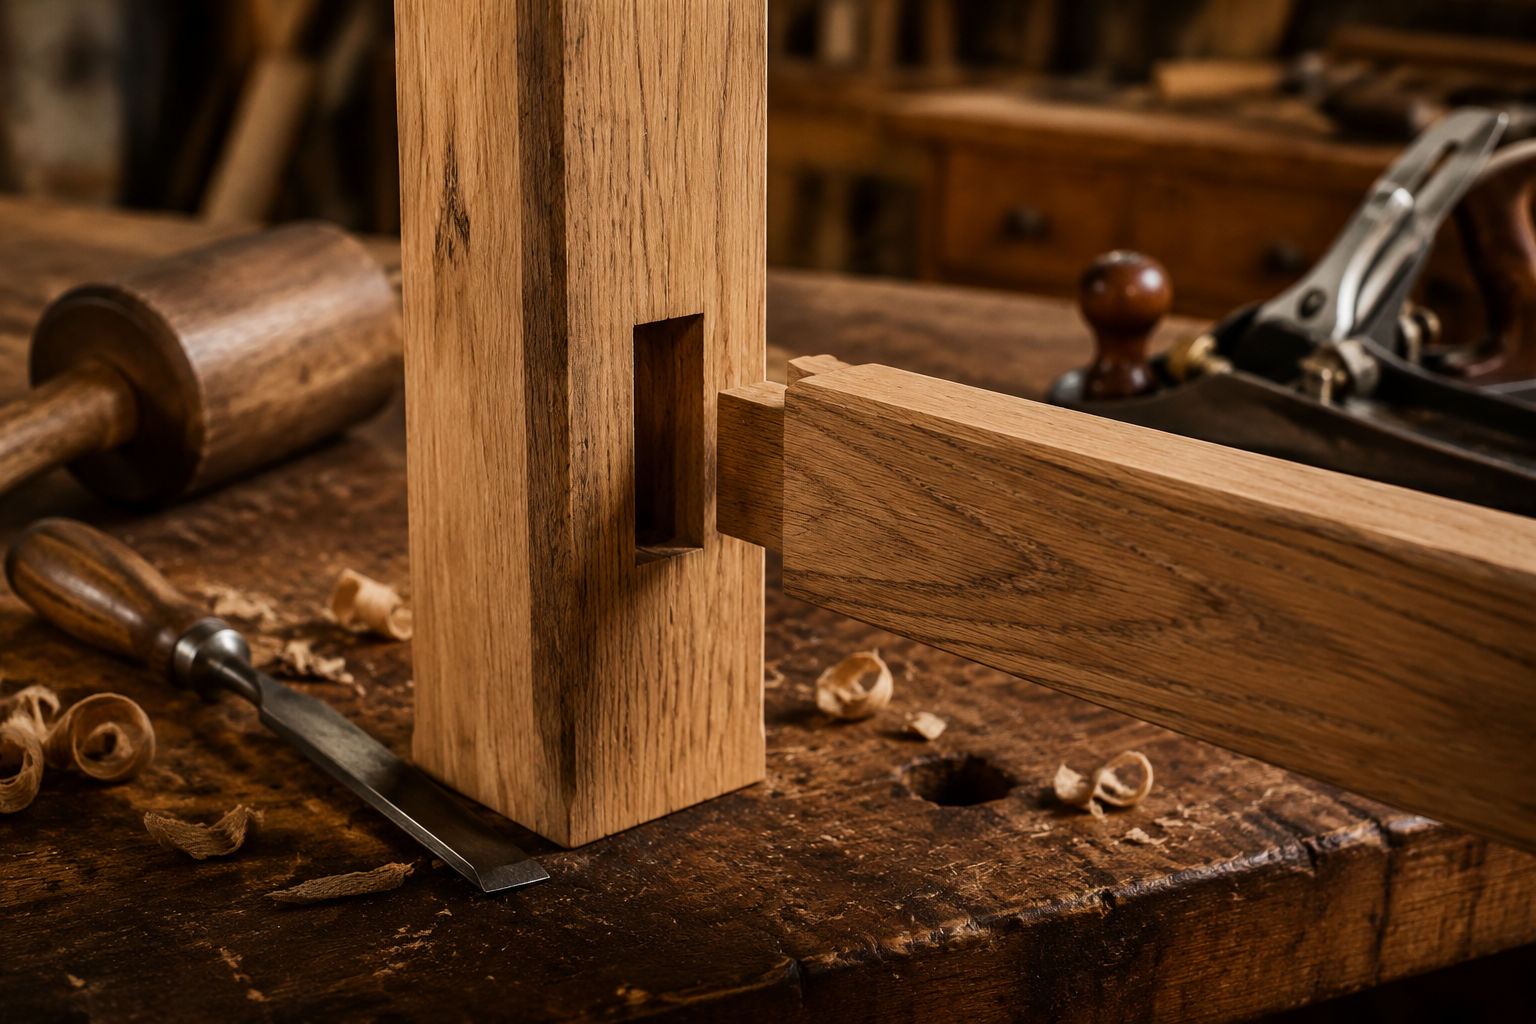
Mortise and Tenon Joints
The mortise and tenon joint is a classic woodworking joint renowned for its strength and durability. It’s an excellent choice for attaching legs to rails or aprons in a traditional legged console table.
- Strength: The long grain-to-long grain glue surface provides exceptional mechanical strength.
- Aesthetics: Can be hidden (blind mortise and tenon) for a clean look or exposed (through mortise and tenon) as a decorative element.
- Application: Ideal for connecting the horizontal support rails (aprons) to the vertical legs.
- Precision: Requires careful measurement and cutting for a tight fit, which can be achieved with hand tools or a router table. Delve into hand tool joinery for a deeper understanding.
Dowel Joints
Dowel joints offer a simpler alternative to mortise and tenon while still providing good strength. They are particularly useful for attaching smaller components or for projects where a hidden joint is preferred.
- Simplicity: Easier to execute than mortise and tenon, especially for beginners.
- Versatility: Can be used for leg-to-apron connections, attaching shelves, or joining board edges.
- Tools: Requires a drill and a doweling jig for accurate hole alignment.
- Limitations: Generally less strong than a well-executed mortise and tenon, but perfectly adequate for lighter console tables.
Pocket Hole Joinery
For quick and strong joints, especially for attaching tabletops to aprons or building box-like structures, pocket hole joinery is a modern and popular method.
- Speed: Fast to create with a dedicated pocket hole jig.
- Strength: Creates a strong, rigid joint using screws driven at an angle.
- Concealment: The holes can be filled with plugs or placed in less visible areas.
- Application: Excellent for attaching the top surface to the frame or for assembling the carcass of a floating console with drawers.
Rabbet and Dado Joints
These joints are fundamental for building sturdy boxes, drawers, or shelves within your console table design.
- Rabbet Joint: A groove cut along the edge of a board to receive another piece, commonly used for drawer bottoms or back panels.
- Dado Joint: A groove cut across the grain of a board to receive the end or edge of another board, perfect for fixed shelves.
- Stability: Provides strong, interlocking connections that resist racking.
- Tools: Can be cut with a router, table saw, or hand plane. Mastering the router table can significantly improve precision for these cuts.
Wall Mounting Hardware for Floating Tables
For floating console tables, the joinery extends beyond wood-to-wood connections to the critical aspect of wall attachment.
- French Cleats: A highly secure and simple method. Two interlocking pieces, one on the wall and one on the table, allow the table to hang flush and strongly.
- Heavy-Duty Brackets: Metal brackets can provide robust support, though they may be visible depending on the design.
- Toggle Bolts/Anchors: Essential when attaching to drywall without studs, but always prioritize finding studs for maximum strength, especially for heavier tables or those that will hold significant weight.
Practical Considerations and Finishing Touches for Your Console Table
Beyond design and joinery, practical considerations and finishing touches are vital to building a space-saving console table that is both beautiful and functional in 2026. This includes wood selection, sanding, and applying a durable finish.
Wood Selection
Choosing the right wood impacts both the aesthetics and the durability of your console table.
- Hardwoods: Oak, maple, cherry, and walnut are excellent choices for their strength, beautiful grain, and resistance to dents and scratches. They are ideal for high-traffic areas like entryways.
- Softwoods: Pine or fir can be more budget-friendly and easier to work with, but they are softer and more prone to wear. They can be a good option if painted or for very light-use tables.
- Plywood/MDF: For painted finishes or when working with a tighter budget, high-quality Baltic birch plywood or medium-density fiberboard (MDF) can provide stable and smooth surfaces. Plywood offers superior strength compared to MDF. For structural applications, understanding plywood for cabinets can be beneficial.
- Reclaimed Wood: Offers unique character and a sustainable option. Sourcing reclaimed wood can add a distinct story to your piece.
Sanding and Preparation
Proper surface preparation is key to a professional-looking finish.

- Gradual Grit Progression: Start with a coarser grit (e.g., 80 or 100) to remove milling marks and imperfections, then progressively move to finer grits (120, 150, 180, 220) until the surface is smooth to the touch.
- Dust Removal: Thoroughly remove all sanding dust between grits and before applying finish. A tack cloth or compressed air works well.
- Edge Treatment: Soften sharp edges with a slight round-over using sandpaper, a block plane, or a router bit.
Finishing Options
The finish protects the wood and enhances its natural beauty, or provides a desired color.
- Oil Finishes: Penetrate the wood, offering a natural, matte look and feel. They are easy to repair but provide less protection against moisture than film finishes. Examples include tung oil, linseed oil, or Danish oil. For pine, oil on pine provides excellent insights.
- Varnish/Polyurethane: Form a durable film on the surface, offering excellent protection against spills, scratches, and wear. Available in various sheens from matte to high gloss. Polyurethane is particularly popular for high-traffic furniture.
- Stain: Changes the color of the wood while allowing the grain to show through. Always apply stain evenly and wipe off excess according to manufacturer instructions.
- Paint: Provides a solid color finish, great for matching decor or covering less attractive wood. Requires proper priming for best adhesion and durability.
- Sustainable Finishes: Consider low-VOC options for a healthier home environment, especially when working with reclaimed wood.
Aesthetic Integration
Consider how your console table will integrate with the existing decor of your entryway or hallway.
- Proportion: Ensure the table’s dimensions are appropriate for the space. A table that is too long or deep will defeat the purpose of being space-saving.
- Style Match: Choose a design and finish that complements your home’s overall aesthetic, whether it’s modern, rustic, traditional, or mid-century. For inspiration, refer to articles like Console Tables That Wow to help refine your vision.
- Accessorizing: Use minimal, carefully chosen accessories to avoid clutter. A small lamp, a plant, a key bowl, or a piece of artwork can enhance the table’s function and appeal without overwhelming the space.
Conclusion
Building a space-saving console table for your entryway or hallway in 2026 is a rewarding woodworking project that offers both practical benefits and an opportunity for creative expression. By carefully considering design ideas like floating or narrow-profile tables, incorporating smart storage solutions, and employing robust joinery techniques such as mortise and tenon or pocket holes, you can create a piece that perfectly fits your space and lifestyle. Remember to choose appropriate materials, meticulously prepare the surfaces, and apply a durable finish to ensure your handcrafted console table stands the test of time. Take these steps, and you’ll transform a challenging narrow space into a functional and aesthetically pleasing part of your home.
Next Steps: Begin by sketching out various design ideas, taking precise measurements of your intended space. Research specific wood types and plan your cuts. Consider investing in a good quality joinery jig if you’re new to the techniques. Finally, gather your materials and tools, and enjoy the process of bringing your unique space-saving console table to life.
