


The average cost of a professional-grade billiard table can exceed $5,000, not including installation. For dedicated woodworkers and billiard enthusiasts, the prospect of building a high-quality table from scratch offers not only significant cost savings but also the profound satisfaction of crafting a custom piece tailored to their exact specifications. This article delves into the advanced woodworking techniques required for Building a DIY Billiard Table: Advanced Frame Construction, Slate Installation, and Felt Application, guiding you through the critical stages to achieve a professional-level playing experience in 2026.
Key Takeaways

- Precision in frame construction, using robust joinery and high-quality hardwoods, is paramount for the table’s stability and longevity.
- The sub-frame and main frame must be perfectly square and level to support the immense weight of the slate accurately.
- Slate installation involves meticulous leveling, sealing seams, and ensuring a perfectly flat playing surface for optimal ball roll.
- Proper felt application demands tension, wrinkle-free stretching, and secure fastening to achieve a smooth, fast playing field.
- Attention to detail throughout all stages, from material selection to final felt finishing, distinguishes a high-quality DIY billiard table.
Advanced Frame Construction for a DIY Billiard Table
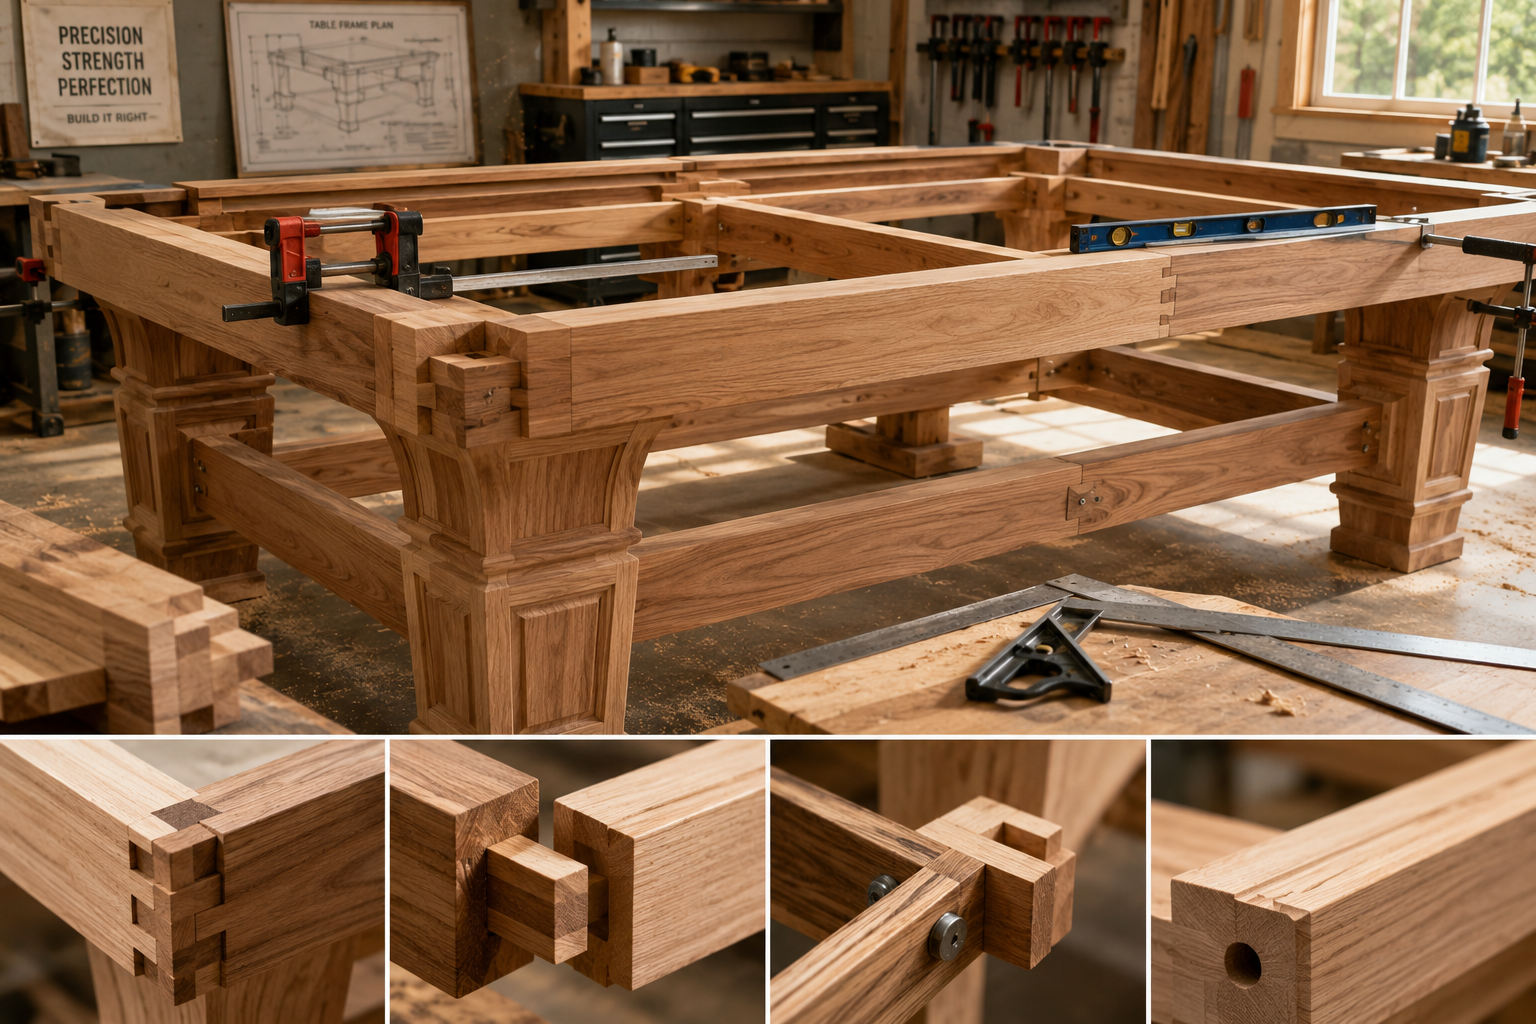
The foundation of any high-quality billiard table lies in its frame. This isn’t merely a decorative element; it’s a precisely engineered structure designed to withstand immense weight (several hundred pounds of slate) and maintain absolute rigidity over decades. For Building a DIY Billiard Table: Advanced Frame Construction, Slate Installation, and Felt Application, selecting the right materials and employing robust joinery are crucial.
Material Selection for Structural Integrity
Hardwoods are the preferred choice for billiard table frames due to their strength, stability, and resistance to warping. Options like oak, maple, ash, or even exotic hardwoods like mahogany offer excellent structural properties. The lumber should be kiln-dried to a consistent moisture content (typically 6-8%) to prevent future movement.
Consider the following components:
- Legs: Four substantial legs provide primary support. Their dimensions will depend on the table size, but typically 4×4 or 5×5 inch stock is used, often tapered or turned for aesthetics.
- Main Frame (Rails): These are the long perimeter pieces that connect the legs and support the slate. They need to be thick and wide to resist sagging. Often, multiple layers of solid wood are laminated for increased strength and stability.
- Sub-Frame (Beams/Stretchers): A complex system of cross-beams and stretchers beneath the main frame distributes the slate’s weight evenly and prevents the main frame from bowing. These internal supports are just as critical as the outer rails.
- Leg Levelers: High-quality threaded leg levelers are essential for fine-tuning the table’s level after construction.
Precision Joinery Techniques
Advanced frame construction relies on joinery that offers maximum strength and resistance to racking. While screws and glue are part of the equation, they are secondary to the mechanical strength of the joints themselves.
- Mortise and Tenon Joints: These are ideal for connecting the main frame rails to the legs. They create a strong, interlocking joint that resists twisting and sheer forces. Proper fitting is critical, often requiring a Pro-Tech 10 Table Saw or similar precision equipment for accurate cuts.
- Dovetail Joints: While more complex, dovetails can be used for corner connections on the main frame or for joining sub-frame elements, offering exceptional tensile strength. For those mastering this craft, techniques are outlined in resources like “Mastering Dovetail Joinery for Drawers: Hand and Router Methods” and “Mastering Dovetail Joints with Hand Tools: A Step-by-Step Guide for Flawless Wood Joinery.”
- Lap Joints and Half-Laps: Useful for connecting cross-beams within the sub-frame, allowing for flush surfaces and strong glued connections.
- Reinforcement: In addition to joinery, corner blocks, gussets, and heavy-duty steel brackets can be added internally for extra reinforcement, especially where the legs meet the frame.
<code>Precision Tip: For critical structural joints, aim for tolerances of less than 1/64 inch (0.4 mm). This requires sharp tools, accurate measurements, and careful test fits.
</code>
The Sub-Frame: The Unsung Hero
The sub-frame is often overlooked but is crucial for supporting the slate. It typically consists of several parallel beams running lengthwise and cross-wise, creating a grid pattern.
- Beam Sizing: These beams should be substantial, often 1.5 to 2 inches thick and 4 to 6 inches deep, depending on the span.
- Spacing: Beams should be spaced to provide continuous support for the slate, typically no more than 12-18 inches apart.
- Leveling Blocks: Once the sub-frame is assembled and precisely level, small leveling blocks or shims are often glued to the top edges of the sub-frame beams. These provide a perfectly flat surface for the slate to rest on and allow for minor adjustments during slate installation.
Slate Installation: Achieving a Perfectly Level Playing Surface
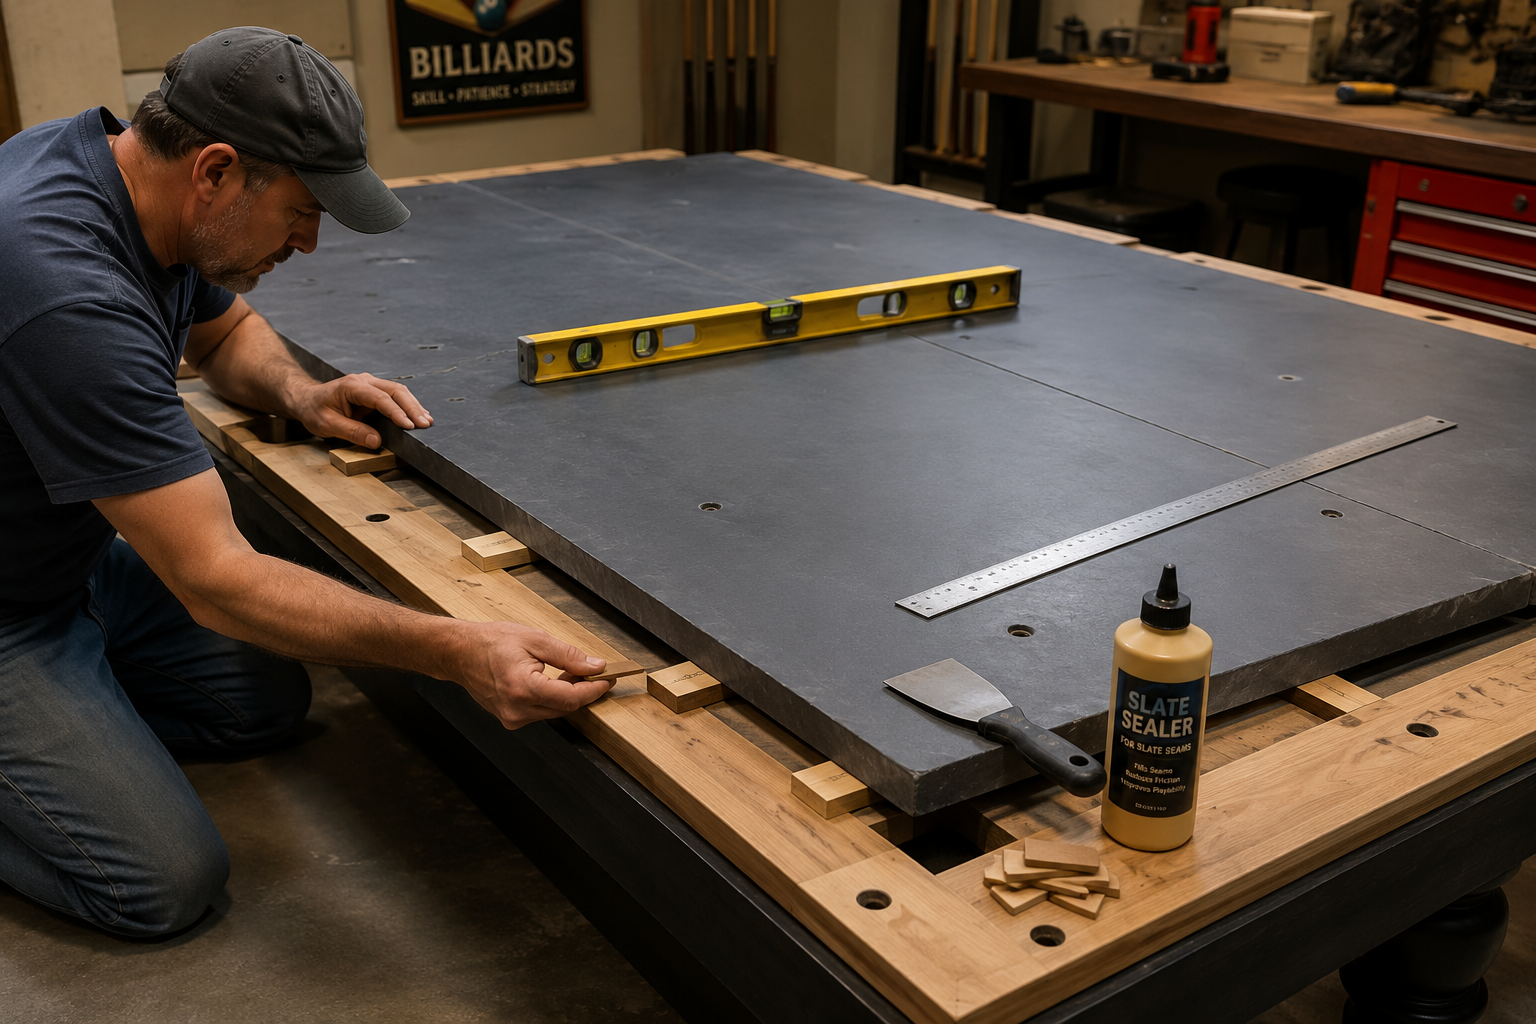
The playing surface of a billiard table is the slate – typically a three-piece set of finely ground rock, often imported from Italy or Brazil. Its weight and fragility demand extreme care and precision during installation. This stage is critical for the “Slate Installation” aspect of Building a DIY Billiard Table: Advanced Frame Construction, Slate Installation, and Felt Application.
Preparing the Frame for Slate
Before placing the slate, the main frame and sub-frame must be absolutely level and square. Use a long, accurate spirit level (at least 4 feet) and a machinist’s level for checking across multiple points.
- Level the Legs: Use the leg levelers to bring the entire frame to a preliminary level.
- Check for Frame Flatness: Lay a long, straight edge across the top of the main frame rails and the sub-frame beams. There should be no gaps. Address any high or low spots with shims or careful planing.
- Cleanliness: Thoroughly clean the top surfaces of the sub-frame beams and rails. Any debris can cause an uneven surface under the slate.
Placing and Leveling the Slate
This is often a two-person job due to the slate’s weight. Each piece can weigh hundreds of pounds.
Initial Placement: Carefully lift and place each slate piece onto the sub-frame. Ensure they are correctly oriented and fit snugly together. The center piece usually goes first, followed by the two end pieces.
Gross Leveling: Begin by placing a long straight edge across the seams of the slate pieces, checking for any major height differences. Use hardwood shims (not cardboard, which can compress) under the slate where needed to bring all pieces to a consistent height. Tap shims gently into place.
Fine Leveling: This is the most crucial step. Using a high-precision machinist’s level (which reads deviations in thousandths of an inch) or a laser level, check the slate across its entire surface – lengthwise, crosswise, and diagonally. Place the level at multiple points, making tiny adjustments with shims. The goal is zero deviation. This can take hours.
Area of Check Tool Recommended Tolerance Goal Overall Frame 4ft Spirit Level Perfectly level Slate Seams Straight Edge No steps/gaps Entire Surface Machinist’s Level Zero deviation Side Rails 2ft Spirit Level Perfectly plumb
Sealing the Slate Seams
Once the slate is perfectly level, the seams between the three pieces must be filled and leveled.
- Fill the Gaps: Use a high-quality, non-shrinking epoxy or beeswax-based slate filler. Force the filler into the seams using a putty knife.
- Scrape and Sand: Allow the filler to cure according to the manufacturer’s instructions. Once cured, carefully scrape away any excess filler with a sharp, flat scraper. Then, light-sand the filled seams with fine-grit sandpaper (e.g., 220-grit) until the surface is absolutely smooth and undetectable to the touch. The goal is a monolithic surface.
- Final Cleaning: Vacuum the entire slate surface to remove all dust and debris. Wipe it clean with a damp, lint-free cloth.
<code>Expert Tip: When leveling slate, never overtighten bolts holding the slate to the frame until all leveling is complete. The bolts are primarily for securing the slate, not for leveling.
</code>
Felt Application: The Final Touch for Optimal Play
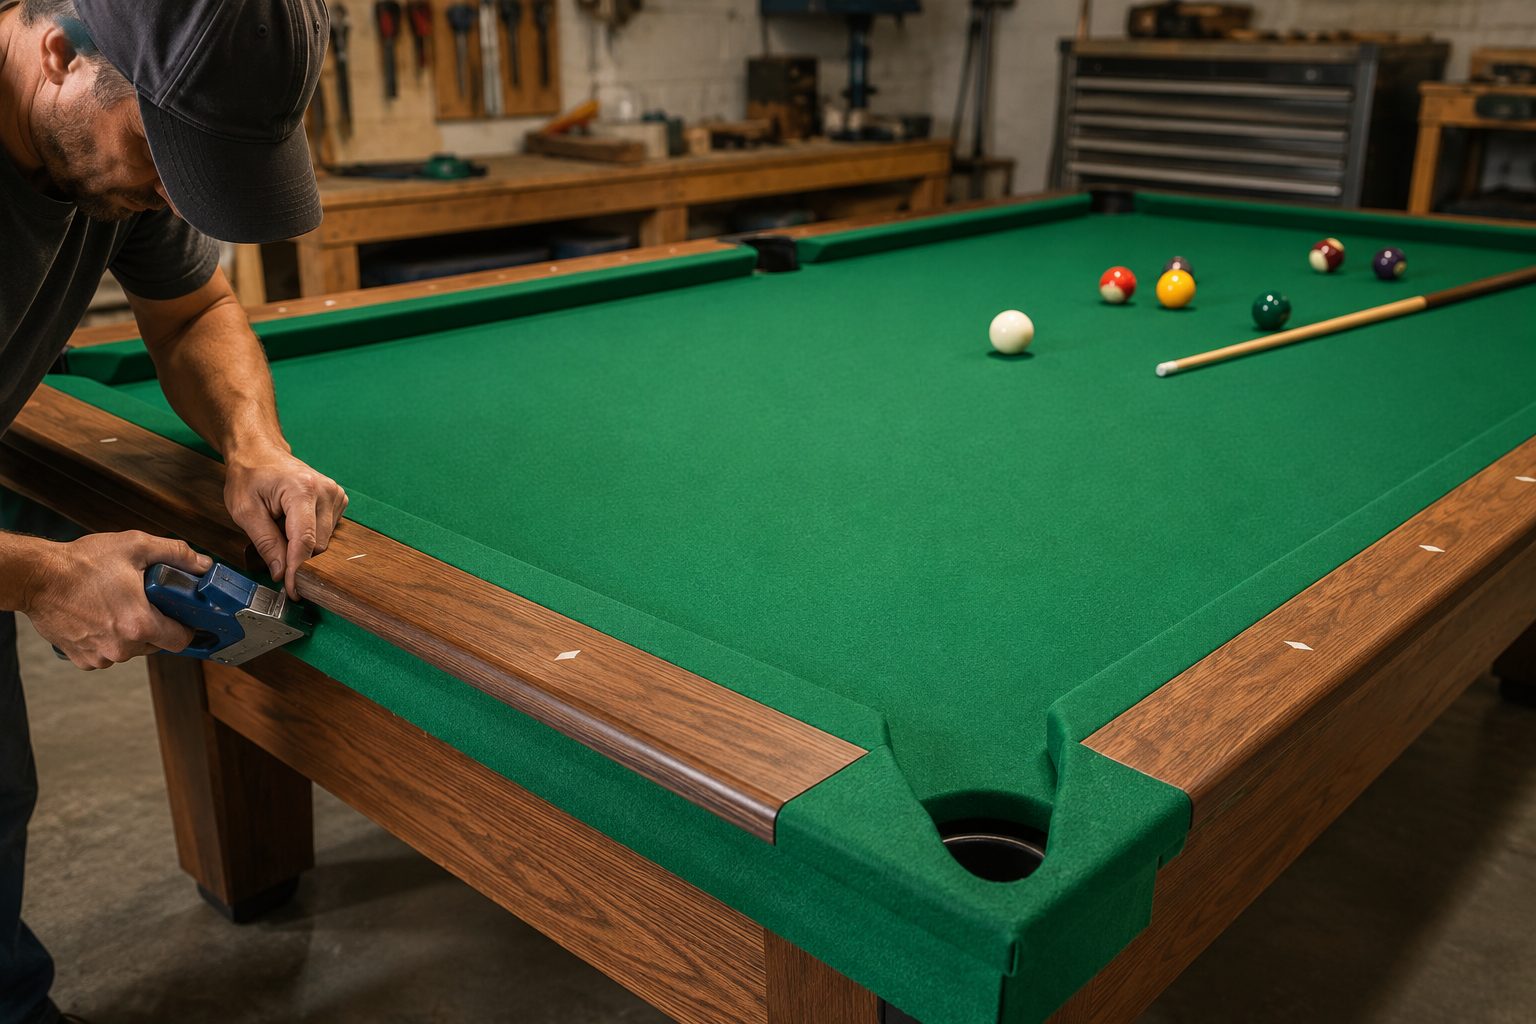
The felt, or billiard cloth, is the interface between the balls and the table. Its proper application is paramount for consistent ball speed, spin, and accuracy. This is the “Felt Application” stage of Building a DIY Billiard Table: Advanced Frame Construction, Slate Installation, and Felt Application. Choosing high-quality billiard cloth is essential. Worsted wool cloths are preferred for professional play due to their speed and durability.
Preparing the Cloth and Work Area
- Unroll and Inspect: Carefully unroll the billiard cloth and inspect it for any flaws, wrinkles, or damage. Let it relax in a clean, temperature-controlled environment.
- Cleanliness: Ensure the slate and the surrounding work area are meticulously clean and dust-free. Any speck of dust trapped under the felt will create a bump.
- Tools: Gather your tools: a stapler (electric or pneumatic recommended), sharp utility knife, felt stretcher (optional but highly recommended for rails), and chalk.
Applying Felt to the Slate (Bed Cloth)
The bed cloth must be stretched taut and even, without any wrinkles or slack.
- Initial Placement: Lay the felt over the slate, centering it carefully. Ensure there’s enough overhang on all sides to reach beneath the rails.
- Anchor One Side: Start by securing one long side. Pull the felt taut and straight, then staple it to the underside of the main frame rail. Use staples every 1.5 to 2 inches.
- Stretch and Staple Opposite Side: Move to the opposite long side. This is where the primary stretching occurs. With a helper, pull the felt firmly and evenly across the table. The goal is to remove all wrinkles and slack, but not to overstretch, which can distort the weave. Staple securely.
- Stretch and Staple Short Sides: Repeat the stretching process for the two short ends, working from the center outwards.
- Cutting Pockets: Carefully cut out the pocket openings. Start with a small “X” cut and gradually enlarge it, stapling the felt around the pocket opening on the underside of the frame. Ensure clean, smooth cuts that don’t fray.
- Trim Excess: Once all sides and pockets are stapled, carefully trim any excess felt, leaving a clean edge.
For precise cutting and accurate joinery during frame construction, refer to our guide on Mastering Woodworking Screws: Your Ultimate Guide for 2026 to ensure robust connections.
Applying Felt to the Rails
The rail felt is often a separate, pre-cut strip designed to cover the cushions and the top and side of the rails.

- Prepare Rails: Remove the cushions from the rails (if not already separate). Clean and prepare the rail wood.
- Apply to Cushions: The felt needs to be adhered to the rubber cushions. This can be done with specialized felt adhesive or by stapling tightly from the back. Professional installation sometimes involves wrapping the felt around the cushion and securing it into a groove.
- Attach to Rails: Once the cushions are felted, they are reattached to the rail sections. The felt that covers the top and side of the rail must be stretched tautly. Use a felt stretcher to get consistent tension, stapling on the underside of the rail.
<code>Felt Application Pro Tip: Use chalk marks on the underside of the rails to guide your staples. Consistency in staple placement and tension is key to a professional finish.
</code>
When considering the longevity and aesthetics of your table, proper wood finishing techniques for the frame are vital. A well-applied finish not only protects the wood but also enhances its natural beauty, complementing the meticulously laid felt.
Conclusion
Building a DIY Billiard Table: Advanced Frame Construction, Slate Installation, and Felt Application is a challenging yet incredibly rewarding woodworking project. It demands patience, precision, and an understanding of advanced techniques from start to finish. From selecting the finest hardwoods and employing robust joinery for the frame, to meticulously leveling the heavy slate, and finally, expertly stretching and applying the felt, each stage builds upon the last, contributing to the table’s overall playability and aesthetic appeal.
The satisfaction of rolling a perfectly true shot on a table you’ve crafted with your own hands is unparalleled. As you embark on this ambitious endeavor, remember that attention to detail, especially in the areas of structural stability, flatness, and surface consistency, will define the quality of your finished billiard table. Embrace the challenge, enjoy the process, and soon you’ll have a custom-built centerpiece that provides countless hours of enjoyment for years to come. For more advanced woodworking projects, explore options like Building Adirondack Chairs: Ergonomic Outdoor Seating with Weather-Resistant Finishes or even DIY Outdoor Wood Pizza Oven Stand and Storage: Building a Functional for continued skill development.
SEO Meta Title: Build a DIY Billiard Table: Advanced Frame, Slate, Felt Guide SEO Meta Description: Master building a DIY billiard table in 2026. Learn advanced frame construction, precise slate installation, and flawless felt application for pro-level play.
DIY billiard table, billiard table construction, slate installation, felt application, advanced woodworking, custom pool table, frame construction, woodworking projects, home game room, pool table felt
