


The average household size has subtly increased in recent years, leading many families to realize their standard dining tables no longer meet their needs. For those who frequently host large gatherings, holiday meals, or simply have a bustling daily family life, a custom dining table becomes not just a luxury, but a necessity. This comprehensive resource provides The Ultimate Guide to Designing and Building a Custom Dining Table for Large Families, ensuring your masterpiece is not only aesthetically pleasing but also exceptionally durable and functional.
Key Takeaways
- Prioritize Functionality and Seating: Begin with a clear understanding of your family’s size and the maximum number of guests you intend to host regularly, as this will dictate table dimensions and design.
- Select Durable Woods: Opt for hardwoods like oak, maple, walnut, or cherry known for their strength, longevity, and resistance to wear, crucial for a frequently used large table.
- Master Sturdy Joinery: Employ robust joinery techniques such as mortise and tenon, bridle joints, or breadboard ends to ensure the table’s structural integrity and prevent warping over time.
- Design for Stability: Choose appropriate leg or base designs (e.g., trestle, pedestal, solid four-leg) that provide ample support and stability for the expansive tabletop, minimizing wobble.
- Apply a Resilient Finish: Select a high-quality, durable finish that protects the wood from spills, scratches, and daily use, enhancing its longevity and beauty.
Planning Your Custom Dining Table: The Ultimate Guide to Designing and Building a Custom Dining Table for Large Families
Designing a custom dining table for a large family requires meticulous planning. This initial phase sets the foundation for a successful build, addressing everything from dimensions to aesthetic appeal. Consider the unique needs of your household and the architectural style of your home.

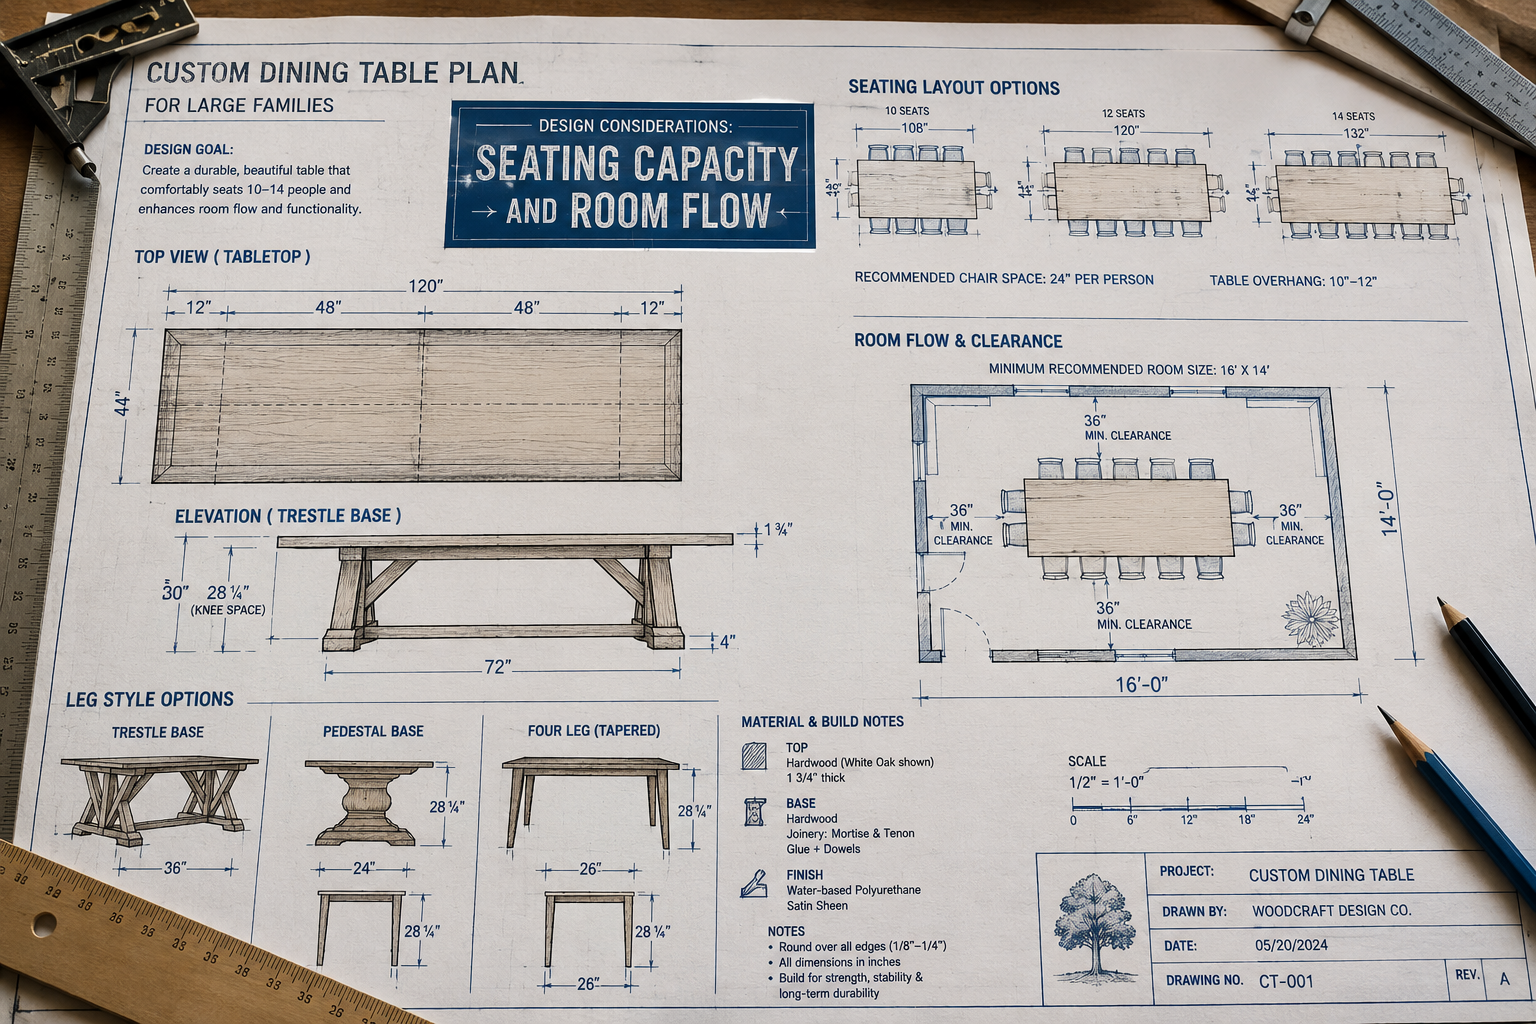
Determining Size and Seating Capacity
The first and most critical step is to determine the ideal size. A common mistake is underestimating the space needed per person. As a general rule, each diner requires about 24-30 inches of table edge space and roughly 18 inches of depth.
Standard Seating Guidelines:
| Number of People | Minimum Table Length (Rectangular) | Minimum Table Width | Minimum Table Diameter (Round) |
|---|---|---|---|
| 6 | 60-72 inches | 36-40 inches | 48-54 inches |
| 8 | 80-92 inches | 36-40 inches | 60-72 inches |
| 10 | 100-110 inches | 40-44 inches | 72-84 inches |
| 12+ | 120+ inches | 44-48 inches | Not practical |
Beyond these guidelines, always factor in at least 36-42 inches of clearance around the table for chairs to be pulled out comfortably and for easy movement. Measure your dining area carefully, perhaps even taping out the table dimensions on the floor to visualize the space. Consider if you’ll need a table base width for stability that can accommodate this size.
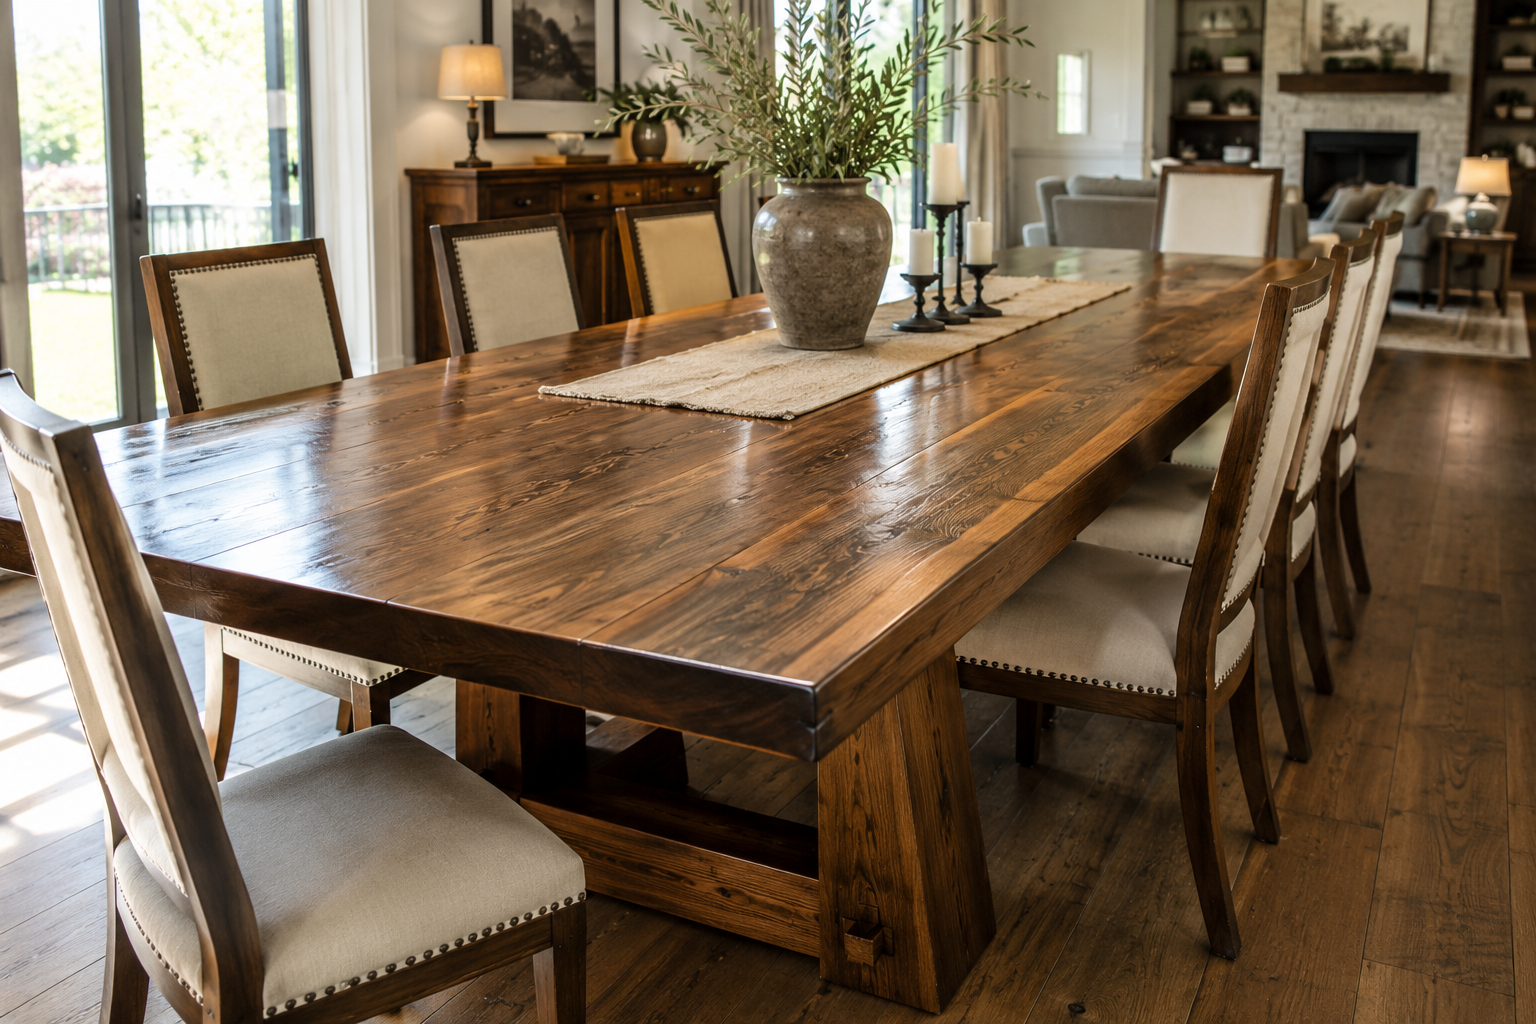
Choosing the Right Wood Species
The wood you select will significantly impact the table’s durability, appearance, and cost. For a large dining table, hardwoods are almost always the preferred choice due to their strength and resistance to dents and scratches.
Popular Hardwood Choices for Dining Tables:
- Oak (Red and White): Extremely durable, strong, and highly resistant to warping. White oak is particularly water-resistant. Its prominent grain adds character.
- Maple: Very hard, dense, and fine-grained, offering a smooth finish. It’s excellent for heavy use and less prone to scratching than softer woods.
- Walnut: A premium hardwood known for its rich, dark color and beautiful grain patterns. It’s highly durable and adds a touch of luxury.
- Cherry: Features a fine, straight grain and a distinctive reddish-brown color that deepens with age. It’s relatively hard but easier to work with than oak or maple.
- Ash: Similar to oak in strength and grain, but often lighter in color and more affordable.
- Reclaimed Wood/Live Edge Slabs: For a unique, rustic look, consider reclaimed wood or live edge wood slabs. These options add character and history, but may require more effort in preparation and finishing.
Design Styles and Legs/Bases
The table’s design should complement your home’s interior. Options range from rustic farmhouse to sleek modern. The leg or base structure is crucial for stability, especially for a large tabletop.
- Four-Legged Table: The most traditional and often the simplest to construct. Ensures good stability, but legs can sometimes impede seating at the corners.
- Trestle Table: Features two sturdy leg supports (trestles) connected by a central beam. Offers excellent stability and allows for flexible seating, as there are no corner legs.
- Pedestal Table: A central column or multiple columns support the tabletop. Ideal for maximizing seating flexibility, especially for round or oval tables, as there are no legs to navigate.
- Box Base/Slab Legs: A contemporary choice where solid wood slabs form the base, often appearing as a continuation of the tabletop. Provides a robust and minimalist aesthetic.
“Considering the vast array of design options, from the raw beauty of live-edge slabs to the crisp lines of a modern pedestal, the key is to balance aesthetic appeal with the unwavering stability required for a large family dining table.”
Building Your Custom Dining Table: The Ultimate Guide to Designing and Building a Custom Dining Table for Large Families
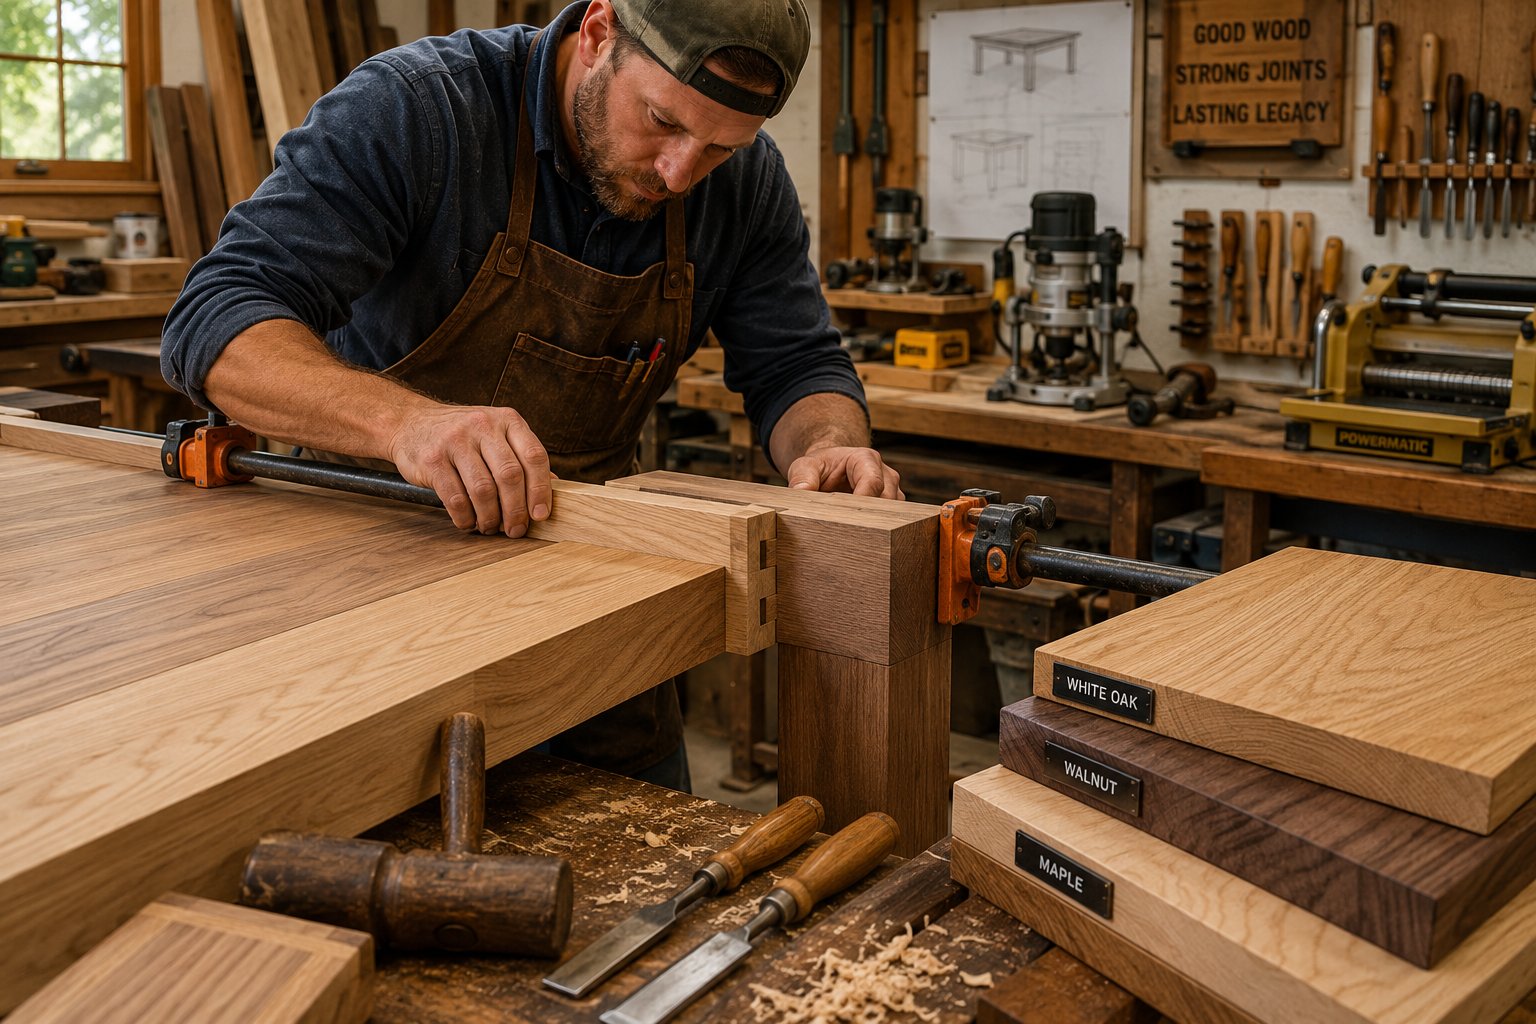
Once your design is finalized and wood selected, the real work begins. Building a large dining table demands precision, strong joinery, and careful execution.
Essential Tools and Workspace Setup
Before you start, ensure you have the necessary tools. A well-equipped workshop with ample space is crucial for handling large pieces of wood. You might consider building a compact and ergonomic workbench for small workshops if your space is limited.
Key Tools:
- Table Saw: Essential for ripping boards to width and cross-cutting longer pieces accurately.
- Jointer and Planer: For flattening and squaring lumber, critical for strong glue-ups.
- Router: For edge profiling, joinery, and creating dadoes/rabbets. See our guide on choosing and using router tables.
- Clamps: A wide array of long clamps (pipe clamps, parallel clamps) are indispensable for gluing tabletops and bases.
- Hand Tools: Chisels, hand planes, measuring tapes, squares, and marking gauges for precision work. Learn more in our guide to essential hand tools for every woodworker.
- Sander: Orbital sander, belt sander, and sanding blocks for preparing the surface for finishing.
Constructing the Tabletop
For a large table, the tabletop will likely consist of several boards glued together. This is where strong, flat glue joints are paramount.
- Milling Lumber: Start by jointing one face and one edge of each board. Then plane the boards to their final thickness and rip them to width on the table saw. This ensures perfectly flat and square edges for strong glue-ups.
- Dry Assembly: Arrange your boards in the desired order, paying attention to grain direction and color matching. Mark them to keep the order consistent.
- Glue-Up: Apply a generous but even layer of wood glue to the mating edges of the boards. Clamp them tightly, ensuring the surface remains flat. Use cauls (clamped boards across the top and bottom) to help keep the panel flat during drying. Allow ample drying time (24 hours is typical).
- Flattening: After the glue dries, the tabletop may have slight unevenness. Use a hand plane, planer sled, or router sled to flatten the entire surface.
- Breadboard Ends (Optional but Recommended): For large tabletops, especially those made from solid wood, breadboard ends are highly recommended. They prevent warping and cupping while allowing the main tabletop panel to expand and contract with humidity changes. This involves cutting a tenon on the end of the tabletop and fitting a grooved breadboard piece over it, often secured with drawbore pins.
Building the Base and Attaching the Top
The base must be robust enough to support the heavy tabletop. Strong joinery is critical here.
- Legs and Aprons: For four-legged tables, cut your legs and aprons to size. Use mortise and tenon joints for the strongest connection between legs and aprons. This creates a rigid frame. For a trestle or pedestal base, ensure the central supports are wide and heavy enough to prevent tipping.
- Cross Members/Stretchers: Incorporate stretchers or cross members between the legs or trestles to enhance stability and prevent racking. These can also be joined with mortise and tenon or robust lag bolts.
- Attaching the Top: Never permanently glue a solid wood tabletop directly to the base. Wood moves, and this will cause warping or cracking. Instead, use methods that allow for seasonal expansion and contraction.
- Z-Clips (Tabletop Fasteners): These metal fasteners fit into a groove routed into the apron and screw into the underside of the tabletop, allowing movement.
- Figure-8 Fasteners: Similar to Z-clips, these are recessed into the apron and screw into the top.
- Elongated Screw Holes: If screwing directly through aprons or stretchers, drill elongated holes in the apron/stretcher to allow the screw to slide as the top moves.
“The strength of your dining table is directly proportional to the quality of your joinery. Investing time in precise mortise and tenon, or even simple but robust lap joints, will ensure your table lasts for generations.”
Finishing Your Masterpiece: The Ultimate Guide to Designing and Building a Custom Dining Table for Large Families
The final step, finishing, protects the wood and enhances its natural beauty. For a dining table, durability and food safety are paramount.

Sanding and Surface Preparation
Thorough sanding is key to a beautiful finish.
- Progressive Grits: Start with a coarser grit (e.g., 80 or 100) to remove milling marks and imperfections. Progress through increasingly finer grits (120, 150, 180, 220). Do not skip grits.
- Dust Removal: After each sanding stage, remove all dust using a vacuum, compressed air, and a tack cloth. Any remaining dust will be trapped in the finish.
- Water Pop (Optional): For open-grain woods, a light misting of water after 180 or 220 grit sanding can raise the grain. After it dries, a final light sanding with the fine grit will create an ultra-smooth surface.
Choosing the Right Finish
For a dining table, you need a finish that is both durable and resistant to water, heat, and food stains.
Popular Durable Finishes:
- Polyurethane (Oil-Based or Water-Based): A highly protective and durable finish that forms a plastic-like film on the surface. Oil-based offers more warmth and ambering, while water-based is clearer and dries faster. Apply in thin coats, sanding lightly between coats.
- Varnish (Spar Varnish, Urethane Varnish): Offers excellent protection and durability, particularly spar varnish, which is flexible and water-resistant. Often used for outdoor furniture but provides superior protection for indoor pieces too.
- Conversion Varnish/Lacquer: Professional-grade finishes that offer exceptional durability and a very smooth, hard surface. Requires specialized spray equipment and good ventilation.
- Hardwax Oil Finishes (e.g., Osmo Polyx-Oil, Rubio Monocoat): These finishes penetrate the wood while leaving a protective, low-sheen surface film. They are often food-safe once cured and allow for spot repairs. They highlight the natural feel of the wood.
- Penetrating Oils (e.g., Tung Oil, Linseed Oil): These soak into the wood fibers, enhancing the natural grain and providing a low-luster finish. While beautiful, they offer less surface protection than film-building finishes and require more frequent maintenance. Ensure they are fully cured if using for food contact surfaces. Learn more about can you stain over linseed oil.
Always test your chosen finish on a scrap piece of the same wood to ensure you like the color and sheen. Apply according to the manufacturer’s instructions, paying close attention to drying times and recoat windows.
Ongoing Maintenance
Even the most durable custom dining table requires some care to maintain its beauty.
- Cleaning: Wipe spills immediately. Clean regularly with a soft, damp cloth and mild soap if necessary. Avoid harsh chemical cleaners.
- Protection: Use placemats, coasters, and trivets to protect the surface from heat and moisture.
- Humidity Control: Maintain stable humidity levels in your home to minimize wood movement.
- Reapplication: Depending on the finish, you may need to reapply a fresh coat every few years to maintain optimal protection. Hardwax oils and penetrating oils generally require more frequent reapplication than polyurethanes or varnishes.
By carefully following these steps, you can successfully design and build a custom dining table that will serve your large family for generations, becoming the heart of countless meals and memories.
Conclusion
Designing and building a custom dining table for a large family is a deeply rewarding project that culminates in a piece of furniture perfectly tailored to your needs and aesthetic preferences. From meticulously planning the dimensions and selecting the ideal wood species to executing robust joinery and applying a durable finish, each step contributes to a table that is both beautiful and built to last. Remember that patience, precision, and the right tools are your greatest allies in this endeavor.
As you embark on this journey, consider documenting your process, not just for practical reference, but as a record of the craftsmanship and dedication invested. The resulting dining table will be more than just a surface for meals; it will be a testament to your skill and a cherished heirloom for your family. Start by measuring your space, sketching your ideal design, and then gather your materials. The satisfaction of gathering around a table you built yourself, surrounded by loved ones, is an unparalleled experience.
SEO Meta Title: Build a Custom Dining Table for Large Families in 2026 SEO Meta Description: Design & build the ultimate custom dining table for large families in 2026. Get expert tips on wood, joinery, and durable finishes for your perfect table.
