


The average household spent $583 on home entertaining in 2025, a figure projected to rise in 2026 as more individuals seek to host memorable gatherings without the expense of professional catering or restaurant bookings. A key element in elevating these home entertaining experiences is the presence of a well-organized and aesthetically pleasing drink station. For the woodworking enthusiast, this presents an exciting opportunity to craft a truly unique and functional piece: the DIY Bar Cart and Portable Drink Stations: Woodworking Plans for Entertaining at Home. This article will guide you through the process, offering insights into design, construction, and customization, ensuring your next gathering is served with style and ease.
Key Takeaways
- Building a DIY bar cart or portable drink station allows for complete customization to fit specific aesthetic and functional needs.
- Careful planning, including material selection and detailed schematics, is crucial for a successful and durable woodworking project.
- Incorporating features like bottle storage, glass racks, and serving surfaces enhances the utility and appeal of the station.
- Finishing techniques are vital for protecting the wood and complementing your home’s decor, transforming a functional item into a statement piece.
- These projects offer both practical utility for entertaining and a rewarding experience for the woodworker.
Planning Your DIY Bar Cart or Portable Drink Station: Woodworking Plans
Before cutting the first piece of lumber, thorough planning is paramount. This stage defines the success of your DIY Bar Cart and Portable Drink Stations: Woodworking Plans for Entertaining at Home. Consider the intended use, available space, aesthetic preferences, and necessary features.

Defining Your Needs and Style
The first step is to decide whether you need a stationary bar cart for a dedicated indoor space or a more portable drink station for flexible use, potentially moving between indoor and outdoor settings.
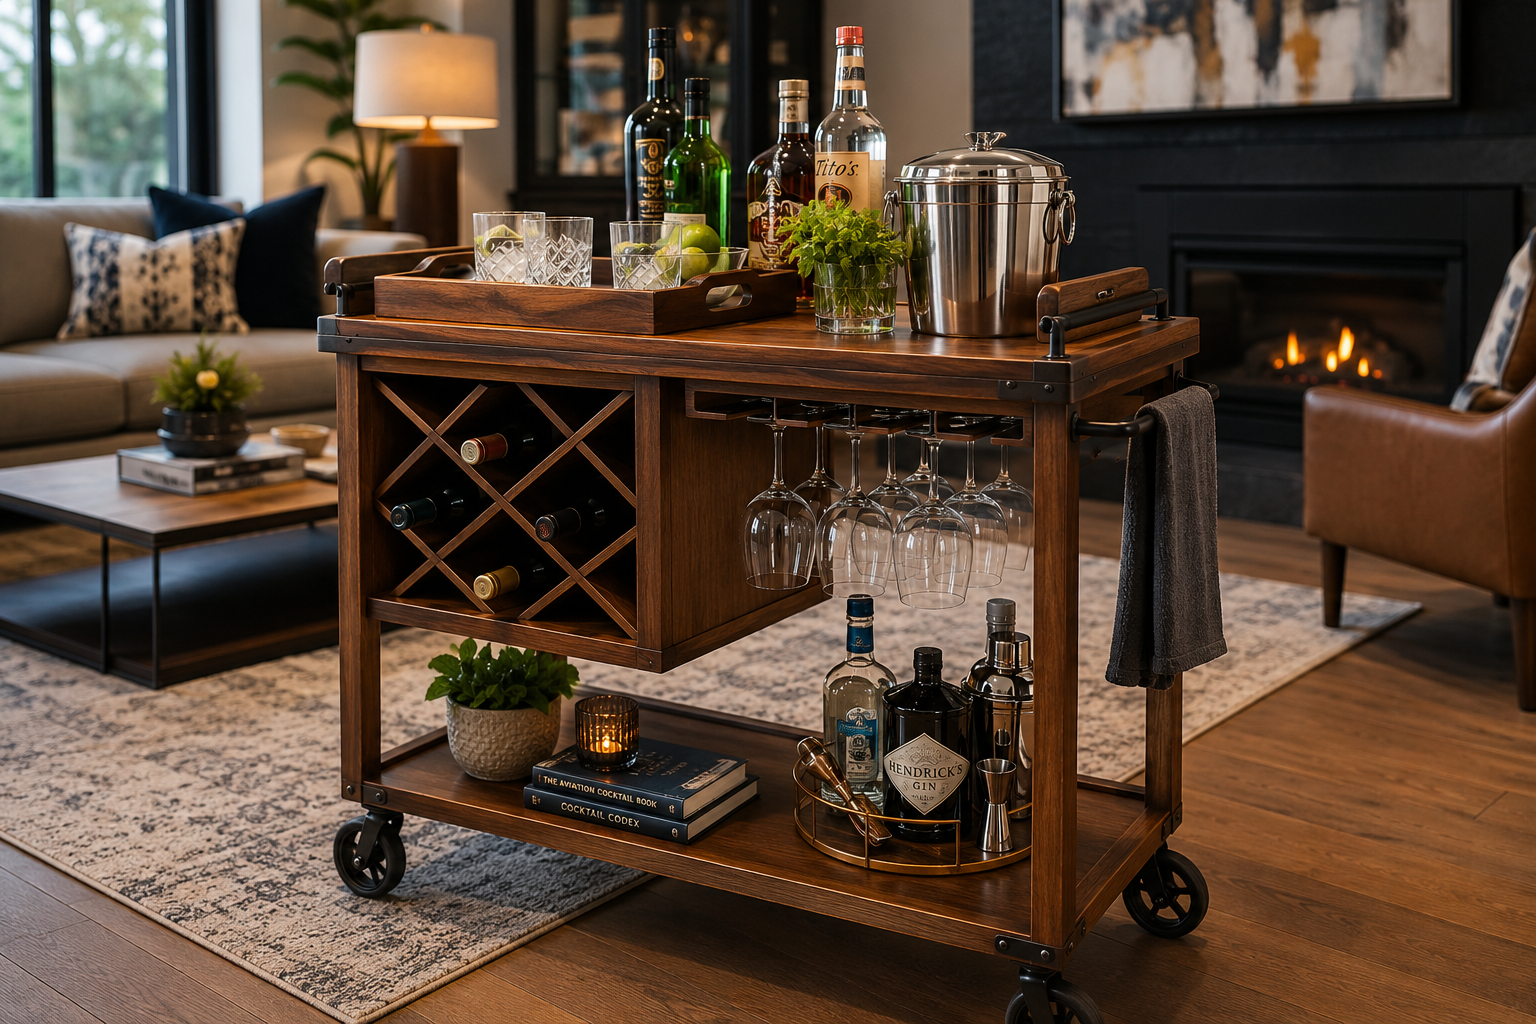
- Bar Cart (Stationary/Semi-Portable): Typically features multiple shelves, bottle storage, and sometimes a designated area for glassware. Often designed with a more refined aesthetic, suitable for a dining room, living room, or home bar area. While often on casters for easy repositioning, its primary role is generally static.
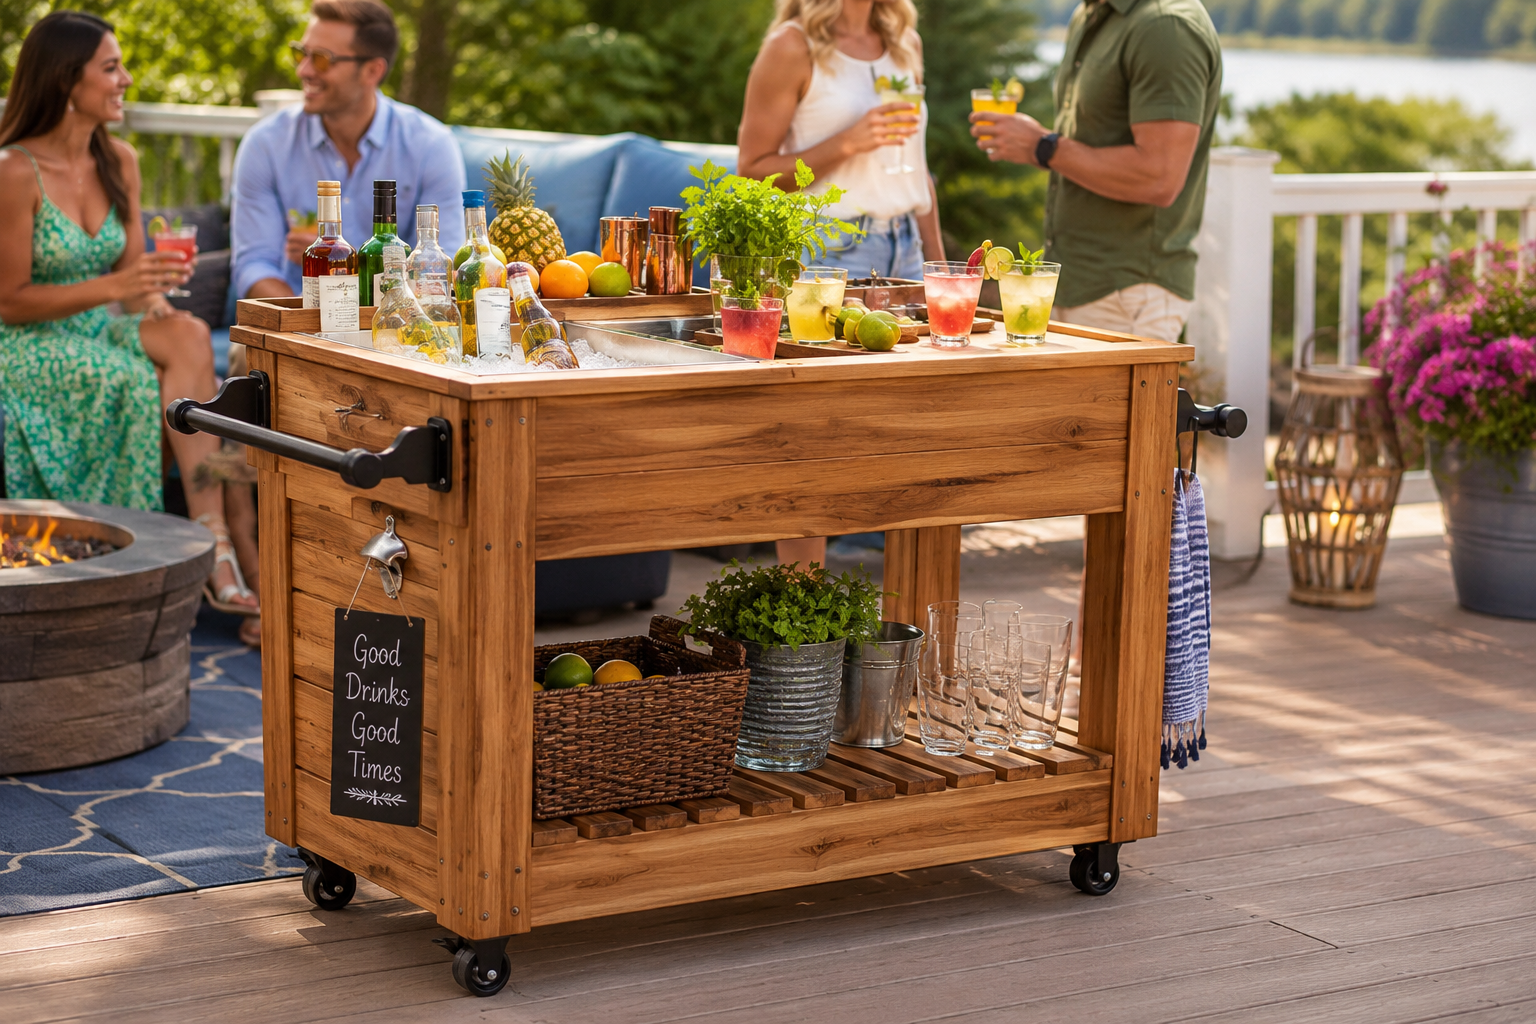
- Portable Drink Station (Highly Mobile): Prioritizes ease of movement and often includes features for outdoor use, such as integrated ice buckets, durable finishes, and robust wheels. Designs can range from rustic to modern, depending on the material and finish.
Next, consider the style that best complements your home decor.
- Modern: Clean lines, minimal ornamentation, often combining wood with metal or glass.
- Rustic/Farmhouse: Distressed wood, visible joinery, robust construction. Sourcing reclaimed and salvaged wood can lend an authentic, weathered look to these designs.
- Industrial: Blends wood with dark metals like iron or steel, often featuring exposed fasteners.
- Traditional: Classic woodworking techniques, richer wood tones, and sometimes more ornate details.
Essential Design Elements and Features
A well-designed drink station goes beyond mere storage. It’s about functionality and presentation.
Storage Solutions
- Bottle Storage: Consider bottle neck holders, horizontal cubbies, or simple open shelving. For wine enthusiasts, incorporating woodwork wine crafting perfection from cellar to table ideas can inspire elegant wine bottle storage.
- Glassware Racks: Inverted stemware racks are popular for wine glasses, while open shelves or partitions work well for tumblers and highball glasses.
- Accessory Trays/Drawers: Small drawers or pull-out trays are perfect for storing bar tools, coasters, and garnishes.
- Ice Bucket Integration: For portable stations, a recessed or easily accessible spot for an ice bucket is invaluable.
Mobility and Stability
- Casters/Wheels: Select appropriate casters based on the weight of your cart and the surfaces it will traverse. Locking casters are essential for stability during use.
- Handles: Sturdy handles are crucial for portable stations, facilitating easy movement.
- Sturdy Construction: Employ robust joinery techniques. Hand tool joinery for visible wood joints: dovetails, mortise and tenon, and box joints can add both strength and aesthetic appeal.
Serving Surfaces
- Countertop Material: A durable, easy-to-clean surface is a must. Solid wood, butcher block, or even a tile inlay can work.
- Fold-out Extensions: For smaller spaces, fold-out or pull-out extensions can provide extra serving space when needed.
Material Selection and Tool Checklist
The right materials and tools are fundamental.
Wood Choices
- Hardwoods (Oak, Maple, Cherry, Walnut): Durable, beautiful grain, but generally more expensive and harder to work with. Excellent for heirloom-quality pieces.
- Softwoods (Pine, Fir): More affordable, easier to cut, but less durable and prone to dents. Good for rustic styles or projects on a budget.
- Plywood/MDF: Cost-effective for larger panels or internal structures, especially if you plan to paint or veneer.
- Reclaimed Wood: Offers unique character and sustainability. Consider upcycling old pallets: creative and sustainable woodworking projects for a rustic or industrial look.
Hardware
- Casters (locking)
- Handles
- Screws, bolts, wood glue
- Hinges (for fold-out sections)
- Bottle/glass racks (if not custom-built from wood)
Essential Woodworking Tools
- Measuring and Marking: Tape measure, ruler, square, pencil.
- Cutting: Circular saw, miter saw, jigsaw, table saw (for precision cuts).
- Shaping/Smoothing: Router (for decorative edges or dados), planer, sandpaper, orbital sander.
- Joining: Drill, clamps, pocket hole jig (for hidden fasteners). Beginner’s guide to essential woodworking jigs can provide valuable tips for accurate joinery.
- Safety Gear: Eye protection, hearing protection, dust mask.
“A well-planned woodworking project is already half-finished. Meticulous design and material selection ensure both functionality and lasting beauty for your DIY bar cart.”
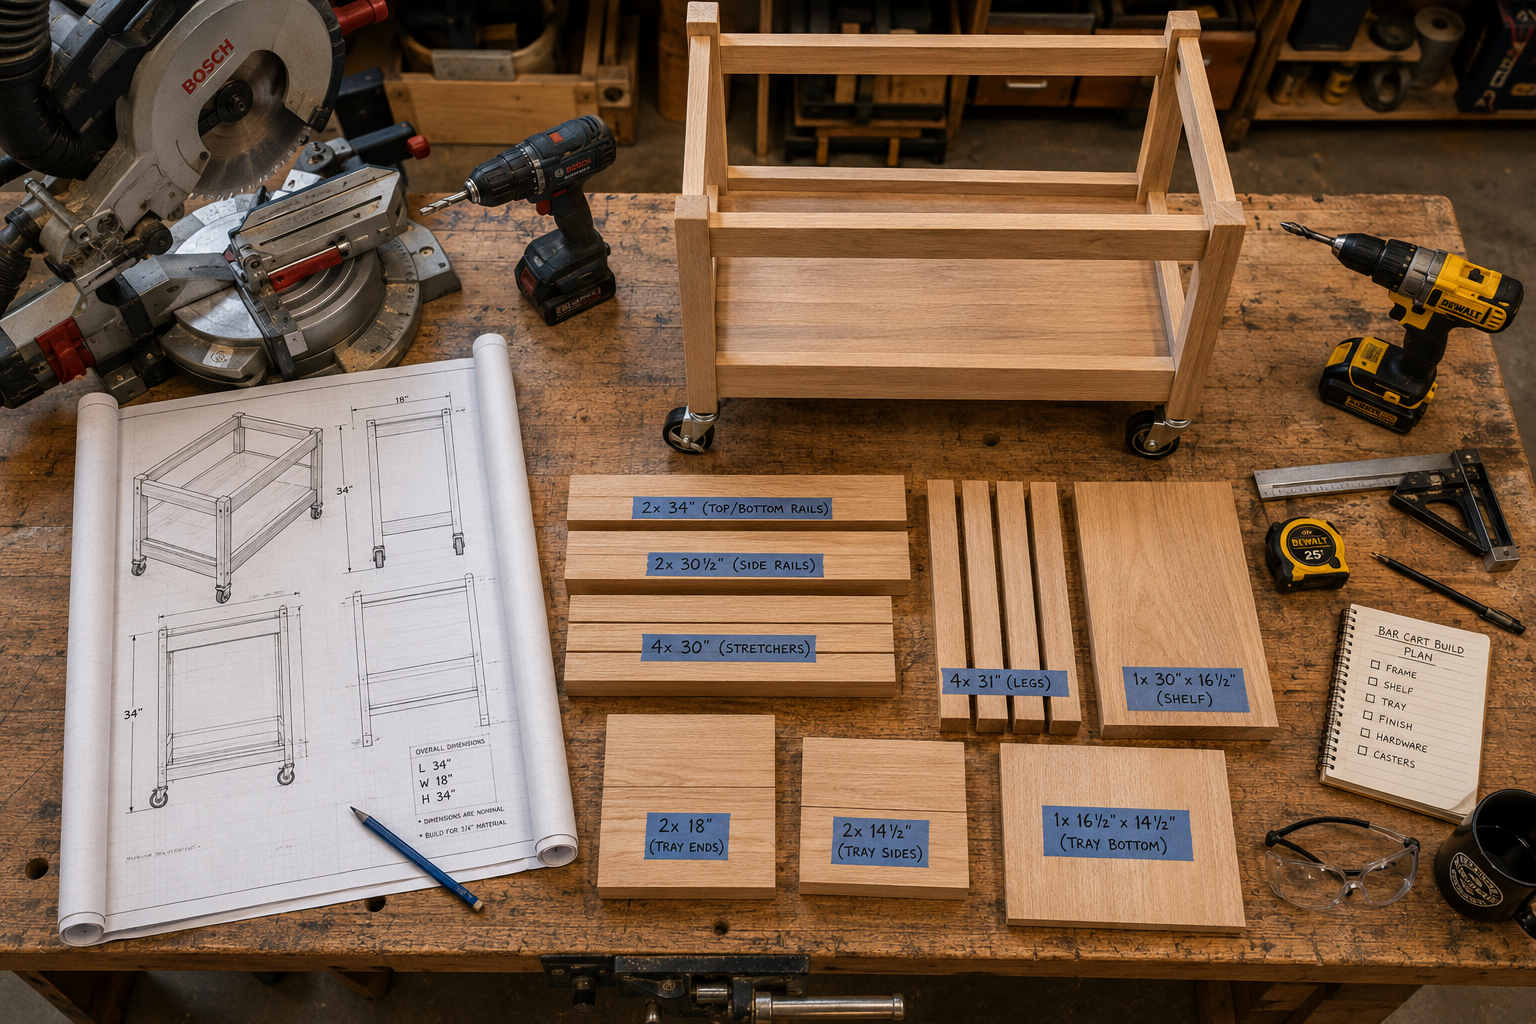
Step-by-Step Construction: Bringing Your Woodworking Plans to Life
With your plans finalized and materials gathered, it’s time to move into the construction phase of your DIY Bar Cart and Portable Drink Stations: Woodworking Plans for Entertaining at Home. Precision and patience are key.
Cutting and Preparing Lumber
- Measure and Mark: Double-check all measurements against your plans. Mark your cuts clearly.
- Execute Cuts: Use the appropriate saws for each cut. A table saw offers the most accuracy for long, straight cuts, while a miter saw is ideal for crosscuts and angles. A jigsaw is useful for curved sections.
- Sand Rough Edges: Lightly sand all cut edges to remove splinters and prepare for assembly.
- Dry Fit: Before applying any glue or permanent fasteners, assemble the main components without them to ensure everything fits correctly. This helps identify and correct any errors early.
Assembling the Frame
The frame provides the structural integrity for your bar cart or drink station.
- Joinery: Choose appropriate joinery methods. Pocket hole joinery is fast and effective for strong, hidden joints. For visible, robust connections, consider mortise and tenon or dovetail joints. Hand tool joinery for visible wood joints can elevate the craftsmanship.
- Square and Plumb: Use a reliable square and level to ensure all corners are truly 90 degrees and all vertical elements are plumb. Clamps are indispensable for holding pieces securely while glue dries or fasteners are driven.
- Reinforcement: For larger or heavily used carts, consider adding corner braces or blocking for extra stability.
Adding Shelves, Racks, and Details
This is where the functionality and specific features of your DIY bar cart truly come to life.
- Shelf Installation: Shelves can be attached using dados, cleats, or shelf pins. Dados (grooves cut into the sides) offer robust support and a clean look.
- Bottle Storage:
- Horizontal Cubbies: Create dividers for individual bottle slots.
- Bottle Neck Racks: Drill appropriately sized holes in a top support piece and corresponding depressions in a bottom support for bottles to rest securely.
- Glassware Racks: Purchase pre-made stemware racks or mill your own from wood. These typically consist of parallel strips with a slot for the base of the glass to slide into.
- Serving Tray: If incorporating a removable serving tray, ensure its dimensions fit snugly within its designated space, perhaps with a slight lip to prevent it from sliding off.
- Pull-out Trays/Drawers: For drawers, you’ll need to install drawer slides. For simple pull-out trays, wooden runners can suffice.
Attaching Casters and Hardware
- Casters: Mount casters securely to the bottom of the cart, typically at the corners. Ensure all casters are of the same height to prevent wobbling. Locking casters should be positioned strategically for easy access.
- Handles: Attach handles firmly to the appropriate sides, usually at a comfortable height for pulling or pushing.
- Other Hardware: Install any hinges, magnetic catches, or other hardware according to your design.
“The assembly phase is where your vision takes shape. Paying attention to detail, using proper joinery, and ensuring everything is square will result in a professional-looking and durable piece.”
Finishing and Customization for Your Entertaining Space
The final stages of your DIY Bar Cart and Portable Drink Stations: Woodworking Plans for Entertaining at Home involve applying a protective finish and adding personalized touches. This not only enhances the cart’s appearance but also ensures its longevity.
Sanding and Surface Preparation
Proper surface preparation is crucial for a flawless finish.
- Gradual Sanding: Start with a coarser grit sandpaper (e.g., 80 or 100 grit) to remove any major imperfections or milling marks. Progress through finer grits (120, 150, 180, and finally 220) until the wood feels smooth to the touch.
- Dust Removal: After each sanding stage, thoroughly remove all dust using a vacuum, tack cloth, or compressed air. Residual dust can create a bumpy or uneven finish.
Choosing and Applying Finishes
The right finish protects the wood and dictates the final look.
- Stain: Enhances the natural wood grain and adds color. Apply with a cloth or brush, then wipe off excess. Always test stain on a scrap piece of the same wood first.
- Polyurethane: A durable, clear protective coat that resists moisture and scratches. Available in oil-based or water-based formulas, and various sheens (matte, satin, semi-gloss, gloss). Apply multiple thin coats, sanding lightly with fine-grit sandpaper (e.g., 320 grit) between coats for a smooth finish.
- Varnish: Offers excellent durability and UV protection, making it suitable for outdoor drink stations.
- Paint: Provides a solid color finish. Requires priming and multiple coats.
- Oil Finishes (e.g., Tung Oil, Linseed Oil): Penetrate the wood to create a natural, hand-rubbed look. Offer less protection than polyurethane or varnish but are easy to repair.
For outdoor-bound portable drink stations, ensure your chosen finish is weather-resistant. Refer to guides on applying polyurethane in high humidity or other weatherproofing tips for best results.
Personalizing Your Bar Cart or Drink Station
Customization is where your DIY project truly shines.
- Color Accents: Paint certain sections (e.g., the interior of a shelf or drawer) a contrasting color.
- Decorative Hardware: Replace standard handles or casters with more ornate or stylish options.
- Integrated Lighting: Add small LED strips or puck lights under shelves or along the top edge for ambiance.
- Themed Elements: Incorporate elements related to your favorite drinks or entertaining style. For instance, a small, built-in cutting board for garnishes or a magnetic strip for bar tools.
- Artistic Touches: Consider wood burning designs using a woodworking burner for a truly unique aesthetic.
- Custom Signage: A small, engraved wooden sign with your family name or a fun bar-themed phrase can add a personal touch. For more ideas on small craft projects, consider exploring customization strategies for mass-producing small woodcraft, which can be adapted for personalization.
The transformation from raw lumber to a finished, personalized bar cart or drink station is immensely satisfying. Not only will you have a functional piece of furniture, but also a testament to your woodworking skills, ready to enhance your home entertaining for years to come.

“The finish is the final handshake of your woodworking project. It protects your hard work and elevates its aesthetic, making it a true centerpiece for entertaining.”
Conclusion
Crafting a DIY Bar Cart and Portable Drink Stations: Woodworking Plans for Entertaining at Home is a rewarding project that combines practical utility with creative expression. From the initial conceptualization and careful planning to the precise execution of cuts and joinery, and finally, to the meticulous finishing and personalization, each step contributes to a unique piece tailored to your specific entertaining needs. In 2026, as home entertaining continues to evolve, a custom-built drink station stands out as a functional art piece that enhances gatherings and reflects personal style.
By following the comprehensive guide outlined in this article, you can confidently embark on this woodworking journey, equipped with the knowledge to select the right materials, employ effective construction techniques, and apply durable finishes. The result will be more than just a place to store drinks; it will be a focal point for conversation, a symbol of hospitality, and a testament to your craftsmanship. So, gather your tools, refine your plans, and prepare to elevate your home entertaining with a stunning, handmade bar cart or portable drink station.
References
- Craftsman. (n.d.). Craftsman 113.299 Table Saw: A Comprehensive Guide for Assembly, Operation, and Maintenance. Retrieved from https://woodcraftwiz.com/craftsman-113299-table-saw-a-comprehensive-guide-for-assembly-operation-and-maintenance/
- WoodcraftWiz. (n.d.). Building a Custom Wood Workbench: Design Considerations and Step-by-Step Plans for a Sturdy, Functional Foundation. Retrieved from https://woodcraftwiz.com/building-a-custom-wood-workbench-design-considerations-and-step-by-step-plans-for-a-sturdy-functional-foundation/
- WoodcraftWiz. (n.d.). Beginner’s Guide to Essential Woodworking Jigs: Improve Accuracy and Safety for Common Cuts. Retrieved from https://woodcraftwiz.com/beginners-guide-to-essential-woodworking-jigs-improve-accuracy-and-safety-for-common-cuts/
- WoodcraftWiz. (n.d.). Sourcing Reclaimed and Salvaged Wood: Quality Assessment, Restoration, and Safe Handling. Retrieved from https://woodcraftwiz.com/sourcing-reclaimed-and-salvaged-wood-quality-assessment-restoration-and-safe-handling/
SEO Meta Title: DIY Bar Cart & Portable Drink Stations: Woodworking Plans SEO Meta Description: Build your own stylish DIY bar cart or portable drink station in 2026! Discover woodworking plans, material selection, and finishing tips for home entertaining.
