

The average household in 2026 spends over $800 annually on out-of-home entertainment, a significant portion of which includes dining and drinking. Imagine redirecting a fraction of that budget into creating a personalized entertainment hub right in your own home. Building DIY Bar Furniture Sets with Integrated Storage: Building Counters, Cabinets, and Stools for Home Bars offers not only a substantial cost saving but also the immense satisfaction of crafting a unique space tailored precisely to your entertaining needs and aesthetic preferences. This comprehensive guide will walk you through the process of designing and constructing functional, stylish, and durable bar furniture that enhances your home’s appeal and maximizes your storage capabilities.
Key Takeaways
- Customization is Key: Designing your own bar furniture allows for precise fit, material selection, and aesthetic alignment with your home decor, offering advantages over off-the-shelf solutions.
- Integrated Storage Maximizes Space: Strategic inclusion of cabinets, shelves, and drawers within your bar counters and stools keeps essentials organized and accessible, reducing clutter.
- Careful Planning is Crucial: Success hinges on thorough design, accurate measurements, and a clear understanding of woodworking techniques and material properties.
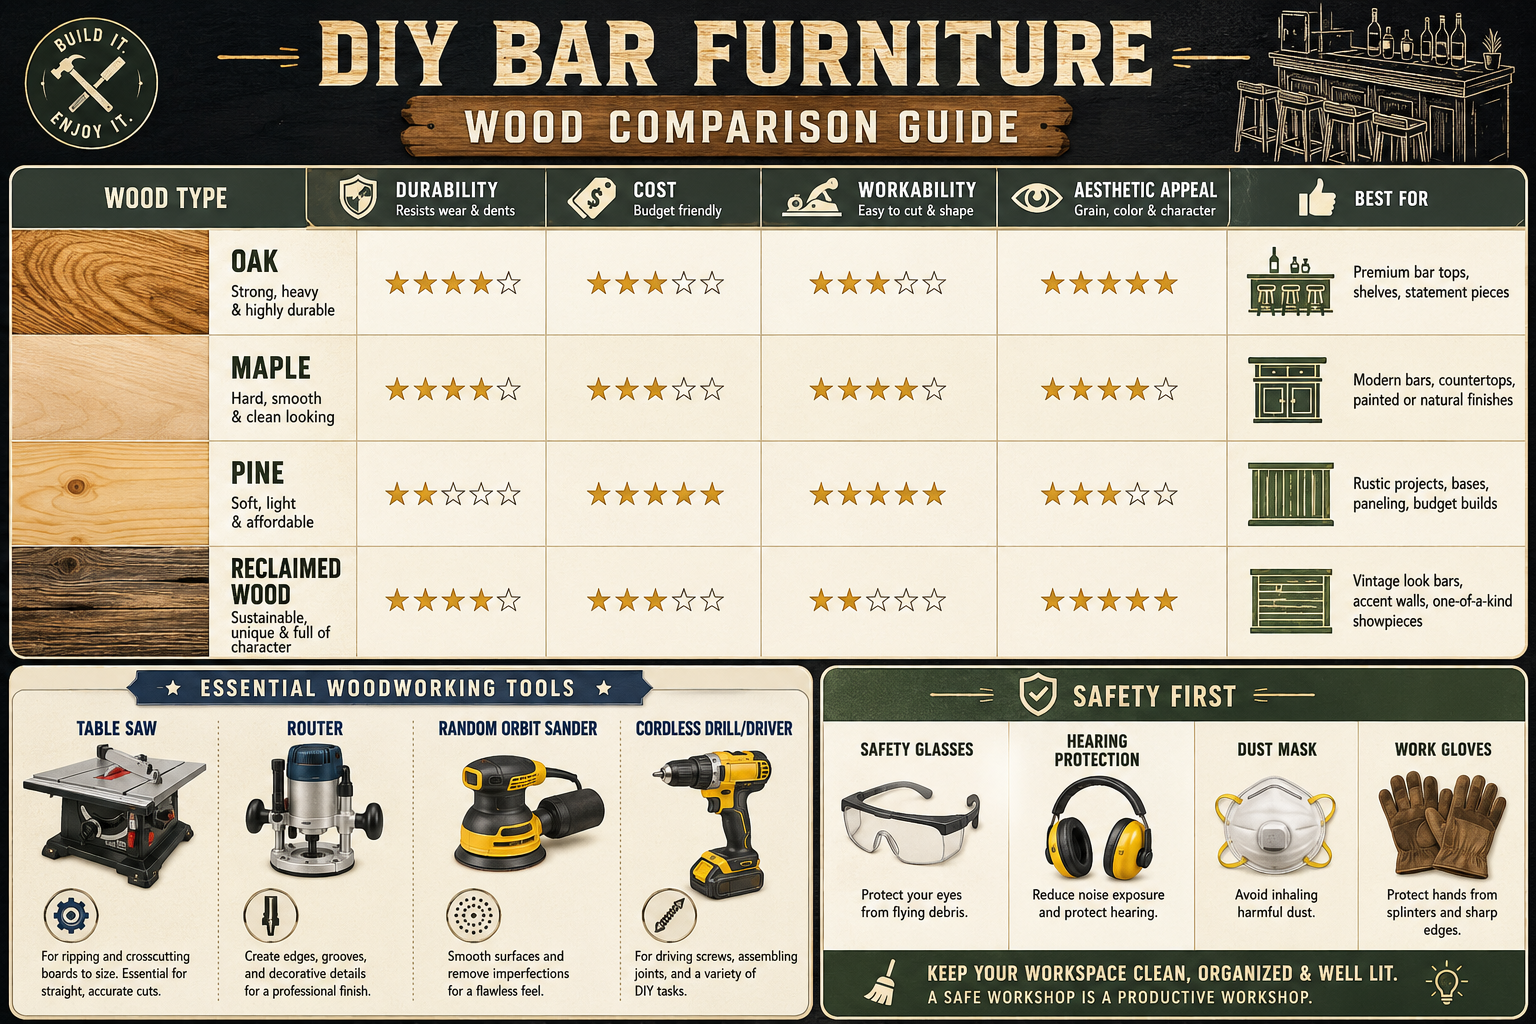
- Safety First: Always prioritize safety by using appropriate personal protective equipment (PPE) and following safe operating procedures for all tools.
- Skill Development: This project offers an excellent opportunity to develop and refine a range of woodworking skills, from joinery to finishing.
Designing Your Ultimate DIY Bar Furniture Sets with Integrated Storage
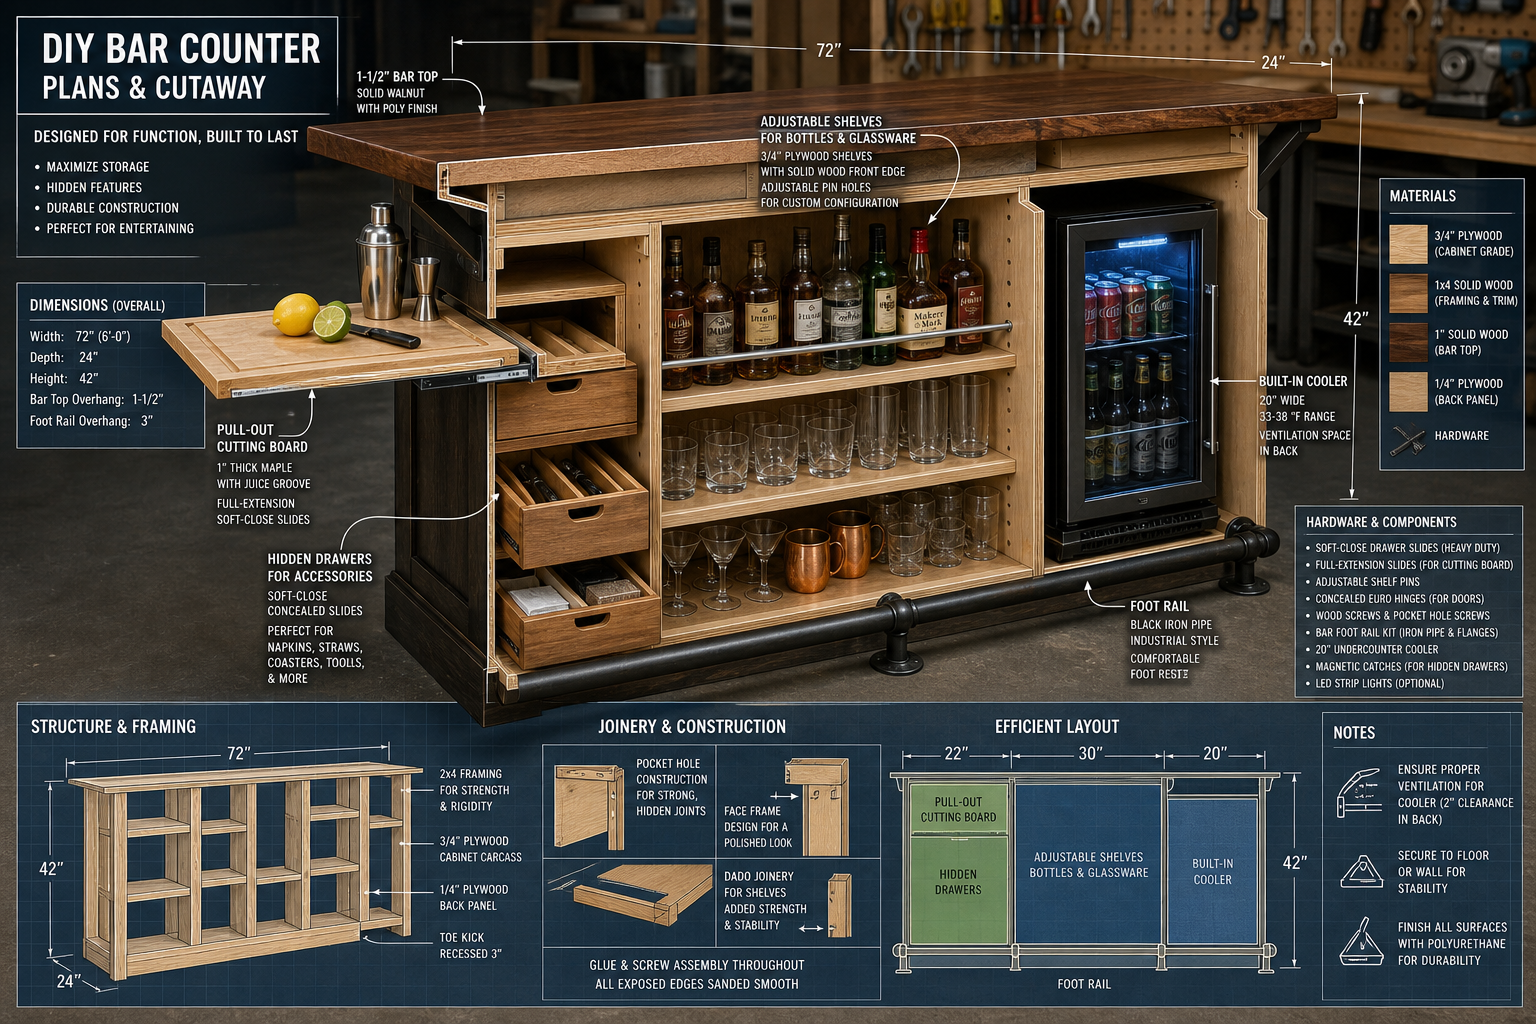
Creating a home bar from scratch begins with meticulous planning and design. This phase dictates the functionality, aesthetics, and overall success of your project. When building DIY Bar Furniture Sets with Integrated Storage, consider not just the look but how each element, counters, cabinets, and stools, will work together to optimize your entertaining space.

Assessing Space and Layout
Before sketching out designs, carefully evaluate the area designated for your home bar. Consider the room’s dimensions, existing electrical outlets, lighting, and proximity to plumbing if you plan on including a sink.
- Measure Accurately: Determine the maximum length, width, and height your bar counter can occupy without impeding foot traffic or making the space feel cramped.
- Traffic Flow: Ensure there’s ample room for people to move around the bar, sit comfortably, and access adjacent areas of the room.
- Ergonomics: Standard bar counter height is typically 42 inches (107 cm), while standard bar stool height is around 30 inches (76 cm) to allow for comfortable seating. Ensure these dimensions align with user comfort.
Conceptualizing Integrated Storage Solutions
The hallmark of a truly great DIY bar furniture set is its integrated storage. This moves beyond simple shelving to smart, hidden, and multi-functional compartments.
- Counters with Hidden Depths:
- Bottle Racks: Design pull-out or fixed bottle racks within the base of your counter.
- Glassware Holders: Include inverted glass racks under the counter lip or dedicated cabinet sections.
- Drawer Dividers: Custom-fit drawers with dividers for bar tools, coasters, and napkins.
- Appliance Nooks: Allocate space for a mini-fridge, ice maker, or small blender, ensuring proper ventilation.
- Cabinets for Maximum Utility:
- Adjustable Shelving: Allows for flexibility in storing different sized bottles and accessories.
- Wine Rack Inserts: Integrate specialized shelving for wine bottles.
- Display Sections: Incorporate open shelving or glass-front cabinets to showcase special bottles or decor.
- For maximizing space and organization in your workshop (and applying principles to your bar), consider exploring “Building Modular Wood Storage Systems for Small Workshops: Maximizing”, https://woodcraftwiz.com/building-modular-wood-storage-systems-for-small-workshops-maximizing-space-and-organization/
- Stools with Secret Spaces:
- Lift-Top Seats: Design stools with hinged tops that reveal a small storage compartment for less-used items, blankets, or even quick-access snacks.
- Integrated Footrests: While not storage, thoughtful footrest design enhances comfort and overall stool functionality.
Material Selection for Durability and Aesthetics
The choice of materials significantly impacts the durability, look, and cost of your DIY bar furniture.
- Wood Species:
- Hardwoods (Oak, Maple, Cherry): Excellent durability, rich grain patterns, but higher cost and more challenging to work with. Maple, for example, offers a clean, light aesthetic that takes stain well; learn more about maple wood finishing techniques.
- Softwoods (Pine, Fir): More affordable, easier to work with, but less durable and prone to dents.
- Plywood/MDF: Cost-effective, stable for cabinet boxes, takes paint well. High-quality plywood can be quite attractive when properly finished.
- Countertop Surfaces:
- Solid Wood: Classic, warm, but requires sealing and maintenance.
- Laminate: Affordable, wide range of patterns, easy to clean.
- Tile: Durable, customizable, but grout lines can be challenging to keep clean.
- Epoxy-coated Wood: Creates a durable, high-gloss, liquid-resistant surface.
Table: Material Considerations for DIY Bar Furniture
| Material Type | Pros | Cons | Best Use Case |
|---|---|---|---|
| Hardwood | Durable, beautiful grain, long-lasting | Expensive, harder to work, heavy | Countertops, stool frames, exposed cabinet doors |
| Plywood | Stable, cost-effective, takes finishes well | Edges need treatment, less aesthetic raw | Cabinet carcasses, drawer boxes, internal shelving |
| Laminate | Affordable, low maintenance, many styles | Less luxurious feel, prone to heat damage | Budget-friendly countertops, backsplashes |
| Epoxy Coating | Highly durable, liquid-resistant, customizable | Tricky application, strong fumes, costly | High-traffic countertops |
| Reclaimed Wood | Unique character, sustainable | Inconsistent quality, potential for defects | Rustic aesthetic elements, feature panels |
When considering various types of wood and their applications, especially for decorative and functional pieces, you might find inspiration in reclaimed wood restoration or even upcycling old pallets.
Building the Components: Counters, Cabinets, and Stools
With a solid design in hand, it’s time to move on to the construction phase. This section focuses on the practical steps and considerations for building DIY Bar Furniture Sets with Integrated Storage: Building Counters, Cabinets, and Stools for Home Bars.
Constructing the Bar Counter
The bar counter forms the central element of your home bar. Its construction requires precision and stability.
- Frame Construction:
- Start by building a sturdy frame from 2x4s or similar lumber. This will be the skeleton for your counter.
- Ensure all joints are strong, using wood glue and screws. Consider pocket hole joinery for clean, hidden fasteners.
- For robust workbenches, similar framing techniques are discussed in building a custom wood workbench.
- Cabinet Carcasses:
- Build separate cabinet boxes that will integrate into the counter frame. These can be made from plywood or MDF.
- Cut all panels (sides, top, bottom, back) accurately. Assemble using pocket screws, dado joints, or rabbet joints for strength.
- Ensure proper dimensions for any integrated appliances like a mini-fridge or wine cooler.
- For guidance on building strong cabinets, refer to resources on 12 plywood cabinets.
- Countertop Installation:
- Once the frame and cabinet carcasses are in place and level, install your chosen countertop material.
- For solid wood tops, use cleats or slotted fasteners to allow for seasonal wood movement.
- Apply appropriate adhesive and fasteners for laminate or tile countertops.
- If using epoxy, ensure proper surface preparation and follow manufacturer instructions carefully.
Pull Quote: “The foundation of any great bar counter is a rock-solid frame. Don’t skimp on quality joinery and materials here; it’s what holds everything together.”
Crafting Custom Cabinets with Integrated Storage
Beyond the counter, wall-mounted or freestanding cabinets significantly boost your storage capacity.
- Design Details:
- Sketch out the internal layout of each cabinet, including fixed or adjustable shelves, wine racks, or glass holders.
- Consider door styles: shaker, flat panel, or glass-front, ensuring they match your aesthetic.
- Pay attention to cabinet face frame overhang tips for a professional look.
- Construction and Assembly:
- Cut cabinet components from your chosen wood or plywood.
- Assemble the cabinet boxes using strong joinery.
- Install shelves, drawer slides, and any specialized inserts.
- Attach face frames (if using) and hang doors, ensuring they are plumb and level.
- Hardware (hinges, pulls) should be installed neatly and consistently.
- Wall Mounting:
- If wall-mounted, locate wall studs and use appropriate heavy-duty fasteners to securely mount the cabinets.
- Use a level to ensure perfect alignment.
Building Custom Stools for Comfort and Style
Custom stools add a personalized touch and can also offer discrete storage.
- Frame Design:
- Choose a design that complements your bar counter, whether it’s a simple four-legged stool, a saddle seat, or a more elaborate swivel design.
- Consider the joinery for strength: mortise and tenon, dado, or sturdy screw constructions are common.
- Ensure the dimensions are appropriate for your counter height (typically 10-12 inches shorter than the counter).
- Seat Construction:
- For comfort, consider ergonomic seat shapes. You can carve a saddle seat or upholster a flat seat with foam and fabric.
- If incorporating storage, design a hinged top that is both sturdy and easy to open.
- Assembly and Finishing:
- Assemble the stool components using wood glue and appropriate fasteners.
- Sand all surfaces thoroughly, progressing through grits for a smooth finish.
- Apply your chosen finish, stain, paint, varnish, or polyurethane. For durable finishes, understanding applying polyurethane in high humidity can be beneficial.
- Install any footrests, glides, or hardware.
Finishing Touches and Integration
The final stage of your DIY bar furniture project is where functionality meets aesthetics. Proper finishing not only protects your investment but also brings out the beauty of your craftsmanship, seamlessly integrating your new bar into your home.
Sanding and Finishing for Durability
A professional finish is paramount for bar furniture, which will endure spills, condensation, and frequent use.
- Thorough Sanding: Start with coarser grit sandpaper (e.g., 80 or 100) to remove imperfections, then progressively move to finer grits (e.g., 150, 220) for a smooth surface. This is critical for optimal stain and finish absorption.
- Stain Application: If desired, apply a wood stain to enhance the grain and achieve your preferred color. Always test the stain on a scrap piece of the same wood first.
- Protective Topcoats:
- Polyurethane: A highly durable and water-resistant option, available in oil-based (more durable, ambering effect) and water-based (dries faster, less yellowing) formulas. Apply multiple thin coats, sanding lightly between coats.
- Varnish: Offers excellent protection, especially for outdoor or high-humidity areas.
- Epoxy Resin: For an extremely durable, high-gloss, and completely waterproof surface, consider an epoxy pour over your countertop. This creates a striking, resilient finish.
- For specific insights on finishing, particularly with challenging wood types, check out mahogany wood finishing techniques or unique wood finishing techniques.
Hardware and Accessories: The Details That Matter
The right hardware and accessories elevate your bar from functional to fabulous.

- Knobs and Pulls: Select hardware that complements your design aesthetic, whether it’s modern brushed nickel, rustic iron, or classic brass.
- Hinges: Choose high-quality hinges for cabinet doors and stool tops. Soft-close hinges are an excellent upgrade, preventing slams.
- Footrests: For bar stools and counters, metal or wooden footrests add comfort and prevent wear on the wood.
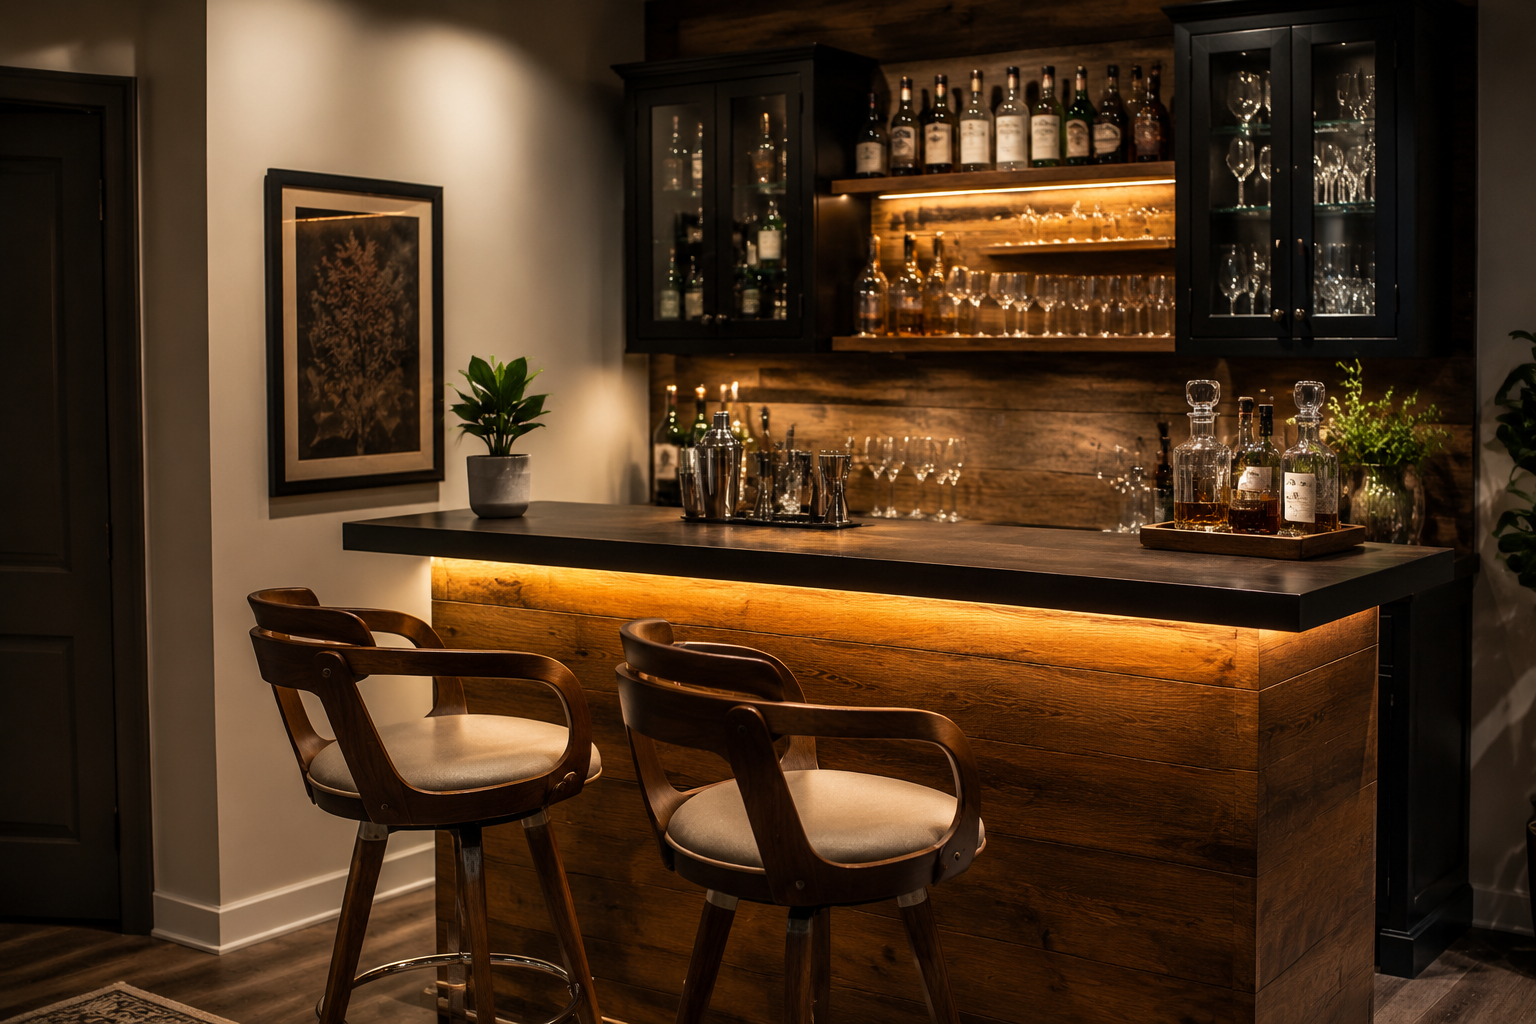
- Lighting: Consider integrating LED strip lighting under the counter or within glass-front cabinets to highlight bottles and create ambiance.
- Bar Railing: A polished brass or stainless steel bar rail adds a classic, professional touch.
Integrating Smart Features and Enhancements
In 2026, integrating technology into home furniture is increasingly popular. Your DIY bar can be a prime candidate for smart enhancements.
- Integrated Charging Stations: Install discreet USB charging ports or wireless charging pads on the countertop or within a drawer.
- Smart Lighting: Connect your bar lighting to a smart home system for voice control, dimming capabilities, and color changes. This can create diverse moods for entertaining.
- Concealed Speakers: Embed small, high-quality speakers into the counter or cabinet structure for seamless audio integration.
- For broader inspiration on smart home woodworking, explore DIY Smart Home Integration with Custom Wooden Enclosures.
Conclusion
Building DIY Bar Furniture Sets with Integrated Storage: Building Counters, Cabinets, and Stools for Home Bars is a rewarding project that transforms your living space into a personalized entertainment zone. From the initial conceptualization of layout and integrated storage to the careful selection of materials and precise execution of construction, each step contributes to a final product that is both highly functional and aesthetically pleasing. By prioritizing thoughtful design, utilizing quality materials, and applying diligent craftsmanship, you can create a home bar that serves as a focal point for gatherings and reflects your unique style for years to come.
Embark on this project with a clear vision, a commitment to detail, and an eagerness to enhance your woodworking skills. The satisfaction of crafting your own bespoke bar furniture, complete with custom storage and comfortable seating, is an unparalleled achievement that will be enjoyed by you and your guests. Take the first step by sketching your dream bar, gathering your tools, and beginning the journey of creating a truly custom piece of your home.
