

The world of woodworking, often associated with grand projects and powerful machinery, holds a charming secret: its miniature counterpart. Far from being merely a hobby for children, minicraft woodworking offers a deeply satisfying, precise, and accessible entry point for anyone wishing to develop their craft skills. For beginners, the process of minicraft woodworking allows for the creation of intricate tiny furniture and dollhouse projects, fostering attention to detail and patience without the need for extensive space or expensive heavy-duty tools. It’s an art form that transforms small pieces of wood into functional, beautiful, and often surprisingly realistic replicas, providing a unique blend of creativity and technical challenge in 2026.
Key Takeaways
- Minicraft woodworking is an accessible entry point into woodworking, requiring minimal space and basic tools.
- Beginners can start with simple projects like miniature chairs, tables, and dollhouse accessories.
- Precision cutting, sanding, and proper adhesion are crucial for successful miniature builds.
- Choosing the right wood and finishing techniques enhances the realism and durability of tiny furniture.
- Scaling down real-world designs and utilizing templates are effective strategies for creating accurate miniatures.
Understanding Minicraft Woodworking: How to Build Tiny Furniture and Dollhouse Projects for Beginners
Minicraft woodworking, at its core, is about scaling down traditional woodworking techniques to create small-scale items. This can range from highly detailed dollhouse furniture at 1:12 scale to tiny decorative objects or architectural models. The beauty of this craft lies in its precision and the relatively low barrier to entry for beginners. Unlike full-scale woodworking, which often demands dedicated workshops and significant investments in machinery, minicraft projects can be tackled on a kitchen table with a modest set of hand tools.
What is Minicraft Woodworking?
Minicraft woodworking involves crafting items from wood where the scale is significantly reduced, often to match popular dollhouse scales like 1:12 (one inch equals one foot), 1:24, or even smaller. This discipline requires meticulous attention to detail, steady hands, and an understanding of how to adapt larger furniture designs to miniature proportions. It’s a fantastic way to develop fine motor skills and spatial reasoning. The resulting pieces, whether a tiny table, a miniature bed, or an elaborate dollhouse kitchen set, offer immense satisfaction and can be truly exquisite works of art.
Why Choose Miniature Projects?
There are several compelling reasons why “Minicraft Woodworking: How to Build Tiny Furniture and Dollhouse Projects for Beginners” is an excellent starting point for aspiring woodworkers:
- Accessibility: Minimal space and tools are required. Many projects can be completed with a craft knife, small saw, sandpaper, and glue.
- Cost-Effectiveness: Small pieces of wood are less expensive, and you can often use scrap wood from larger projects. For ideas on utilizing scraps, consider “Tealight Candle Holders And Cross Wall Art Scrap Wood Projects That Sell In Minutes” – https://woodcraftwiz.com/tealight-candle-holders-and-cross-wall-art-scrap-wood-projects-that-sell-in-minutes/.
- Skill Development: It sharpens precision, patience, and attention to detail, skills transferable to any woodworking endeavor.
- Portability: Projects are small and easy to store or transport.
- Creative Freedom: The possibilities are endless, from historical replicas to modern designs.
This particular niche of woodworking also opens doors to creating DIY woodworking gifts that are unique and heartfelt.
Essential Tools and Materials for Minicraft Woodworking: How to Build Tiny Furniture and Dollhouse Projects for Beginners
Embarking on minicraft woodworking requires a specific set of tools and materials that emphasize precision over power. For beginners, focusing on quality hand tools will yield the best results and provide a safer, more controlled working environment than trying to adapt large power tools.
Key Tools for Miniature Woodworking
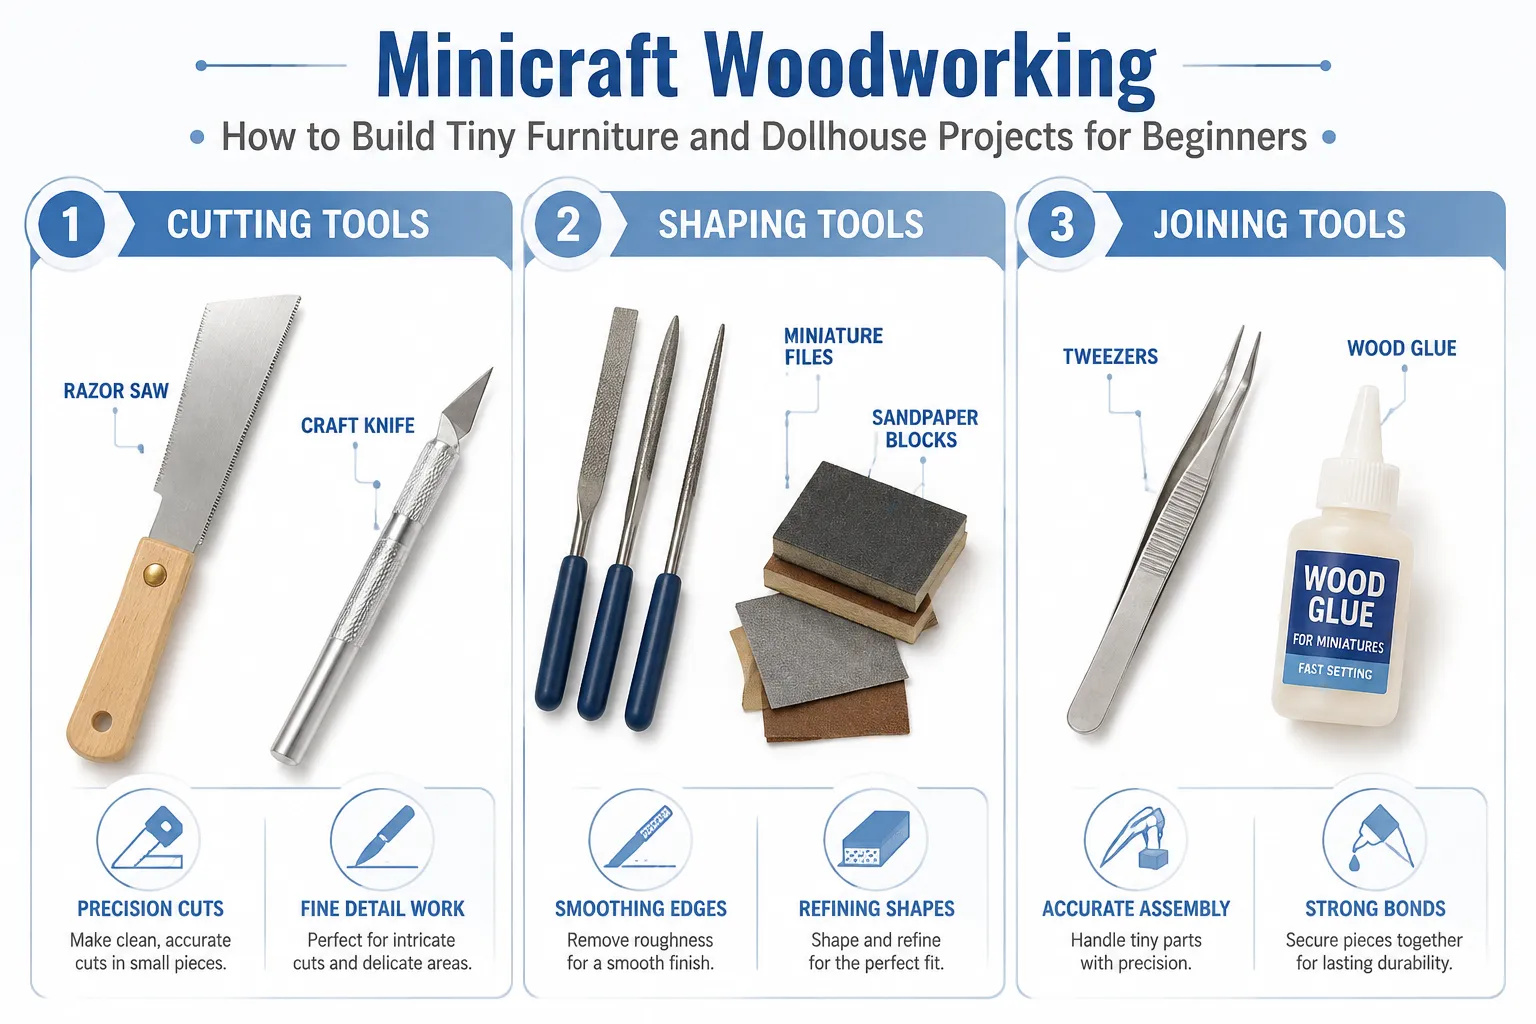
Your workbench for minicraft woodworking doesn’t need to be extensive, but a few core tools are indispensable:
- Precision Cutting Tools:
- Craft Knife (X-Acto knife): Essential for scoring and cutting thin wood sheets. Keep blades sharp for clean cuts.
- Razor Saw: A small, fine-toothed saw designed for delicate cuts, far more appropriate than a full-size hand saw.
- Miter Box: A small miter box paired with your razor saw ensures accurate 45- and 90-degree cuts.
- Sanding and Shaping:
- Assorted Sandpapers: Fine-grit sandpaper (220-400 grit) is crucial for smoothing tiny edges and surfaces. You can wrap it around small blocks for better control.
- Miniature Files: For shaping and refining small curves and details that sandpaper can’t reach effectively.
- Measuring and Marking:
- Steel Ruler: A good quality metal ruler for accurate measurements and as a straight edge for cutting.
- Pencil/Mechanical Pencil: A fine-tip pencil for precise marking.
- Small Square: To ensure all your angles are perfectly perpendicular.
- Assembly and Adhesion:
- Wood Glue: High-quality wood glue, applied sparingly with a toothpick or fine applicator, is vital. For more on choosing the right adhesive, see “The Ultimate Guide To Wood Glue Choosing The Right Adhesive For Every Woodworking Joint And Project.”
- Tweezers: Indispensable for handling tiny pieces and applying glue accurately.
- Clamps (Miniature): Small spring clamps or clothespins can hold pieces together while glue dries.
- Safety Gear:
- Safety Glasses: Always protect your eyes, even with small tools.
- Cutting Mat: Protects your work surface and provides a stable base for cutting.
Recommended Woods for Tiny Furniture and Dollhouse Projects
Choosing the right wood is critical for the success and appearance of your miniature projects.
| Wood Type | Characteristics | Best Uses |
|---|---|---|
| Basswood | Fine grain, soft, easy to cut and carve, takes stain well. | Dollhouse furniture, detailed carvings, general miniature construction. |
| Birch Plywood (Thin) | Strong, stable, thin sheets available, good for structural components. | Dollhouse walls, floors, backs of cabinets, larger flat surfaces. |
| Walnut | Dark, rich color, fine grain, durable, polishes beautifully. | Luxury miniature furniture, accent pieces, where a dark, natural finish is desired. |
| Maple | Light color, dense, hard, very fine grain, takes paint well. | Modern miniature furniture, painted pieces, durable surfaces. |
| Poplar | Relatively soft, uniform texture, takes paint and stain well. | Painted furniture, hidden structural elements, cost-effective options. |
For more insights into wood types, consult "Beginner's Guide to Wood Species: Hardwoods vs. Softwoods," – https://woodcraftwiz.com/beginners-guide-to-wood-species-hardwoods-vs-softwoods-workability-and-best-uses-for-diy-projects/.
Step-by-Step Guide: How to Build Tiny Furniture and Dollhouse Projects for Beginners
Building miniature furniture requires a methodical approach, emphasizing accuracy at every stage. This guide breaks down the process into manageable steps, perfect for mastering “Minicraft Woodworking: How to Build Tiny Furniture and Dollhouse Projects for Beginners.”
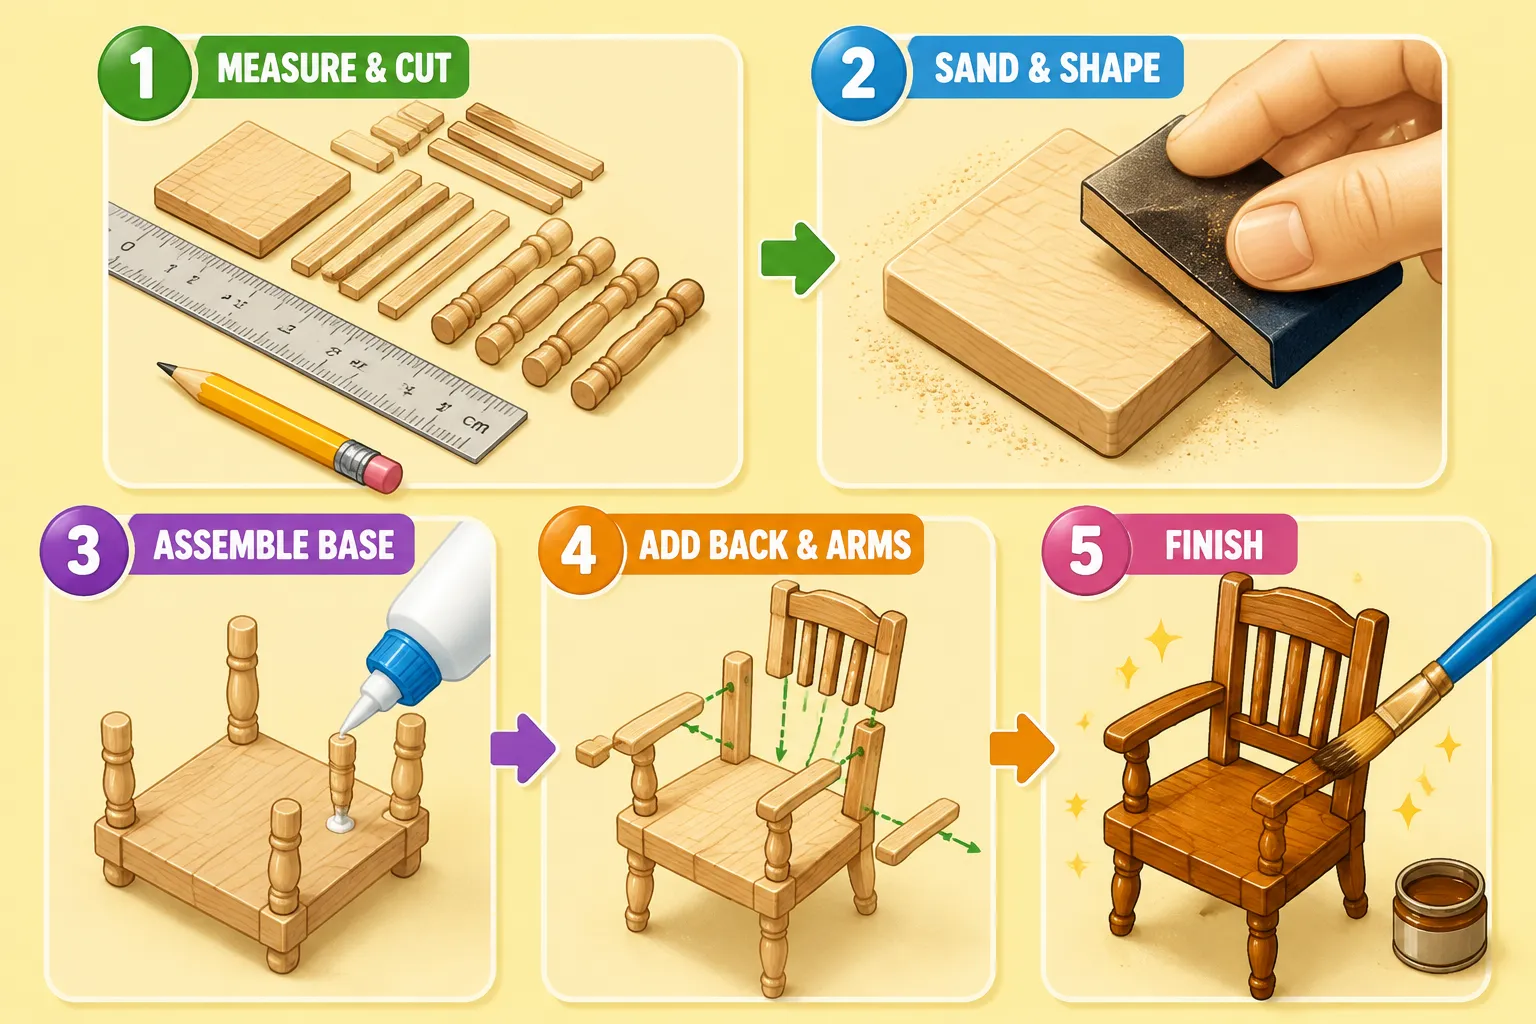
1. Planning and Design
Every successful miniature project begins with a clear plan.
- Choose a Project: Start simple. A small stool, a basic table, or a simple box are excellent first projects. Avoid complex joinery or intricate curves initially.
- Determine Scale: The most common dollhouse scale is 1:12 (one inch equals one foot). This means if a real chair is 36 inches tall, your miniature version will be 3 inches tall.
- Gather Plans/Drawings: Look for existing miniature plans online or in books. Alternatively, find a picture of a real piece of furniture and scale down its dimensions.
- Create a Cut List: List all the individual pieces of wood you’ll need, along with their exact dimensions (length, width, thickness).
2. Measuring and Cutting with Precision
Accuracy here is paramount, as even a millimeter off can be noticeable in a miniature.
- Mark Clearly: Use a sharp pencil and a steel ruler to mark all cut lines accurately on your chosen wood.
- Score First (for thin wood): With a craft knife, score along your cut lines several times on thin sheets of wood before attempting to cut through completely. This helps prevent splintering.
- Use a Razor Saw and Miter Box: For thicker pieces or precise angles, a razor saw combined with a miniature miter box provides clean, straight cuts.
- Cut Slightly Oversize (Optional): For very precise work, some prefer to cut pieces slightly larger than needed and then sand them down to the exact dimension.
3. Sanding and Shaping
Smoothness and refinement define quality miniature pieces.
- Rough Sanding: Start with a slightly coarser grit (e.g., 220) to remove saw marks and achieve the basic shape.
- Fine Sanding: Progress to finer grits (320-400) for a silky-smooth finish. Use small sanding blocks or wrap sandpaper around a dowel for curved areas.
- Edge Treatment: Gently break sharp edges with sandpaper to make the furniture feel more realistic and less toy-like.
4. Assembly and Joinery
Careful assembly is key to durable and attractive miniatures.
- Dry Fit: Always dry-fit all your pieces together before applying any glue. This allows you to identify and correct any fit issues.
- Apply Glue Sparingly: Use a toothpick or a fine-tip applicator to apply a very thin, even coat of wood glue. Excess glue will squeeze out and can be difficult to clean without damaging the wood.
- Clamp Gently: Use miniature clamps or painter’s tape to hold pieces together while the glue dries. Don’t over-tighten, as this can squeeze out too much glue and weaken the joint.
- Wipe Away Excess Glue: Immediately wipe away any glue squeeze-out with a damp cloth or cotton swab. Dried glue can prevent stain from absorbing evenly.
For more on joinery, explore “Introduction To Shaker Furniture Joinery Simplicity Strength And Timeless Design Principles“, applying the principles to a smaller scale.
5. Finishing Your Miniature Projects
The finish brings your tiny furniture to life.
- Cleaning: Ensure the piece is perfectly clean and dust-free before applying any finish.
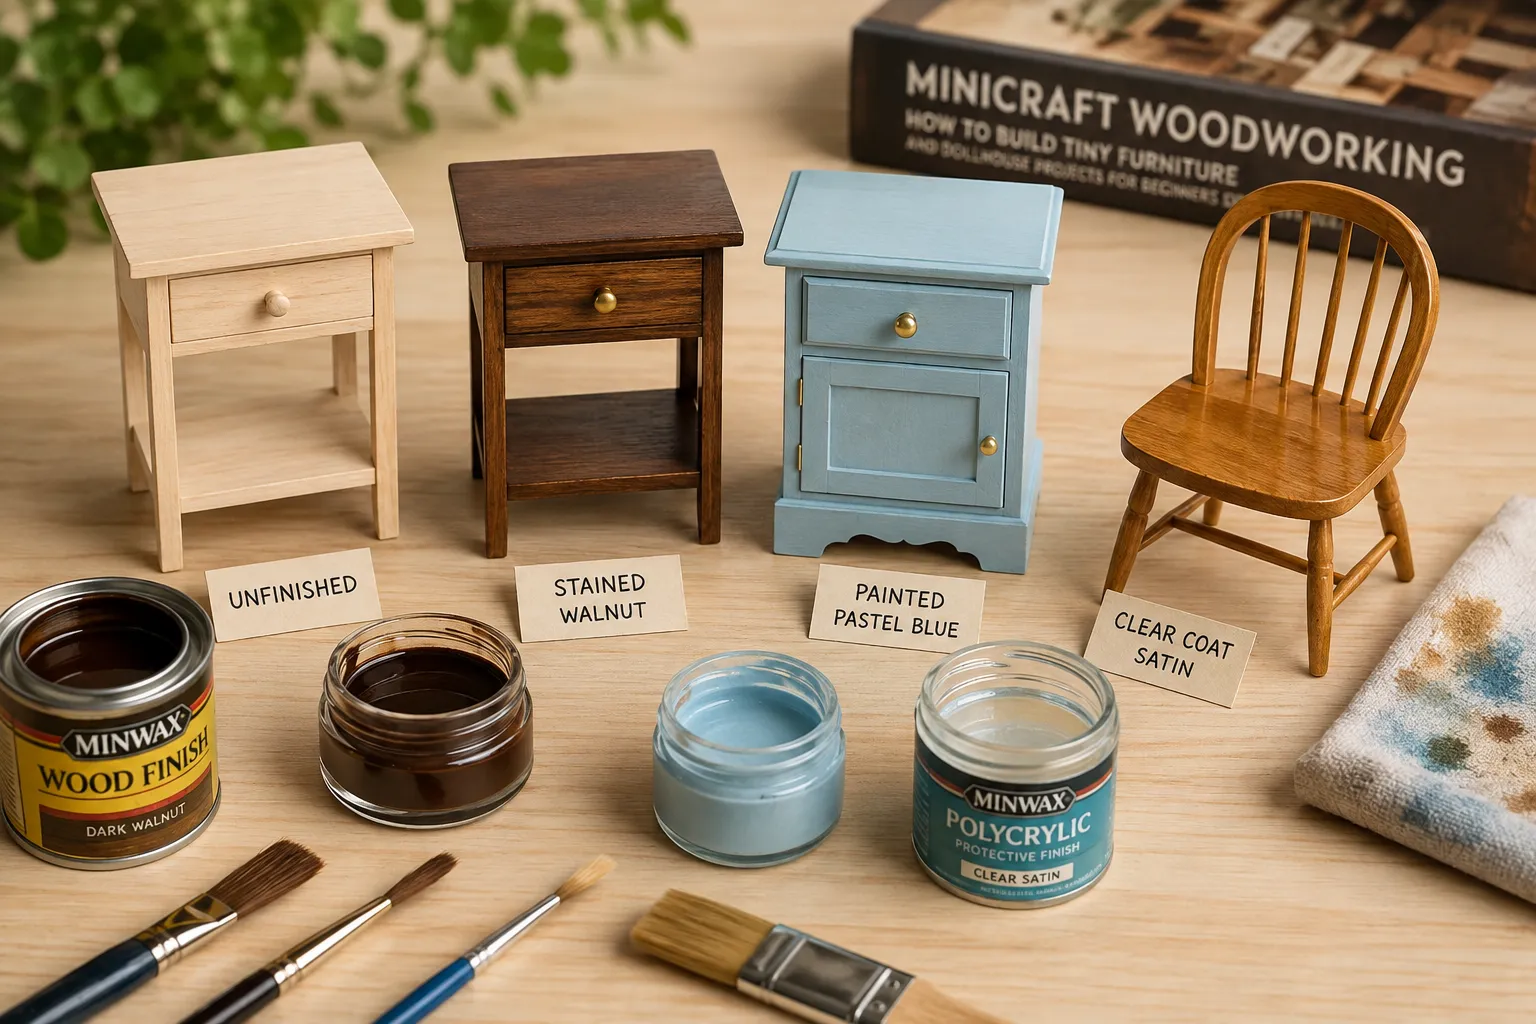
- Staining: If you want a wood grain look, apply a wood stain. Test the stain on a scrap piece of the same wood first. Apply thinly and wipe off excess.
- Painting: For painted furniture, a primer coat can help achieve a smooth, even color. Use acrylic or enamel paints, applying multiple thin coats rather than one thick one.
- Protective Coat: Once dry, apply a clear protective coat (matte, satin, or gloss polyurethane or lacquer) to seal and protect your miniature. Again, multiple thin coats are best.
- Waxing/Oiling: For a natural feel, a thin coat of paste wax or furniture oil can enhance the wood’s natural beauty. For natural finishing options, see “Natural Wood Finishing Without Chemicals Plant Based Stains Oils And Protective Coatings For Health Conscious Makers And Eco Conscious Buyers.”
Advanced Tips and Project Ideas for Minicraft Woodworking
Once you’ve mastered the basics of “Minicraft Woodworking: How to Build Tiny Furniture and Dollhouse Projects for Beginners,” you might be ready to explore more complex techniques and ambitious projects.
Enhancing Realism and Detail
To elevate your miniature woodworking, focus on details that mimic full-size furniture.
- Hardware: Tiny hinges, drawer pulls, and knobs can dramatically increase realism. These can often be purchased at dollhouse miniature stores or crafted from wire.
- Upholstery: Adding miniature fabric cushions to chairs and sofas, or even attempting tiny tufting, brings warmth and texture.
- Glazing: For windows or cabinet doors, use thin acetate sheets or clear plastic to simulate glass.
- Wear and Tear: Subtle distressing, like slightly worn edges or tiny scratches, can add character and a sense of history to your pieces.
- Functionality: Try to incorporate working elements, such as tiny drawers that slide open or cabinet doors that swing on miniature hinges.
Scaling and Template Creation
Accurately scaling down designs is a critical skill for advanced miniature work.
- Ratio Calculation: If you’re working at 1:12 scale, simply divide all real-world dimensions by 12. For 1:24 scale, divide by 24, and so on.
- CAD Software (Optional): For complex designs, even free 2D CAD software can help you accurately scale and plan your cuts.
- Templates: Create paper or thin cardboard templates of your components. This ensures consistency and accuracy, especially if you’re making multiple identical pieces.
Project Ideas to Challenge Your Skills in 2026
Expand your repertoire with these ideas:
- Miniature Bookcases: Practice shelving and precise assembly.
- Four-Poster Bed: Introduces more complex turning (if you have a micro lathe) or shaping of posts.
- Cabinetry with Working Drawers: Challenges your joinery and hardware installation skills.
- Period Furniture Replicas: Research historical furniture styles and attempt to replicate their intricate details.
- Dollhouse Kitchen or Bathroom Set: Incorporate sinks, faucets, and other fixtures, which often involves working with other materials like metal or polymer clay.
- Outdoor Miniature Furniture: Adirondack chairs, picnic tables, or garden benches for a miniature garden scene.
Consider exploring “High Demand Woodworking Projects For 2026 Coffee Tables Wine Racks And Clocks” – https://woodcraftwiz.com/high-demand-woodworking-projects-for-2026-coffee-tables-wine-racks-and-clocks-2/ for inspiration on how real-world trends can influence miniature designs. While not selling miniature items directly, the principles of popular designs can be adapted. For intricate shaping, an “Introduction To Wood Carving For Beginners Tools Techniques And Simple Projects To Get Started” could offer valuable techniques for minicraft details.
Conclusion
Minicraft woodworking offers a rewarding journey into the world of detailed craftsmanship, perfect for “Minicraft Woodworking: How to Build Tiny Furniture and Dollhouse Projects for Beginners.” It’s a craft that prioritizes precision, patience, and creativity, allowing you to create beautiful, intricate miniatures without needing a large workshop or a significant investment in heavy machinery. From selecting the right tiny tools and woods to mastering delicate cuts, assembly, and finishing, each step builds foundational woodworking skills that are both enjoyable and highly transferable.
By starting with simple projects and gradually challenging yourself with more complex designs and techniques, you can develop a profound appreciation for the art of miniature making. The satisfaction of holding a perfectly scaled, handcrafted piece of furniture in your palm, knowing every detail was meticulously brought to life by your own hands, is an experience few other hobbies can match. So, gather your small tools, select your wood, and begin your journey into the captivating world of minicraft woodworking today.
SEO Meta Title: Minicraft Woodworking: Build Tiny Furniture & Dollhouse Projects
SEO Meta Description: Learn minicraft woodworking for beginners. Build tiny furniture and dollhouse projects with our step-by-step guide on tools, materials, and techniques in 2026.