
Achieving a truly professional, glass-smooth finish on wood with spray applications of polyurethane and lacquer is often seen as the zenith of advanced wood finishing. While brushing and wiping techniques yield excellent results for many projects, the unparalleled smoothness, consistency, and efficiency of spray application sets it apart for high-end furniture, cabinetry, and architectural millwork. This comprehensive guide, focused on “Advanced Wood Finishing: Achieving Professional Spray Application Results with Polyurethane and Lacquer,” will demystify the equipment, techniques, and problem-solving required to master this skill, empowering you to elevate your woodworking projects in 2026 and beyond.
Key Takeaways
- Proper Equipment is Crucial: Selecting the right spray gun (HVLP, airless, conventional) and understanding its setup is fundamental for achieving professional results with polyurethane and lacquer.
- Meticulous Surface Preparation: Flawless spray finishing begins with impeccable wood preparation, including sanding to appropriate grits and ensuring a dust-free environment.
- Mastering Spray Technique: Consistent gun movement, proper overlap, and distance are vital for even film build and avoiding common defects like runs, sags, and orange peel.
- Understanding Finish Properties: Different finishes (polyurethane, lacquer) have unique characteristics regarding drying times, viscosity, and recoat windows, which impact application strategy.
- Effective Troubleshooting: Identifying and correcting common spray application issues is a learned skill that separates amateur results from professional quality.
Essential Equipment for Professional Spray Finishing
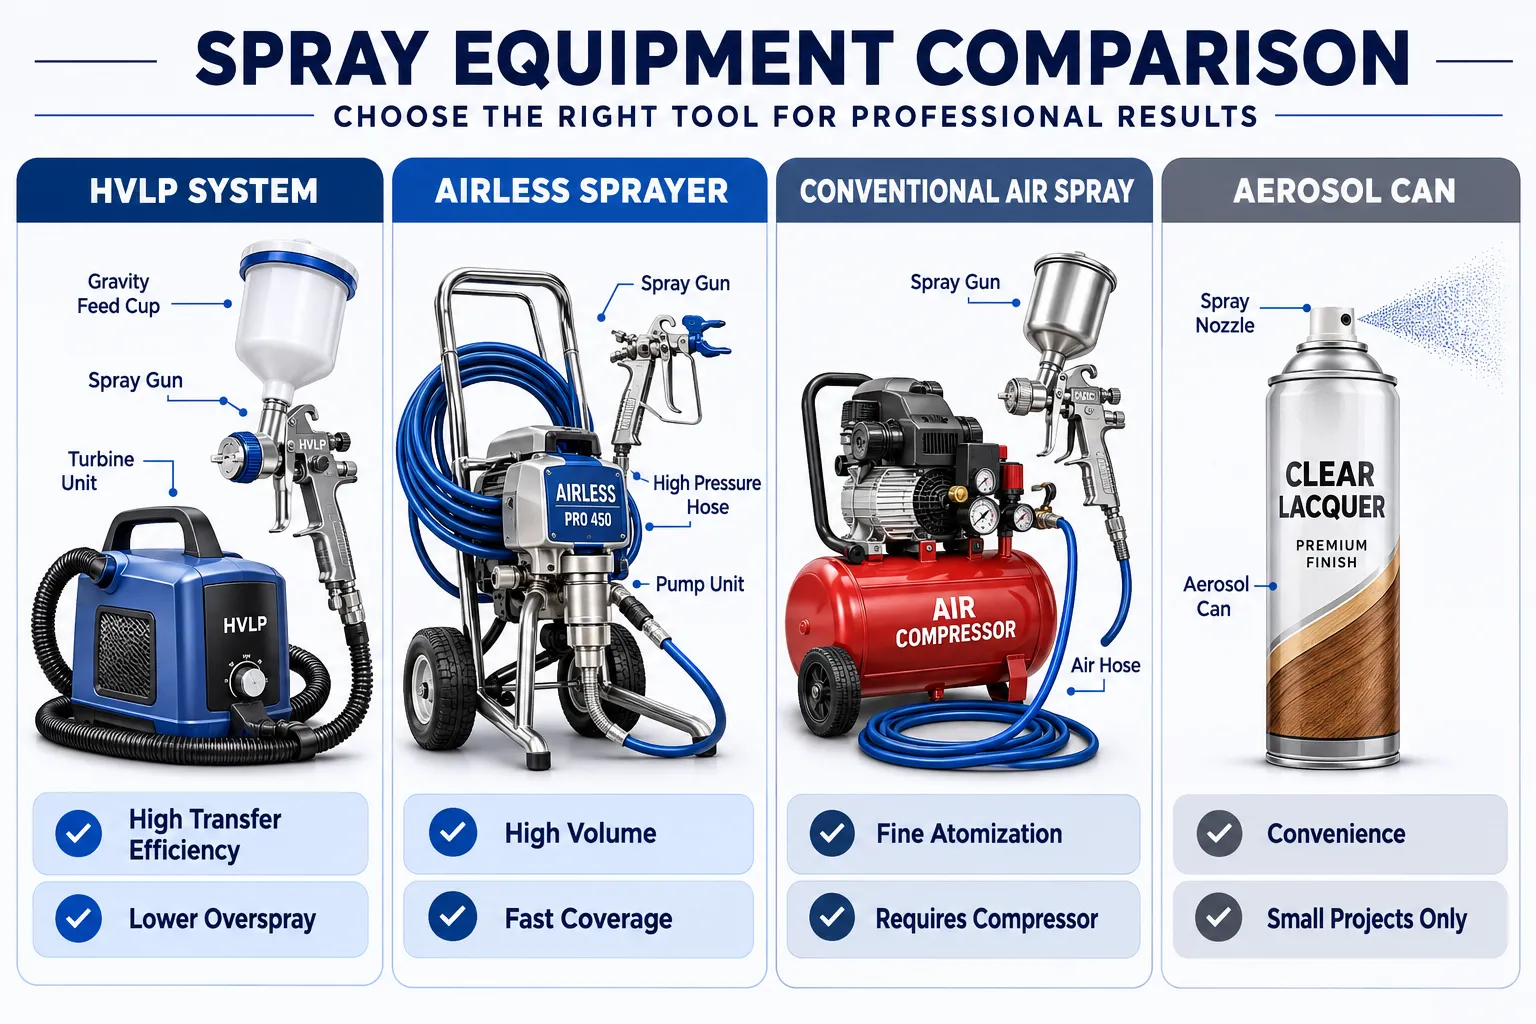
The foundation of “Advanced Wood Finishing: Achieving Professional Spray Application Results with Polyurethane and Lacquer” lies in understanding and utilizing the correct spray equipment. Each type offers distinct advantages and is suited for specific finishes and project scales.
Types of Spray Guns
- HVLP (High Volume Low Pressure) Systems: HVLP guns are widely favored by woodworkers for their high transfer efficiency (less wasted material) and reduced overspray. They operate at lower air pressures but move a higher volume of air, leading to excellent atomization and a smooth finish. They are ideal for both polyurethane and lacquer due to their ability to finely atomize a wide range of viscosities. HVLP systems can be turbine-driven (self-contained, portable) or convert air from a compressor.
- Conventional Air Spray Guns: These guns use high air pressure and low air volume to atomize the finish. They provide very fine atomization, often resulting in an exceptionally smooth finish, but typically have lower transfer efficiency and produce more overspray than HVLP. A robust air compressor is essential for conventional guns.
- Airless Sprayers: Airless sprayers use a high-pressure pump to atomize the finish, eliminating the need for an air compressor. They are incredibly fast for large surfaces and thick coatings but can be overkill and less precise for fine furniture work. Their high pressure can also lead to more overspray and less control compared to HVLP. While they can apply polyurethane, they are less commonly used for the fine, delicate finishes typical of lacquer.
- Gravity Feed vs. Siphon Feed:
- Gravity Feed: The cup is on top of the gun, allowing gravity to feed the finish to the nozzle. This is excellent for small to medium projects, allows for easier cleaning, and handles thicker finishes better. Most HVLP guns are gravity feed.
- Siphon Feed: The cup is below the gun, and air pressure siphons the finish up. Good for larger batches of finish and projects where the cup might interfere with maneuverability, though less efficient with thinner materials as the cup needs to be kept fairly full for consistent suction.
Air Compressors and Hoses
If using a compressor-driven HVLP or conventional spray gun, a suitable air compressor is paramount. Look for a compressor with sufficient CFM (cubic feet per minute) output at the required PSI (pounds per square inch) to meet the gun’s specifications. A minimum of 5-6 CFM at 40 PSI is often recommended for smaller HVLP guns, while conventional guns may require significantly more.
Important Compressor Features:
- Tank Size: A larger tank helps maintain consistent air pressure, reducing compressor cycling during continuous spraying.
- Pressure Regulator and Water Trap: Essential for controlling air pressure and removing moisture from the air, preventing finish defects.
- Hose: Use a flexible, non-marring air hose with appropriate diameter (e.g., 3/8 inch) and length to avoid pressure drops.
For a deeper dive into the nuances of spray versus brush application for polyurethane, consult our guide on “Polyurethane Spray vs Brush: Pros, Cons, and Choosing the Right Method“.
Preparation and Technique for Flawless Finishes
Achieving “Advanced Wood Finishing: Achieving Professional Spray Application Results with Polyurethane and Lacquer” demands meticulous preparation and a refined application technique. Shortcuts here invariably lead to disappointing results.
Surface Preparation: The Foundation
No spray finish, however skillfully applied, can hide poor surface preparation.
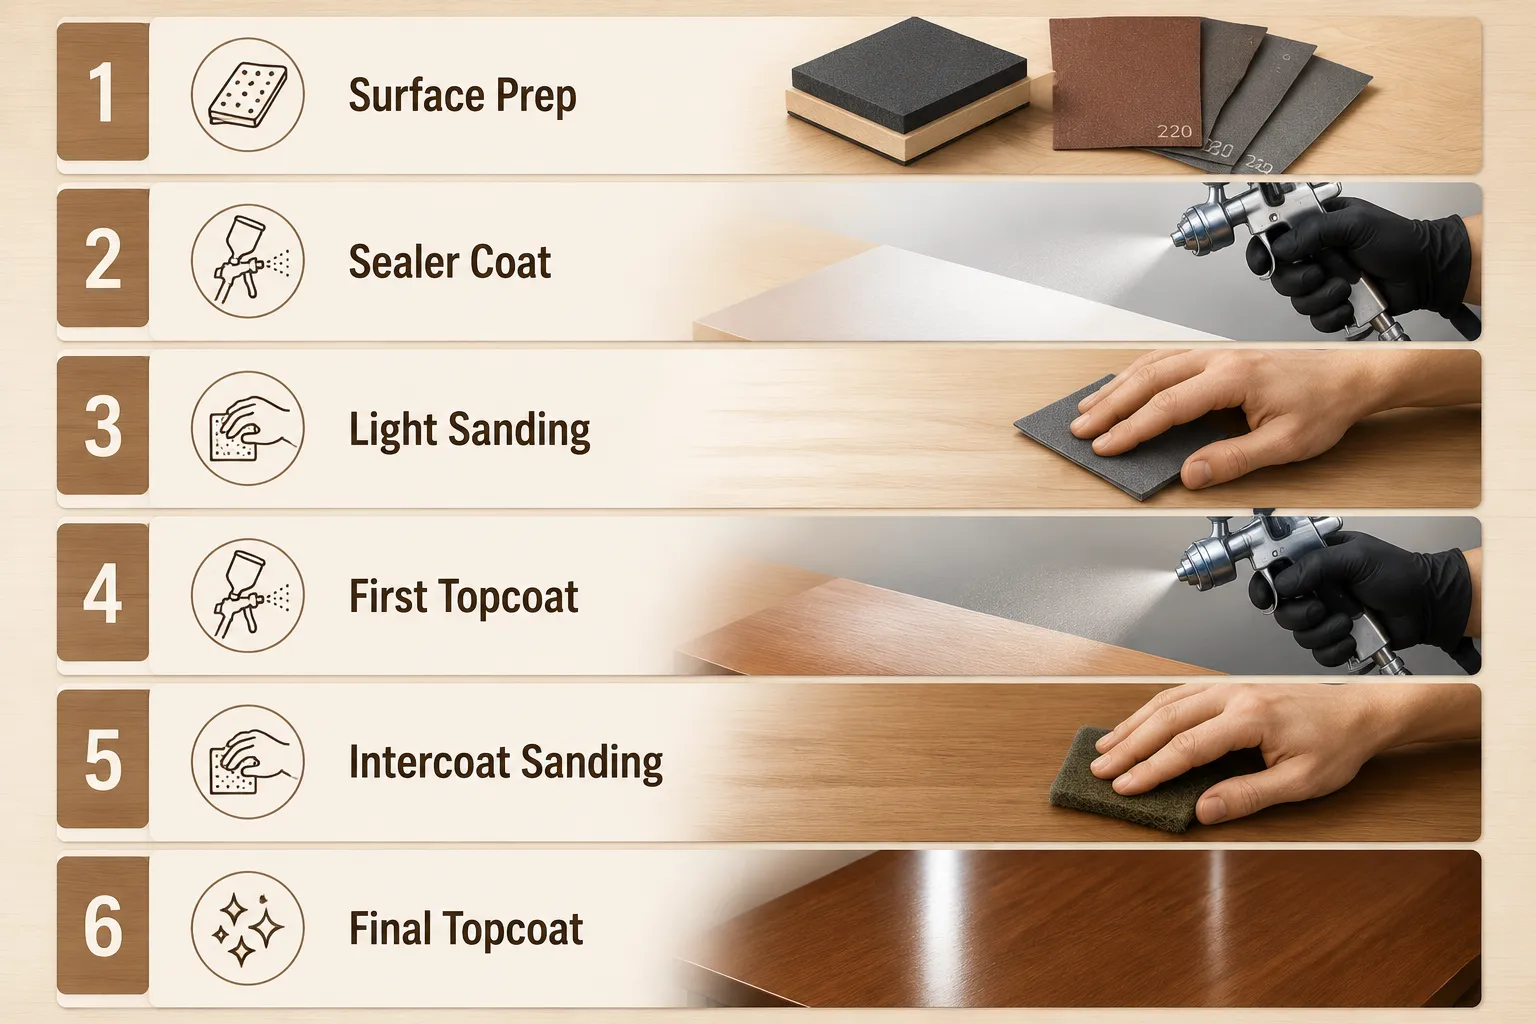
- Sanding Sequence: Begin with a grit appropriate for the wood species and condition (e.g., 100-120 grit for initial shaping). Progress through successively finer grits, typically ending at 180-220 grit for most hardwoods before finishing. For very fine, open-pored woods or a glass-smooth finish, you might go up to 320 or even 400 grit. Sand with the grain.
- Dust Removal: After each sanding stage, especially the final one, remove all dust. Use compressed air, a tack cloth (ensure it leaves no residue), or a vacuum with a brush attachment. Dust is the enemy of a smooth finish.
- Grain Filling (Optional): For open-pored woods like oak or ash, grain filling can create a truly flat, mirror-like surface. This is typically done before the final sanding steps and initial finish coats.
- Conditioning/Sealing (Optional but Recommended): A thin wash coat of shellac or a specific sanding sealer can help even out absorption, prevent blotching, and build a smooth base. Shellac is an excellent choice for sealing before lacquer or polyurethane, as it adheres well and is compatible with most finishes.
Workshop Setup and Safety
- Ventilation: Critical for health and finish quality. Use an exhaust fan to draw fumes away, and ensure fresh air intake. Work in a well-ventilated area, preferably a dedicated spray booth.
- Lighting: Bright, even lighting is essential to spot imperfections, ensure even coverage, and prevent runs. Overhead and angled lighting can reveal issues.
- Dust Control: Minimize airborne dust by cleaning the workshop thoroughly. Consider a dust collection and air filtration system to maintain a pristine environment.
- Personal Protective Equipment (PPE): Always wear a proper respirator (NIOSH-approved for organic vapors), safety glasses, and chemical-resistant gloves.
Mastering Spray Technique
Consistency is key to “Advanced Wood Finishing: Achieving Professional Spray Application Results with Polyurethane and Lacquer.”
- Practice: Start on scrap wood. This allows you to dial in your gun settings and perfect your technique without risking your project.
- Gun Setup:
- Fluid Nozzle/Needle: Choose the correct size for your finish (e.g., 1.3-1.5mm for most polyurethanes and lacquers).
- Air Cap: Ensures proper atomization pattern.
- Fluid Pressure: Adjust to achieve smooth flow without excessive material.
- Air Pressure: Adjust for optimal atomization. Too low, and you get “orange peel”; too high, and you get excessive overspray and solvent evaporation, leading to dry spray.
- Fan Pattern: Adjust for the width of your spray pattern. Typically, a wide pattern for large areas and a smaller pattern for edges.
- Viscosity: Many finishes, especially lacquers, need thinning. Follow the manufacturer’s recommendations for the specific finish and equipment. A viscosity cup can help ensure consistency.
- Spray Distance: Typically 6-10 inches from the surface. Too close causes runs; too far causes dry spray and poor adhesion.
- Overlap: Each pass should overlap the previous one by about 50%.
- Speed and Consistency: Move the gun at a consistent speed, keeping it perpendicular to the surface. Arc your wrist as you spray, rather than pivoting from your elbow, to maintain consistent distance.
- Edge Control: Start spraying off the edge of the piece and release the trigger after passing the opposite edge to avoid heavy build-up on edges.
- Coats: Apply multiple thin coats rather than one heavy coat. This reduces runs, promotes even drying, and builds depth. Allow adequate flash-off and drying time between coats as per manufacturer instructions.
- Intercoat Sanding: Lightly sand between coats with fine-grit sandpaper (320-400 grit) or an abrasive pad to denib any dust or imperfections and provide mechanical adhesion for subsequent coats. Clean thoroughly after sanding.
Advanced Techniques and Troubleshooting Polyurethane and Lacquer
Even with perfect preparation, challenges can arise when pursuing “Advanced Wood Finishing: Achieving Professional Spray Application Results with Polyurethane and Lacquer.” Understanding the unique properties of these finishes and how to troubleshoot common issues is crucial.
Characteristics of Polyurethane and Lacquer
| Feature | Polyurethane (Oil-based) | Polyurethane (Water-based) | Lacquer (Nitrocellulose/Pre-Cat) |
|---|---|---|---|
| Durability | Very High (impact, abrasion, chemical resistance) | Good to Very High (less than oil-based, good abrasion) | Good (hard, brittle, resistant to some chemicals) |
| Drying Time | Slow (hours for tack-free, days for recoat) | Fast (minutes for tack-free, 1-2 hours for recoat) | Very Fast (minutes for tack-free, 30-60 mins for recoat) |
| Application | Excellent flow-out, few coats needed | Fast application, builds film quickly | “Melts into” previous coats, builds quickly |
| Clarity/Color | Ambering over time (enhances wood warmth) | Clear, non-yellowing | Clear, can yellow slightly over time |
| VOCs | High | Low | Very High |
| Thinning Agent | Mineral Spirits, Naphtha | Water, Manufacturer’s Reducer | Lacquer Thinner |
| Best Use | High-wear surfaces, floors, bar tops | Cabinets, furniture, clear-coated wood | Fine furniture, musical instruments, easily repairable |
Considerations:
- Polyurethane: Its slower dry time allows for excellent flow-out, minimizing spray marks. Water-based polyurethanes offer faster drying and lower VOCs but require careful attention to avoid foaming. Always ensure full cure for maximum durability.
- Lacquer: Its fast drying and “re-melting” properties allow for rapid build-up of multiple thin coats, often creating incredible depth and a smooth surface. It’s also very easy to repair, as new coats dissolve and fuse with old ones. However, the high VOC content and rapid drying demand good ventilation and quick, consistent application to avoid dry spray. For projects requiring durability and scratch resistance, consider a pre-catalyzed or post-catalyzed lacquer.
Common Spray Application Issues and Solutions
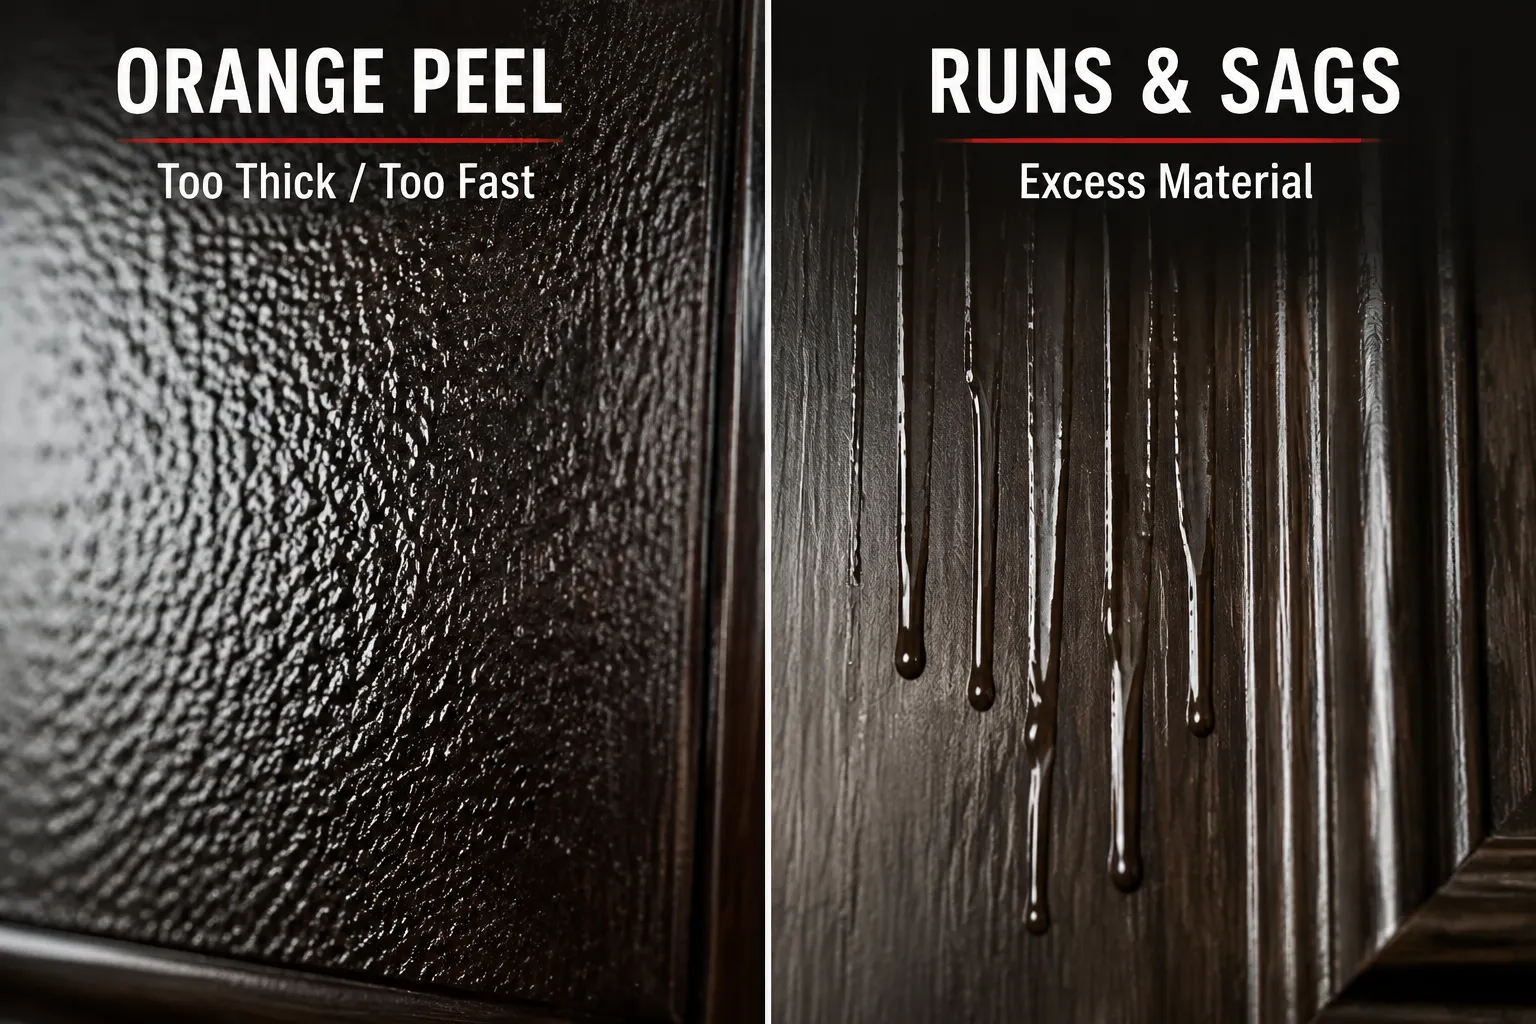
- Orange Peel: The finish looks like an orange peel texture.
- Cause: Finish too thick, air pressure too low, gun moved too fast, gun too far from surface.
- Solution: Thin the finish, increase air pressure, slow down gun movement, move gun closer. Lightly sand smooth and re-spray.
- Runs or Sags: Droplets or thick lines of finish.
- Cause: Too much material applied in one coat, gun too close, gun moved too slow.
- Solution: Apply thinner coats, increase gun speed, increase distance. Allow to dry, sand flat, and re-spray.
- Dry Spray/Overspray: Rough, sandy texture, particularly on edges or areas where overspray settles.
- Cause: Air pressure too high, gun too far from surface, not enough overlap, finish drying too quickly.
- Solution: Reduce air pressure, move gun closer, ensure proper overlap, add a retarder to slow drying (for lacquer), or spray in less drafty conditions. Sand smooth and re-spray.
- Fish Eyes: Small, circular craters in the finish.
- Cause: Contamination on the surface (oil, silicone, wax).
- Solution: Meticulous cleaning of the surface before finishing. Use a “fish eye eliminator” additive, but this is a band-aid, proper cleaning is best. Sand and clean thoroughly before re-spraying.
- Blushing/Cloudiness (primarily with Lacquer): Hazy or milky appearance.
- Cause: High humidity or rapid solvent evaporation trapping moisture in the film.
- Solution: Spray when humidity is low. Add a “retarder” to the lacquer thinner to slow drying. A “blush eliminator” can sometimes be sprayed over the existing blush to clear it.
- Poor Adhesion/Peeling:
- Cause: Inadequate surface preparation (not sanded enough, surface contamination), incompatible finishes, or insufficient drying/curing time between coats.
- Solution: Ensure proper sanding and cleaning. Use compatible finish systems. Allow full flash-off and recoat times.
For supplies that can aid your finishing journey, including various sandpapers, thinners, and safety gear, you can check a comprehensive wood craft supplies checklist.
Conclusion
Mastering “Advanced Wood Finishing: Achieving Professional Spray Application Results with Polyurethane and Lacquer” is a journey that combines the right equipment, meticulous preparation, and refined technique. While initial attempts may present challenges, persistence and attention to detail will yield incredibly rewarding, professional-grade finishes. By understanding the characteristics of polyurethane and lacquer, setting up your workspace correctly, and practicing your spray technique, you can confidently tackle projects in 2026 with a new level of craftsmanship. The smooth, durable surfaces you achieve will not only enhance the beauty of your woodworking but also provide lasting protection for your creations.
Actionable Next Steps:
- Invest in Quality Equipment: If you’re serious about spray finishing, consider a quality HVLP system.
- Dedicate a Spray Area: Set up a clean, well-ventilated, and well-lit space.
- Practice on Scraps: Before spraying your project, practice your technique and dial in your gun settings on scrap pieces of the same wood.
- Read Manufacturer’s Instructions: Always follow the specific thinning, drying, and recoat instructions for your chosen finish.
- Prioritize Safety: Never spray without appropriate PPE, especially a respirator rated for organic vapors.
References
- Flexner, B. (2012). Understanding Wood Finishing: How to Choose and Apply the Right Finish. Fox Chapel Publishing.
- Jewitt, T. (2014). The Wood Finisher’s Handbook. Taunton Press.
- Mehler, J. (2013). The Art of Wood Finishing: A Guide to the Art and Science of Professional Finishing. Linden Publishing.
SEO Meta Title: Advanced Wood Finishing: Pro Spray Polyurethane & Lacquer SEO Meta Description: Master advanced wood finishing techniques in 2026 with expert spray application of polyurethane and lacquer. Achieve professional, flawless results on your projects.