

The pursuit of exceptional fine furniture often begins not with pristine lumber, but with the raw, untamed beauty of live-edge slabs and the storied character of reclaimed wood. Transforming these unique materials into stable, workable stock suitable for high-end projects requires mastery of Advanced Wood Milling Techniques: Preparing Live-Edge Slabs and Reclaimed Wood for Fine Furniture. Without precise milling, these remarkable pieces, each with its own inherent challenges like irregular shapes, varied moisture content, and embedded foreign objects, risk becoming unstable, warped, or unusable, undermining the artisan’s vision before a single joint is cut. The ability to accurately flatten, dimension, and stabilize these woods is not just a skill, but a foundational art form that elevates a woodworker’s craft from competent to exceptional in 2026.
Key Takeaways
- Mastering advanced milling techniques is crucial for transforming raw live-edge slabs and reclaimed wood into stable material for fine furniture.
- Proper slab preparation involves careful log selection, precise rough milling, and controlled drying methods to prevent defects.
- Specialized tools like router sleds, wide-belt sanders, and CNC machines are essential for achieving extreme flatness and consistent thickness.
- Reclaimed wood demands rigorous inspection, cleaning, and stabilization to address metal inclusions, surface imperfections, and inherent instability.
- Understanding wood movement and utilizing appropriate stabilization techniques are vital for the longevity and integrity of furniture made from unique wood forms.
Initial Preparation and Rough Milling for Live-Edge Slabs
The journey from a raw log to a refined live-edge slab suitable for fine furniture is intricate, beginning long before the first tool touches the wood. The quality of the final piece is heavily influenced by the initial selection and rough milling processes. Neglecting these early steps can lead to significant problems down the line, including warping, checking, and an inability to achieve a truly flat surface.
Selecting the Right Log for Live-Edge Slabs
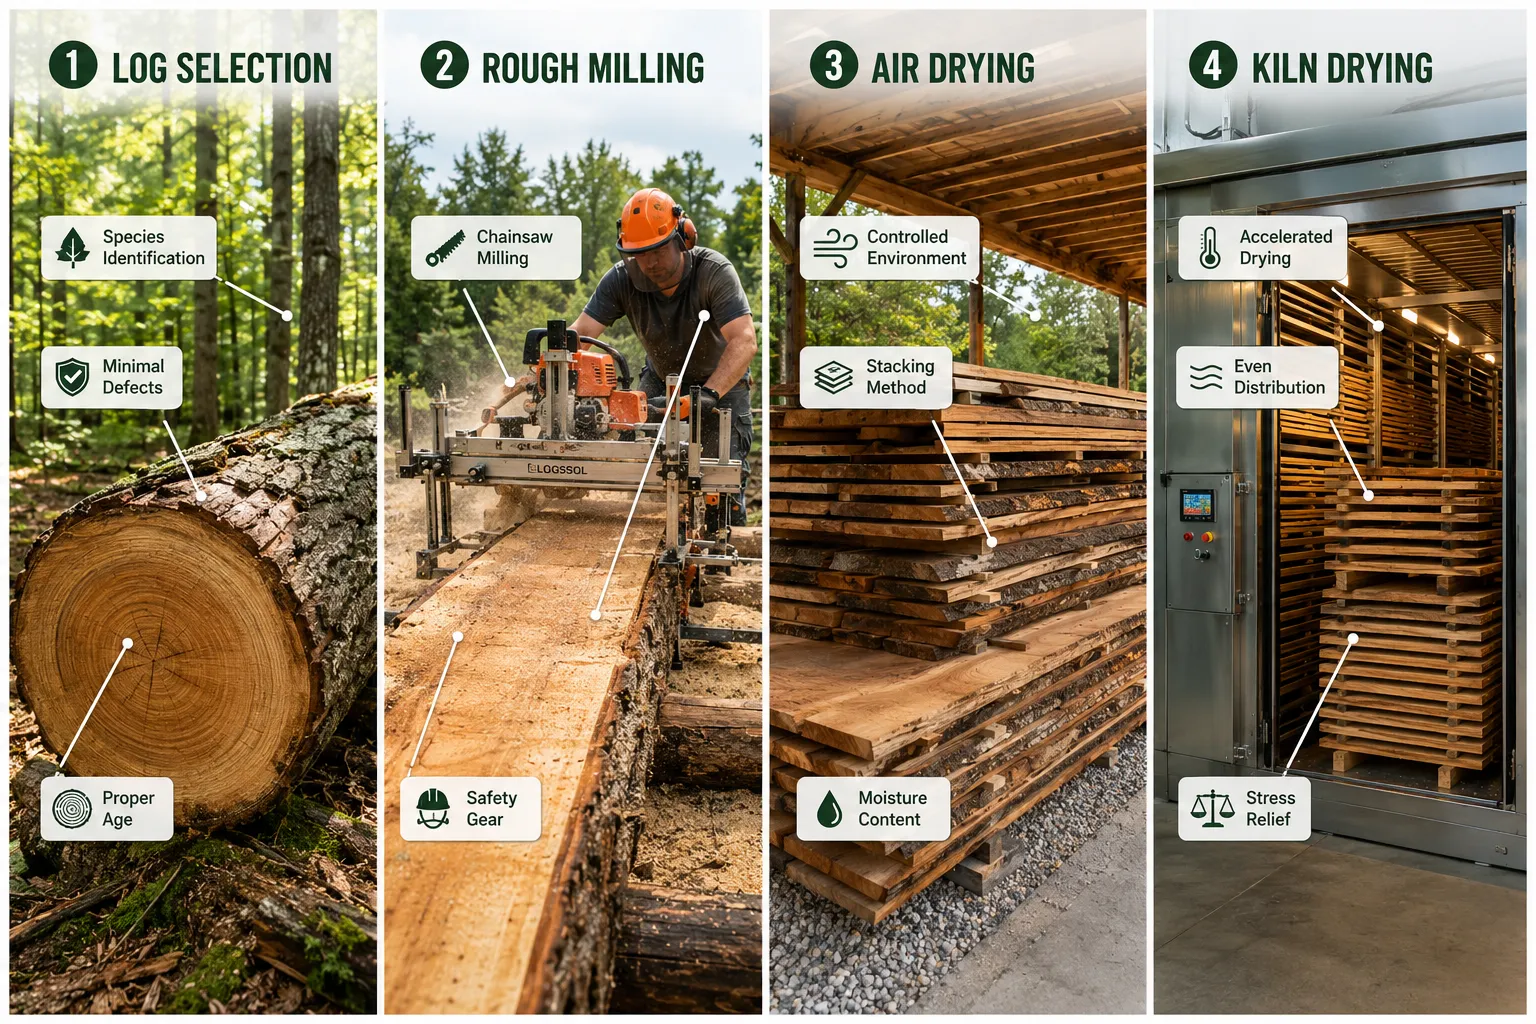
Choosing the correct log is paramount. Look for logs that are relatively straight and free from excessive knots, deep cracks, or signs of rot. While a certain degree of natural character is desirable for live-edge pieces, structural integrity must be prioritized. Consider the wood species; hardwoods like walnut, oak, and maple are popular for their stability and aesthetic appeal. Softwoods can also be used, but generally require more careful handling and stabilization.
Important Considerations for Log Selection:
- Species: Understand the properties of different woods. For example, some species are prone to greater checking during drying.
- Diameter and Length: Ensure the log dimensions are appropriate for your milling equipment and the desired slab size.
- Health: Avoid logs with signs of insect infestation or advanced decay, as these will compromise the slab’s structural integrity.
- Harvesting Time: Logs cut in winter often have lower sap content, which can aid in the drying process.
Techniques for Rough Milling Live-Edge Slabs
Once selected, the log must be milled into slabs. While commercial sawmills offer efficiency, many woodworkers prefer to undertake this step themselves, using specialized equipment to capture unique grain patterns or specific dimensions.
Chainsaw Milling For those without access to a large band sawmill, chainsaw mills are a popular option for milling logs into slabs. These portable mills attach to a powerful chainsaw, guiding it along a rail system to cut straight, consistent slabs. Stihl Chainsaw Techniques For Woodworkers Milling Slabs Cutting Joinery Blanks And Safe Log Handling offers further insights into this process. Key aspects include:
- Proper Chainsaw Selection: A large, powerful saw with a long bar is essential.
- Specialized Chains: Ripping chains, designed to cut with the grain, produce smoother cuts and reduce power consumption.
- Leveling the First Cut: Establishing a perfectly flat first cut is critical, as all subsequent cuts will reference this plane.
- Consistent Feed Rate: Maintain a steady, even feed rate to prevent bogging down the saw and ensure uniform thickness.
Band Saw Milling For larger operations or those seeking higher precision and less waste, a dedicated band sawmill is ideal. Band sawmills produce smoother cuts than chainsaw mills, requiring less post-milling flattening. They also convert more of the log into usable lumber due to their thinner kerf.
Drying Live-Edge Slabs
After milling, proper drying is perhaps the most critical step to prevent warping, checking, and internal stresses that can ruin a slab. Wood typically needs to dry to an equilibrium moisture content (EMC) suitable for its intended use, usually between 6-12% for indoor furniture.
Air Drying This traditional method involves stacking slabs with stickers (small spacers) between them to allow air circulation. The stack should be covered to protect from rain and direct sunlight but open enough for airflow. Air drying is slow, often taking one year per inch of thickness, but it is gentle on the wood, reducing the risk of internal stress.
Kiln Drying For faster and more controlled drying, kiln drying is employed. Kilns can reduce moisture content uniformly and rapidly, also sterilizing the wood against pests. However, it requires careful monitoring to prevent rapid drying defects. For many fine furniture projects, kiln-dried wood is preferred for its stability.
Advanced Flattening and Surfacing for Fine Furniture
Once slabs or reclaimed pieces are dried, the real work of precision milling begins. Achieving perfectly flat, uniformly thick material is non-negotiable for fine furniture, especially when dealing with the irregular shapes of live-edge wood or the inconsistencies of reclaimed timber.
Techniques for Flattening Live-Edge Slabs
Live-edge slabs often come with significant warp, twist, cup, or bow. Traditional jointers and planers are insufficient for pieces wider than their beds or with non-parallel faces.
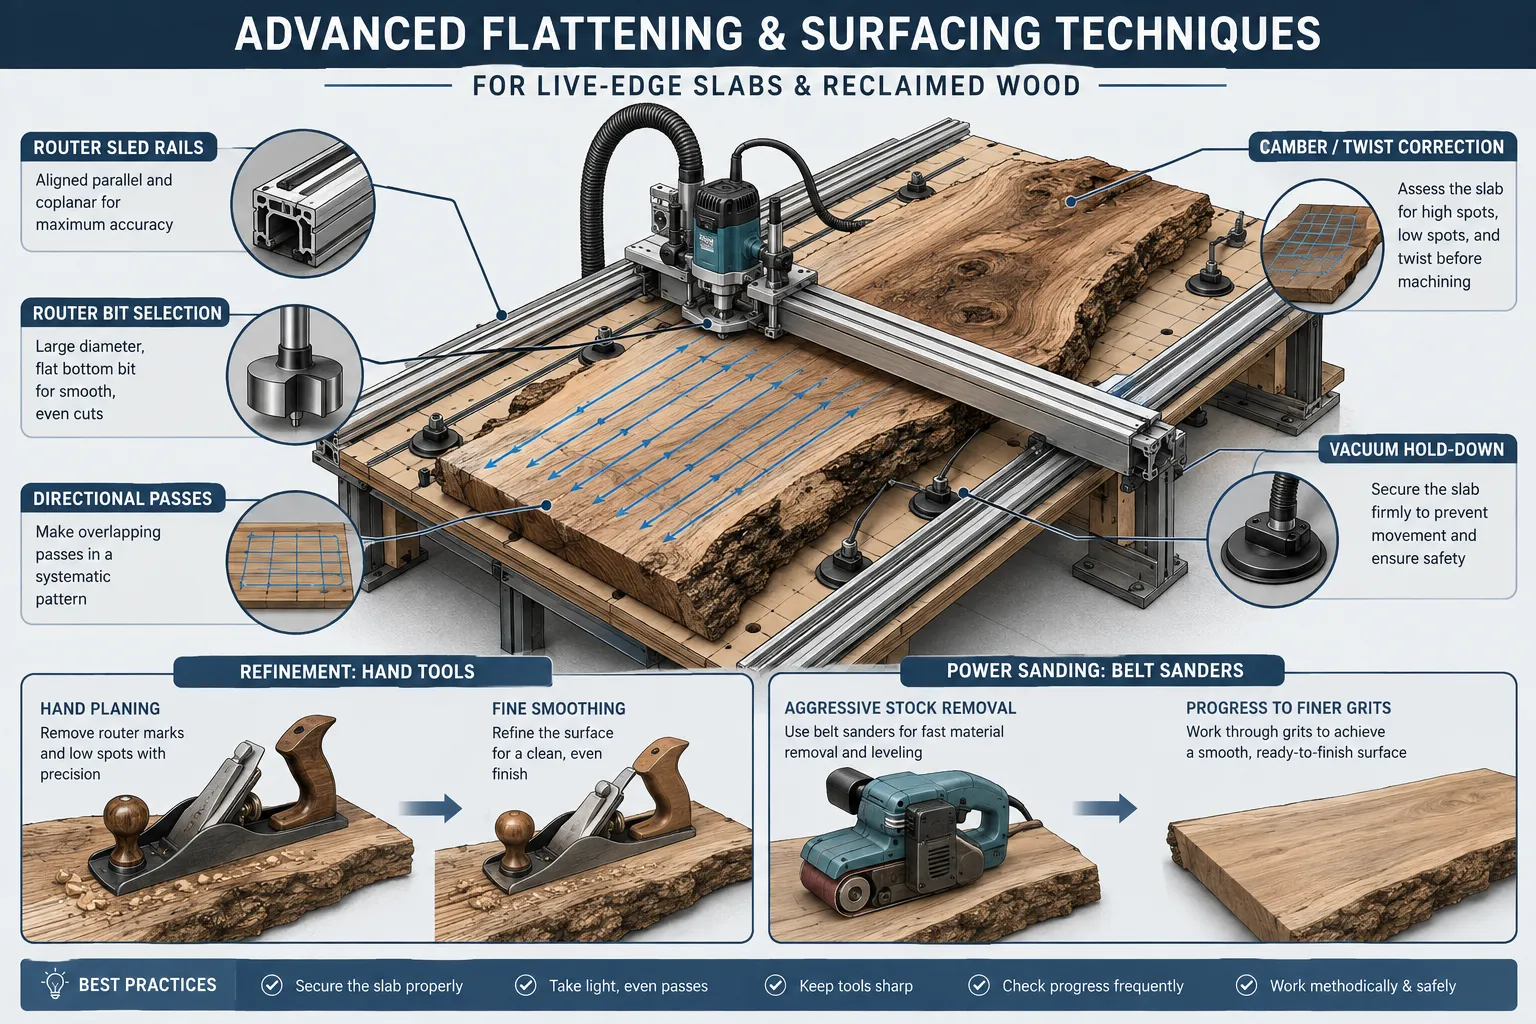
Router Sled Systems A router sled is arguably the most common and effective method for flattening large, irregular slabs. The system involves securing the slab to a stable base, then running a router mounted in a gantry system across the slab’s surface.
Key components and steps:
- Sturdy Base: A rigid workbench or torsion box is essential.
- Level Rails: Construct a track system, typically using aluminum extrusions or straight pieces of MDF, that is perfectly parallel to the base and the desired plane.
- Router Sled: A rigid carriage holds the router, allowing it to move smoothly along the rails.
- Large Router Bit: A large-diameter, flat-bottom surfacing bit (e.g., 2-3 inches) ensures efficient stock removal and a smooth surface.
- Sequential Passes: Make shallow, overlapping passes across the entire surface. Flip the slab to flatten the second face once the first is done.
CNC Flattening For ultimate precision and automation, a large format CNC router can flatten slabs with unparalleled accuracy. Once the slab is secured and mapped, the CNC can execute a precise flattening routine, often achieving tolerances within thousandths of an inch. While an investment, CNC machines offer speed, consistency, and the ability to mill intricate details.
Surfacing and Dimensioning Reclaimed Wood
Reclaimed wood presents its own set of challenges, from embedded nails and screws to uneven surfaces and varying thicknesses. Preparing it for fine furniture requires a systematic approach.
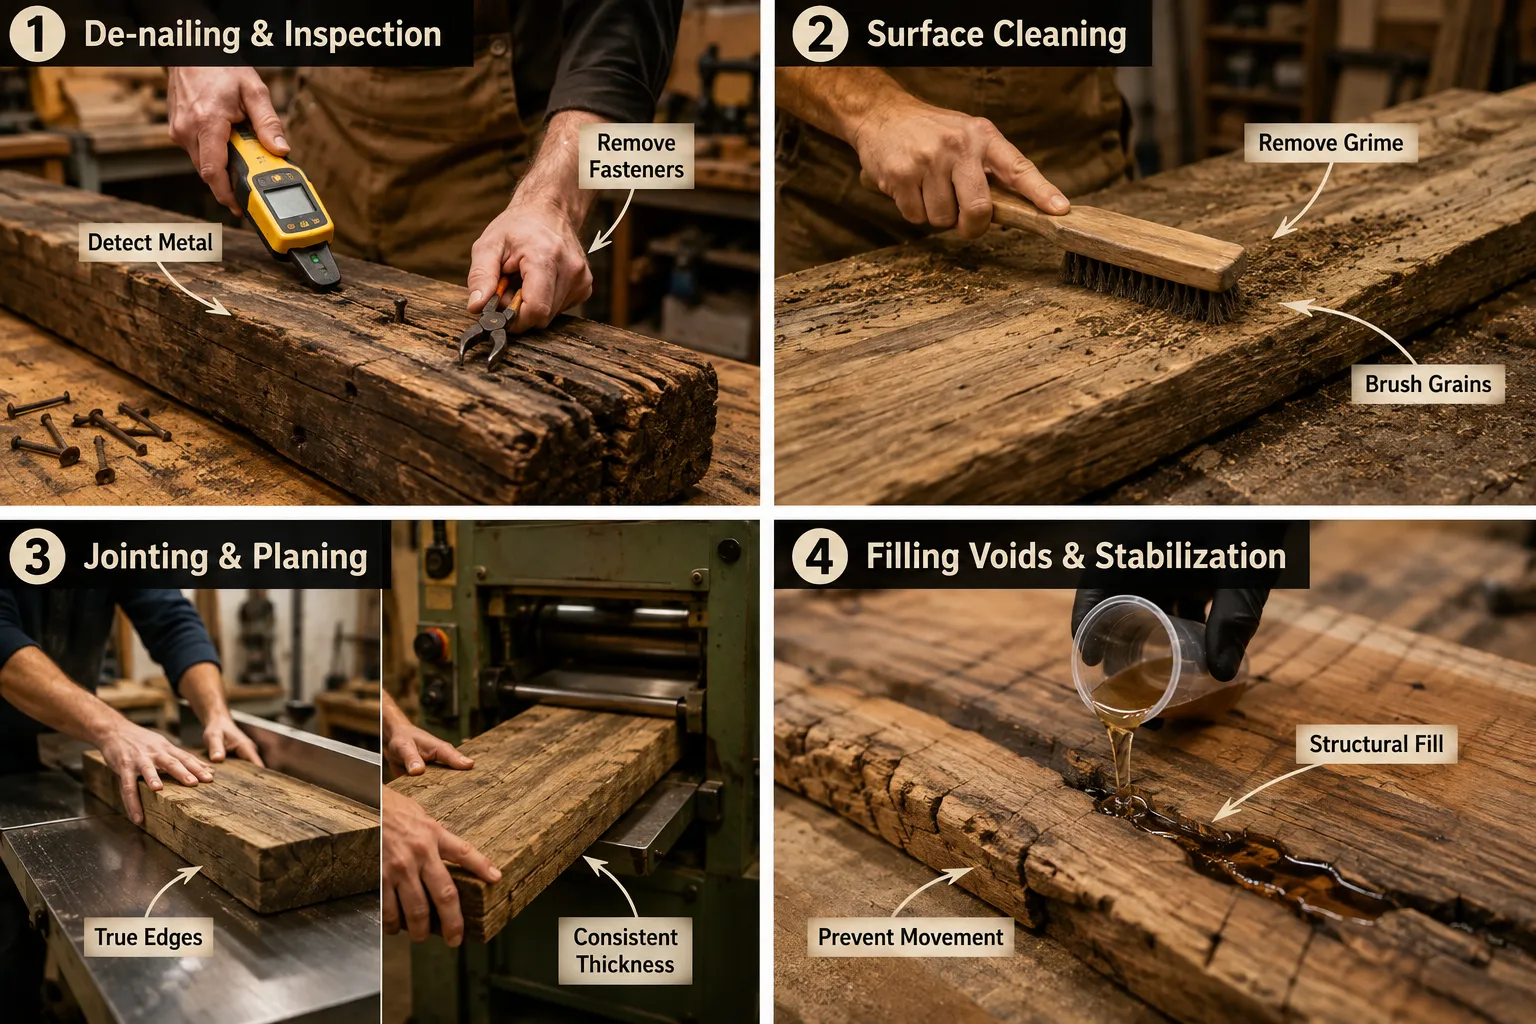
- Thorough Inspection: Before any cutting, meticulously inspect every inch of reclaimed wood for metal. A metal detector is an indispensable tool. Any detected metal must be carefully removed. Failure to do so will destroy planer and jointer knives.
- Initial Cleaning: Wire brushing or even power washing (followed by redrying) can remove loose dirt, grime, and flaking paint, revealing the wood underneath.
- Jointing: The first step to achieving flat, square stock from reclaimed wood is jointing. Given the potential for cupping or twisting, careful technique is required. Start with the “best” face to flatten one side, then joint one edge square to that face.
- Planing: Once one face is flat and one edge is square, the wood can be run through a thickness planer to achieve uniform thickness. Always take shallow passes to avoid tear-out, especially with challenging grain patterns or old, brittle wood.
- Wide-Belt Sanding: For large panels or slabs, a wide-belt sander offers an efficient way to achieve a smooth, consistent surface after initial flattening and planing. This machine uses a wide abrasive belt to remove material evenly, ideal for preparing surfaces for Eco Friendly Bio Resin Finishes And Low Voc Wood Finishing Techniques.
- Edge Trimming: Use a track saw or table saw to trim the live edge to its final desired shape or to square up the ends of reclaimed boards.
Managing Wood Movement and Defects
Both live-edge slabs and reclaimed wood are prone to movement due to changes in humidity. Understanding and mitigating this is vital. Understanding Wood Movement: How to Design and Build Furniture That provides comprehensive guidance.
- Moisture Content: Ensure the wood is dried to the appropriate EMC for your local climate and intended indoor environment.
- Stress Relief Cuts: For very wide slabs, sometimes a kerf cut on the underside can help relieve internal stress and prevent future cupping.
- Stabilization: For significant checks or voids in live-edge slabs, or for stabilizing softer, punky sections of reclaimed wood, epoxy resin can be a game-changer. It fills gaps, reinforces weak areas, and can even incorporate inclusions for aesthetic effect, as discussed in Epoxy Resin Inlay Woodworking: Magnetic Knife Holders, Coasters, and.
- Proper Fastening: When constructing furniture, always allow for wood movement. Use methods like tabletop fasteners that permit seasonal expansion and contraction.
Specialized Tools and Techniques for Advanced Wood Milling
To achieve the highest standards in preparing live-edge slabs and reclaimed wood for fine furniture, specific tools and advanced techniques become indispensable. These go beyond basic woodworking machinery, enabling greater precision, efficiency, and the ability to tackle complex material challenges.
High-Precision Flattening and Jointing Tools
While router sleds are excellent for initial flattening, achieving a truly parallel and square workpiece requires further refinement.
Precision Jointers and Planers For slabs that fit, a wide industrial jointer is ideal for creating one perfectly flat face. Following this, a wide-belt planer or even a specialized large-capacity planer can dimension the slab to an exact, consistent thickness. The key is ensuring your machines are accurately calibrated and maintained.
- Abrasive Planers: These machines use abrasive belts instead of knives, similar to wide-belt sanders but designed for more aggressive stock removal. They are particularly useful for surfacing highly figured or interlocking grain, which might cause tear-out on traditional knife planers.
- Straight-Line Rip Saws: For reclaiming lumber or squaring edges of irregular slabs, a straight-line rip saw provides a perfectly straight edge, often cleaner and more accurate than a table saw without a jointing sled.
Advanced Wood Milling Techniques: Preparing Live-Edge Slabs and Reclaimed Wood for Fine Furniture with Specialized Machinery
Modern woodworking has introduced technologies that further enhance the milling of unique wood forms.
CNC Router Capabilities Beyond simple flattening, CNC routers can perform a variety of advanced milling tasks:
- Precision Shaping: Cut intricate curves, dados, and mortises directly into slabs or reclaimed pieces.
- Pocketing and Inlays: Create perfectly sized pockets for epoxy resin fills or intricate inlays, adding unique design elements.
- Tapering and Sculpting: Execute complex 3D carving or precise tapers on legs and bases for furniture designs that integrate with the organic slab forms.
- Fixture Creation: CNCs can also mill custom jigs and fixtures, improving efficiency and repeatability for specific projects.
Large-Format Wide-Belt Sanders These machines are not just for finishing; they can effectively remove significant material and achieve incredibly flat and smooth surfaces, especially important for large live-edge tabletops.
- Graduated Grits: Start with a coarser grit (e.g., 60-80) for initial stock removal and progress through finer grits (120-180) to prepare the surface for finishing.
- Consistent Pressure: Modern wide-belt sanders have segmented platens that ensure even pressure across the entire width, preventing dishing or uneven sanding.
Managing Unique Challenges of Live-Edge and Reclaimed Wood
These materials inherently come with character that must be carefully managed.
Void and Crack Stabilization Natural voids, checks, and cracks are common in live-edge and reclaimed wood. Instead of discarding them, these can be stabilized and enhanced.
- Epoxy Resin Filling: Low-viscosity epoxy resin is poured into voids and cracks. It permeates the wood, reinforcing weak areas and preventing further propagation of cracks. Tinting the epoxy can create striking visual effects.
- Butterfly Keys/Bowties: These traditional joinery elements are not only decorative but also serve a structural purpose, preventing cracks from spreading. They are typically cut into the slab and inlaid with contrasting wood.
Wormholes and Inclusions Small insect holes or old nail holes in reclaimed wood can be filled with clear epoxy for a smooth surface or left exposed to highlight the material’s history, depending on the desired aesthetic. For deep inclusions, consider Hybrid Joinery Techniques: Blending Traditional Mortise-and-Tenon to integrate them securely into the design.
Achieving Organic Flow in Designs When integrating live-edge slabs into furniture, consider how their natural curves and forms will interact with the overall design. Often, a combination of precise milling for structural components and embracing the organic flow of the slab creates the most impactful pieces, like those explored in Japandi Slatted Bench With Live Edge Seat A Minimalist Furniture Project For Intermediate Woodworkers.
Example: A Workflow for a Live-Edge Dining Table
- Log Selection & Rough Milling: Source a high-quality walnut log, mill into 3-inch thick slabs with a band sawmill.
- Air Drying: Sticker and air dry for 1.5 years until moisture content is around 15%.
- Kiln Finishing: Transfer to a kiln for final drying to 8% EMC over several weeks.
- Router Sled Flattening: Secure a slab on a large router sled and flatten one face using a 2.5-inch surfacing bit.
- Flip & Flatten: Flip the slab and flatten the second face, ensuring parallel surfaces.
- Edge Trimming: Use a track saw to trim the ends square while preserving the live edge.
- Epoxy Stabilization: Fill any significant cracks or voids with clear epoxy resin.
- Wide-Belt Sanding: Finish the flattening and surface preparation on a wide-belt sander, progressively using finer grits.
- Final Sanding: Hand-sand or orbital sand to a fine grit, preparing for Advanced Wood Finishing For Outdoor Poolside Tables Protecting Against Chlorine And Uv Exposure.
This meticulous process ensures the slab is perfectly prepared, providing a stable and beautiful foundation for a heirloom-quality dining table.
Conclusion
Mastering Advanced Wood Milling Techniques: Preparing Live-Edge Slabs and Reclaimed Wood for Fine Furniture is a transformative skill for any serious woodworker. It’s an investment in precision, patience, and the right tools, but the rewards are profound: turning challenging, character-rich materials into stunning, stable components for heirloom-quality pieces. From the careful selection of logs and the deliberate process of drying, to the meticulous flattening with router sleds or CNC machines, and the detailed preparation of reclaimed timber, each step contributes to the ultimate success of a fine furniture project. Embracing these advanced methods allows artisans to unlock the full potential of unique woods, creating furniture that not only stands the test of time but also tells a compelling story of its origin and journey. Continue to refine your techniques, explore new tools, and challenge yourself with diverse wood forms to elevate your craft in 2026 and beyond.
References
- Hoadley, R. B. (2000). Understanding Wood: A Craftsman’s Guide to Wood Technology. Taunton Press.
- Koehler, A. (1933). The Properties and Uses of Wood. McGraw-Hill Book Company.
- Taunton’s Fine Woodworking. (Various Issues). Fine Woodworking Magazine. Taunton Press.
SEO Meta Title: Advanced Wood Milling: Live-Edge Slabs & Reclaimed Wood for Furniture SEO Meta Description: Master advanced wood milling techniques in 2026. Prepare live-edge slabs and reclaimed timber for stunning, stable fine furniture projects with precision.