
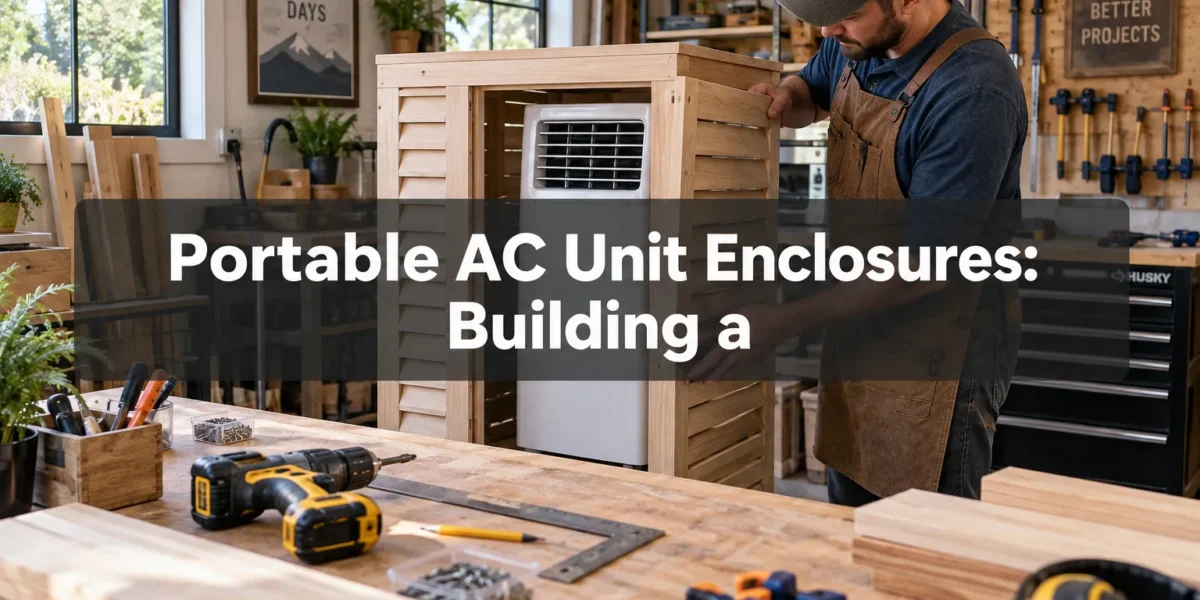
The average workshop temperature in July can climb to a sweltering 90 degrees Fahrenheit or higher, making focused work nearly impossible and risking damage to sensitive tools and materials. While portable AC units offer a quick solution, their noise, dust vulnerability, and sometimes awkward appearance can detract from a productive environment. This article will guide you through the process of building a robust and efficient solution: Portable AC Unit Enclosures: Building a Wooden Cooling Cabinet That Protects Your Workshop Climate Control. This project not only mitigates these common issues but also integrates your climate control system seamlessly into your workspace, enhancing both functionality and aesthetics.
Key Takeaways
- A custom wooden enclosure protects your portable AC unit from workshop dust and physical damage.
- Strategic design elements can significantly reduce operational noise, making your workshop a more pleasant place to work.
- Proper ventilation and airflow management are crucial for the AC unit’s efficiency and longevity within an enclosure.
- Materials like plywood and MDF offer a balance of cost-effectiveness, durability, and ease of workability for this project.
- Integrating features like casters and accessible panels enhances portability and maintenance ease.
Why Build Portable AC Unit Enclosures: Enhancing Workshop Climate Control
Portable AC units are invaluable assets in maintaining a comfortable workshop environment, especially during hot months. However, their inherent design often presents several challenges. They are typically loud, drawing attention away from intricate tasks. Furthermore, the constant churn of woodworking dust can clog internal components, shortening the unit’s lifespan and reducing its efficiency. A wooden cooling cabinet addresses these issues head-on, creating a controlled micro-environment for your AC unit.
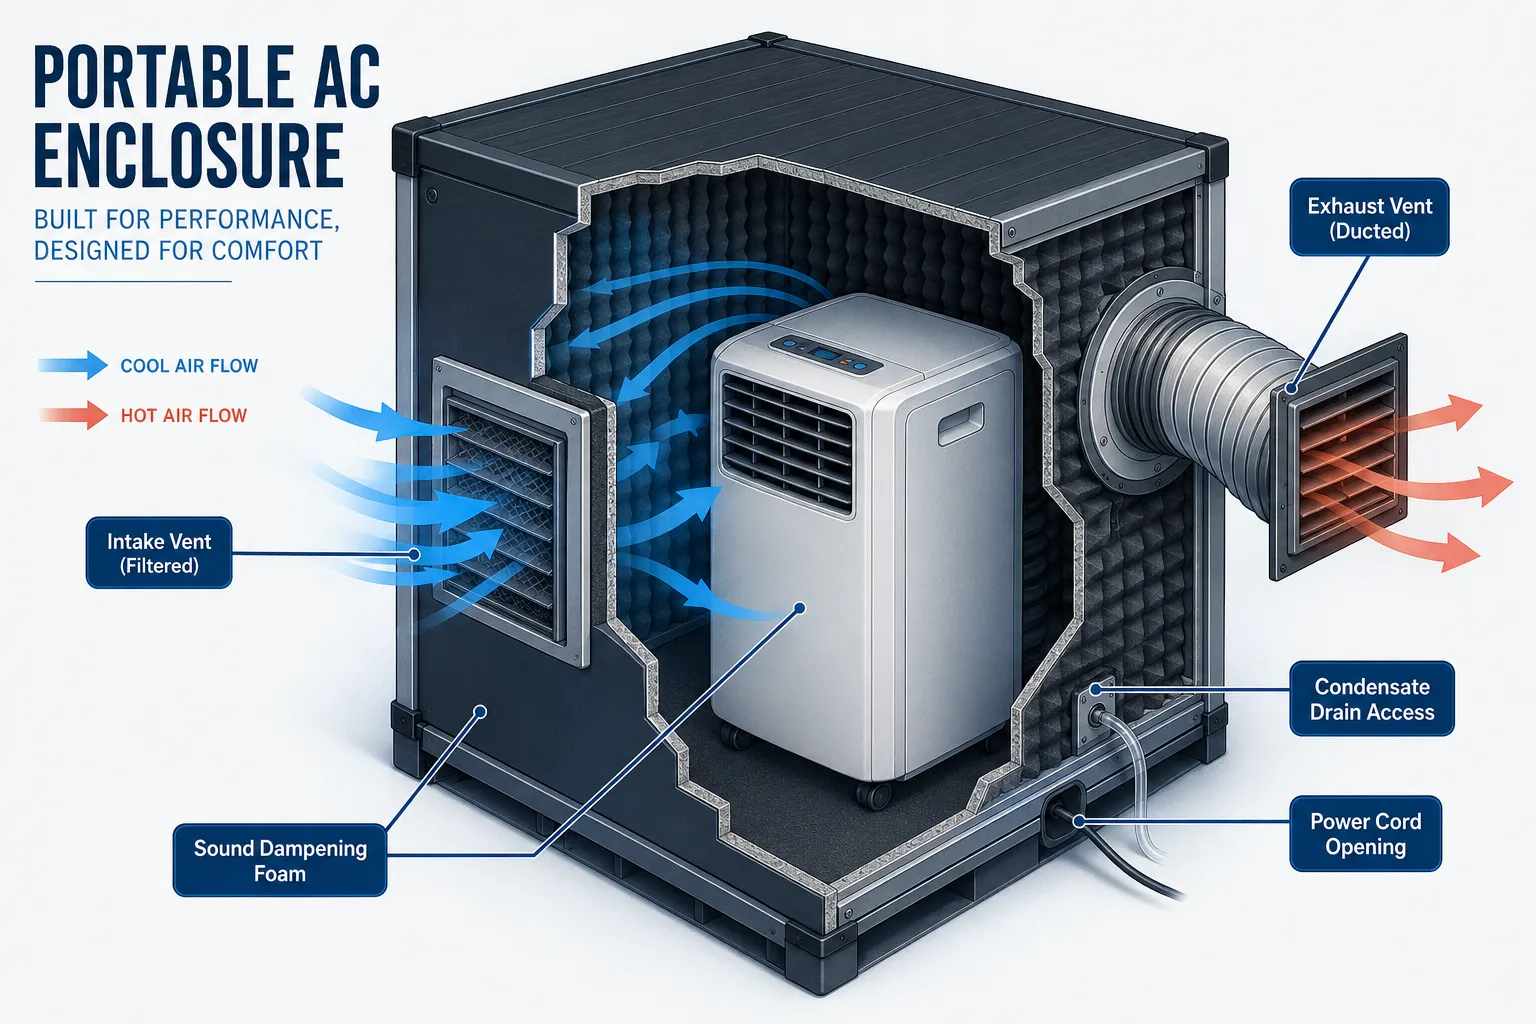
The primary benefits of Portable AC Unit Enclosures: Building a Wooden Cooling Cabinet That Protects Your Workshop Climate Control extend beyond simple comfort. They safeguard your investment, minimize operational disruptions, and can even improve the aesthetic integration of the unit into your shop.
Protection from Workshop Hazards
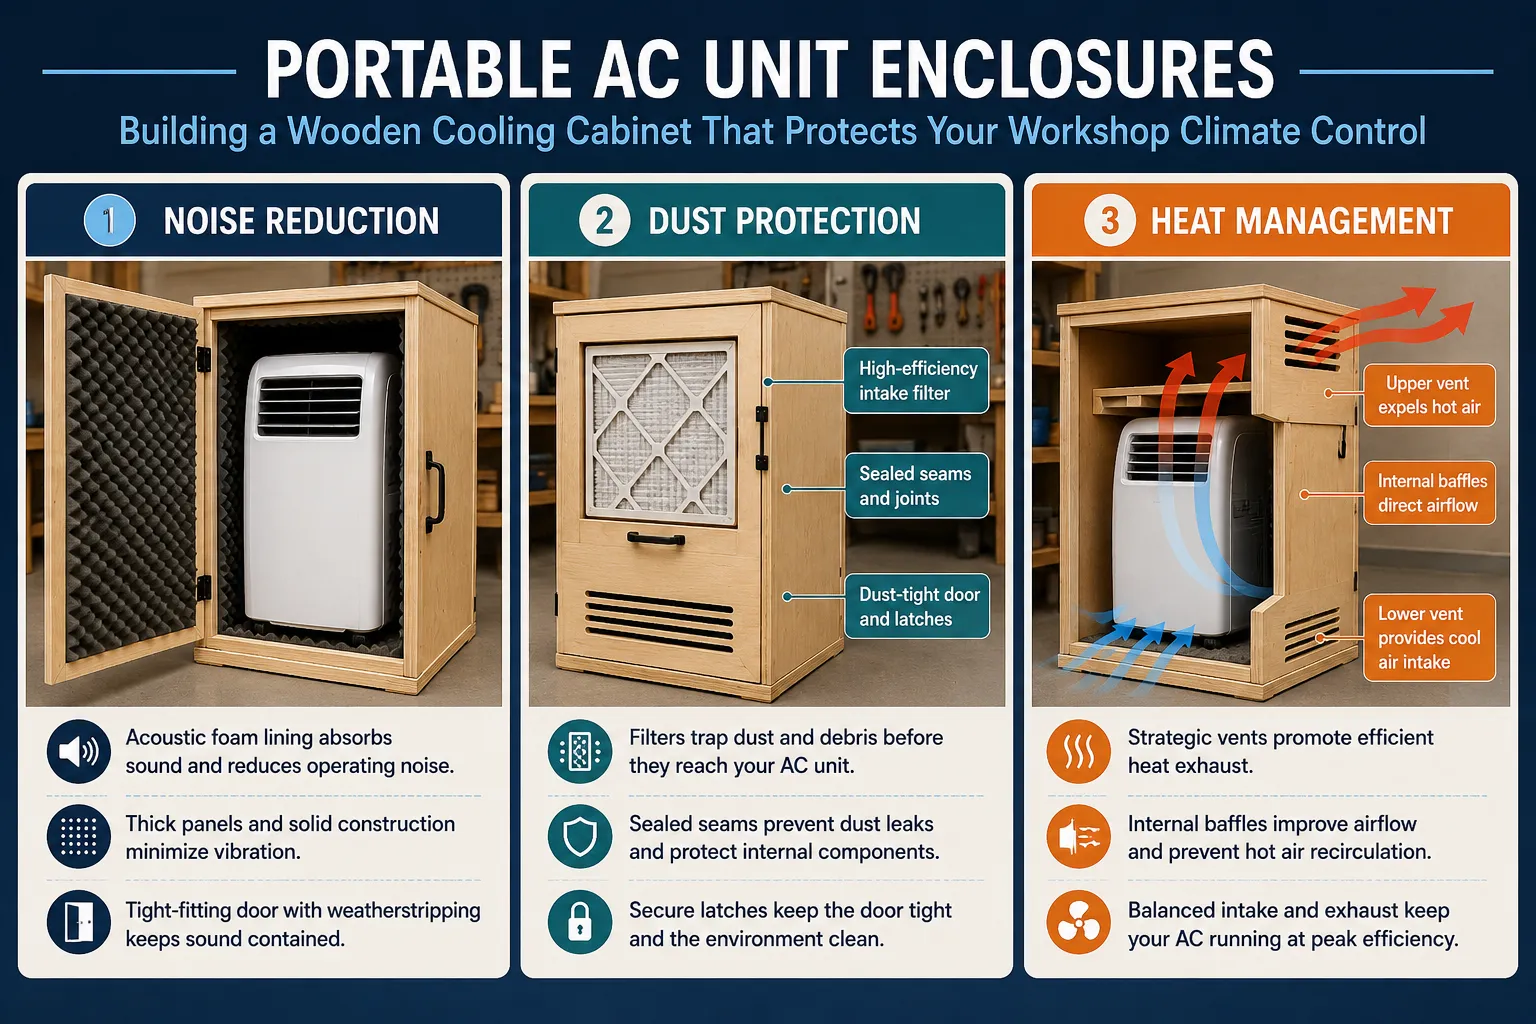
Workshops, particularly those dedicated to woodworking, are inherently dusty environments. Fine sawdust can infiltrate the delicate mechanisms of a portable AC unit, clogging filters, coating coils, and potentially leading to motor burnout. A well-designed wooden enclosure acts as a physical barrier, protecting the unit from airborne particles, accidental bumps, and spills. By incorporating filters at intake vents, you can significantly reduce the amount of dust reaching the AC unit itself. This proactive protection ensures your unit runs cleaner, more efficiently, and for a longer period.
Noise Reduction and Aesthetic Integration
Most portable AC units generate a considerable amount of noise, often reaching levels that interfere with concentration or even safe operation if it masks the sound of machinery. Wood, especially when combined with sound-dampening materials like acoustic foam, is an excellent insulator. A sturdy wooden cabinet can dramatically reduce the decibel level emitted by the AC unit, creating a quieter, more conducive workspace.
Beyond functionality, the visual impact of a portable AC unit can be less than appealing. A custom-built wooden enclosure allows you to integrate the unit seamlessly into your workshop’s design. You can choose finishes and styles that match your existing workshop furniture or create a new focal point. This attention to detail elevates the overall professionalism and comfort of your workspace.
Optimized Airflow and Efficiency
A critical aspect of any enclosure for an AC unit is ensuring proper airflow. Restricting the unit’s ability to draw in and expel air will severely hamper its efficiency and could lead to overheating. The design must account for:
- Intake Air: Sufficient unfiltered air must be available for the unit to cool the workshop.
- Exhaust Air: Hot air generated by the AC must be efficiently vented out of the enclosure and preferably out of the workshop entirely.
- Condensate Management: Portable AC units produce water, which must be collected and drained without affecting the wooden structure.
Careful planning of vent locations, sizes, and internal baffling (if necessary) ensures that the AC unit operates at peak efficiency within its protective shell.
Designing Your Wooden Cooling Cabinet: Key Considerations for Optimal Performance
The success of your portable AC unit enclosure hinges on thoughtful design. This isn’t just about building a box; it’s about creating a functional, protective, and efficient climate control solution. Several critical factors must be considered during the planning phase to ensure your cooling cabinet performs as intended.
Materials and Construction
Choosing the right materials is fundamental for durability, sound dampening, and ease of construction.
- Plywood or MDF: These are excellent choices for the main structure. Plywood offers strength and screw-holding ability, while MDF provides a smooth finish and good sound-dampening properties. Both are stable and relatively inexpensive. For a deeper dive into materials suitable for various woodworking projects, consider resources on wood species selection.
- Sound Dampening: Line the interior with acoustic foam, mass loaded vinyl, or even thick rubber mats. These materials absorb sound waves, significantly reducing noise output.
- Vents and Grilles: Select sturdy, open-design grilles for intake and exhaust. Metal or hard plastic options are best for durability. Consider magnetic or easily removable filters for the intake.
- Hardware: Heavy-duty casters will make the enclosure portable, allowing you to move it around your workshop as needed. Robust hinges and latches are essential for access panels.
Ventilation and Airflow Design
This is arguably the most critical aspect of your portable AC unit enclosure. Incorrect ventilation will cause the unit to overheat and fail prematurely.
- Intake Vents: Position intake vents strategically, typically lower on the cabinet, to draw in cooler ambient air. These should be generously sized to avoid restricting airflow. Incorporate washable or replaceable air filters to keep dust out of the AC unit.
- Exhaust Vents: The AC unit’s hot air exhaust hose must be ducted directly to an external vent on the cabinet, which then directs the hot air out of the workshop. This vent should be high on the cabinet to allow hot air to rise and escape efficiently. Ensure a tight seal around the exhaust hose connection to prevent hot air from re-entering the enclosure.
- Internal Air Circulation: Leave adequate clearance around the AC unit inside the cabinet (at least 2-3 inches on all sides) to allow for proper air circulation around its coils. You may even consider adding a small, quiet computer fan to actively draw cool air into the intake chamber if the AC unit’s own fan struggles with static pressure in a very tight enclosure.
- Condensate Drain: Portable AC units collect water. Some evaporate it, others require manual emptying, and many have a continuous drain option. Plan for easy access to the condensate tray or, ideally, route a drain hose from the unit through the bottom of the enclosure to a collection bucket or floor drain. Ensure the wooden base is sealed or has a catch tray to protect against accidental leaks.
Access and Maintenance Features
An enclosure should not make your AC unit harder to use or maintain.
- Front or Side Access Panel: Design a large, easily removable or hinged panel (or multiple panels) to allow full access to the AC unit for control adjustments, filter cleaning, and maintenance. Magnetic catches or simple latches work well here.
- Power Cord Management: Include a neatly routed opening for the power cord, ensuring it is protected from damage and does not create an air leak.
- Filter Access: If you add external intake filters, make sure they are simple to remove and clean without needing to disassemble the entire cabinet.
- Portability: Adding heavy-duty casters to the base allows you to easily move the cooling cabinet around your workshop, positioning it where cooling is most needed or storing it away when not in use. This makes it a truly versatile piece of shop equipment.
Building Your Portable AC Unit Enclosures: A Step-by-Step Guide
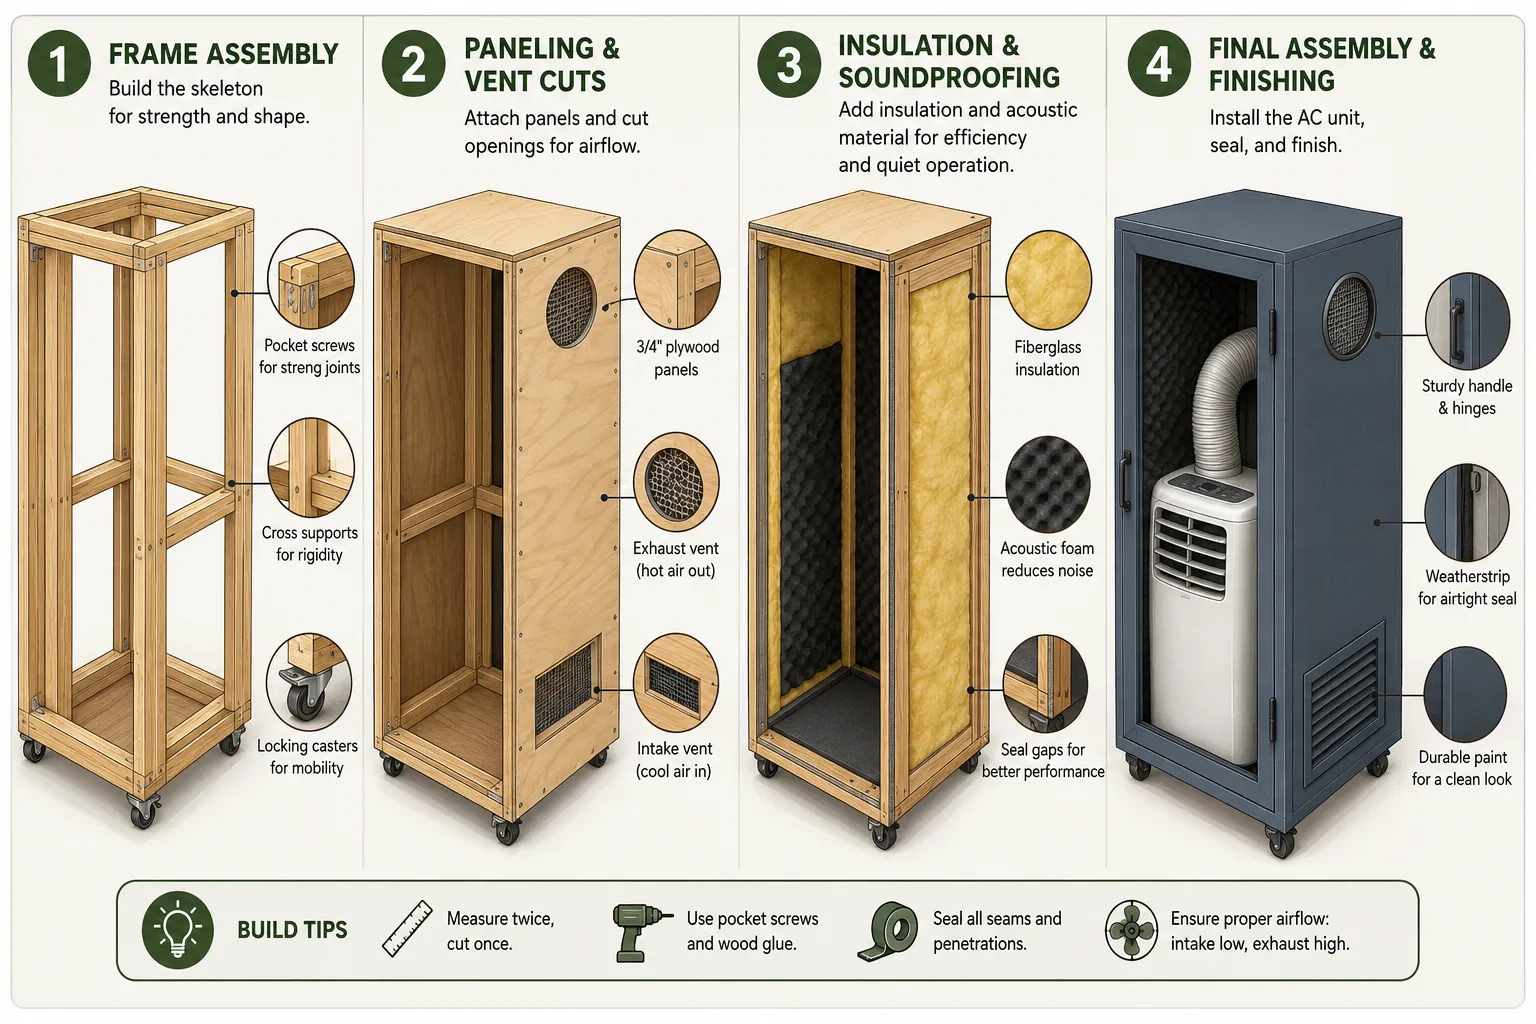
Constructing a wooden cooling cabinet is a rewarding woodworking project that significantly upgrades your workshop’s climate control. This guide outlines the general steps involved, but remember to adapt dimensions and specific features to your portable AC unit’s size and requirements.
Step 1: Measure and Plan
Before cutting any wood, accurately measure your portable AC unit. Note its height, width, depth, and the diameter of its exhaust hose. Crucially, identify the locations of its air intake, exhaust port, and control panel. Add at least 2-3 inches of clearance on all sides and at the top/back to ensure ample airflow within the enclosure. Design your cabinet with these dimensions, factoring in the thickness of your chosen wood and any internal sound-dampening material. Sketch out a plan, indicating vent locations, access panels, and casters.
Step 2: Cut and Assemble the Frame
Begin by cutting your chosen wood (e.g., ¾-inch plywood or MDF) to size for the bottom, top, and side panels. Consider using dado joints or pocket screws for strong connections.
- Cut Base and Top: Cut the base and top panels. The base should be slightly larger than the AC unit’s footprint, plus clearance. The top panel will be the same size as the base.
- Cut Side Panels: Cut four side panels to the required height and width. These will form the main body.
- Assemble the Box: Join the side panels to the base using wood glue and screws. Ensure the assembly is square. You can leave one side open for now to facilitate internal work. For those interested in modular designs, consider how this cabinet could be integrated into a larger system.
Step 3: Integrate Ventilation and Ducting
This step is critical for performance.
- Mark and Cut Vents: Mark the locations for the intake and exhaust vents on the appropriate panels, based on your AC unit’s design. Use a jigsaw or hole saw to cut these openings. Ensure the exhaust opening matches your AC unit’s exhaust hose diameter for a snug fit.
- Install Grilles: Attach decorative and protective grilles over the intake and exhaust openings on the outside of the cabinet.
- Duct Exhaust Hose: Once the AC unit is inside, connect its exhaust hose directly to the exhaust vent opening on your cabinet. Use flexible ducting and clamps to ensure an airtight seal, preventing hot air from recirculating.
Step 4: Add Sound Dampening and Internal Components
Line the interior surfaces of the cabinet with sound-dampening material. Adhere acoustic foam panels, mass-loaded vinyl, or heavy rubber mats to the inside walls, top, and bottom. Cut precise openings in the dampening material for the vents and any internal AC components.
Consider adding an internal shelf or bracing if your AC unit requires specific support or if you plan to incorporate a condensate collection system below it. Ensure any internal structures do not impede airflow.
Step 5: Construct and Install Access Panels
Design one or more access panels that are easy to open for maintenance and control.
- Cut Panel: Cut a piece of plywood or MDF for your access panel, ensuring it fits snugly into the opening you left or created.
- Attach Hinges/Latches: Use robust hinges for a swinging door or magnetic catches for a removable panel. For a professional look, hand tool joinery could be used for the door frame.
- Install Controls Access: If your AC unit’s control panel is not easily accessible through the main access door, consider cutting a small, hinged flap or a clear acrylic window on the panel directly in front of the controls.
Step 6: Finishing Touches and Portability
- Sanding and Finishing: Sand the entire exterior of the cabinet smooth. Apply a finish that complements your workshop, such as paint, stain, or a durable clear coat. Consider a finish that is easy to clean and resistant to dust and moisture.
- Install Casters: Attach heavy-duty swivel casters to the bottom of the cabinet. Use locking casters on at least two wheels to keep the unit stationary when needed. This mobility is a game-changer for workshop ergonomics and flexibility.
- Final Assembly: Place your portable AC unit inside the finished cabinet. Connect the exhaust hose, ensure the power cord is routed safely, and close all access panels. Test the unit for proper operation, checking for good airflow and reduced noise.
With these steps, your workshop will soon benefit from a more comfortable, quieter, and cleaner environment, thanks to your custom-built wooden cooling cabinet.
Conclusion
Building a custom wooden enclosure for your portable AC unit is an investment in your workshop’s comfort, longevity of your tools, and overall productivity. By taking the time to design and construct a cabinet that prioritizes dust protection, noise reduction, and efficient airflow, you transform a utilitarian appliance into a seamlessly integrated and highly functional piece of shop equipment. The process, while requiring careful measurement and woodworking skills, offers significant long-term benefits, protecting your portable AC from the harsh workshop environment and allowing you to maintain optimal climate control year-round. This project exemplifies how practical woodworking solutions can profoundly improve your working conditions.
Actionable Next Steps:
- Measure Your AC Unit: Obtain precise dimensions of your portable AC unit, noting all intake/exhaust ports and control panel locations.
- Sketch a Design: Draw a detailed plan for your enclosure, including vent placement, access points, and the type of wood and sound-dampening materials you’ll use.
- Gather Materials: Purchase ¾-inch plywood or MDF, acoustic foam, ventilation grilles, heavy-duty casters, hinges, and fasteners.
- Begin Construction: Follow the step-by-step guide outlined above to cut, assemble, and finish your cooling cabinet.
- Test and Optimize: Once complete, place your AC unit inside, test its operation, and make any necessary adjustments to optimize airflow and noise reduction.
Meta Title: Portable AC Unit Enclosures: Build a Wooden Cooling Cabinet Meta Description: Learn to build custom wooden portable AC unit enclosures for your workshop. Protect from dust, reduce noise, and optimize climate control with our DIY guide.