


Ceiling treatments are experiencing a magnificent resurgence in home design, moving beyond mere paint to become a focal point of interior architecture. In 2026, homeowners are increasingly seeking cost-effective yet impactful ways to personalize their spaces, and one trend stands out for its blend of rustic charm and modern appeal: DIY Exposed Wood Box Beams: Transform Your Ceiling on a Budget. These lightweight, hollow structures offer the timeless elegance of traditional timber beams without the hefty price tag or structural demands. Imagine transforming a plain, flat ceiling into a cozy, human-scale room by adding architectural depth and character, all while providing a clever solution for hiding unsightly wiring and plumbing. This comprehensive guide will equip you with the knowledge and steps to achieve this stunning upgrade, turning your design aspirations into a tangible reality.
Key Takeaways
- Cost-Effective Transformation: DIY box beams offer a high-impact aesthetic upgrade at a fraction of the cost and weight of solid timber beams.
- Design Versatility: Customize your beams with various wood types, finishes, and configurations to match any interior style, from farmhouse to modern industrial.
- Hidden Benefits: These hollow structures are ideal for concealing electrical wires, plumbing pipes, and other ceiling imperfections, improving both aesthetics and functionality.
- Accessible Project: With basic woodworking tools and readily available materials like plywood or common lumber, this project is achievable for many DIY enthusiasts.
- Increased Home Value: Adding architectural detail like exposed beams can significantly enhance your home’s perceived value and appeal.
Understanding DIY Exposed Wood Box Beams: Transform Your Ceiling on a Budget
When considering a ceiling renovation, the idea of exposed wood beams often conjures images of heavy, structural timber and significant construction costs. However, DIY Exposed Wood Box Beams: Transform Your Ceiling on a Budget offers an elegant workaround. Instead of solid lumber, these beams are fabricated from lighter materials, typically plywood or common dimensional lumber, assembled into a hollow, three-sided box shape. This design mimics the appearance of a weighty, load-bearing beam but without the associated structural challenges or expense.

The Allure of Faux Beams
The aesthetic appeal of wood beams is undeniable. They bring warmth, texture, and a sense of history to a space, effectively breaking up large, monotonous ceilings and adding visual interest. This architectural detail can make a high ceiling feel cozier and more intimate, or give a standard-height room a sophisticated, custom look. The beauty of the DIY box beam approach lies in its versatility. Homeowners can choose from a wide array of wood species, stains, and finishes to perfectly match their existing decor, whether aiming for a rustic farmhouse, a sleek modern, or a transitional style.
Beyond aesthetics, faux beams offer practical advantages. Their hollow nature makes them perfect conduits for concealing electrical wires, recessed lighting, speaker cables, or even small plumbing lines. This allows for a cleaner, more streamlined ceiling, eliminating visual clutter and improving the overall functionality of the room. Furthermore, for those living in older homes with less-than-perfect ceilings, box beams can artfully distract from or even cover up minor imperfections, cracks, or uneven surfaces.
Choosing Your Materials: Wood Types and Finishes
The success of your DIY Exposed Wood Box Beams: Transform Your Ceiling on a Budget project hinges on selecting the right materials and finishes.
Wood Options:
- Plywood: Often the most budget-friendly and easiest to work with. Sanded pine plywood or birch plywood provides a smooth surface that takes stain beautifully. The edges can be hidden or chamfered for a more finished look. For those seeking the rustic appeal of shiplap, consider using thinner plywood cut into planks for a textured finish on the beam’s exterior.
- Common Dimensional Lumber (Pine, Fir): Readily available at any lumberyard. Using 1x stock (e.g., 1x6s, 1x8s) allows for simpler box construction. This option often provides more natural wood grain and can be distressed more easily for an aged look.
- Reclaimed Wood: For a truly unique and eco-friendly approach, reclaimed wood offers unparalleled character and history. However, it can be more challenging to work with due to variations in size and potential imperfections. Always ensure reclaimed wood is free of pests and properly cleaned.
- Medium Density Fiberboard (MDF): While not wood, MDF is an option for painted beams, offering a perfectly smooth surface. It’s heavier than plywood and doesn’t hold screws as well, so planning for proper attachment is critical.
Finishing Techniques:
The finish you choose will dramatically impact the final appearance of your beams.
- Staining: This is the most popular choice as it allows the natural wood grain to show through while adding color and depth. Experiment with different stain colors on scrap pieces to find the perfect match for your room. From light oaks to rich walnuts or dark mahoganies, the possibilities are vast. For tips on enhancing specific wood types, consider exploring mahogany wood finishing techniques or antique wood finishing techniques.
- Painting: A painted finish offers a clean, modern look. White or off-white beams can brighten a space, while darker colors can add dramatic contrast.
- Distressing: To achieve a rustic or vintage feel, distressing techniques like sanding edges, creating faux wormholes, or applying a wire brush can add character. After distressing, a Danish Oil vs Linseed: The Ultimate Wood Finishing Guide can help protect the wood while highlighting its texture.
- Sealing/Topcoat: Regardless of staining or painting, applying a sealant (like polyurethane or lacquer) is crucial for durability and easy cleaning. Water-based polyurethanes are often preferred for their low odor and faster drying times. For optimal results, especially in varying conditions, consult guides like applying polyurethane in high humidity: tips & techniques.
💡 Pro Tip: Always purchase a few extra feet of wood than your measurements indicate. This accounts for miscuts, knotty sections, or unexpected damage, ensuring your project stays on track.
Choosing the right materials and finish is the first step towards realizing your vision for DIY Exposed Wood Box Beams: Transform Your Ceiling on a Budget. Careful planning in this stage will ensure a beautiful and long-lasting result.
Step-by-Step Guide to Constructing and Installing Your Box Beams
Creating and installing your DIY Exposed Wood Box Beams: Transform Your Ceiling on a Budget involves careful planning, precise cuts, and secure attachment. This section breaks down the process into manageable steps, ensuring a successful transformation.
1. Planning and Measurement 📐
Accurate planning is crucial.
- Measure Your Ceiling: Determine the exact length, width, and number of beams you need. Consider the room’s dimensions and architectural features.
- Beam Dimensions: Decide on the desired height and width of your finished beams. A common ratio is that the beam’s depth (height) should be at least 1/10th to 1/12th of the room’s ceiling height for a balanced look. The width is typically half to two-thirds of the depth.
- Locate Joists: Use a stud finder to mark the ceiling joists. These are essential for securely attaching your beams. If beams will run perpendicular to joists, you’ll have ample attachment points. If parallel, you’ll need to locate specific joists and potentially add blocking between them for adequate support.
- Sketch It Out: Draw a simple diagram of your ceiling with beam placement. This helps visualize the final look and identify any potential conflicts (e.g., light fixtures, vents).
2. Cutting Your Wood Pieces 📏
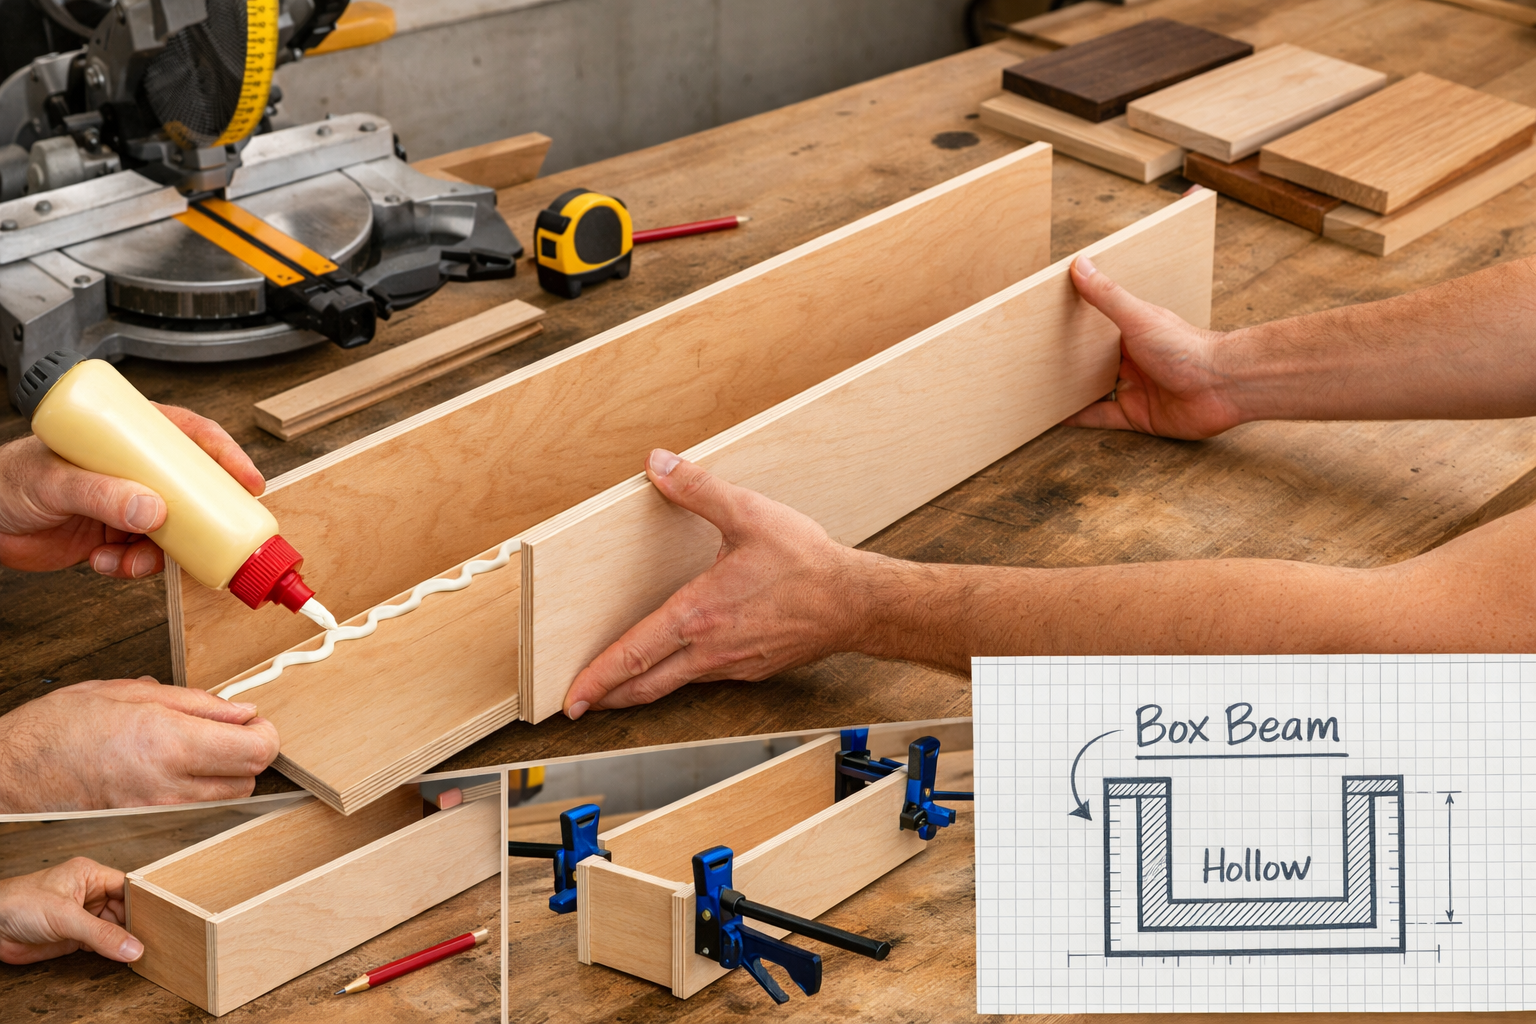
For each box beam, you will need three pieces of wood: two side pieces and one bottom piece. The top will be open to allow for attachment to the ceiling.
- Rip Cuts for Plywood: If using plywood, you’ll need a table saw or a circular saw with a straight edge guide to rip the plywood sheets into the desired widths for your side and bottom pieces. For instance, if you want an 8-inch deep beam with a 6-inch wide bottom, you’d rip two pieces 8 inches wide and one piece 6 inches wide.
- Cross Cuts for Length: Cut all pieces to the precise length determined during your planning phase using a miter saw or circular saw.
- Beveling Edges (Optional): For a more seamless appearance where the side and bottom pieces meet, consider cutting a 45-degree bevel along the edges that will join. This creates a mitered corner that looks more like a solid piece of wood. Alternatively, a simple butt joint is also effective and easier for beginners.
🛠️ Tool Tip: A miter saw height set correctly ensures accurate and safe cuts, especially for longer pieces. For larger projects, a Grizzly G1019 Bandsaw: Unbiased Review & Optimal Usage might be helpful for custom cuts.
3. Assembling the Box Beams 🔨
Assemble each beam on a flat, clean surface.
- Create the U-Shape: Lay one side piece flat. Apply a generous bead of strong wood glue along the edge where the bottom piece will attach.
- Attach Bottom Piece: Carefully place the bottom piece onto the glued edge of the first side piece, aligning the ends.
- Attach Second Side Piece: Apply glue to the remaining edge of the bottom piece and the corresponding edge of the second side piece. Attach the second side piece.
- Secure with Fasteners: Use screws or nails to secure the pieces together. Pre-drilling pilot holes is recommended, especially for thinner plywood, to prevent splitting. Spacing fasteners every 6-8 inches provides strong adhesion.
- Clamping: Use clamps to hold the glued pieces tightly together while the glue dries. This ensures a strong bond. Wipe away any excess glue immediately with a damp cloth.
- Repeat: Construct all your beams following these steps.
4. Finishing the Beams 🎨
This step is best done before installation, as it’s easier to work on flat surfaces.
- Sanding: Thoroughly sand each beam, starting with a coarser grit (e.g., 80-100) to remove imperfections, then progressing to finer grits (e.g., 150-220) for a smooth finish. This is crucial for uniform stain absorption or a smooth paint finish.
- Cleaning: Remove all dust from sanding with a tack cloth or vacuum.
- Apply Stain or Paint: Apply your chosen stain or paint according to the manufacturer’s instructions. If staining, remember to test on scrap wood first. Apply multiple thin coats for best results.
- Topcoat/Sealant: Once the stain or paint is dry, apply a protective topcoat like polyurethane. Again, multiple thin coats are better than one thick coat. Lightly sand between coats with a very fine grit sandpaper (e.g., 320-400) for an ultra-smooth finish.
5. Installing Mounting Boards 🔩
Before installing the finished box beams, you need to attach mounting boards (sometimes called ledger boards or cleats) to the ceiling. These boards will serve as the attachment points for your hollow beams.

- Material: Use 1×4 or 2×4 lumber, depending on the size and weight of your beams, cut to the same length as your beams.
- Location: Center the mounting board precisely where each box beam will sit.
- Attachment: Screw the mounting boards directly into the ceiling joists you located earlier. Use long, strong construction screws (e.g., 3-inch screws). Ensure these boards are perfectly straight and level, as they dictate the straightness of your finished beams. For added security, a strong adhesive for mirrors on wood: types, tips & step-by-step guide could be used in conjunction with screws, though standard construction adhesive is more typical here.
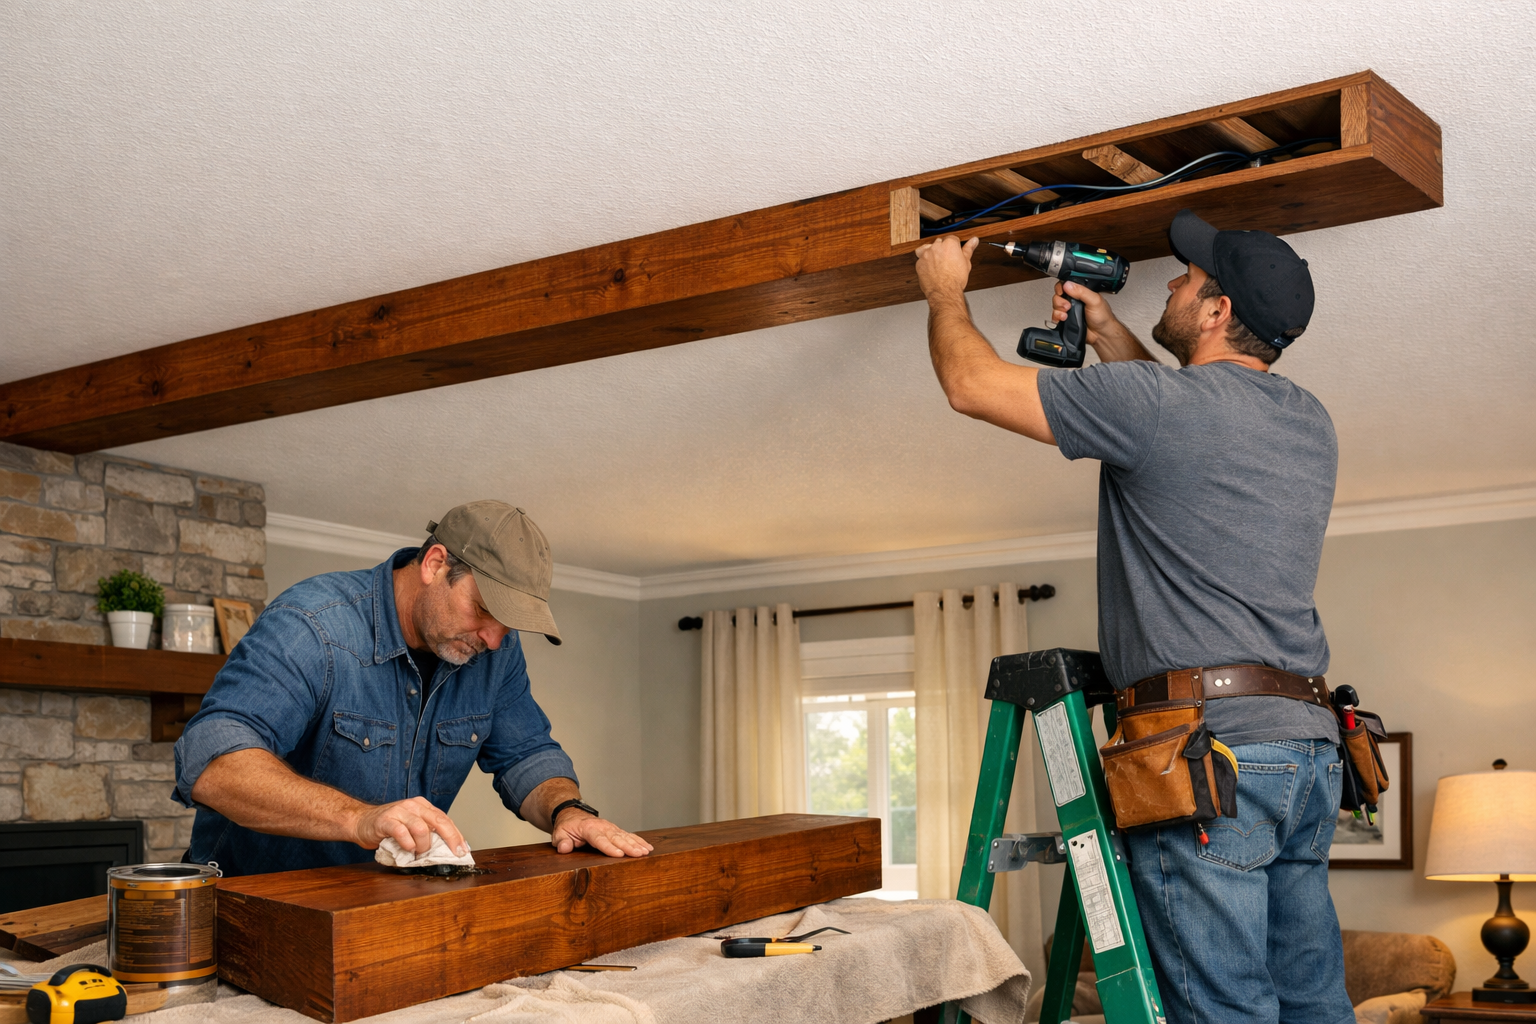
6. Installing the Box Beams to the Ceiling ✨
This step often requires two people due to the length and awkwardness of the beams.
- Lift and Align: Carefully lift a finished box beam and align its open top with the mounting board on the ceiling.
- Secure to Mounting Board: Using screws, attach the box beam to the mounting board. Drive screws up through the side edges of the beam into the mounting board. Countersink the screw heads for a flush finish that can be filled later.
- Check for Level: Continuously check that the beam is level and straight as you attach it. Shims can be used if needed to correct minor ceiling imperfections.
- Concealing Wires (if applicable): If you are running wiring through the beams, do so before fully securing the final side. Ensure all wiring meets local electrical codes.
- Finish Fasteners: Fill any visible screw holes with wood putty that matches your finish, then lightly sand and touch up with stain or paint.
By following these detailed steps, you can successfully implement DIY Exposed Wood Box Beams: Transform Your Ceiling on a Budget, creating a stunning focal point that enhances your home’s aesthetic and value.
Elevating Your Space: Design Tips and Finishing Touches
Once your DIY Exposed Wood Box Beams: Transform Your Ceiling on a Budget are installed, the real fun of interior design begins. These architectural elements offer a fantastic foundation for further personalization and can significantly elevate the overall feel of your room.
Designing with Your New Beams 🏡
- Beam Placement and Spacing: The layout of your beams can dramatically alter the perception of a room.
- Parallel to Long Wall: This can make a room feel longer.
- Perpendicular to Long Wall: This can make a room feel wider.
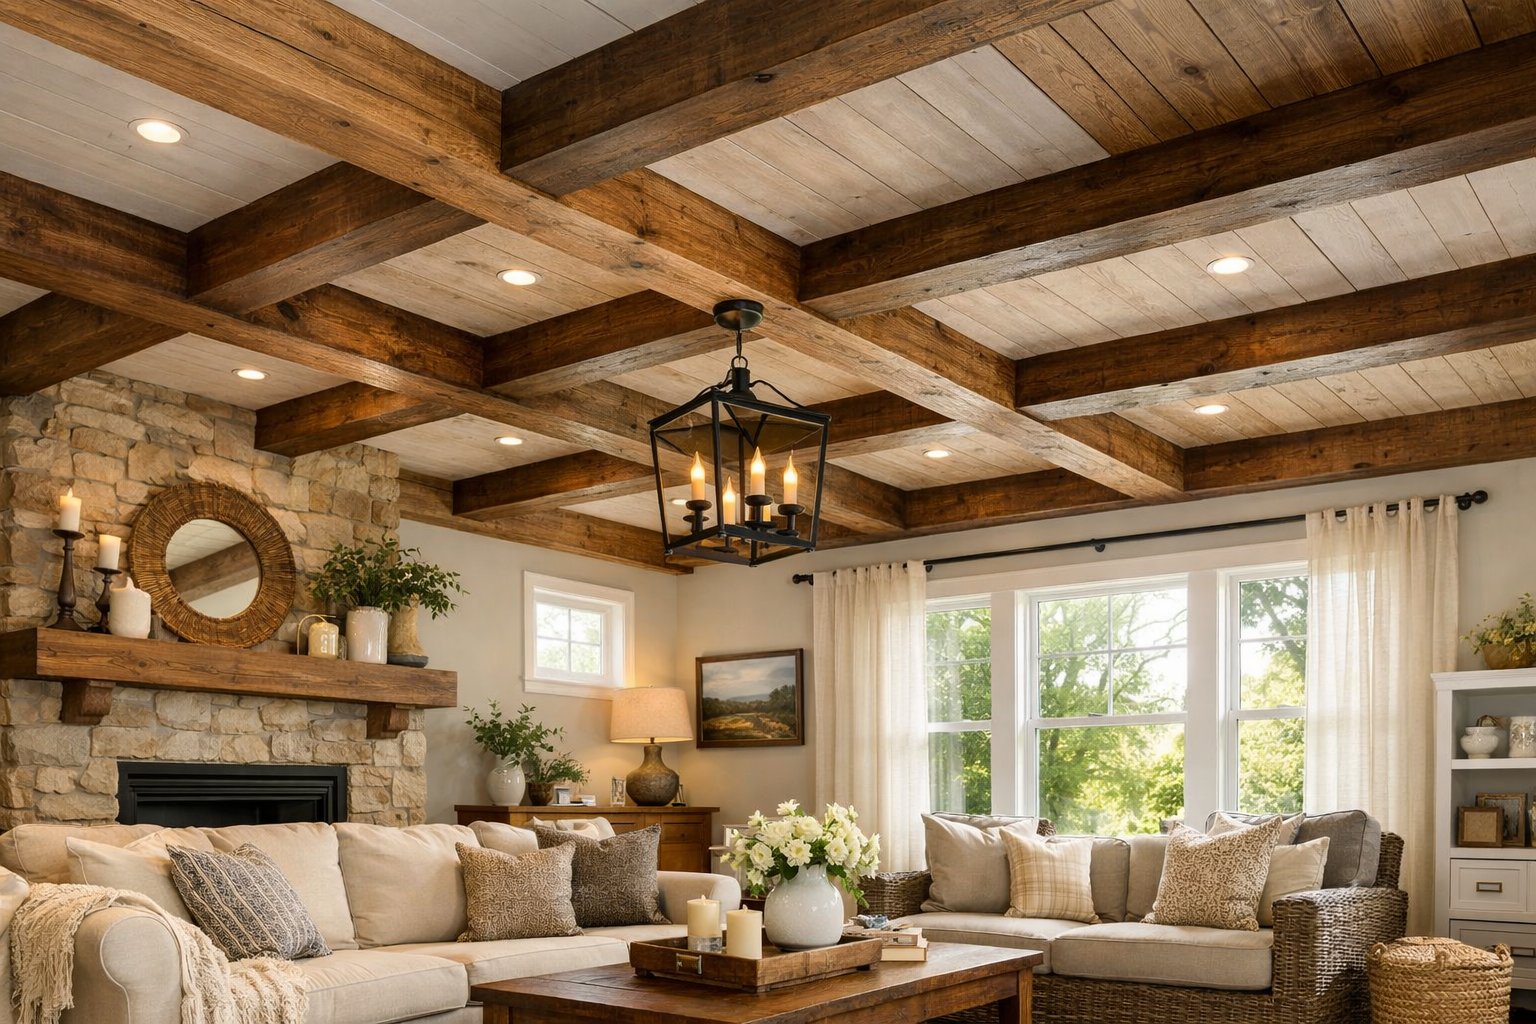
- Grid Pattern: For larger rooms or an impactful statement, a grid pattern adds a classic, coffered ceiling look. Ensure the grid is symmetrical and balanced.
- Single Beam: A single beam can define a zone within an open-concept space or draw attention to a specific architectural feature like a fireplace.
- Ceiling Color Contrast: The color of your ceiling itself plays a huge role.
- Light Ceiling, Dark Beams: Creates a striking, high-contrast look that emphasizes the beams and adds drama.
- Dark Ceiling, Light Beams: A less common but equally dramatic choice, making the ceiling feel cozier and more intimate, especially in rooms with ample natural light.
- Monochromatic: If your beams are stained a light wood tone, a slightly darker (or lighter) shade of the same color on the ceiling can create subtle depth without harsh lines.
- Integrate Lighting: This is where the hollow nature of box beams truly shines.
- Recessed Lighting: Install small LED recessed lights directly into the bottom of the beams for focused task lighting or ambient glow.
- Uplighting: LED strips can be installed on top of the beams, casting a soft, indirect light upwards onto the ceiling, creating a sophisticated and ethereal ambiance.
- Pendant Lights/Chandeliers: Beams provide excellent structural support (via the mounting board) for hanging decorative fixtures, allowing you to position them precisely where needed without worrying about ceiling joist locations. Consider the weight and size of the fixture to ensure proper support.
Adding Character and Cohesion ✨
- Distressing for Rustic Charm: If your home leans towards farmhouse or rustic aesthetics, apply distressing techniques before the final topcoat. Use chains, hammers, or chisels to create dents and marks. A wire brush can enhance wood grain. After distressing, a thin coat of a darker stain wiped back can highlight the aged look.
- Hardware and Accents: While faux beams don’t require structural hardware, decorative metal straps, brackets, or bolts can be added for an authentic, industrial, or rustic touch. Ensure these are purely decorative and securely attached to the beam’s surface. For advice on woodworking brackets, explore “Unlock the Secrets of Brackets Woodworking: A Comprehensive Guide” – https://woodcraftwiz.com/unlock-the-secrets-of-brackets-woodworking-a-comprehensive-guide/.
- Extend the Theme: Carry the wood theme elsewhere in the room. This could be through:
- Furniture: Wood furniture pieces that complement the beam finish.
- Wall Accents: A reclaimed wood accent wall or decorative wooden shelves.
- Flooring: Coordinating wood flooring helps tie the room together beautifully.
- Decor: Incorporate other natural elements like woven baskets, linen fabrics, or ceramic pieces to enhance the warm, inviting atmosphere created by the wood beams.
- Maintenance and Care: Once installed, your DIY box beams will require minimal maintenance.
- Dusting: Regular dusting with a soft cloth will keep them looking fresh.
- Cleaning: For deeper cleaning, use a mild wood cleaner (if stained/sealed) or a damp cloth (if painted). Avoid harsh chemicals that could damage the finish.
- Inspections: Periodically check the beams for any signs of loosening or damage, especially if they are in high-humidity areas or experience significant temperature fluctuations.
Embracing DIY Exposed Wood Box Beams: Transform Your Ceiling on a Budget is more than just a home improvement project; it’s an opportunity to infuse your personal style and warmth into your living space. With thoughtful design choices and careful attention to detail, these beams will become a cherished feature of your home for years to come.
Conclusion
The journey of transforming a plain ceiling into an architectural masterpiece with DIY Exposed Wood Box Beams: Transform Your Ceiling on a Budget is incredibly rewarding. As we’ve explored, this project offers an unparalleled combination of aesthetic appeal, practical benefits, and cost-effectiveness, making it an ideal choice for homeowners looking to make a significant impact without breaking the bank. In 2026, where unique character and personalized spaces are highly valued, these faux beams stand out as a smart, accessible upgrade.
From selecting the perfect wood and finish to meticulously planning, constructing, and installing each beam, the process is designed to be achievable for those with basic woodworking skills. The ability to conceal wiring, add ambient lighting, and define spaces further cements their status as a functional as well as beautiful addition. The warm, inviting ambiance they create, along with the added visual depth, can truly turn a house into a home, imbuing it with a sense of history and handcrafted elegance.
Embrace the satisfaction of a DIY project that elevates your living environment. The architectural character and timeless charm brought by your new wood box beams will not only enhance your daily enjoyment but also contribute significantly to your home’s appeal and value.
Actionable Next Steps:
- Assess Your Space: Stand in the room you wish to transform. Consider the existing ceiling height, natural light, and overall decor style.
- Sketch and Measure: Create a preliminary sketch of beam placement and take accurate measurements of your ceiling. Decide on the ideal dimensions for your beams.
- Research Materials & Finishes: Visit your local lumberyard or home improvement store. Look at different wood types (plywood, dimensional lumber) and experiment with stain samples on scrap wood to find your perfect match.
- Gather Tools: Ensure you have the necessary tools, including a miter saw, circular saw, drill, stud finder, clamps, and safety gear.
- Start Small: If you’re new to woodworking, consider building a single, shorter beam first to refine your technique before tackling the entire project.
By taking these steps, you’ll be well on your way to achieving a stunning ceiling transformation with your very own DIY exposed wood box beams.
References
- Fine Homebuilding. (2018). Faux Beams that Fool the Eye.
- This Old House. (2020). How to Install a Faux Beam Ceiling.
- Wood Magazine. (2021). Adding Character with Wood Beams.
