
The relentless pursuit of perfection in woodworking often culminates not in the joinery or the carving, but in the finish. A piece of furniture, no matter how expertly crafted, can be diminished by a mediocre finish, while an exceptional one elevates it to art. This article delves into Advanced Wood Finishing: Achieving a Flawless, Commercial-Grade Sheen on Tables and Cabinets, moving beyond basic stains and sealers to master techniques that result in durable, high-gloss, and deeply lustrous surfaces typically seen in high-end manufactured furniture. By understanding the science and artistry behind meticulous surface preparation, sophisticated application methods, and specialized finishing products, woodworkers in 2026 can transform their projects into truly professional-grade masterpieces.
Key Takeaways
- Achieving a commercial-grade sheen starts with meticulous surface preparation, including precise sanding and grain management.
- Specialized finishes like catalyzed lacquers, conversion varnishes, and two-part polyurethanes offer superior hardness, durability, and depth.
- Spray application (HVLP, air-assisted airless) is crucial for uniform, streak-free results, requiring specific equipment and technique.
- Intermediate sanding and polishing between coats are vital steps to eliminate imperfections and build a truly flawless surface.
- Understanding film build, cure times, and environmental controls are critical for professional-level results and longevity.
Surface Preparation: The Foundation of Flawless Finishing
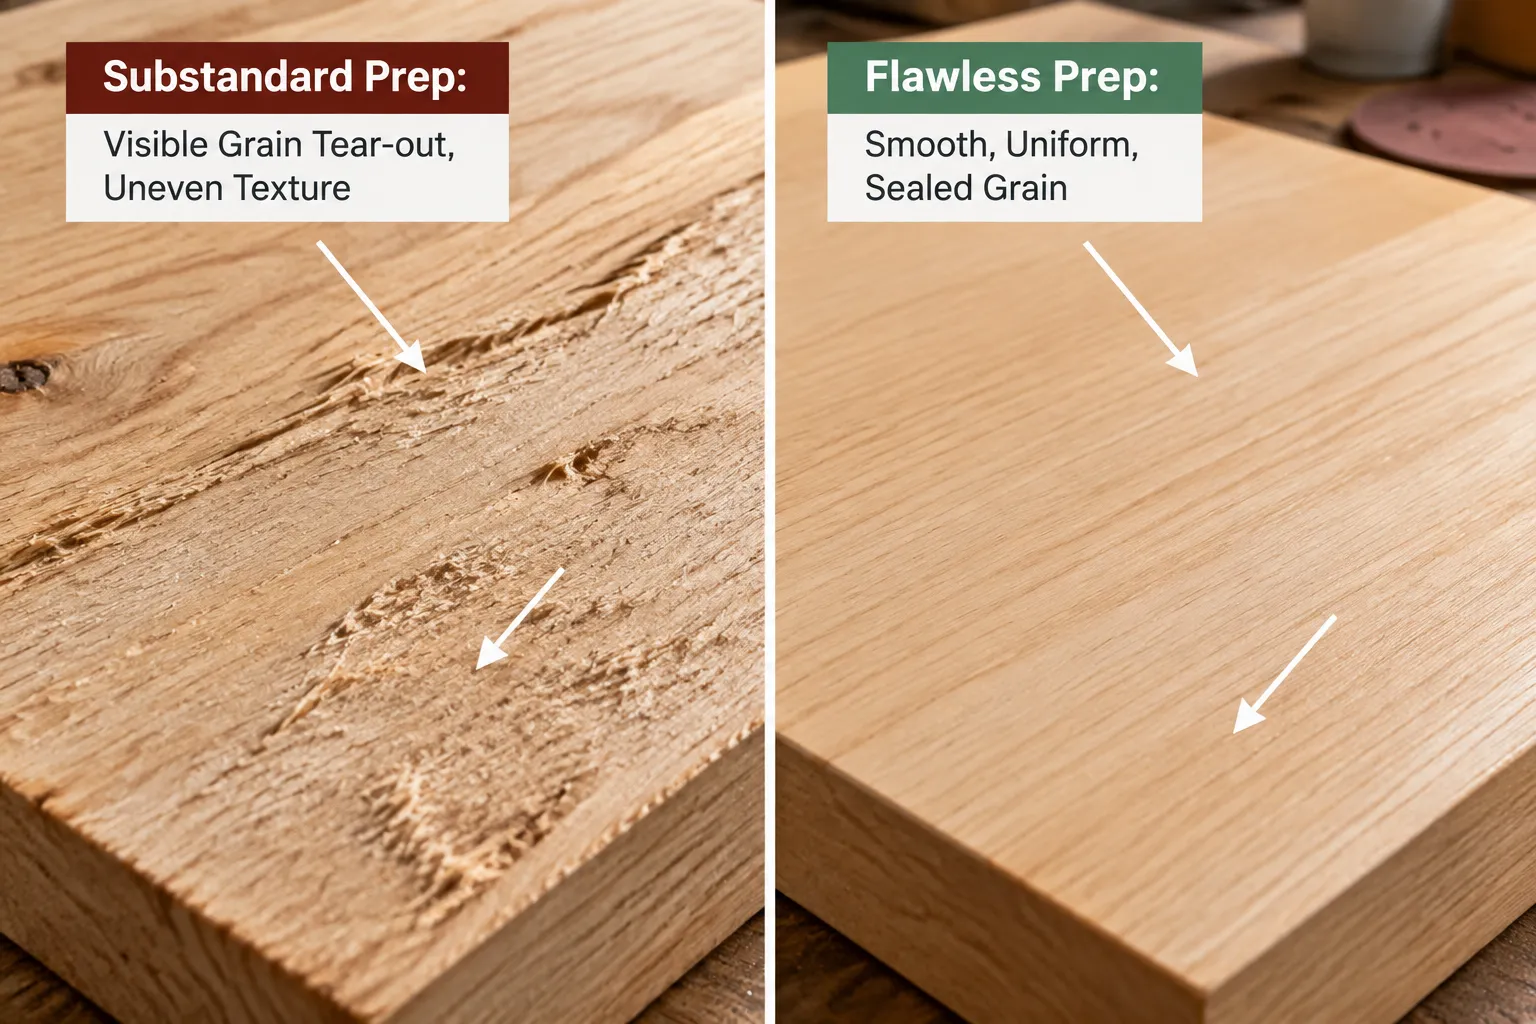
The journey toward a flawless, commercial-grade sheen begins long before the first drop of finish is applied. Superior surface preparation is not merely sanding; it is a meticulous, multi-stage process designed to eliminate every imperfection, ensure uniform porosity, and create the ideal substrate for adhesion and finish clarity. Neglecting this phase guarantees a less-than-perfect result, regardless of the quality of the finish itself.
The Art of Sanding: Beyond the Basics
Basic sanding aims to smooth the wood. Advanced sanding aims to eliminate all visible scratches, prevent blotching, and prepare the grain to accept the finish evenly. This involves a systematic progression through grits, meticulous dust removal, and often, a final “water pop” or solvent wipe.
- Initial Aggressive Sanding: Start with 120-grit sandpaper (or 100-grit for very rough surfaces). The goal here is to flatten the surface, remove machine marks, and establish overall smoothness. Ensure consistent pressure and overlap to avoid creating depressions.
- Progressive Finer Grits: Move systematically through 150, 180, and 220-grit. The key is to completely remove the scratch pattern from the previous grit before moving to the next. Inspect the surface under glancing light to spot any remaining coarse scratches, which will be magnified by the finish. For extremely fine finishes, some professionals may go up to 320 or even 400-grit, particularly on dense hardwoods like Maple Wood.
- Dust Management: Dust is the enemy of a perfect finish. After each grit, thoroughly vacuum the surface, then wipe it down with a tack cloth or an air hose. Using a dedicated dust extractor with your sander is highly recommended.
- Grain Raising (Water Popping): For water-based finishes or to ensure uniform stain absorption, a “water pop” is often beneficial. Lightly dampen the sanded wood with distilled water, allow it to dry completely, and then perform a final light sanding with the last grit used (e.g., 220-grit) to knock down the raised fibers. This ensures that the finish doesn’t raise the grain later, leading to a rough feel.
“A flawless finish is 90% preparation and 10% application. Any shortcut taken during sanding will be magnified tenfold by the final clear coat.”
Grain Filling and Sealing for Ultimate Smoothness
Open-pore woods like oak, ash, and mahogany often require grain filling to achieve a truly smooth, glass-like surface. Without it, the finish will sink into the pores, leaving a textured, slightly uneven appearance.
- Grain Fillers: These are typically paste-like compounds, often tinted to match or contrast the wood, applied after staining (if applicable) but before the sealer. They are worked into the pores with a squeegee or rag, allowed to set, then wiped clean across the grain, leaving the pores filled. Once dry, light sanding is required.
- Sealants/Primers: A dedicated sealer or primer coat serves multiple purposes:
- Isolation: It isolates the stain (if used) from subsequent topcoats, preventing color bleed or interaction.
- Adhesion: It provides a consistent, uniform surface for the topcoats to adhere to.
- Pore Sealing: Even on closed-grain woods, a sealer can help minimize finish absorption and create a smoother base for the build coats.
- Building Thickness: Some sealers are designed to build film thickness quickly, contributing to the overall depth of the finish.
Common sealers include shellac (universal compatibility, fast drying), sanding sealers (often stearated to improve sandability), and specialized primers designed for specific topcoats. Ensure compatibility between your sealer and chosen topcoat. For example, some two-part polyurethanes might require specific primers to maximize adhesion.
Applying Commercial-Grade Finishes for Tables and Cabinets
Once the surface is meticulously prepared, the choice and application of the finish itself become paramount. Commercial-grade finishes are designed for durability, hardness, and depth, offering superior protection and aesthetic appeal compared to typical DIY-store options.
Choosing the Right Finish: Durability Meets Aesthetics
For high-use items like dining tables and kitchen cabinets, mere aesthetics are not enough. The finish must withstand spills, abrasions, and daily wear.
- Catalyzed Lacquers: These are professional-grade lacquers with an added catalyst that significantly improves their hardness, chemical resistance, and durability. They dry quickly, allowing for multiple coats in a day, and are often spray-applied. While offering excellent build and clarity, they require careful mixing and good ventilation.
- Conversion Varnishes: Considered one of the most durable clear finishes for furniture and cabinetry, conversion varnishes are two-part finishes (resin and catalyst) that cure through a chemical reaction, forming a tough, cross-linked film. They offer exceptional resistance to moisture, solvents, and abrasion. Application typically requires spraying, and they have a limited pot life once mixed.
- Two-Part Polyurethanes: These are extremely hard and durable finishes, often used in marine applications due to their water and chemical resistance. They consist of a resin and an isocyanate hardener, forming a very tough, clear film. While more challenging to apply due to their strong solvents and specific safety requirements, they provide an unparalleled level of protection and gloss retention.
- UV-Cured Finishes: Increasingly common in industrial settings, UV-cured finishes dry almost instantly when exposed to ultraviolet light. This allows for extremely fast production cycles and results in a very hard, durable finish. While not practical for most home workshops due to specialized equipment requirements, they represent the pinnacle of commercial finishing speed and performance.
For those interested in exploring various finishes, understanding the nuances between options like Danish Oil Vs Linseed can provide a foundational perspective on how different oils interact with wood, though for commercial sheen, film-building finishes are generally preferred.
Mastering Spray Application Techniques
Achieving a truly flawless, commercial-grade sheen virtually necessitates spray application. Brushing or wiping film finishes often leaves brush marks, uneven thickness, and trapped dust. Spraying allows for thin, even coats, faster build-up, and a smoother final surface.
- Equipment:
- HVLP (High Volume Low Pressure) Systems: Ideal for most workshop settings. They atomize the finish efficiently with less overspray, making them economical and easier to control.
- Air-Assisted Airless (AAA) Sprayers: Offer faster application rates and a finer finish than traditional airless sprayers, combining high pressure with an air cap for superior atomization. These are more common in larger production shops.
- Conventional Air Spray Guns: Require higher air pressure and produce more overspray but can deliver excellent results in skilled hands.
- Preparation: Ensure your spray gun is meticulously clean. Mix your finish thoroughly and strain it to remove any particles. Adjust air pressure and fluid flow according to the finish manufacturer’s recommendations and your specific gun.
- Technique:
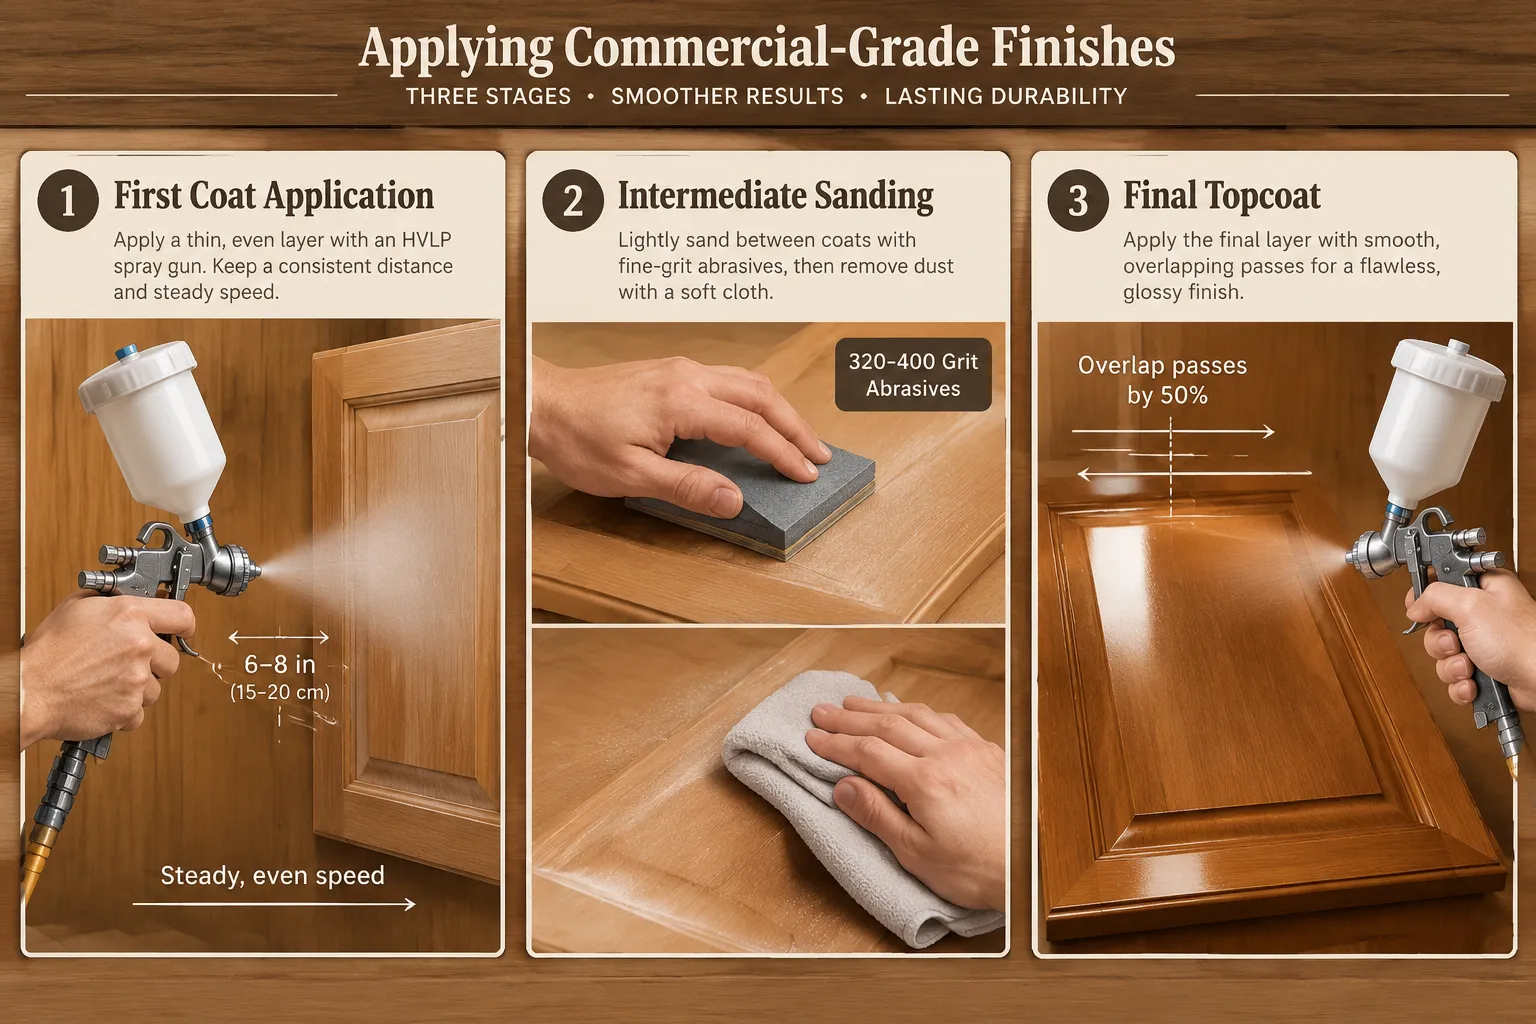
- Consistent Distance: Maintain a consistent distance (typically 6-10 inches) from the work surface to ensure even atomization and wet film thickness.
- Overlapping Passes: Overlap each pass by 50% to ensure full coverage and avoid dry spots or streaks.
- Even Speed: Move the gun at a consistent speed. Too fast results in a thin, dry coat; too slow leads to runs and sags.
- Edge-to-Edge: Start spraying just off the edge of the piece and continue past the opposite edge to ensure full coverage at the ends.
- Vertical vs. Horizontal: On flat surfaces, spray horizontally. On vertical surfaces, spray horizontally or vertically, ensuring complete coverage.
Proper ventilation and personal protective equipment (respirator, gloves, eye protection) are non-negotiable when spraying these types of finishes due to solvent fumes and atomized particles.
Achieving Depth and Durability: Multi-Layering and Polishing
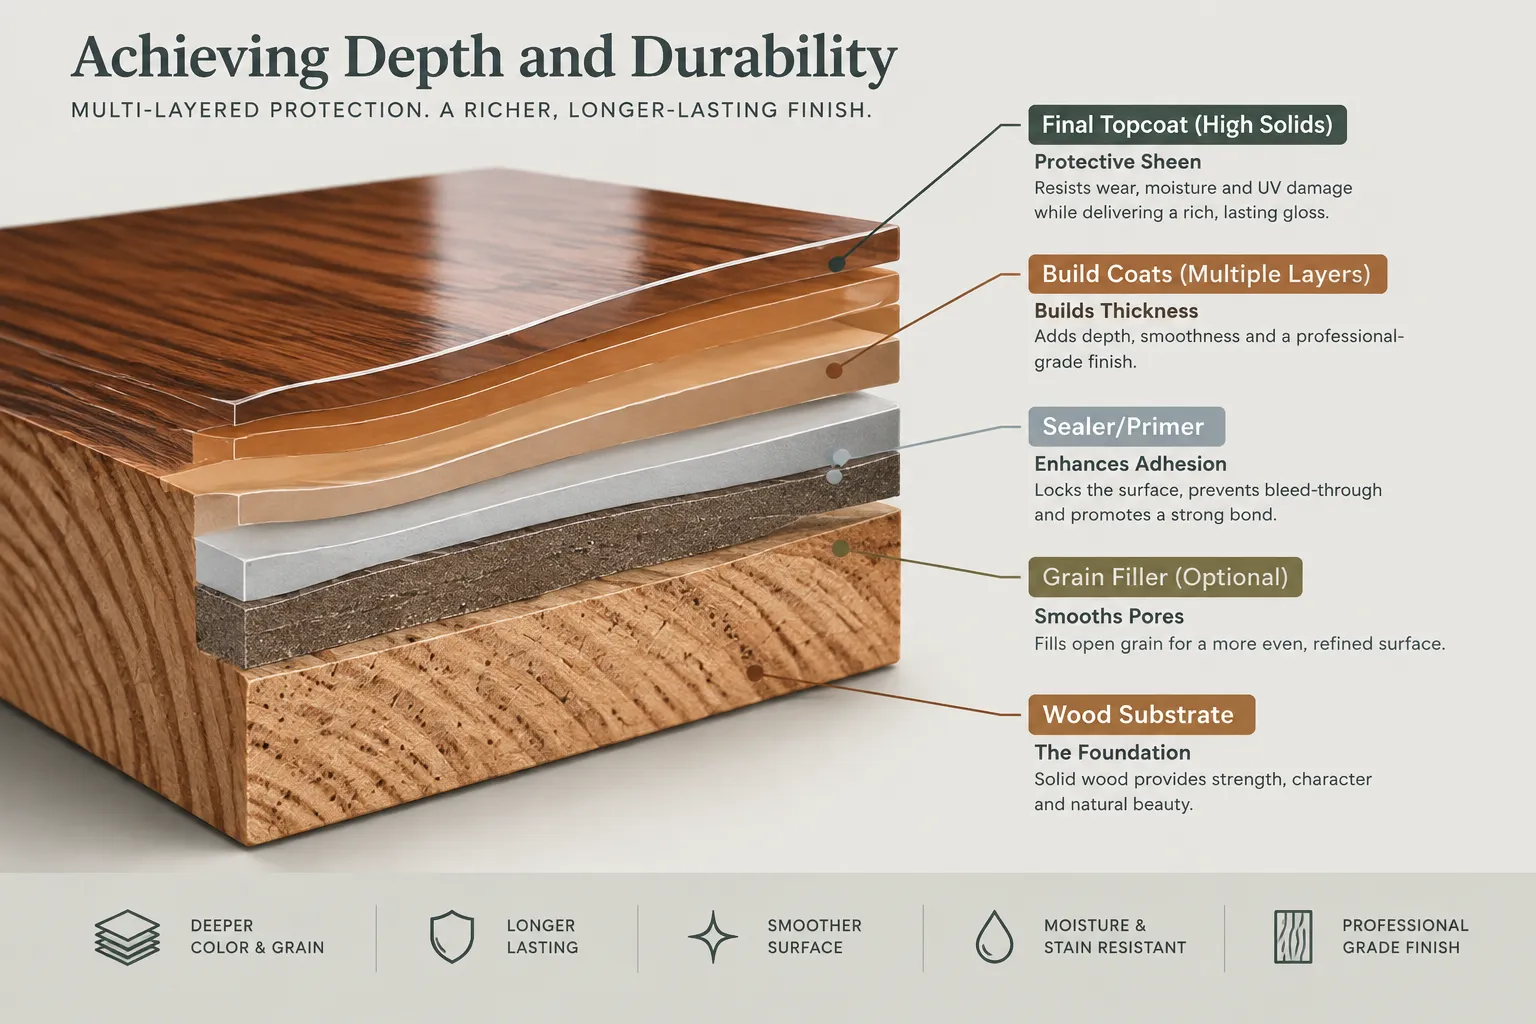
The hallmark of a commercial-grade finish is not just its smoothness but its apparent depth, a look as if you could dive into the surface, combined with rock-hard durability. This is achieved through strategic multi-layer application and meticulous intermediate and final polishing.
Building Film Thickness: The Key to Visual Depth
Multiple thin coats are superior to a few thick coats. Each thin coat allows for better leveling, faster drying, and reduces the risk of defects like runs, sags, and solvent pop.
- Sealer Coat(s): Apply one to two thin coats of your chosen sealer. Allow adequate dry time, then light sand with 220-320 grit sandpaper to create a smooth, consistent base for the build coats.
- Build Coats: Apply two to four (or more, depending on the desired depth) thin coats of your primary finish (e.g., catalyzed lacquer, conversion varnish, 2K polyurethane). Each coat should be allowed to dry thoroughly according to the manufacturer’s schedule.
- Intermediate Sanding: This is a critical step for achieving a truly flawless surface. After each set of build coats (or sometimes after every other coat), very lightly sand the surface with 320-400 grit sandpaper. The goal is not to remove a lot of material but to level any dust nibs, minor imperfections, or slight orange peel. Sand gently and evenly, often referred to as “de-nibbing,” until the surface feels uniformly smooth. Then, clean thoroughly to remove all sanding dust before the next coat. For projects requiring extreme clarity and depth, this meticulous sanding can be repeated multiple times.
- Final Topcoat: Apply the final one to two coats, ensuring they are perfectly uniform and free of imperfections. Allow the finish to cure fully. This curing process can take days or even weeks, depending on the product, temperature, and humidity. Rushing this step can lead to a softer finish and potential damage.
The Art of Rubbing and Polishing for a Mirror Sheen
Even the most perfectly sprayed finish will have a microscopic texture (orange peel) or tiny dust inclusions. Rubbing and polishing are the final steps to transform a smooth finish into a mirror-like, commercial-grade sheen. This process is time-consuming but yields exceptional results.
- Allow Full Cure: This is non-negotiable. Attempting to rub out a finish that hasn’t fully cured will result in smearing, peeling, or a dull, hazy appearance. Consult your finish manufacturer for specific cure times.
- Initial Leveling (Wet Sanding): Using a sanding block and progressively finer wet/dry sandpaper (starting around 800-grit, then 1000, 1200, 1500, 2000, and even 3000-grit), wet sand the fully cured finish. Use plenty of water with a drop of dish soap as a lubricant. The goal is to carefully flatten the surface, removing any orange peel or minor defects, resulting in a uniform matte appearance. Work slowly and methodically, ensuring even pressure.
- Compounding: Once the wet sanding is complete and the surface is a uniform matte, apply a fine-cut rubbing compound (automotive compounds work well) with a foam pad on a rotary or orbital polisher. Work in small sections, allowing the compound to break down and polish the surface. This step removes the sanding scratches from the finer grits.
- Polishing: Follow the compounding with an even finer polishing compound or swirl remover. This step refines the surface further, bringing out the deep gloss and clarity. Use a softer foam pad and clean microfiber cloths.
- Glazing/Waxing: For an extra layer of protection and a deeper, richer look, a final glaze or high-quality furniture wax can be applied. This step enhances the shine and provides a sacrificial layer of protection. For more on this, consider resources on Wax On Top Of Polyurethane: Achieving A Smooth Finish.
Table: Troubleshooting Common Finishing Problems
| Problem | Cause | Solution |
|---|---|---|
| Orange Peel | Too little solvent, too thick, spray gun too far | Adjust finish viscosity, apply thinner coats, optimize spray gun technique |
| Runs/Sags | Too much finish, gun too slow/close | Apply thinner coats, move gun faster/further, ensure proper overlap |
| Dust Nibs | Dusty environment, poor surface cleaning | Work in clean area, use tack cloth, clean between coats |
| Blotching (Stain) | Uneven wood porosity, poor prep | Use wood conditioner, sanding sealer, specific staining techniques |
| Cratering/Fish-eyes | Surface contamination (oil, silicone) | Clean surface thoroughly, use fisheye eliminator (last resort) |
| Poor Adhesion | Improper surface prep, incompatible products | Ensure clean, sanded surface; use compatible sealers and topcoats |
Conclusion
Achieving a flawless, commercial-grade sheen on tables and cabinets is a testament to patience, precision, and a willingness to invest in quality materials and techniques. It’s a journey that moves beyond basic application to a holistic understanding of surface preparation, sophisticated finish chemistry, and meticulous multi-stage refinement. In 2026, as woodworking standards continue to rise, mastering these advanced finishing methods will distinguish true craftsmen from hobbyists.
By embracing systematic sanding, utilizing professional-grade spray equipment, carefully selecting durable finishes like catalyzed lacquers or two-part polyurethanes, and committing to the thorough process of multi-layer application and detailed rubbing out, you can transform your woodworking projects. The resulting depth, clarity, and mirror-like sheen will not only enhance the aesthetic appeal of your tables and cabinets but also provide lasting protection, ensuring your creations endure as timeless pieces for generations to come. Start with the foundation, build with intent, and finish with perfection.
References
- Jewitt, John. 2007. Hand-Applied Finishes. Taunton Press.
- Flexner, Bob. 2005. Understanding Wood Finishing: How to Choose and Apply the Right Finish. Fox Chapel Publishing.
- Peters, Michael. 2012. Wood Finishing with Mike Peters. Schiffer Publishing.
SEO Meta Title: Advanced Wood Finishing: Achieve Flawless Commercial Sheen SEO Meta Description: Master advanced wood finishing techniques in 2026. Learn to achieve a flawless, commercial-grade sheen on tables and cabinets with expert tips.