

The average cost of a new, high-quality billiard table can easily exceed $3,000, not including installation. For the dedicated woodworking enthusiast, however, the allure of crafting a custom pool or billiard table offers a uniquely rewarding challenge that combines precision carpentry with specialized textile application and structural engineering. This Beginner’s Guide to Building Pool and Billiard Tables: Slate Bed Installation, Felt Covering, and Pocket Construction delves into the intricate steps required, transforming raw materials into a centerpiece of recreation and craftsmanship in your home by 2026.
Key Takeaways
- Building a pool table requires a solid understanding of woodworking fundamentals and attention to detail.
- Slate bed installation is critical for a perfectly level and stable playing surface, involving careful leveling and seaming.
- Applying felt properly ensures optimal ball roll and playability, demanding precision stretching and attachment.
- Pocket construction integrates durable materials and precise placement for both aesthetics and functionality.
- Careful material selection, especially for wood and slate, significantly impacts the table’s longevity and performance.
Essential Components and Initial Preparations for Your Pool Table Project
Before diving into the detailed construction steps for your billiard table, it is crucial to understand the primary components and undertake meticulous preparation. A well-built pool table is a significant piece of furniture, demanding stability, precision, and durability. The core structure typically consists of a sturdy wooden frame, a multi-piece slate playing surface, rail assemblies with cushions, and the felt covering, all culminating in the meticulously designed pockets.
The main frame, often called the cabinet, must be exceptionally robust to support the immense weight of the slate, which can easily be several hundred pounds. Hardwoods like oak, maple, or even dense plywood are excellent choices for the cabinet, offering both strength and an attractive finish. When considering your design, remember that dimensions for pool and billiard tables are standardized (e.g., 7-foot, 8-foot, 9-foot tables), so planning your space and material quantities accordingly is vital.
For the aspiring DIY builder in 2026, sourcing high-quality materials is paramount. This includes kiln-dried lumber for the frame, premium slate, professional-grade billiard cloth, and durable pocket materials. Investing in good materials upfront will save time and frustration in the long run. Additionally, having a dedicated workspace with adequate lighting and essential woodworking tools, such as a table saw, router, drills, and clamps, will streamline the process. For those looking to optimize their workspace, consider our guide on building a compact and ergonomic workbench for small workshops.
Building the Frame and Sub-Frame
The foundation of your pool table’s stability is its frame and sub-frame. The main frame forms the legs and side aprons, providing the primary support. The sub-frame sits atop this, creating the platform for the slate.
Key Steps for Frame Construction:
- Cut and Join Lumber: Precisely cut all frame components to your chosen table dimensions. Utilize robust joinery techniques such as mortise and tenon joints or heavy-duty lag bolts with appropriate wood glue for maximum strength. For more on advanced joinery, explore mastering wood joinery techniques.
- Assemble Legs and Side Rails: Construct the main frame, ensuring all corners are perfectly square and joints are tight.
- Construct Sub-Frame: Build a strong sub-frame that will directly support the slate. This typically involves cross-members and support beams, creating a level surface where the slate will rest. Use a high-quality wood such as a durable plywood or solid lumber for this critical component.
- Leveling Feet: Install adjustable leveling feet on each leg. These are indispensable for achieving a perfectly level playing surface, especially on uneven floors.
Slate Bed Installation: The Heart of Your Beginner’s Guide to Building Pool and Billiard Tables
The slate bed is the single most important component influencing the playability of a pool table. It provides an unyielding, perfectly flat surface essential for true ball roll. Most professional tables use a three-piece slate design, which is easier to transport and level than a single, massive slab. This section of the Beginner’s Guide to Building Pool and Billiard Tables: Slate Bed Installation, Felt Covering, and Pocket Construction focuses on the meticulous process of installing and leveling the slate.
Positioning and Initial Securing
Once your sub-frame is robust and level, carefully place the slate pieces onto it. Ensure the numbered sides (if applicable) face up and are oriented correctly according to the manufacturer’s instructions.
Steps for Slate Installation:
- Clean the Sub-Frame: Thoroughly clean the sub-frame to remove any dust or debris that could impede proper slate seating.
- Position Slate Pieces: With the help of at least one other person (slate is extremely heavy), gently place the first slate piece onto the sub-frame. Center it as much as possible, leaving room for the other pieces. Repeat for all pieces.
- Secure with Screws: Lightly secure the slate pieces to the sub-frame using flat-head wood screws. Do not overtighten yet, as adjustments will be necessary during leveling. Counter-sink screw heads below the surface to prevent felt damage.
Leveling the Slate
Achieving a perfectly level slate bed is paramount. This process requires patience and precision.
The Leveling Process:
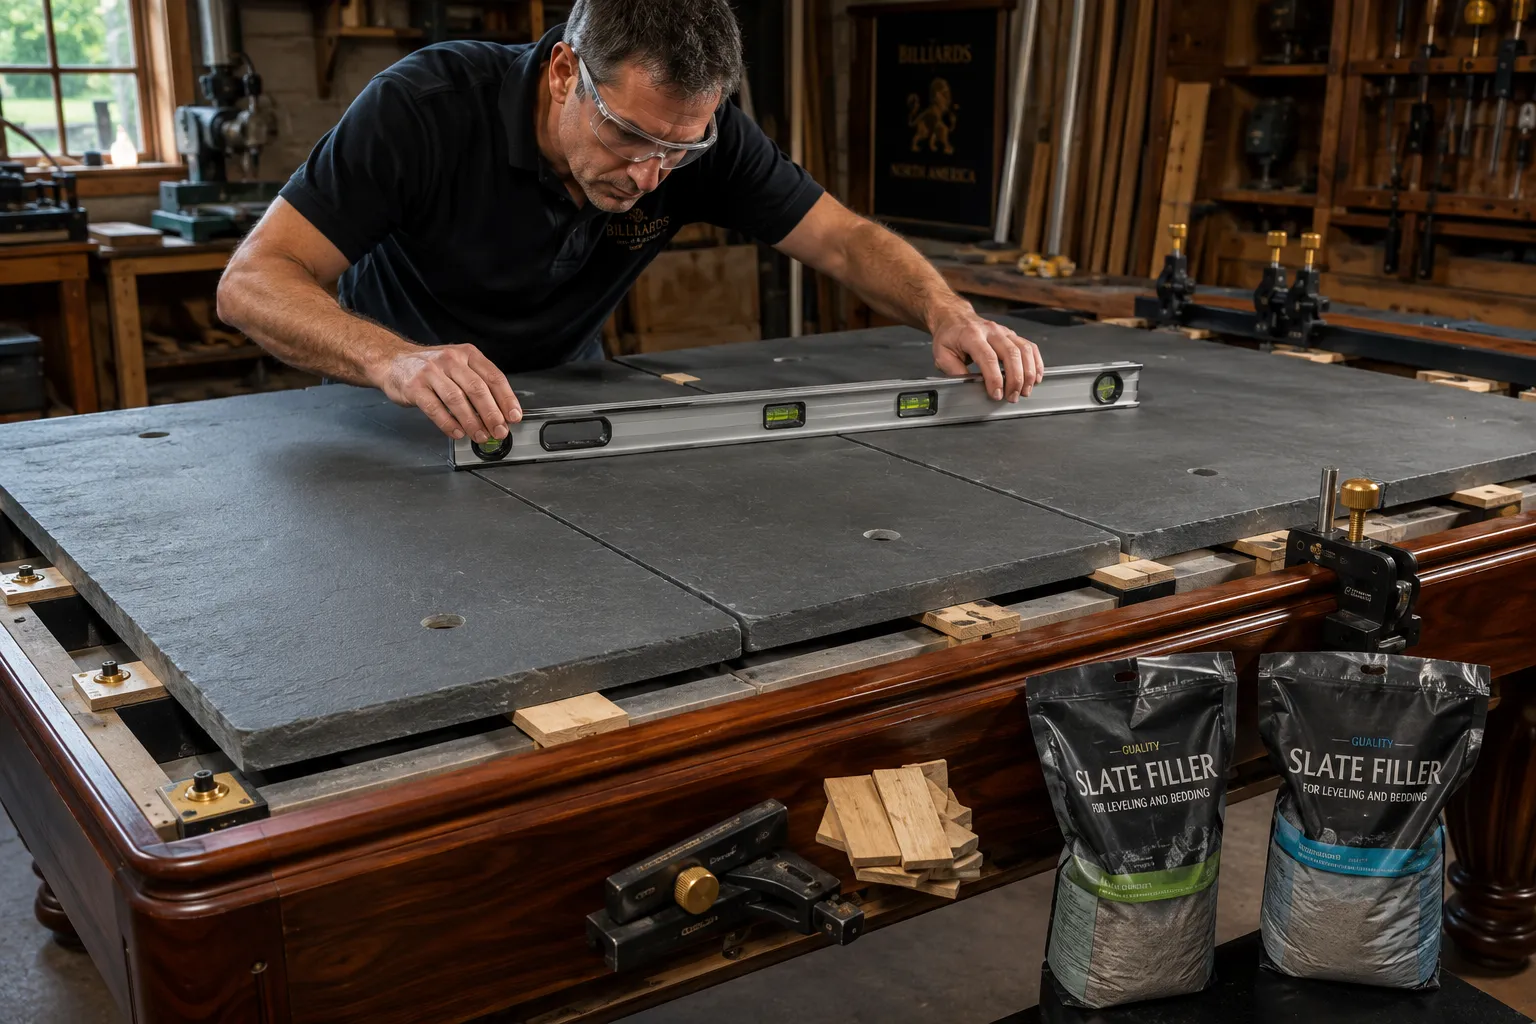
- Rough Leveling: Use a long, accurate spirit level (at least 4 feet long) to check the level across each individual slate piece, then across the seams, and finally diagonally across the entire surface.
- Shimming: Identify low spots. Gently lift the slate (if necessary) and insert thin wooden or plastic shims between the slate and the sub-frame. Work methodically, making small adjustments.
- Seam Leveling: The most critical aspect is ensuring the seams between the slate pieces are perfectly flush. Use a straightedge to check for any lips or gaps. Apply slate filler (a mixture of epoxy and fine marble dust or a specialized slate putty) to fill any gaps along the seams. Allow this to dry thoroughly and then sand it perfectly smooth and flush with the slate surface. This is vital for seamless ball roll.
- Final Securing: Once perfectly level and seams are flush, tighten all the screws securing the slate to the sub-frame. Avoid overtightening.
Felt Covering and Pocket Construction
With the slate bed perfectly installed and leveled, the next phase in our Beginner’s Guide to Building Pool and Billiard Tables: Slate Bed Installation, Felt Covering, and Pocket Construction involves applying the billiard felt and constructing the pockets. These steps are crucial for the table’s aesthetics and playability.
Applying the Billiard Felt
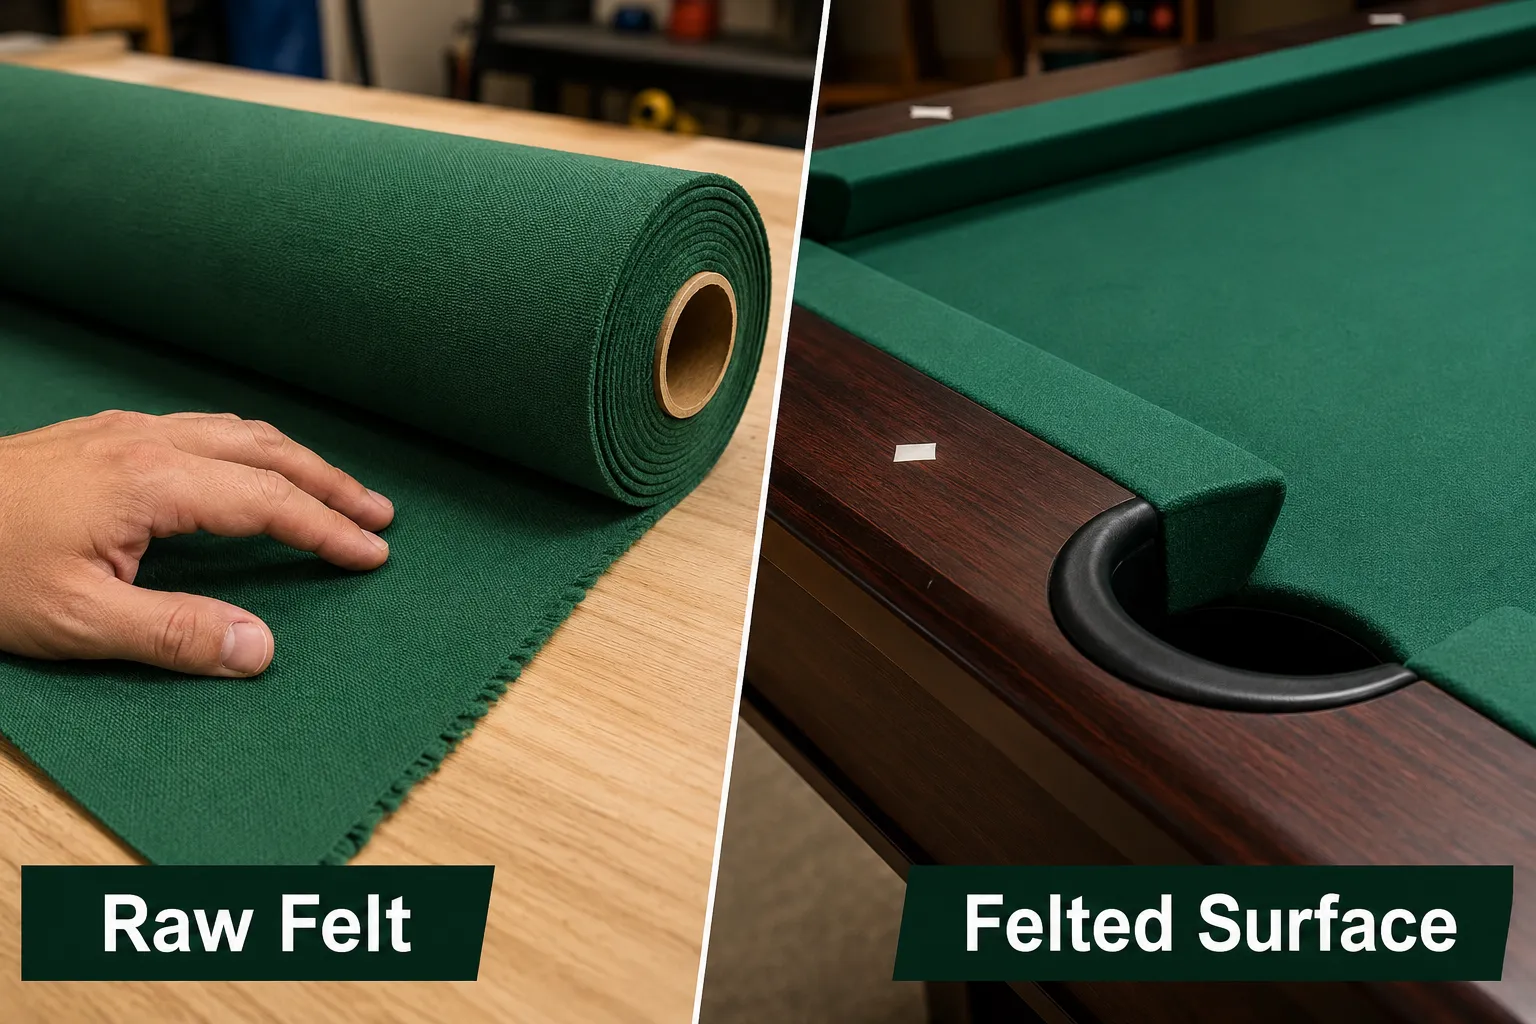
Applying felt is a delicate process that requires patience and a good stapler. The goal is a taut, wrinkle-free surface that allows for consistent ball speed and roll.
Steps for Felt Application:
- Prepare the Felt: Unroll the billiard felt and allow it to relax. Ensure it is perfectly clean and free of creases.
- Position the Felt: Drape the felt over the slate, ensuring an even overhang on all sides. Center it carefully.
- Initial Securing (Long Sides): Starting from the middle of one long side, gently pull the felt taut and staple it to the underside of the sub-frame or the designated felt rail. Work outwards towards the corners, alternating staples from side to side to maintain even tension. Do not staple into the slate itself.
- Securing (Short Sides): Repeat the process for the short sides, again starting from the middle and working outwards.
- Corners and Pockets: This is where precision is key.
- Corners: Carefully fold and trim the felt at the corners, creating neat, tight folds that will be hidden by the rail cushions. Secure with staples.
- Pockets: Cut an “X” into the felt at each pocket opening. Carefully trim the felt around the pocket, leaving enough material to pull taut and staple securely to the inside edge of the pocket opening on the sub-frame. Ensure no felt protrudes above the playing surface.
- Railing Felt: Cut separate strips of felt for the rail cushions. Glue and/or staple these strips to the cushion rubber, ensuring they are stretched tightly and evenly.
Railing and Pocket Construction
The rails house the cushions that determine the ball’s rebound, and the pockets are where the game truly happens.
Steps for Railing and Pocket Construction:
- Attach Cushion Rubber: If not already attached, glue the rubber cushions to the wooden rail sections. Use a specialized contact cement or rubber adhesive. Ensure they are aligned perfectly to provide consistent rebound.
- Felt the Rails: Once the cushion rubber is secure, carefully apply the felt to the rails, stretching it tightly over the cushions and securing it to the underside of the wooden rail. Trim any excess felt neatly.
- Install Rails: Attach the completed rail assemblies to the table frame. This typically involves bolts that pass through the frame and into the rails, securely fastening them. Ensure the rails are perfectly aligned and level with the playing surface.
- Pocket Liners and Drops: Install the pocket liners, which are usually plastic or metal inserts that fit into the pocket openings. Then, attach the pocket drops, which can be leather, plastic, or woven nets, to the underside of the table, allowing them to hang down. For custom woodworking projects that require precise measurements and durable finishes, consider our guide on building a DIY tool cabinet with drawer organization.
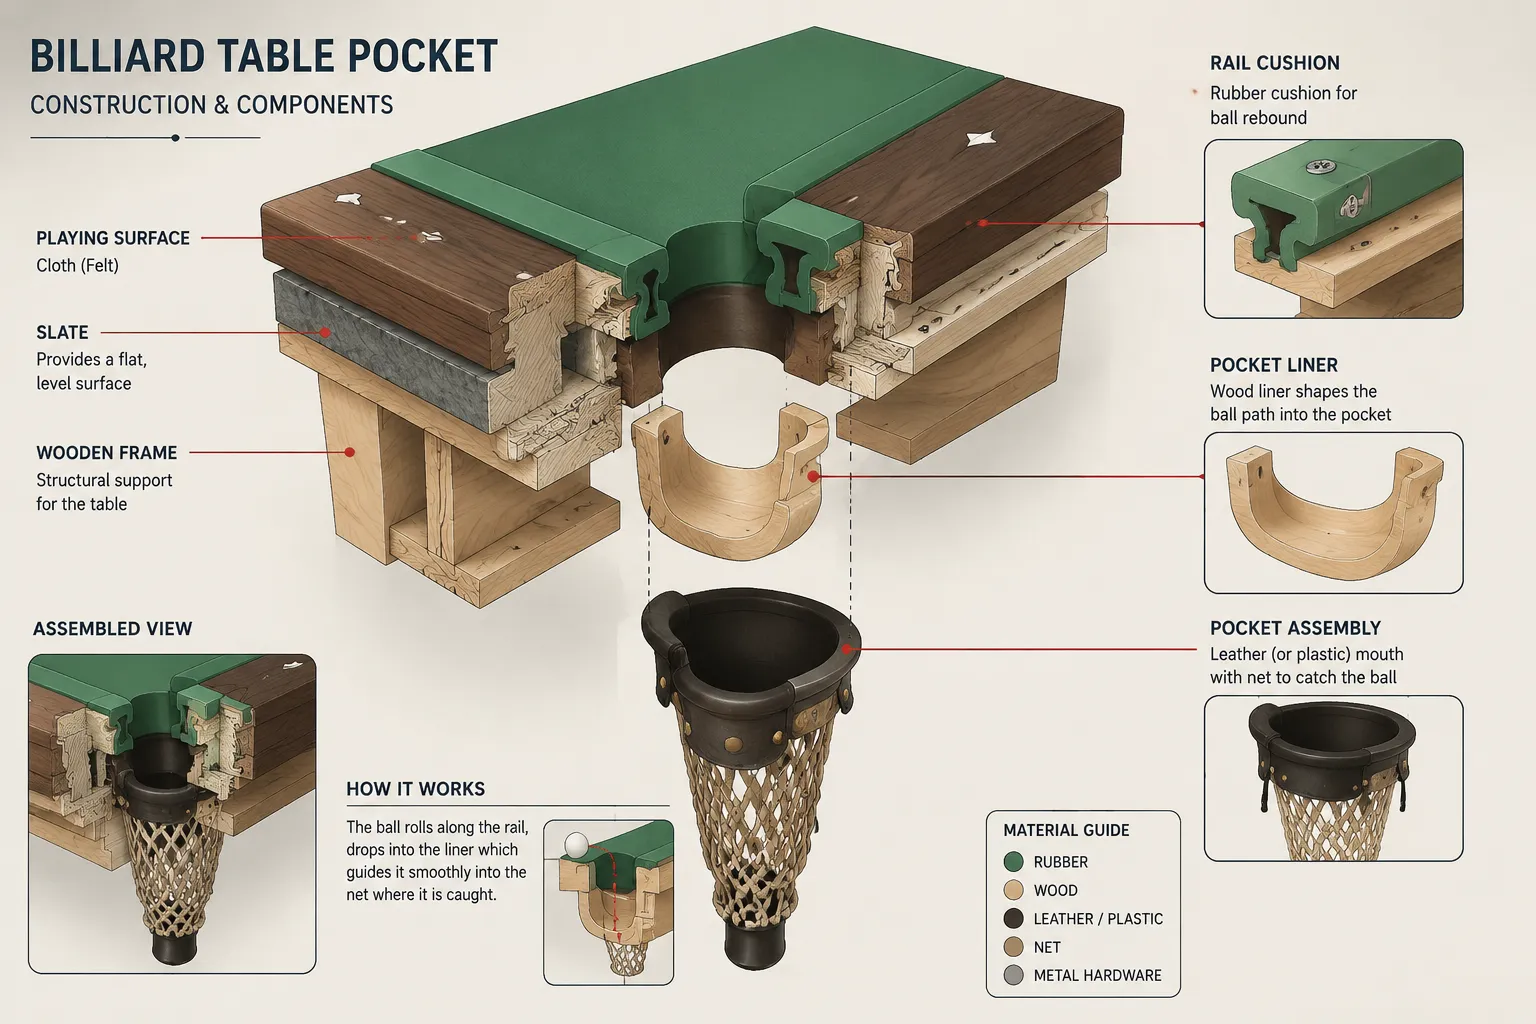
Proper pocket construction involves ensuring the opening is smooth and correctly sized to allow balls to drop freely, while the collection system is sturdy enough to hold multiple balls. The integrity of the felt and the precise alignment of the cushions are paramount for optimal gameplay.
Finishing Touches and Maintenance for Your DIY Pool Table
After the intricate work of slate installation, felt covering, and pocket construction, the final steps involve adding the finishing touches and understanding proper maintenance for your newly built pool table. These details elevate your creation from a functional piece to a true heirloom quality game table.
Finishing the Woodwork
The exposed wooden components of your pool table, primarily the frame and legs, should receive a high-quality finish. This protects the wood, enhances its aesthetic appeal, and integrates the table seamlessly into your home’s decor.
Finishing Recommendations:
- Sanding: Begin with thorough sanding, progressing through various grits from coarse to fine (e.g., 80, 120, 180, 220). Achieve a silky-smooth surface.
- Staining (Optional): If you desire a specific wood tone, apply a wood stain evenly. Always test the stain on scrap wood first.
- Sealing and Topcoat: Apply a protective finish. Options include:
- Polyurethane: Highly durable and scratch-resistant, available in various sheens. Apply multiple thin coats, sanding lightly between coats.
- Lacquer: Dries quickly and provides a smooth finish, often preferred for a classic look.
- Oil Finish: Penetrates the wood, enhancing its natural beauty with a satin finish. Requires more frequent reapplication.
- Waxing: A final coat of furniture wax can add an extra layer of protection and luster.
For those interested in other furniture projects, learning about various wood finishes is crucial. Our article on console and sofa tables: buyer’s guide for DIY-friendly bases and tops you can customize also touches upon finishing techniques applicable to home furnishings.
Final Assembly and Accessories
With the major components complete and finishes applied, it’s time for the final assembly and the addition of accessories.
Checklist for Final Assembly:
- Install Pockets: Ensure all pocket leathers/nets are securely attached and aligned.
- Inspect Rails: Double-check that all rail bolts are tight and that the rails are perfectly aligned with the slate.
- Leveling Confirmation: Use your spirit level one last time across the entire playing surface to confirm it remains perfectly level. Adjust leveling feet if needed.
- Accessory Installation: Install ball returns (if applicable), scorekeepers, and cue racks.
- Lighting: Proper overhead lighting is essential for a good game. Consider installing a dedicated billiard light fixture.
Ongoing Maintenance
To ensure your handmade pool table remains in pristine condition and provides years of enjoyment, regular maintenance is key.
Maintenance Tips for 2026:
- Felt Care: Brush the felt regularly with a specialized billiard brush to remove dust and chalk residue. Avoid liquid spills, but if they occur, blot immediately with a clean, dry cloth. Professional cleaning can be done periodically.
- Wood Care: Dust the wooden frame and legs regularly. Use appropriate wood polish or cleaners designed for your specific finish. Avoid abrasive chemicals.
- Rail Maintenance: Inspect rail cushions for any signs of wear or damage. Over time, rubber cushions can harden and lose their rebound quality, requiring replacement.
- Pocket Inspection: Check pockets for tears or damage to the netting or leather. Repair or replace as necessary.
- Leveling Checks: Periodically re-check the table’s level, especially if it has been moved or if your floor settles.
By following this comprehensive guide, you can successfully embark on your journey of building a custom pool or billiard table. The satisfaction of crafting such a complex and functional piece with your own hands is truly immense.
Conclusion
Building your own pool or billiard table is a challenging yet profoundly rewarding woodworking project that merges precision craftsmanship with the joy of creating a recreational centerpiece. This Beginner’s Guide to Building Pool and Billiard Tables: Slate Bed Installation, Felt Covering, and Pocket Construction has walked through the critical steps, from the robust foundational frame to the meticulous slate leveling, the delicate felt application, and the functional pocket construction.
The dedication required for accurate measurements, strong joinery, and patient leveling will result in a professional-grade table. As you progress, remember that each phase, particularly the slate installation and felt covering, demands attention to detail that directly impacts the table’s playability. By carefully following these guidelines, sourcing quality materials, and applying sound woodworking principles, you will create a durable and beautiful billiard table ready for countless games in your home. The journey of building it is as enjoyable as the games you’ll play on it.
Actionable Next Steps:
- Finalize Design & Dimensions: Choose your table size and create detailed plans, including materials lists.
- Source Materials: Acquire high-quality lumber, professional-grade slate (consider a local supplier for transport), billiard felt, and pocket components.
- Prepare Your Workspace: Ensure you have adequate space, lighting, and all necessary tools, including a reliable table saw. For a good table saw, review guides like Delta 36-600 Table Saw: Pros, Cons, and Buying Guide.
- Begin Construction: Start with the frame, focusing on structural integrity before moving on to the specialized steps of slate, felt, and pockets.
- Enjoy & Maintain: Once complete, enjoy your custom-built table and commit to regular maintenance to preserve its quality for years to come.
SEO Meta Title: Beginner’s Guide to Building Pool and Billiard Tables SEO Meta Description: Learn how to build your own pool table in 2026, covering slate bed installation, felt covering, and pocket construction for a professional finish.