


Woodworking, by its very nature, often generates a significant amount of offcuts and smaller pieces of material. Far from being mere waste, these scraps represent valuable resources, often possessing unique grains, species, or dimensions perfectly suited for future projects, jigs, or repairs. Failing to organize these remnants, however, often leads to chaos: piles cluttering the workshop, valuable pieces getting overlooked, and ultimately, good wood being discarded. This article provides a comprehensive guide to Building a Custom Modular Storage System for Woodworking Scraps: Maximizing Material Use and Organization in your workshop for 2026. Such a system not only cleans up your workspace but fundamentally shifts your approach to material management, fostering creativity and reducing waste.
Key Takeaways
- Modular storage systems for scraps adapt to evolving needs and workshop layouts.
- Effective categorization by species, dimension, and type is crucial for efficient material retrieval.
- Planning and design should prioritize accessibility, visibility, and safety.
- A custom system maximizes space, reduces waste, and inspires creative reuse of materials.
- Regular maintenance and adaptation ensure the system remains functional and valuable over time.
Designing Your Custom Modular Scrap Storage System: Maximizing Material Use
The cornerstone of any efficient woodworking shop is a well-thought-out organizational system, and this is especially true for managing valuable scraps. A custom modular approach offers unparalleled flexibility, allowing you to adapt your storage to the specific types and quantities of wood you accumulate, as well as the unique dimensions of your workspace. Building a Custom Modular Storage System for Woodworking Scraps: Maximizing Material Use and Organization begins with meticulous planning.

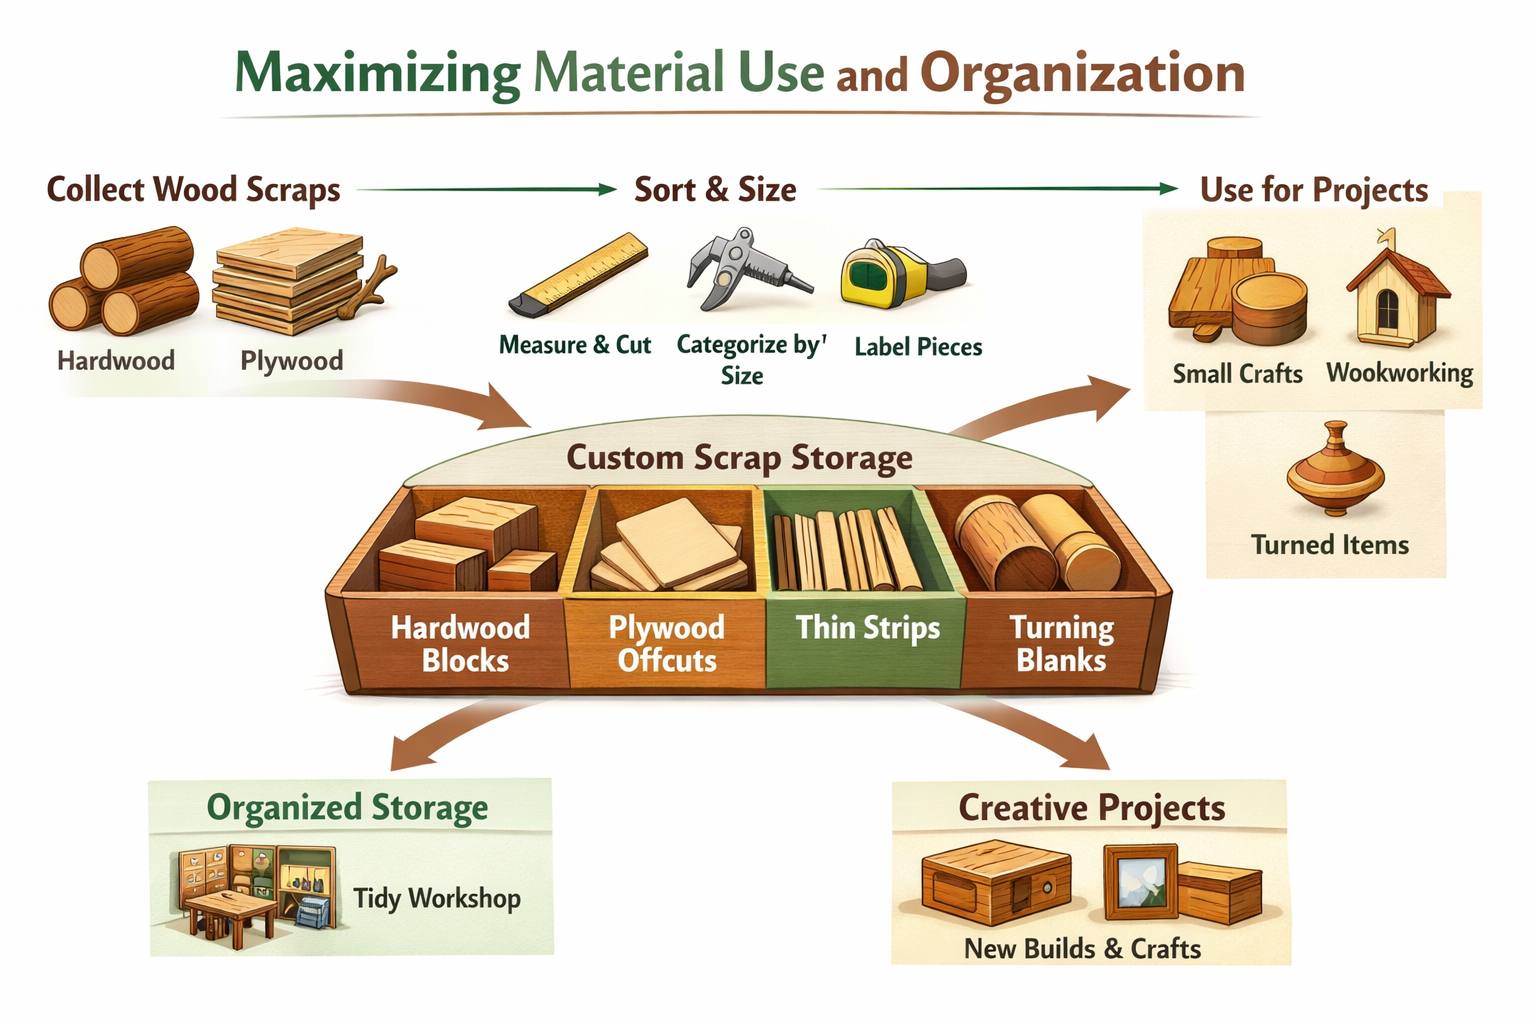
Assessing Your Scrap Inventory and Needs
Before cutting a single piece of lumber for your storage system, take stock of your existing scrap collection. Consider the following:
- Volume and Variety: What types of wood do you typically work with (hardwoods, softwoods, plywood, MDF)? What are the common sizes of your offcuts? Do you have many small blocks, long thin strips, or larger panel remnants?
- Project Frequency: How often do you find yourself needing a small piece for a jig, repair, or accent? This helps determine the accessibility requirements of different categories.
- Workshop Space: Evaluate the available wall space, under-bench areas, or corners where a modular system could be integrated. Consider vertical storage to utilize height effectively.
Categorizing your scraps is the first step towards an effective system. Instead of a single “scrap” bin, think about:
- By Species: Oak with oak, maple with maple. This prevents confusion and maintains consistency for projects where specific wood types are critical.
- By Dimension: Small blocks (e.g., under 6×6 inches), medium pieces (e.g., 6×6 to 12×12 inches or strips up to 24 inches), long thin strips, and larger panels.
- By Type: Solid wood vs. plywood/MDF. Turning blanks vs. carving blocks.
- By Project Suitability: Designate specific bins for “jig material,” “small project stock,” or “firewood” (for unusable pieces).
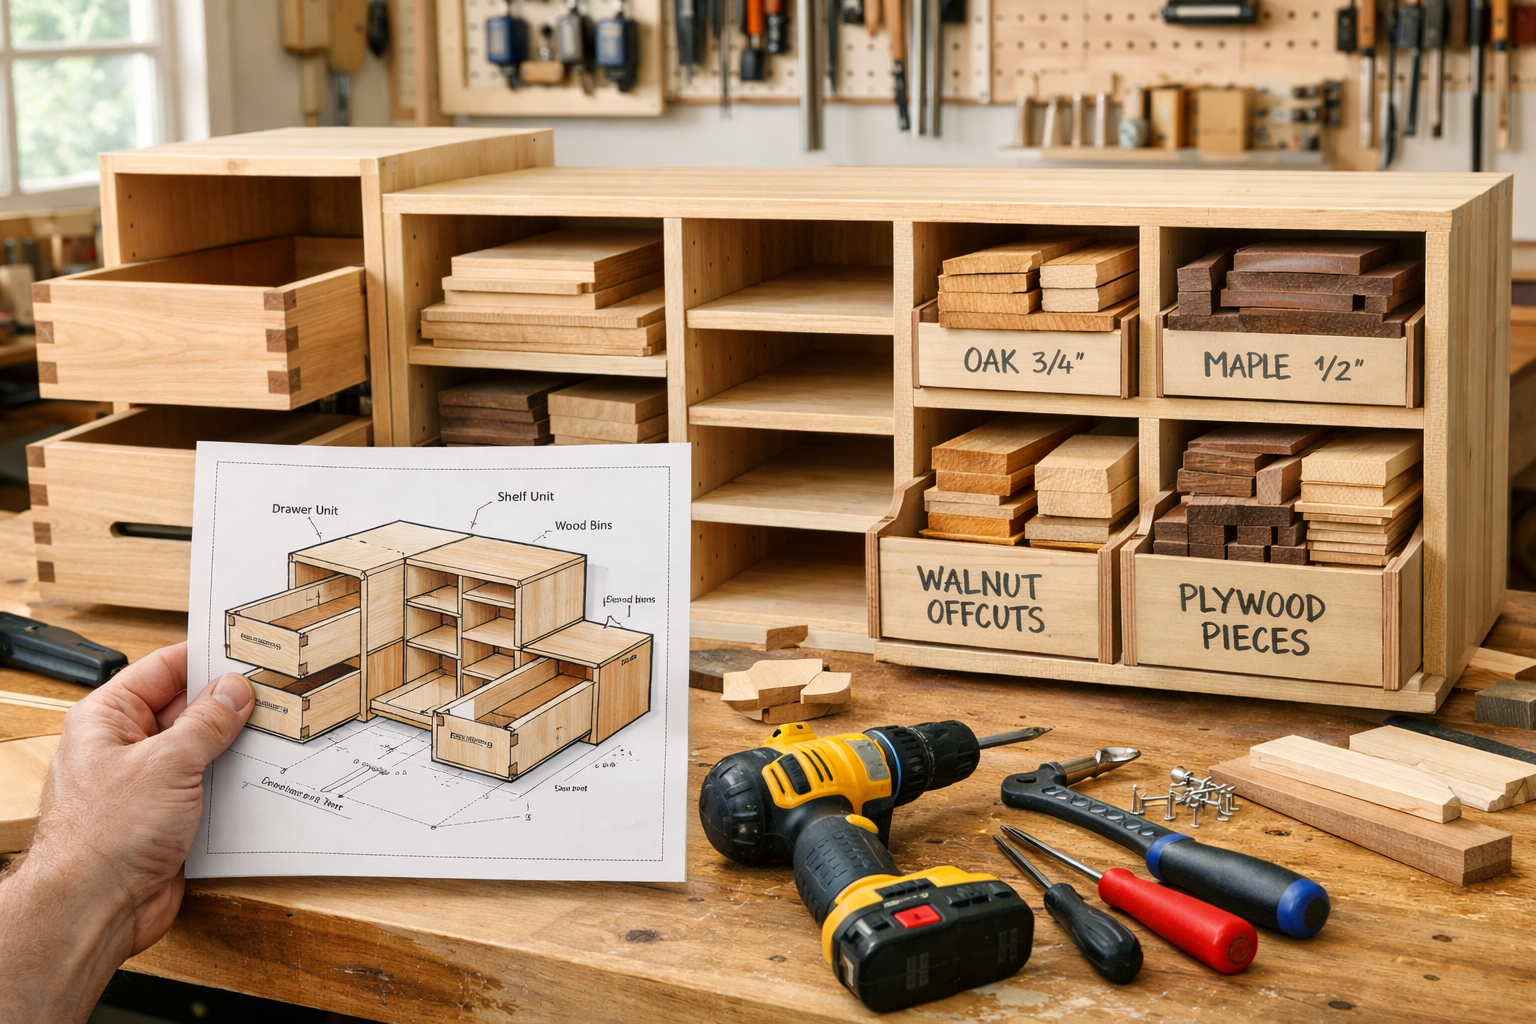
Modular Components and Materials
The beauty of a modular system lies in its ability to grow and change. Your system should consist of interchangeable units that can be rearranged, added to, or even repurposed.
Common Modular Components:
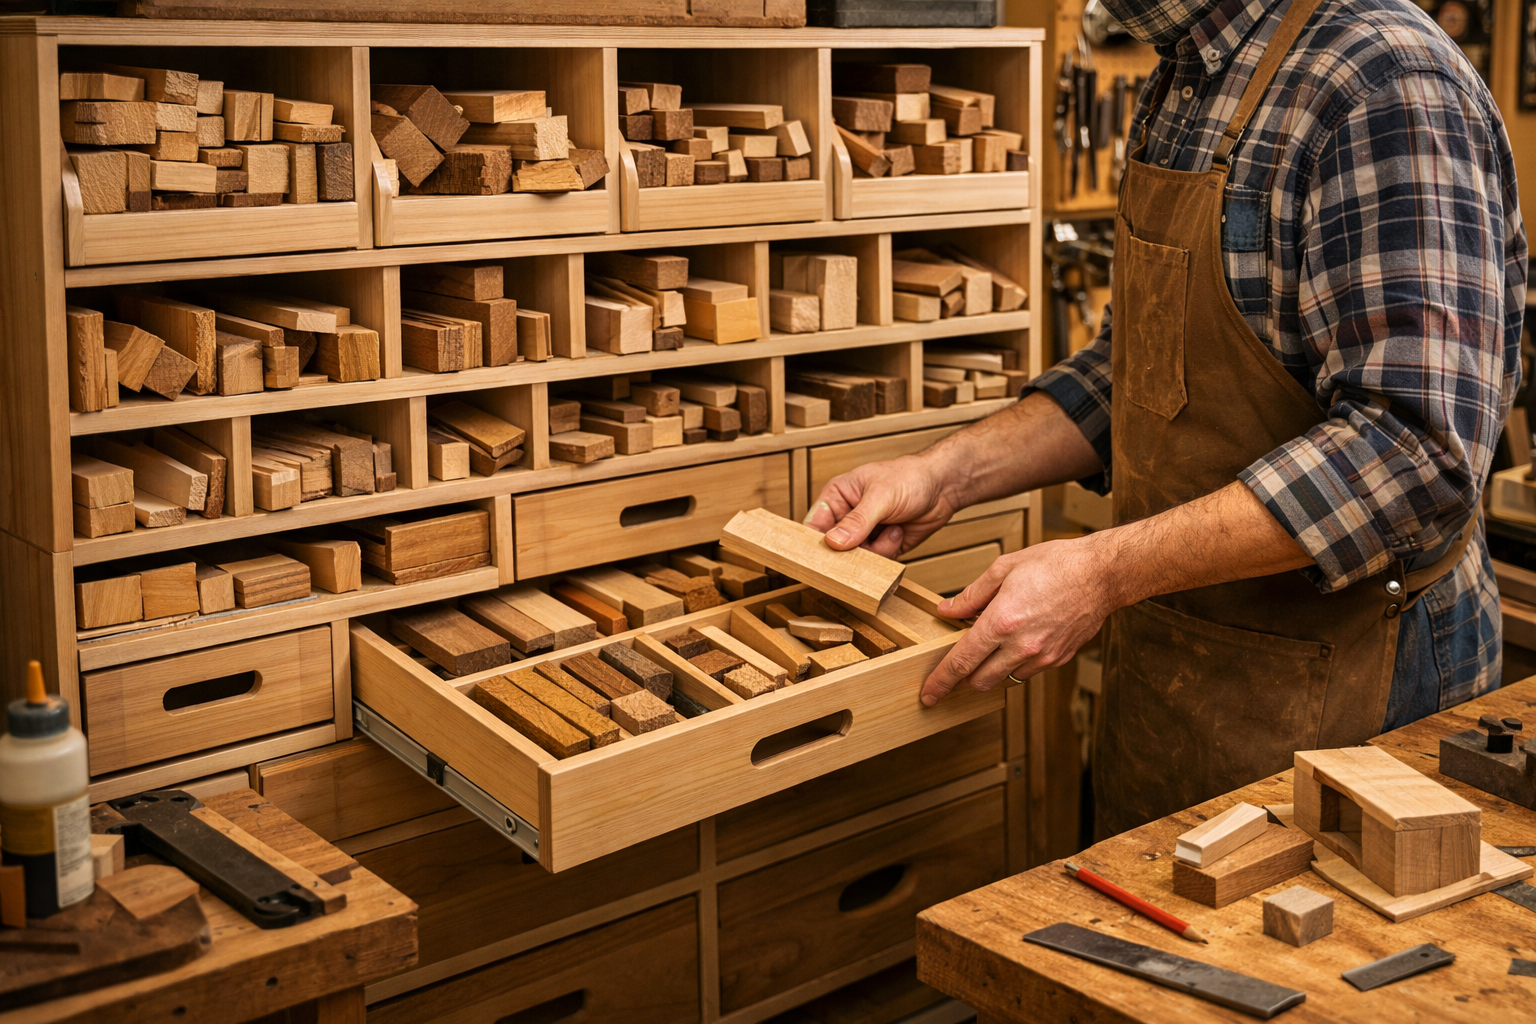
Open Cubbies/Shelves: Ideal for larger panels or longer pieces that need quick visual access.
Drawers/Bins: Excellent for smaller blocks, cutoffs, and thin strips. Clear bins or bins with labels enhance visibility.
Dividers/Partitions: Within larger cubbies or drawers, these help separate different types or sizes of wood.
Sliding Trays: For thin, flat pieces that can be stacked horizontally but still need easy access without digging.
Rolling Carts/Units: For heavy or frequently moved scrap categories, offering flexibility in workshop layout.
💡 Pull Quote: “A well-designed modular storage system for scraps is more than just organization; it’s an investment in your workshop’s efficiency and a commitment to sustainable woodworking practices.”
Material Selection:
- Plywood (¾” or ½”): A versatile choice for carcases, shelves, and drawer boxes due to its stability and strength. Baltic Birch plywood is particularly durable and visually appealing.
- MDF: Economical for drawer bottoms, backs, or internal dividers where strength is less critical.
- Dimensional Lumber (2x2s, 1x3s): Useful for framework, drawer slides, or cleat systems.
Consider using a French cleat system for wall-mounted modules. This allows for easy repositioning and adding new units as your needs evolve. For more ideas on maximizing space with modular systems, explore “Smart Workshop Storage Solutions: Maximizing Small Spaces with Modular Systems and DIY Organizers” – https://woodcraftwiz.com/smart-workshop-storage-solutions-maximizing-small-spaces-with-modular-systems-and-diy-organizers/ and “DIY Smart Workshop Storage Solutions: Maximizing Space and Organization for Every Tool” – https://woodcraftwiz.com/diy-smart-workshop-storage-solutions-maximizing-space-and-organization-for-every-tool/.

Building Your Modular System: Step-by-Step Construction
Once your design is finalized, the construction phase focuses on precision and durability. A robust system will withstand the rigors of a woodworking environment for years to come.
Essential Tools and Techniques
For Building a Custom Modular Storage System for Woodworking Scraps, you’ll need standard woodworking tools:
- Table Saw or Circular Saw: For accurate sheet goods and lumber cuts.
- Miter Saw: For precise crosscuts.
- Drill/Driver: For fasteners and pilot holes.
- Router (optional): For dados, rabbets, or edge treatments.
- Clamps, Squares, Measuring Tape: For assembly and accuracy.
Joinery Methods:
- Screws and Glue: The simplest and most common method for plywood and MDF construction. Pocket hole joinery can also be very effective for strong, hidden joints.
- Dados and Rabbets: Create strong mechanical joints for shelves and dividers, offering excellent load-bearing capacity. These can be cut with a table saw or router.
- Dovetail or Box Joints (advanced): For premium, robust drawers or if you want to showcase your craftsmanship. For more on advanced joinery, refer to “Mastering Dovetail Joinery for Drawers: Hand and Router Methods for Cabinet Builders” – https://woodcraftwiz.com/mastering-dovetail-joinery-for-drawers-hand-and-router-methods-for-cabinet-builders/.
Constructing Modular Units
Focus on building repeatable units to ensure consistency and modularity.
1. Cutting Components:
- Accurately cut all plywood or MDF panels for carcases, shelves, and drawer parts according to your cut list.
- Label each piece to avoid confusion during assembly.
2. Assembling Carcases:
- Begin with the basic box forms for your cubbies or drawer units. Use glue and screws, ensuring all corners are square.
- For wall-mounted units, consider adding a French cleat to the back for easy installation and removal.
3. Building Drawers and Bins:
- Construct drawer boxes using butt joints with screws and glue, or explore more advanced joinery for durability.
- Install drawer slides (full extension slides are recommended for easy access to the back of the drawer).
- For open bins, consider using simple box construction or even repurposing existing plastic bins that fit your modular dimensions.
4. Adding Dividers and Organizers:
- Within larger units, add adjustable shelves or fixed dividers to create specific compartments for different scrap sizes.
- Think about removable dividers in drawers to allow for flexibility as your scrap inventory changes.
<code>
</code>Integrating and Maintaining Your System: Maximizing Material Use and Organization
The effectiveness of your custom modular storage system isn’t just in its construction; it’s in its integration into your daily workflow and ongoing maintenance.

Strategic Placement and Accessibility
Where you place your modular units significantly impacts their usability.
- Proximity to Work Areas: Store frequently used small scraps near your workbench. For example, a small set of modular bins for thin strips or small blocks could be integrated into your custom wood workbench design.
- Vertical Space: Utilize wall space with French cleat systems to keep floors clear and make visual inventory easier.
- Under-Bench Storage: Rolling carts or drawer units fit perfectly under workbenches, offering concealed yet accessible storage for bulkier items.
- Labeling is Key: Every drawer, bin, or cubby should be clearly labeled. Include information like wood species, approximate dimensions (e.g., “Oak blocks < 6×6” or “Pine strips > 24″”), and date of acquisition if relevant. Consider color-coding for different wood types.
Workflow Integration and Waste Reduction
A custom modular storage system isn’t passive; it’s an active tool for efficient woodworking.
- The “Scrap Station” Principle: Designate a specific area for processing new offcuts immediately after they are generated. Cut them to usable sizes, trim edges, and sort them into their respective modular bins. This prevents the “pile-up” syndrome.
- Pre-emptive Planning: Before starting a new project, consult your scrap inventory. Can a component be cut from an existing scrap instead of a new piece of lumber? This directly reduces material consumption and saves money.
- Inspiring Creativity: Having an organized, visible collection of scraps can spark new project ideas. A unique piece of figured maple might inspire a small box, or a collection of small offcuts could become acoustic diffusers or a segmented turning project.
Ongoing Maintenance and Adaptation for 2026
Your modular system needs periodic attention to remain effective.
Regular Audits: Every few months, go through your scrap inventory. Discard truly unusable pieces, consolidate similar items, and reassess categories.
Adaptation: As your woodworking focus shifts, so might your scrap collection. The modular nature allows you to add new units for specific materials or reconfigure existing ones. For instance, if you start doing more turning, you might dedicate a new module specifically for turning blanks.
Cleanliness: Keep your storage units free of sawdust and debris. This maintains a professional workshop environment and prevents contamination of your materials.

Conclusion
Building a Custom Modular Storage System for Woodworking Scraps: Maximizing Material Use and Organization is a transformative project for any woodworker. It moves beyond simple tidiness, creating a highly functional framework that enhances efficiency, reduces material waste, and fosters a more sustainable and creative approach to your craft. By carefully planning, constructing durable units, and integrating the system into your daily workflow, you’ll find yourself reaching for those “scraps” not as an afterthought, but as a valuable, pre-sorted resource. In 2026, a well-organized shop is not just a sign of professionalism; it’s a testament to smart, eco-conscious woodworking.
Actionable Next Steps:
- Inventory Your Scraps: Dedicate an hour to truly assess your current scrap situation – what you have, what you use, what you discard.
- Sketch Your Layout: Draft a basic plan for where your modular units will go in your workshop.
- Prioritize Categories: Decide on the 3-5 most important categories for your scraps (e.g., hardwoods, plywood, thin strips).
- Start Small: Begin by building one or two basic modular units, like a set of open cubbies or a single drawer bank, and expand from there.
