
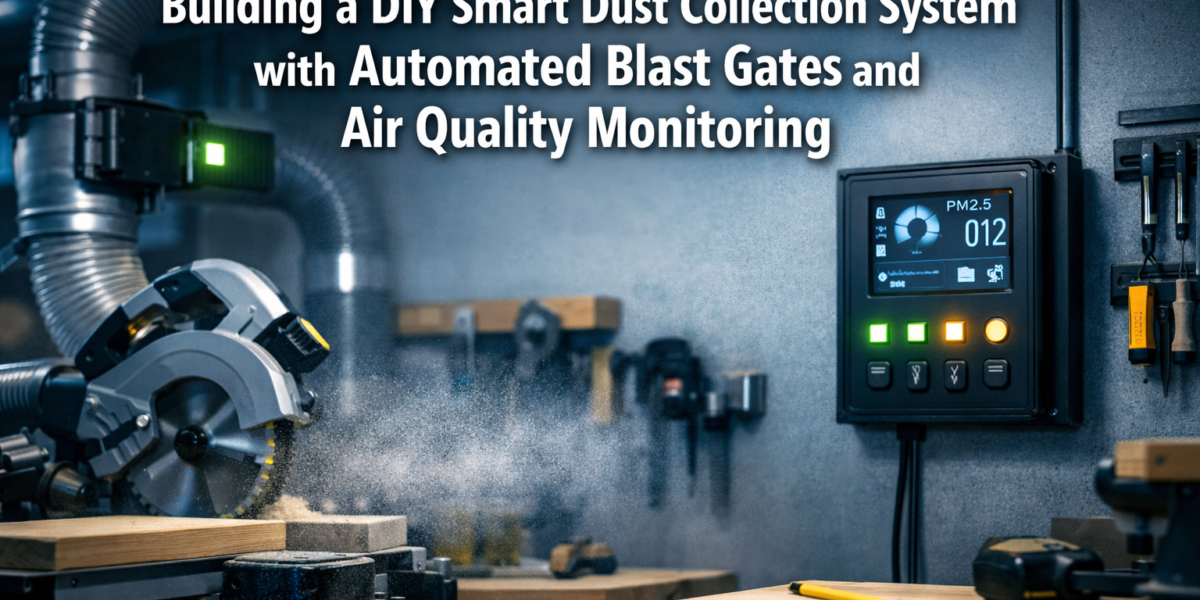

The air in many workshops contains up to 100 times more dust particles than outdoor air, a silent threat that can severely impact long-term health and diminish woodworking precision. While traditional dust collectors offer a basic solution, they often lack the intelligence to respond dynamically to workshop activities or provide real-time air quality insights. This article explores how to bridge that gap, guiding makers through Building a DIY Smart Dust Collection System with Automated Blast Gates and Air Quality Monitoring. By integrating smart home technology into your workshop’s dust collection, you can achieve improved air quality, enhanced efficiency, and truly automated operation, moving beyond basic dust extraction to a sophisticated, responsive environment.
Key Takeaways

- A smart dust collection system significantly improves workshop air quality and operational efficiency.
- Automated blast gates, controlled by microcontrollers, direct suction only where needed.
- Integrating air quality sensors provides real-time particulate matter data, triggering system responses.
- The system can be activated by tool use or scheduled, optimizing energy consumption.
- This DIY project combines woodworking, electronics, and programming for a custom, highly effective solution.
The Foundation: Understanding Smart Dust Collection Systems
Building a DIY Smart Dust Collection System with Automated Blast Gates and Air Quality Monitoring begins with a clear understanding of its core components and how they interact. A traditional dust collection system relies on manual intervention: turning on the collector and manually opening/closing blast gates for each tool. A smart system automates these processes, making your workshop cleaner, safer, and more efficient.
Core Components of a Smart System
At the heart of any smart dust collection system are several key elements that work in concert:
- Dust Collector: The primary unit that generates suction. This can be a single-stage, two-stage (cyclone), or dedicated dust extractor.
- Ductwork: The network of pipes that transports dust and chips from tools to the collector.
- Blast Gates: Valves within the ductwork that open or close specific branches, directing airflow.
- Automated Actuators: Small motors (servos or stepper motors) attached to blast gates, allowing them to open and close electronically.
- Microcontroller: The “brain” of the system (e.g., Raspberry Pi, ESP32, Arduino) that processes data and controls actuators.
- Air Quality Sensors: Devices that detect airborne particulate matter (PM2.5, PM10) to monitor dust levels in real-time.
- Tool Activation Sensors: Methods to detect when a tool is running (e.g., current sensors, smart plugs, vibration sensors).
- User Interface: A way to monitor and control the system (e.g., web dashboard, smartphone app, physical control panel).
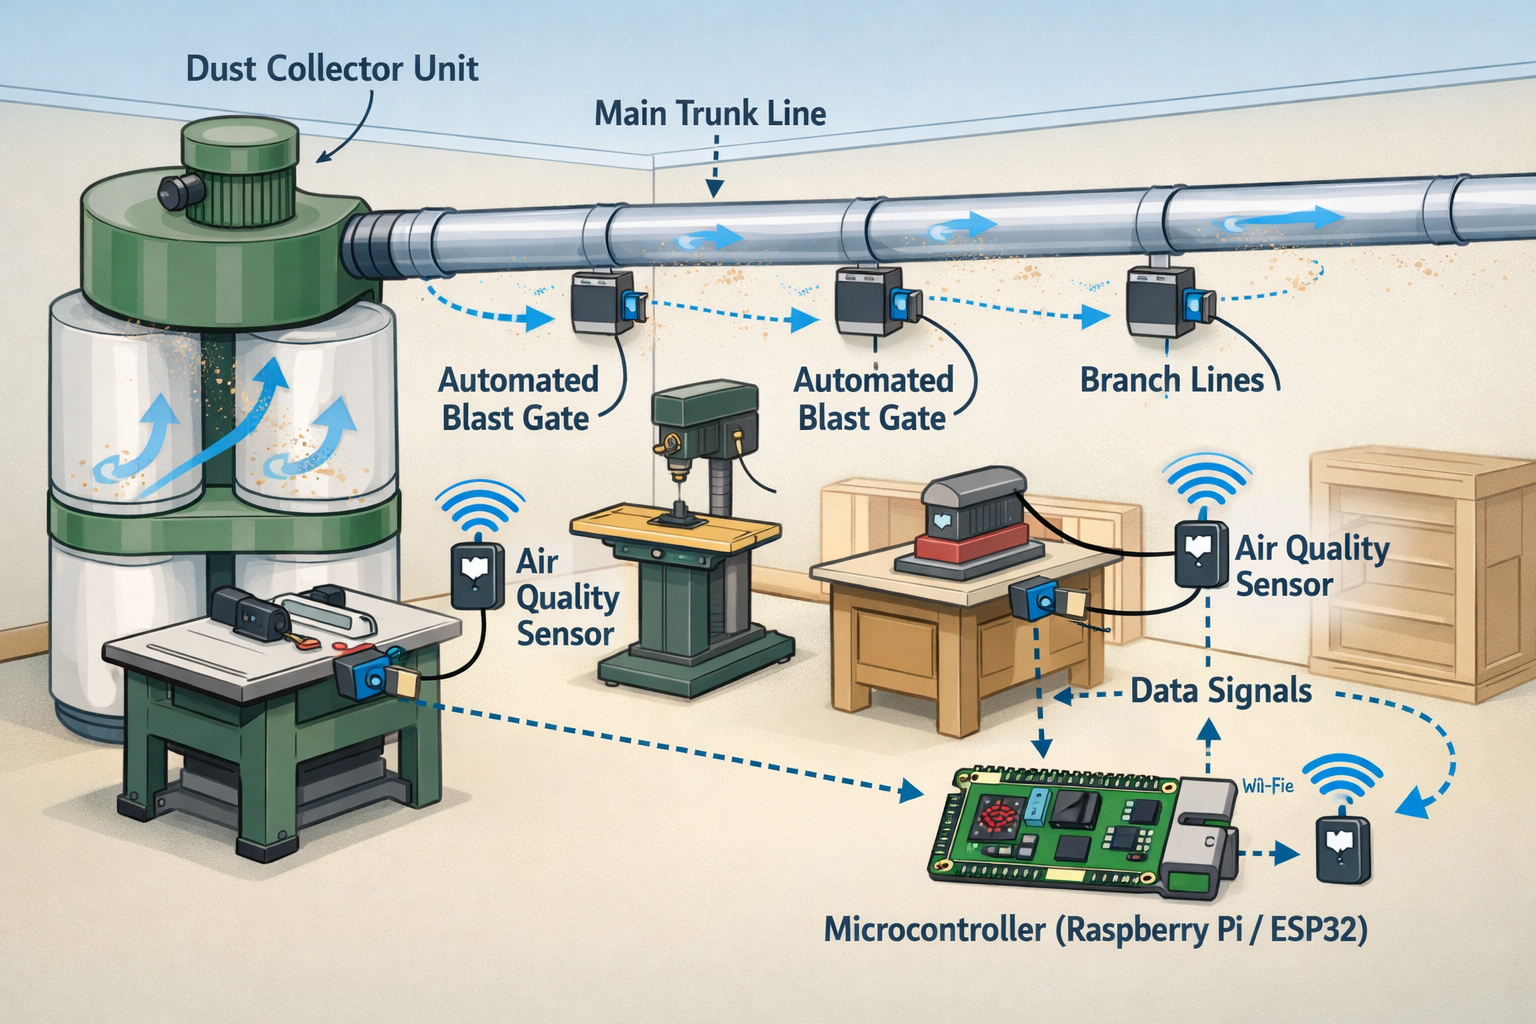
A smart system functions by monitoring air quality and tool usage. When a tool is activated, or when air quality degrades, the microcontroller receives this signal. It then commands the appropriate automated blast gate to open, powers on the dust collector, and begins actively extracting dust. Once the operation is complete and air quality returns to acceptable levels, the system can automatically shut down the collector and close the blast gate, saving energy and reducing noise.
Why Go Smart? Benefits Beyond Basic Dust Collection
The advantages of Building a DIY Smart Dust Collection System with Automated Blast Gates and Air Quality Monitoring are substantial:
- Improved Air Quality: Real-time monitoring and automated response drastically reduce airborne dust, protecting your respiratory health.
- Enhanced Efficiency: The system only runs when needed and directs suction precisely to the active tool, maximizing CFM (Cubic Feet per Minute) effectiveness and minimizing energy waste.
- Convenience and Automation: No more manual blast gate adjustments or forgetting to turn on the collector. The system handles it.
- Extended Equipment Life: Less dust circulating means less wear and tear on your tools and electronics.
- Safer Workspace: Reduced dust leads to better visibility and a cleaner environment, minimizing slip hazards from sawdust accumulation.
- Cost Savings: Lower energy consumption from optimized operation can lead to reduced electricity bills over time.
“A truly smart workshop is one where environmental control isn’t an afterthought, but an integrated, reactive component that safeguards both health and efficiency.”
For those interested in further integrating IoT into their workshops, consider exploring Building a DIY Smart Workshop Dust Collection System: Integrating IoT for advanced concepts.
Automated Blast Gates: Design and Implementation
Automated blast gates are the linchpin of an efficient smart dust collection system. They allow the microcontroller to precisely control airflow. Designing and implementing these gates involves a blend of woodworking, electronics, and basic programming.
Designing Your Automated Blast Gates
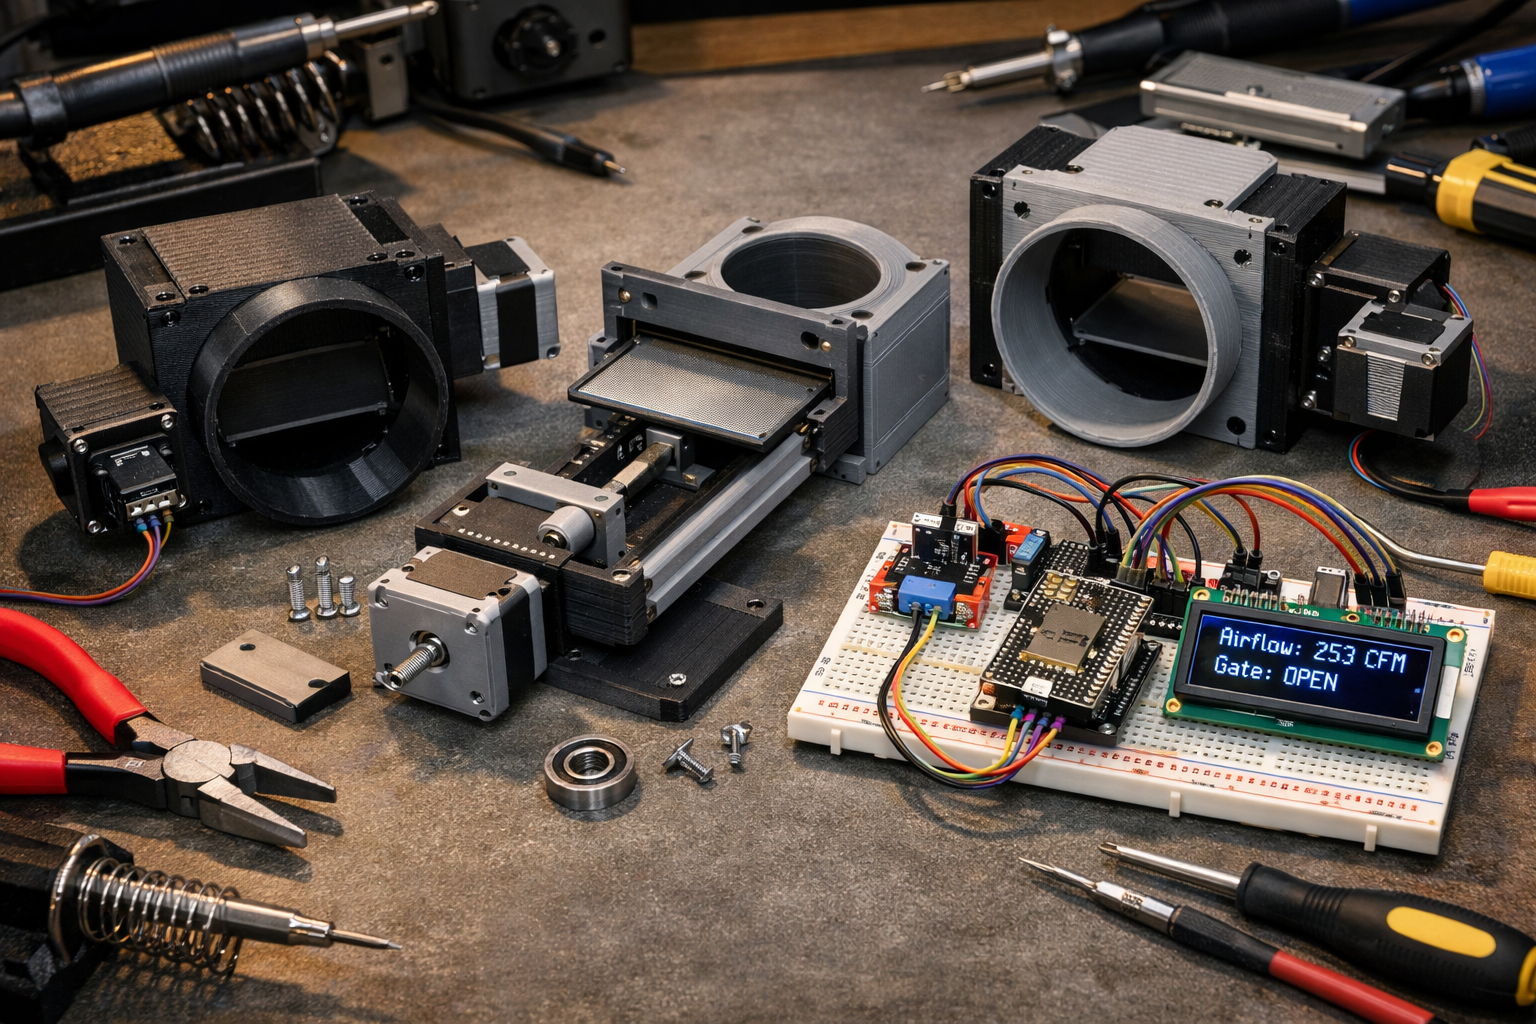
Traditional blast gates are often made from wood or metal. For automation, consider designs that are compatible with small actuators.
- Materials: PVC pipe and fittings are popular for ductwork. Gates can be 3D-printed, fabricated from plywood, or modified commercial gates. PVC is often preferred for its smooth interior, which minimizes air resistance.
- Actuator Choice:
- Servo Motors: Good for simpler open/close operations. They are relatively inexpensive and easy to control.
- Stepper Motors: Offer more precise control over the gate’s position (e.g., partial open) but require more complex control circuitry.
- Gate Mechanism: The most common design involves a sliding blade that moves within a housing. The motor connects to this blade via a linkage, rack and pinion, or lead screw.
- Sealing: Ensure the gate creates a good seal when closed to prevent air leaks, which can reduce suction at active ports. Gaskets or tight tolerances are crucial.
Wiring and Control: The Electronic Heartbeat
Each automated blast gate requires an actuator, which needs power and a signal from the microcontroller.
Required Components per Blast Gate:
- Actuator (Servo/Stepper Motor): As discussed above.
- Motor Driver: (Especially for stepper motors) to provide the necessary current and control signals from the microcontroller.
- Limit Switches: (Optional but recommended) Small switches at the fully open and fully closed positions provide feedback to the microcontroller, confirming the gate’s state. This prevents motors from continuously trying to move beyond their physical limits.
- Wiring: Appropriate gauge wire for power and signal.
Microcontroller Integration:
An ESP32 or Raspberry Pi is an excellent choice for this project due to their Wi-Fi capabilities, allowing for remote monitoring and control.
- Power Supply: A dedicated power supply (e.g., 5V or 12V, depending on your motors) for the motors is essential. Do not power motors directly from the microcontroller’s GPIO pins.
- Connections: Connect the motor driver (if used) to the microcontroller’s digital output pins. Connect limit switches to input pins with pull-up or pull-down resistors.
- Code (Firmware): The microcontroller’s code will:
- Read inputs from tool activation sensors and air quality sensors.
- Control the state of each blast gate (open/close) based on programmed logic.
- Communicate with a central server or user interface (if a web dashboard is implemented).
<code class="language-cpp">// Example Arduino/ESP32 pseudocode for a single blast gate
#include <Servo.h>

Servo blastGateServo;
const int servoPin = 9;    // Connect servo signal to this pin
const int openPin = 2;     // Input pin for 'open' command (e.g., from tool sensor)
const int closePin = 3;    // Input pin for 'close' command (e.g., from air quality sensor)
const int openLimit = 4;   // Input pin for 'open' limit switch
const int closeLimit = 5;  // Input pin for 'close' limit switch

void setup() {
  blastGateServo.attach(servoPin);
  pinMode(openPin, INPUT_PULLUP); // Use pull-up for button/sensor
  pinMode(closePin, INPUT_PULLUP);
  pinMode(openLimit, INPUT_PULLUP);
  pinMode(closeLimit, INPUT_PULLUP);
  Serial.begin(115200);
  blastGateServo.write(0); // Start closed
}

void loop() {
  if (digitalRead(openPin) == LOW && digitalRead(openLimit) == HIGH) {
    // If open command received and not already fully open
    Serial.println("Opening blast gate...");
    blastGateServo.write(90); // Adjust angle for open position
    delay(1000); // Give time to open
  } else if (digitalRead(closePin) == LOW && digitalRead(closeLimit) == HIGH) {
    // If close command received and not already fully closed
    Serial.println("Closing blast gate...");
    blastGateServo.write(0); // Adjust angle for closed position
    delay(1000); // Give time to close
  }
}
</code>
This pseudocode demonstrates the basic logic. A real-world system would incorporate more robust error checking, state management, and communication protocols. When Building a Compact and Ergonomic Workbench for Small Workshops, plan for easy access to your dust collection ductwork for maintenance and smart system integration.

Air Quality Monitoring and System Automation
The “smart” aspect of your dust collection system truly shines when integrated with air quality monitoring and automated responses. This allows the system to react dynamically to workshop conditions.
Selecting and Integrating Air Quality Sensors
Air quality sensors, specifically particulate matter (PM) sensors, are crucial for this project.
- Sensor Types:
- PMS5003 / PMS7003: Popular, relatively inexpensive laser-scattering sensors that provide PM1.0, PM2.5, and PM10 concentration data. They are accurate enough for workshop environments.
- SDS011: Another common and affordable option.
- Data Output: These sensors typically communicate via UART (serial communication). Your microcontroller will read this data.
- Placement: Place sensors strategically in your workshop, ideally near the main work area and away from direct dust streams from a running tool to get an accurate ambient reading.
Example Air Quality Data Interpretation:
| PM2.5 Concentration (µg/m³) | Air Quality Index (AQI) Equiv. | Implication |
|---|---|---|
| 0 – 12 | Good (0-50) | Minimal health impact. |
| 12.1 – 35.4 | Moderate (51-100) | May affect sensitive individuals. Start collection. |
| 35.5 – 55.4 | Unhealthy for Sensitive Groups | System should be in full operation. |
| > 55.5 | Unhealthy / Very Unhealthy | High alert. Ensure maximum collection. |
Note: These are general guidelines; specific thresholds can be customized.
Automation Logic and User Interface
The microcontroller processes sensor data and executes pre-defined logic.
Automation Scenarios:
- Tool-Activated Collection:
- A current sensor detects a woodworking tool (e.g., table saw) drawing power.
- Microcontroller identifies the active tool, opens the corresponding blast gate, and turns on the dust collector (via a smart plug or relay).
- System runs for a set duration after the tool stops, or until air quality falls below a threshold.
- Air Quality Triggered Collection:
- Air quality sensor detects PM2.5 levels exceeding a user-defined threshold (e.g., 30 µg/m³).
- Microcontroller activates the dust collector and opens all or specific blast gates (e.g., a general ambient air intake).
- System runs until air quality returns to an acceptable level.
- Scheduled Operation:
- Run the dust collector for a few minutes before starting work to clear ambient dust.
- Run a ‘purge’ cycle after a heavy dust-producing session.
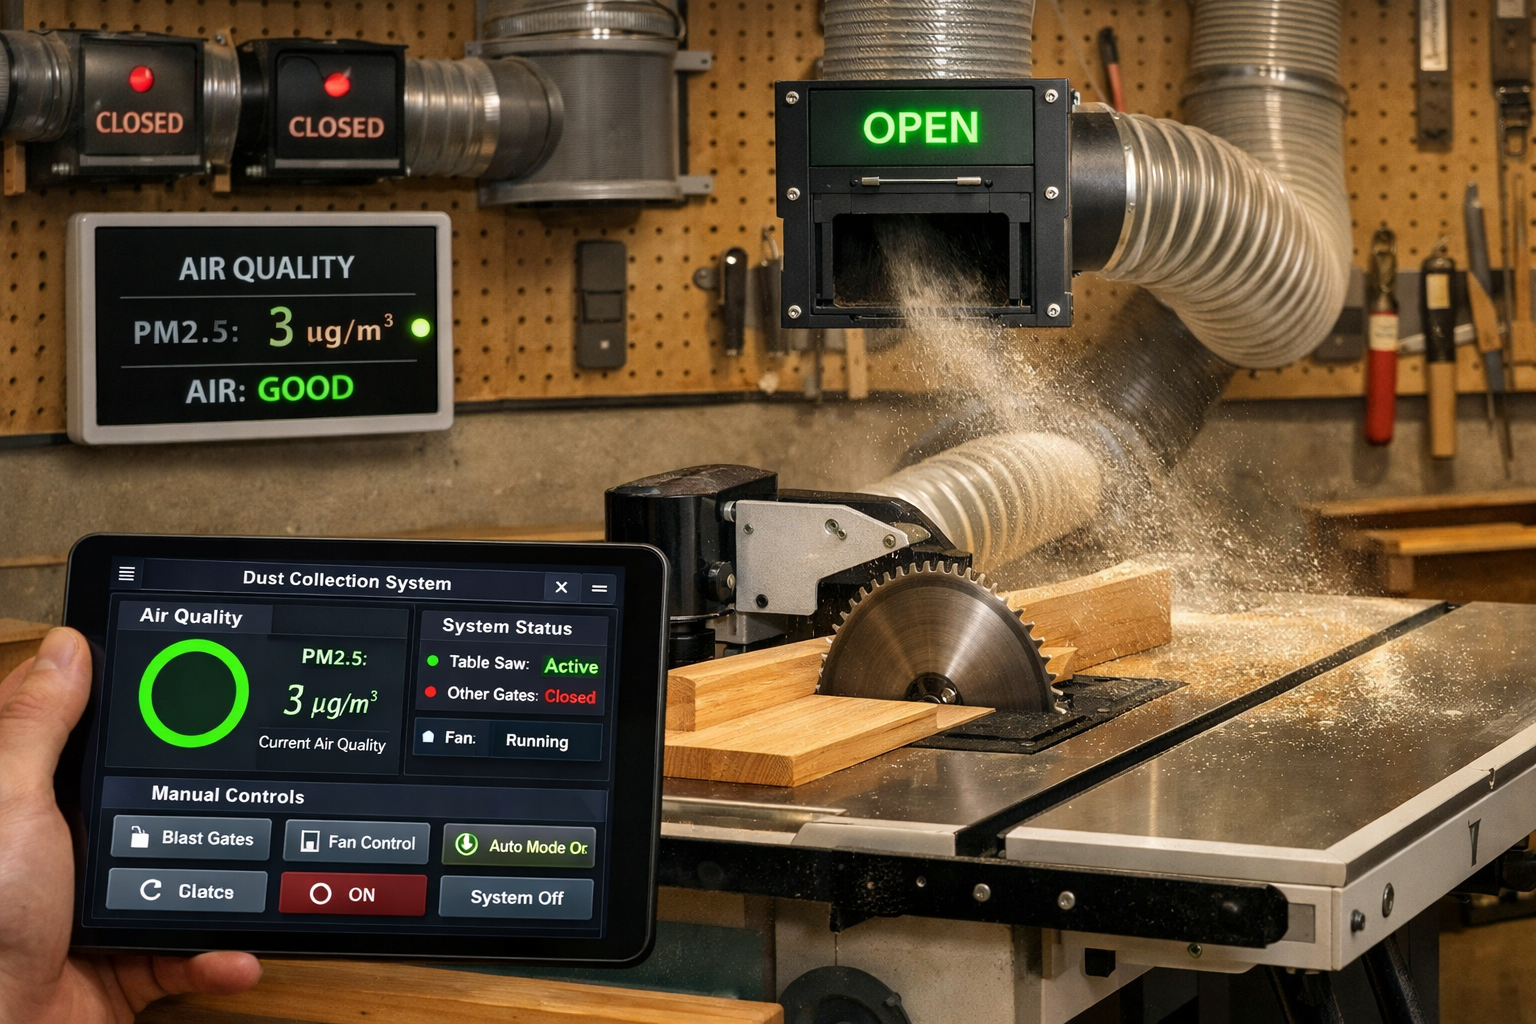
User Interface (UI):
A good UI allows you to monitor the system and override automated controls.
- Web Dashboard: Using a small web server on the ESP32 or Raspberry Pi, you can create a simple dashboard accessible from any device on your network. This can display real-time air quality, current active gates, and provide buttons for manual control.
- Mobile App: More advanced users might develop a custom app or integrate with existing smart home platforms (Home Assistant, OpenHAB).
- Physical Panel: A small LCD screen and a few buttons on the workshop wall can offer immediate feedback and control.
For advanced woodworking projects, precision is key. Consider Mastering Modern Hand-Cut Joinery: Adapting Classics for Live Edge and Modular Furniture to refine your craft in a dust-free environment enabled by your smart system.
Advanced Considerations for 2026
As of 2026, smart home technology continues to evolve rapidly.
- Voice Control: Integrate with virtual assistants (Alexa, Google Assistant) for hands-free control: “Alexa, turn on dust collector.”
- Machine Learning: Over time, the system could learn your typical workshop patterns and pre-emptively activate collection for certain tools or times of day.
- Predictive Maintenance: Monitor motor current draws or vibration on the dust collector to detect issues before they cause breakdowns.
- Filter Monitoring: Pressure sensors across the dust collector filter could indicate when it needs cleaning or replacement, notifying you automatically.
Key Components for Advanced Automation:
| Component | Function | Example Model/Type |
|---|---|---|
| Microcontroller | System ‘Brain’, Wi-Fi enabled | ESP32-WROOM-32, Raspberry Pi Zero 2 W |
| PM Sensor | Detects airborne dust particles | PMS5003, SDS011 |
| Current Sensor | Detects tool activation by monitoring current draw | ACS712, PZEM-004T |
| Solid State Relay | Safely switches high-power devices (dust collector) | SSR-40 DA, Smart Wi-Fi Plug |
| Servo Motor | Actuates blast gates (simple open/close) | SG90, MG996R |
| Stepper Motor | Actuates blast gates (precise positioning) | NEMA 17 + A4988 Driver |
| Limit Switches | Provides feedback on gate position | Micro Roller Lever Switch |
| Display (Optional) | Real-time status, air quality readings | 0.96″ I2C OLED, 16×2 LCD |
Remember, safety is paramount. When dealing with high-voltage devices like dust collectors, always consult with a qualified electrician or ensure proper safety protocols are followed for relays and wiring.

Conclusion
Building a DIY Smart Dust Collection System with Automated Blast Gates and Air Quality Monitoring is a transformative project for any serious woodworker or maker. It elevates your workshop from a basic space to an intelligent, responsive environment that actively protects your health and optimizes your workflow. By combining readily available electronics, creative design, and a bit of coding, you can construct a system that not only captures dust but also thinks for itself, ensuring cleaner air and greater efficiency.
The journey involves understanding the interplay of sensors, microcontrollers, and actuators, culminating in a system that can respond dynamically to your activities. From automated blast gates that open precisely when a tool is in use to air quality sensors that trigger a clean-up cycle, every component works towards a healthier, more productive workspace. As technology progresses, the potential for even greater integration, such as voice control and predictive maintenance, will continue to enhance these systems. Embarking on this DIY venture is an investment in your well-being and the longevity of your workshop.
Actionable Next Steps:
- Plan Your Layout: Map out your workshop, identifying all tools and potential dust collection points.
- Research Components: Source your microcontroller, sensors, motors, and smart plugs based on your specific needs and budget.
- Design Blast Gates: Decide on a design for your automated blast gates (3D print, wood, modified commercial) and choose appropriate actuators.
- Develop Firmware: Start with basic control for one blast gate and one sensor, then gradually expand the code to integrate all components.
- Build and Test: Assemble your components, focusing on electrical safety, and rigorously test each part of the system before full deployment.
- Iterate and Optimize: Monitor your system’s performance and air quality. Adjust thresholds, timing, and logic for optimal results.
