


A shocking 85% of woodworkers and DIY enthusiasts claim limited space is their biggest obstacle to pursuing their craft in 2026. This common challenge often leads to projects being abandoned or never started. However, owning a small living area or a cramped garage doesn’t mean sacrificing your passion for woodworking. Instead, it necessitates intelligent, adaptable solutions. This article delves into Building a Portable Folding Workbench for Small Spaces: Maximizing Functionality and Storage on a Budget, providing a comprehensive guide to constructing a versatile workstation that transforms your crafting experience without consuming your entire footprint. This DIY project offers the flexibility to set up a robust workspace when needed and neatly tuck it away when not, proving that innovation can overcome spatial constraints and empower creativity.
Key Takeaways
- A portable folding workbench is an essential solution for woodworkers and DIYers with limited space.
- Careful design considerations, including dimensions, materials, and folding mechanisms, are crucial for functionality and portability.
- Common, budget-friendly materials like plywood and 2x4s are ideal for a robust and affordable build.
- Integrating features like dog holes, T-track, and shelves significantly enhances the workbench’s utility and storage capacity.
- Proper maintenance and smart storage solutions extend the life and usability of your folding workbench.
Designing Your Portable Folding Workbench for Small Spaces: Maximizing Functionality and Storage on a Budget
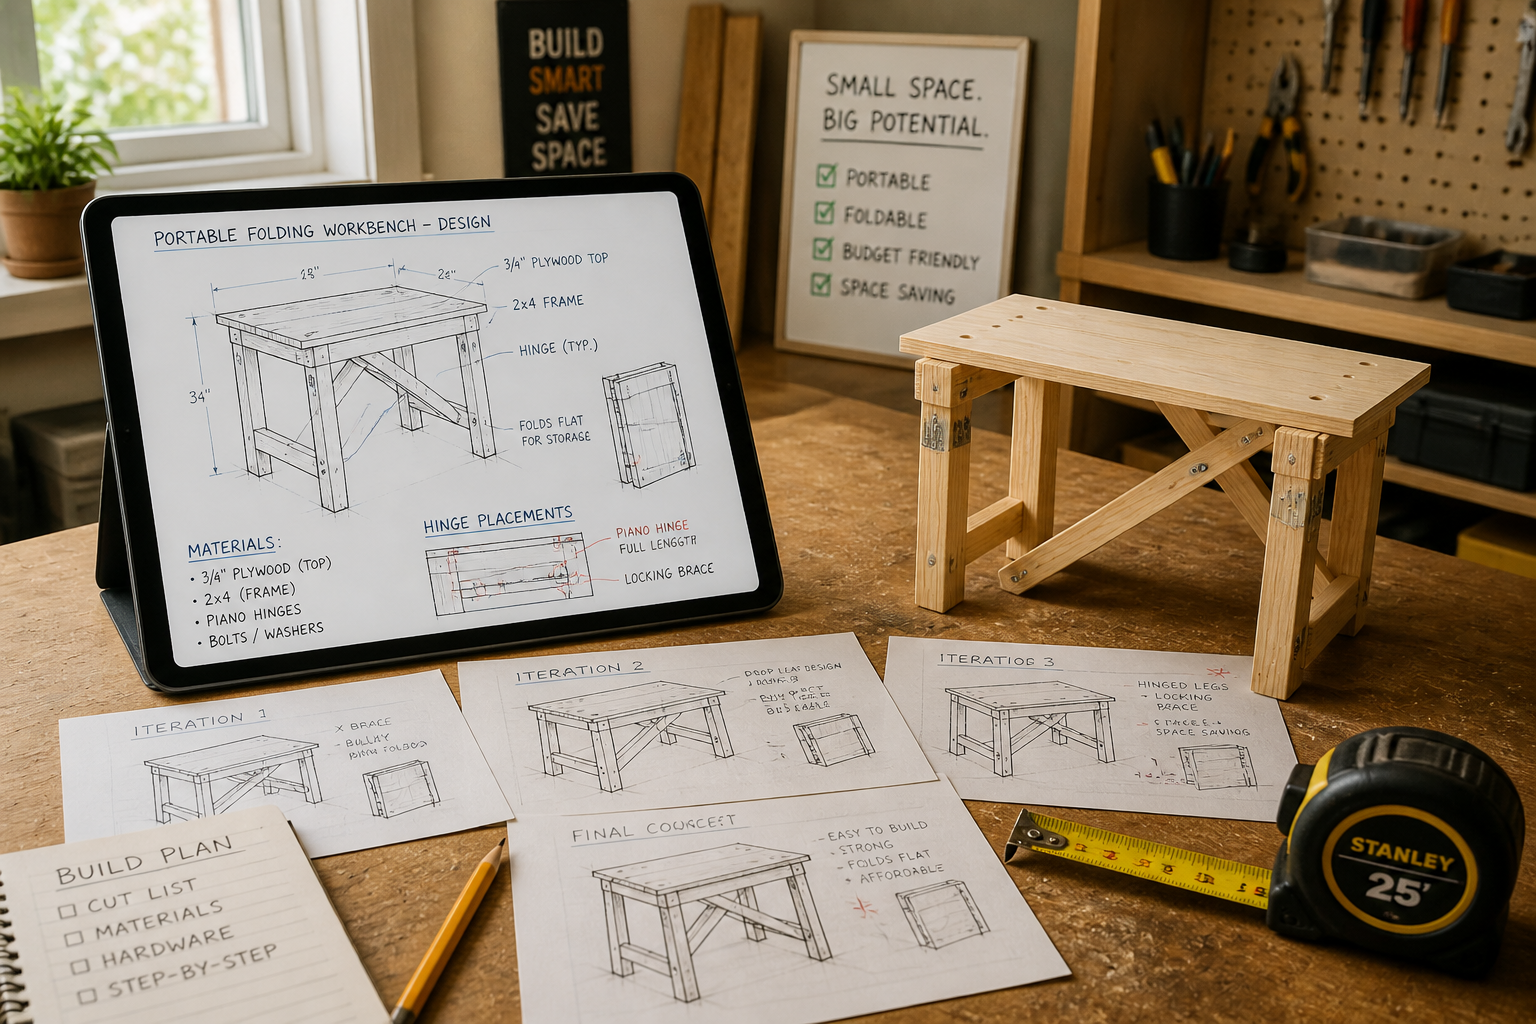
The foundation of any successful woodworking project begins with thoughtful design, and a portable folding workbench is no exception. For those working within confined areas, every inch counts, making the design phase critical for Building a Portable Folding Workbench for Small Spaces: Maximizing Functionality and Storage on a Budget. The goal is to create a sturdy, usable surface that can disappear when not in use, without compromising stability or utility.

Essential Design Considerations
Before cutting any material, consider these crucial aspects:
- Dimensions:
- Working Height: Aim for a comfortable working height, typically between 34-38 inches, to prevent back strain. This can be customized based on your personal height.
- Work Surface Area: Balance the need for a sufficient workspace with the desire for a compact folded footprint. A common size might be 24×48 inches, offering ample room for many projects without being overly cumbersome.
- Folded Dimensions: Crucially, determine how compact the workbench needs to be when folded. Will it slide under a bed, hang on a wall, or stand upright in a corner? This dictates the design of the legs and tabletop.
- Materials:
- Plywood: A popular choice for its stability, relatively low cost, and ease of cutting. Baltic birch plywood is excellent for durability, but standard construction-grade plywood can suffice for budget builds.
- Lumber (e.g., 2x4s): Used for the frame and legs, providing structural integrity.
- Hardware: Heavy-duty hinges are non-negotiable for a folding workbench. Look for sturdy gate hinges or piano hinges for robust support. Locking mechanisms for the legs (e.g., barrel bolts, folding leg brackets) are also vital for safety and stability during use.
- Folding Mechanism:
- Tabletop Fold: Some designs allow the tabletop itself to fold in half, reducing the surface area.
- Legs Fold Flat: The most common approach involves legs that fold flat against the underside of the tabletop. This is often achieved with simple pivot points and locking braces.
- Detachable Legs: For ultimate compactness, some designs feature legs that can be entirely removed and stored separately.
A well-designed portable workbench prioritizes both utility and efficient storage. For instance, incorporating a small shelf underneath that folds with the legs can provide immediate access to frequently used tools. Similarly, integrating a pegboard section on one side that’s exposed when folded can maximize vertical storage in a small workshop. Consider how your compact and ergonomic workbench will integrate with other space-saving solutions you might employ.
Sketching and Prototyping
Before committing to cutting expensive materials, create detailed sketches or even a small-scale cardboard prototype. This allows for testing the folding mechanism, assessing stability, and refining dimensions. Software like SketchUp or Fusion 360 can be invaluable for creating 3D models and visualizing the finished product. Pay close attention to how the legs will lock securely when the workbench is open, preventing accidental collapse. Stability is paramount for safety and effective work.
“The true test of a portable workbench isn’t just how small it folds, but how solid it feels when fully deployed. Stability ensures safety and precision in your work.”
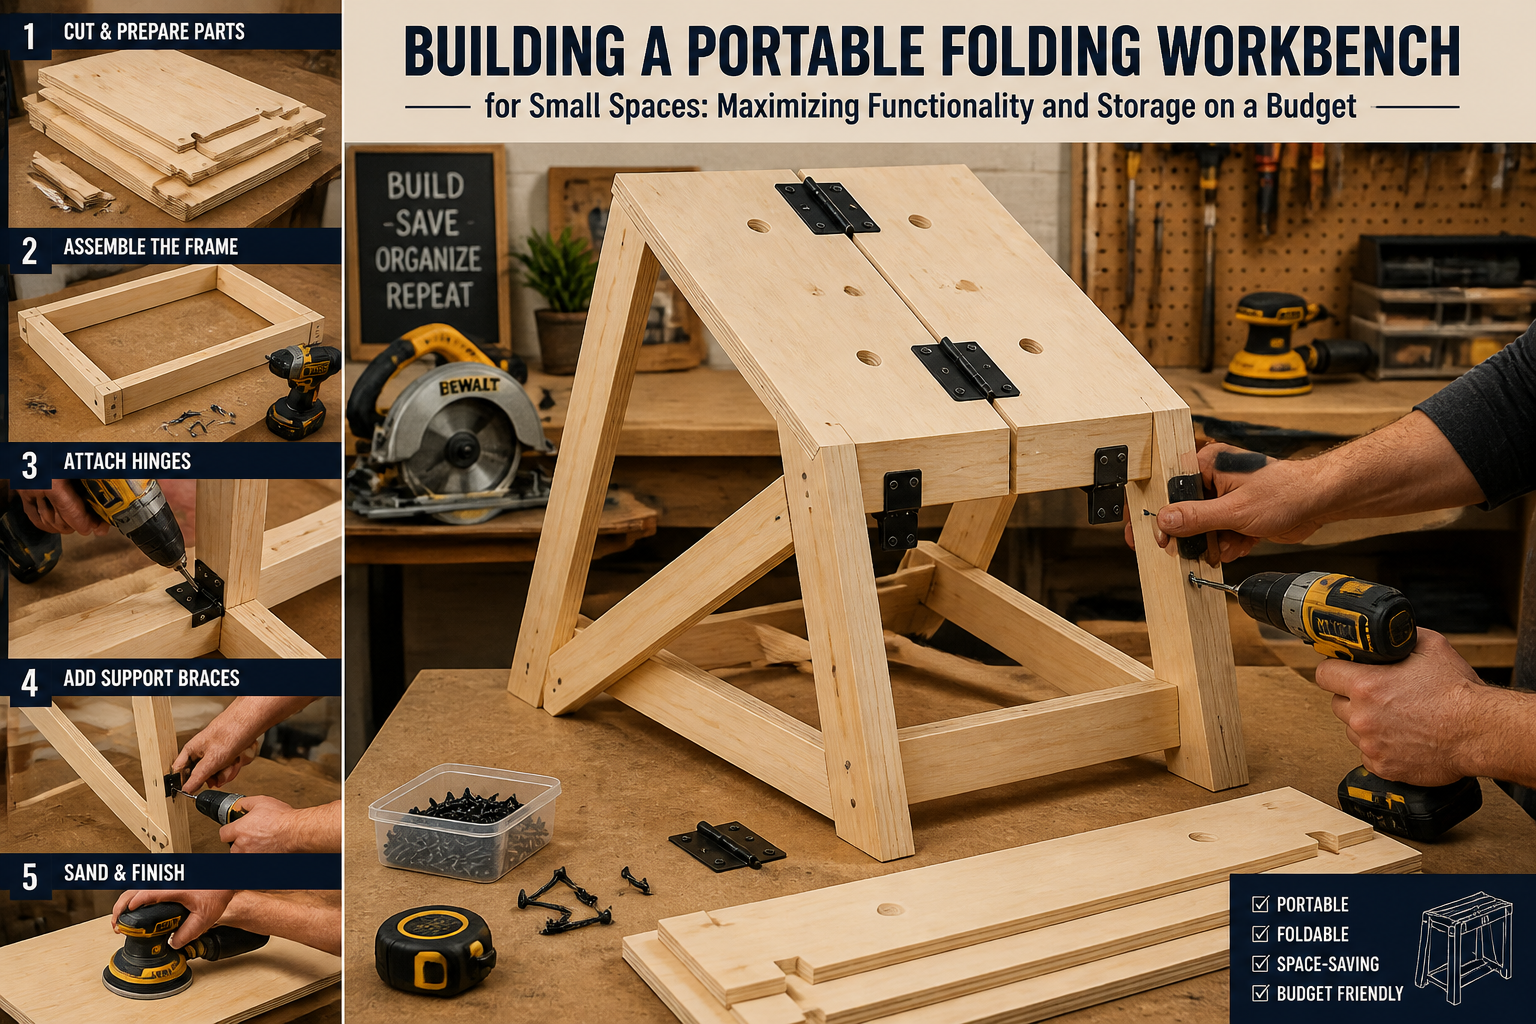
Constructing Your Robust and Portable Workbench
With a well-thought-out design, the construction phase for Building a Portable Folding Workbench for Small Spaces: Maximizing Functionality and Storage on a Budget can begin. This section guides you through the process, emphasizing key steps for durability and ease of use.
Tools and Materials Checklist
Before you start, gather your essential tools and materials:
Tools:
- Circular saw or miter saw (for precise cuts)
- Drill/driver
- Measuring tape
- Square
- Pencil
- Sander (orbital or block)
- Safety glasses and hearing protection
- Clamps
Materials:
- Plywood: (e.g., 3/4-inch for top, 1/2-inch for shelves if applicable)
- Lumber: (e.g., 2x4s or 2x3s for frame and legs)
- Heavy-duty hinges: (e.g., 4-6 large gate hinges or 2 piano hinges)
- Locking leg braces/mechanisms: (e.g., folding table leg brackets, barrel bolts, or custom wooden latches)
- Wood screws: (various lengths, appropriate for material thickness)
- Wood glue: (PVA wood glue for strong joints)
- Finish: (polyurethane, paint, or oil for protection)
Step-by-Step Construction Guide
- Cut Materials: Based on your design, accurately cut all plywood and lumber pieces. Ensure all cuts are square for optimal assembly. Remember to consider the kerf of your saw blade for precise measurements.
- Assemble the Tabletop Frame: Build a sturdy frame for the plywood top using 2x4s or 2x3s. This frame will provide rigidity and a mounting surface for the legs. Use wood glue and screws to create strong butt joints or pocket hole joints for a cleaner look.
- Attach the Workbench Top: Securely attach the plywood top to the frame using wood glue and screws. Countersink screws for a flush finish. Sand the surface smooth at this stage to prepare it for finishing.
- Construct the Legs: Each pair of legs should form a stable unit. Consider an “A-frame” design or simple rectangular frames for each end. The length of the legs will determine your working height. Ensure they are perfectly matched in length.
- Install Hinges for Legs: This is the most critical step for the folding mechanism.
- Position the legs on the underside of the workbench frame, ensuring they can swing freely.
- Attach heavy-duty hinges to allow the legs to fold flat against the underside of the tabletop. Ensure the hinges are robust and well-secured with appropriate screws. For stability, use two hinges per leg assembly.
- Integrate Locking Mechanisms: Install reliable locking mechanisms to secure the legs when the workbench is in its open, functional position. This could involve folding table leg brackets that lock automatically, or a combination of barrel bolts and cross-braces for added stability. Test the locking mechanism thoroughly to ensure it engages securely and is easy to disengage.
- Add Reinforcements and Features:
- Cross Bracing: For ultimate stability, add cross-bracing between the leg frames. This can be removable or fold with the legs.
- Storage Solutions: Consider adding a small shelf that folds with the legs, or pre-drilling dog holes into the workbench top for clamping.
- Handle: Attach a sturdy handle for easy transport when folded.
- Finishing: Apply a protective finish to all wooden surfaces. Polyurethane is excellent for durability, especially for a workbench that will see heavy use. This also makes the surface easier to clean.
For those who frequently move their tools, consider building a mobile dust collection cart which can perfectly complement your portable workbench, keeping your small workspace clean and organized. Remember, consistent drilling practices are key; for insights on precision, explore resources like drill press spindle travel.
Maximizing Functionality and Storage on a Budget
Once the workbench is built, the next step is to enhance its utility and storage capabilities, especially important for Building a Portable Folding Workbench for Small Spaces: Maximizing Functionality and Storage on a Budget. The goal is to make every square inch work harder, both when the bench is in use and when it’s stored.
Enhancing Functionality
- Dog Holes: Drill a grid of 3/4-inch or 20mm dog holes into the workbench top. These allow for the use of bench dogs, clamps, and various jigs, greatly expanding your workholding capabilities. This is a simple addition that offers immense versatility, mimicking professional workbenches.
- T-Track System: Install aluminum T-track flush with the workbench surface. T-track allows for quick and secure clamping anywhere along its length, perfect for routing operations or holding down irregularly shaped pieces.
- Vise Integration: While a full-sized woodworking vise might add too much bulk, consider a small, clamp-on vise that can be easily attached and removed. Alternatively, some designs can integrate a small face vise into the side of the workbench frame.
- Removable Fences and Stops: Create simple wooden fences or stops that can be clamped to the workbench for precise cutting or routing operations. These can be stored separately when not needed.
Integrating Storage Solutions
- Under-Workbench Shelf/Tray: Even a small, fixed or folding shelf beneath the main work surface can hold frequently used tools like pencils, measuring tapes, and small hand tools, keeping them within reach.
- Side-Mounted Tool Holders: When the workbench is folded, its side surfaces become available. Install pegboard, magnetic strips, or small hooks to hang hand tools, safety gear, or even small bins for fasteners. This transforms the stored workbench into a vertical tool organizer.
- Custom Storage Boxes: Build custom wooden boxes or drawers that fit snugly under the workbench when it’s open. These can be easily removed when the bench needs to be folded. For inspiration, consider techniques used in wooden storage chests with hinged lids.
- Wheel/Caster Integration: For easier portability, especially if the workbench is somewhat heavy, consider adding folding or retractable casters. This allows you to roll it into position or storage with minimal effort. Ensure the casters can be locked or retracted to maintain stability during work.
- Magnetic Tool Strips: Affix magnetic strips to the sides or underside of the workbench to hold metal tools like chisels, screwdrivers, and wrenches, keeping them secure and easily accessible.
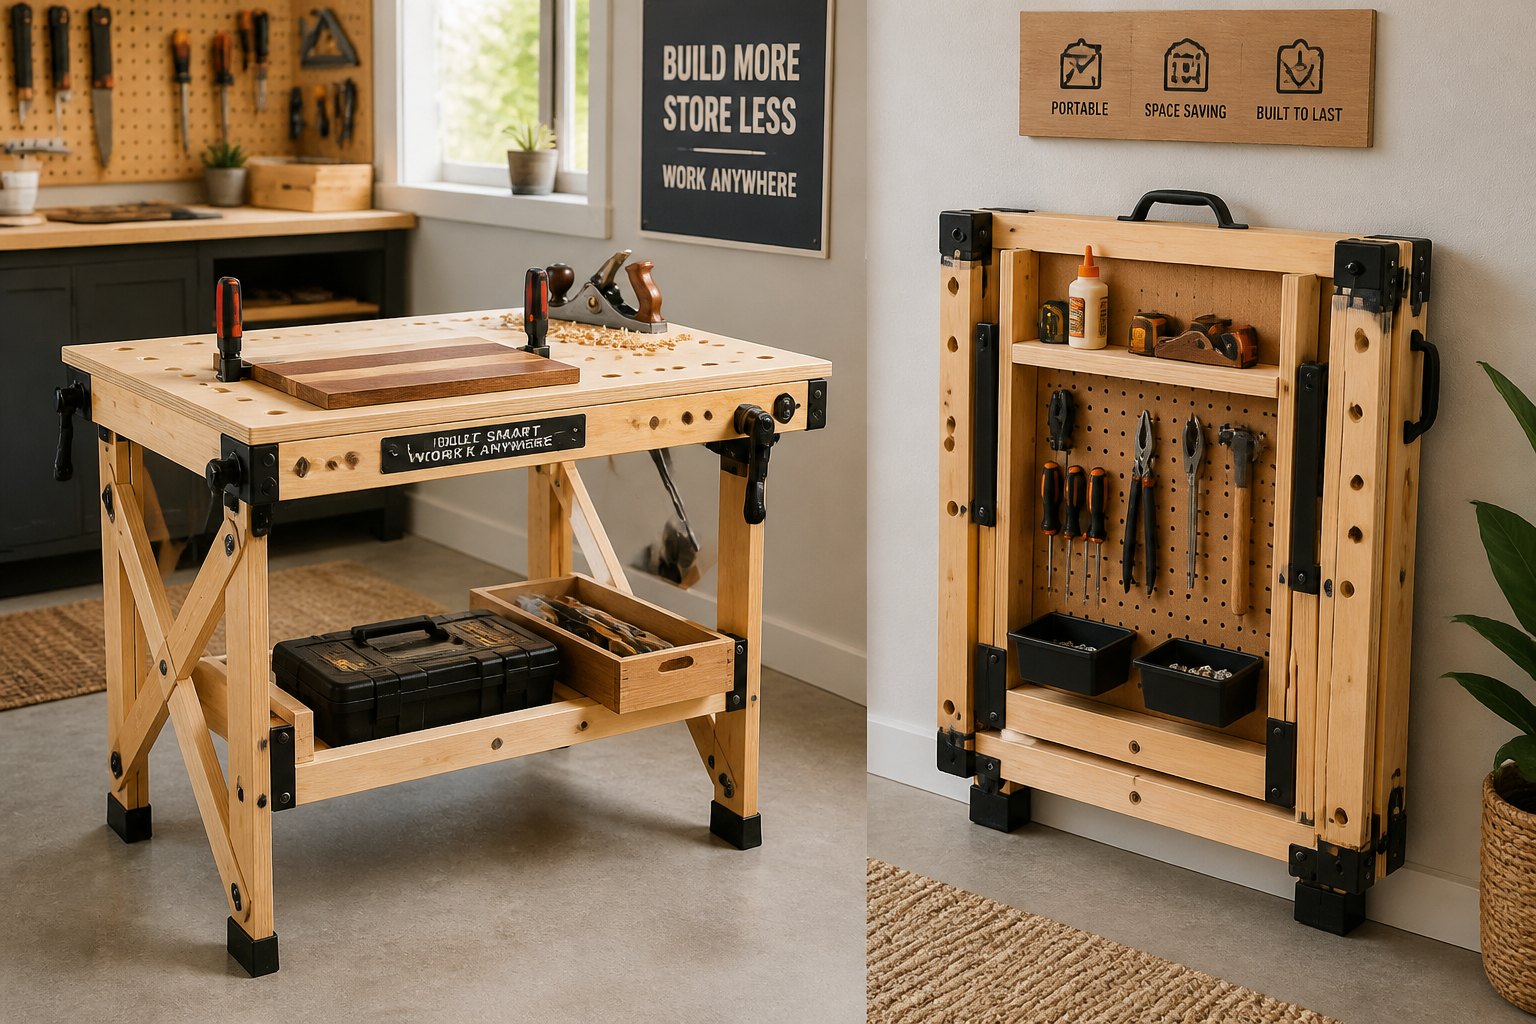
Choosing the right wood for your project is also essential for durability and aesthetics. Learn more about various wood finishing techniques to protect and enhance your workbench. Understanding how to reinforce structures, as detailed in articles like table base width for stability, is equally crucial for your portable build. By thoughtfully incorporating these functional and storage enhancements, your portable folding workbench will become an indispensable asset in your small workspace, proving that budget and space constraints do not limit your woodworking ambitions.
Conclusion
Building a Portable Folding Workbench for Small Spaces: Maximizing Functionality and Storage on a Budget is more than just a woodworking project; it’s an investment in your craft, regardless of your spatial limitations. The 2026 landscape demands adaptable solutions, and a well-designed, sturdy, and multi-functional folding workbench delivers precisely that. By focusing on practical design, utilizing budget-friendly materials, and integrating clever storage and functional enhancements, woodworkers and DIY enthusiasts can create an invaluable asset that transforms any corner into a productive workshop.
This project empowers you to maintain an organized and efficient workspace, ensuring that your tools are always accessible and your projects can proceed unhindered. Embrace the challenge of small spaces as an opportunity for innovative design and discover the immense satisfaction of crafting a piece of furniture that genuinely enhances your productivity and passion.
Actionable Next Steps:
- Assess Your Space: Measure your available working and storage areas to finalize workbench dimensions.
- Sketch Your Design: Create a detailed drawing of your ideal folding workbench, including folding mechanisms and desired features.
- Source Materials: Compile a shopping list and procure the necessary plywood, lumber, and hardware. Look for reclaimed wood or sales to stay within budget.
- Gather Tools: Ensure you have all the required tools, including saws, drills, and safety gear.
- Build and Refine: Follow the construction steps, prioritizing safety and precision. Don’t hesitate to make small adjustments as you build to suit your specific needs.
- Add Enhancements: Integrate dog holes, T-track, or custom storage solutions to maximize the workbench’s utility.
- Apply Finish: Protect your creation with a durable finish to ensure longevity.
Meta Title: DIY Folding Workbench for Small Spaces: Maximize Function & Storage Meta Description: Build a portable folding workbench for small spaces in 2026. Maximize functionality & storage on a budget with this comprehensive DIY guide.

