
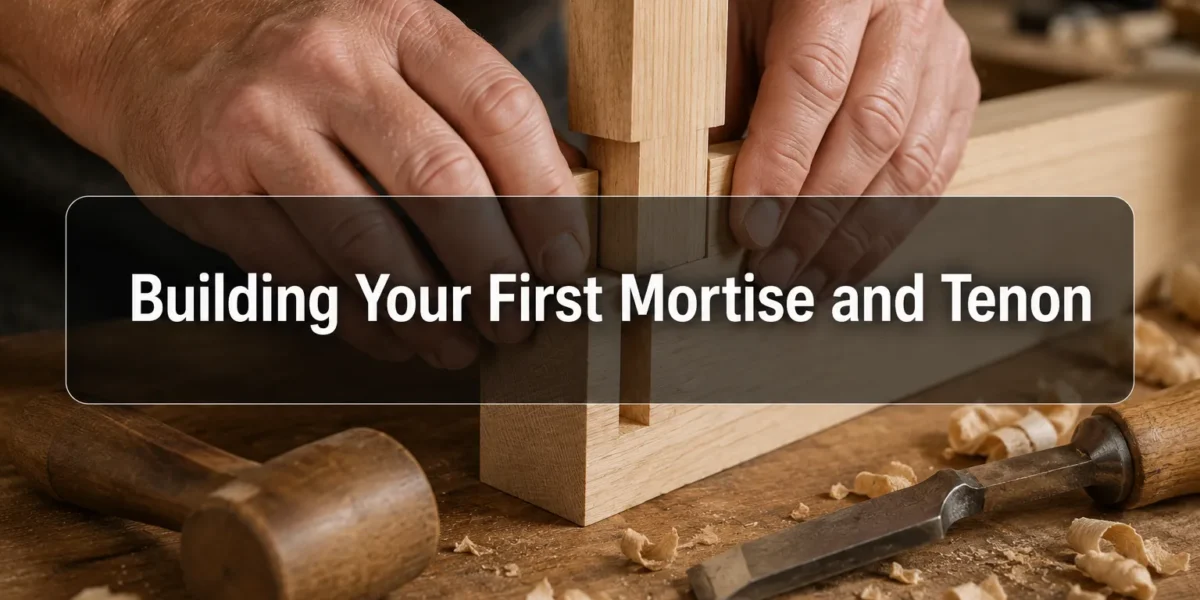
The average piece of furniture constructed today lasts less than two decades before requiring significant repair or replacement. In stark contrast, a single, properly executed mortise and tenon joint, when crafted by hand, possesses the potential to endure for centuries, forming the backbone of heirloom-quality furniture. This longevity isn’t merely a testament to the strength of the joint itself, but to the meticulous hand skills that bring it to life. This guide focuses on Building Your First Mortise and Tenon Joints by Hand: Step-by-Step Techniques for Heirloom-Quality Furniture, providing a detailed roadmap for beginners to master this foundational woodworking skill.
Key Takeaways
- The hand-cut mortise and tenon joint is a cornerstone of strong, durable furniture.
- Precision in marking and cutting is paramount for a tight, lasting joint.
- Selecting appropriate hand tools and sharpening them correctly is essential for success.
- Learning to pare to the line with chisels is a critical skill for clean joinery.
- Patience and practice are more important than speed when aiming for heirloom quality.
Understanding the Mortise and Tenon Joint
At its core, the mortise and tenon joint is a robust connection formed by inserting a rectangular protrusion (the tenon) on one piece of wood into a corresponding rectangular hole (the mortise) in another. This simple yet incredibly effective design has been a staple in woodworking for millennia, valued for its mechanical strength and resistance to racking. When executed properly, the joint creates a large gluing surface, offering superior stability compared to screws or nails alone, especially in furniture that will endure significant stress over time.
There are several variations of the mortise and tenon, each suited to different applications:
- Through Mortise and Tenon: The tenon passes completely through the mortised piece and is often pinned or wedged for added strength and visual appeal.
- Blind Mortise and Tenon: The mortise does not pass through the entire thickness of the wood, concealing the tenon. This is common in frame and panel construction where aesthetics are key.
- Haunched Mortise and Tenon: Features a reduced section (haunch) at the end of the tenon, often used in rail-to-stile connections to prevent twisting and provide greater resistance to racking.
- Wedged Mortise and Tenon: Small wedges are driven into the end of a through-tenon, expanding it within the mortise for an exceptionally strong, locked joint.
For beginners focused on Building Your First Mortise and Tenon Joints by Hand, starting with a simple blind mortise and tenon is recommended. It teaches the fundamental techniques without the added complexity of through-joint finishing. The principles learned here are transferable to all other variations. For those interested in expanding their joinery repertoire, exploring other methods like dovetails or half-lap joints can be incredibly rewarding; a great resource is Mastering Wood Joinery Techniques: Essential Methods for Strong and.
Essential Tools and Materials for Building Your First Mortise and Tenon Joints by Hand
Before you begin, gathering the right tools is crucial. Hand-cut joinery demands sharp, high-quality instruments. Investing in good tools now will save frustration and produce better results in the long run.
Required Tools
- Layout Tools:
- Marking Gauge: Essential for accurately scoring parallel lines for both the mortise and tenon shoulders.
- Pencil and Marking Knife: A sharp pencil for initial layout and a marking knife for precise, hair-thin lines that your chisel can register against.
- Square (Combination and Try Square): For checking squareness and transferring lines accurately.
- Ruler/Measuring Tape: For overall dimensions.
- Cutting Tools:
- Mortise Chisels: These are robust chisels with thicker blades designed for chopping mortises. A set including 1/4″, 3/8″, and 1/2″ is a good starting point.
- Bench Chisels: For paring and cleaning up the mortise and tenon cheeks. A sharp 1/2″ or 3/4″ bench chisel is invaluable.
- Mallet: For striking the chisels. A wooden or rawhide mallet is preferred over a metal hammer to avoid damaging chisel handles.
- Handsaws:
- Tenon Saw (Backsaw): A fine-toothed saw with a stiff back for cutting the tenon shoulders and cheeks accurately.
- Coping Saw (Optional but Recommended): Useful for removing waste from the tenon cheeks if you’re not using a band saw.
- Workholding:
- Workbench with Vise: A sturdy workbench is paramount for holding your work securely.
- Clamps: Various sizes of F-style or parallel clamps to hold workpieces during layout and assembly.
- Sharpening Supplies:
- Sharpening Stones/System: Chisels and marking knives must be razor-sharp. A sharpening system, whether water stones, oil stones, or diamond plates, is non-negotiable. Learn more about maintaining your tools in Mastering Traditional Hand Planes For Fine Furniture Making From Jointer To Smoothing Planes.
Materials
- Practice Wood: Start with readily available, stable hardwood like poplar, pine (though pine can tear out easily), or scrap oak. Avoid very hard or highly figured woods for your first attempts. Clear, straight-grained wood is easiest to work with.
- Wood Glue: High-quality wood glue (e.g., Titebond II or III) for assembly.
Remember, the quality of your cuts is directly tied to the sharpness of your tools. A dull chisel will crush wood fibers, lead to tear-out, and make precise work frustratingly difficult.
Step-by-Step Techniques for Heirloom-Quality Mortise and Tenon Joints
This section guides you through creating a blind mortise and tenon joint, emphasizing precision at each stage.
1. Stock Preparation and Joint Design
Begin with stock that is perfectly milled flat, square, and to final dimensions. Any inaccuracies here will compound into significant joint issues. For a beginner, use stock at least 1-1/2 inches thick for the mortised piece and 3/4 to 1 inch for the tenoned piece, making the process less delicate.
The general rule of thumb for tenon thickness is one-third the thickness of the mortised piece. So, for a 1-1/2 inch thick mortised piece, your tenon would be 1/2 inch thick. The width of the tenon can vary, but generally, it should be no more than two-thirds the width of the rail to leave enough shoulder for strength. The depth of a blind mortise should be approximately 3/4 of the thickness of the mortised piece to ensure adequate gluing surface without risking blow-through.
2. Laying Out the Mortise
Precision in layout is the bedrock of a good joint. Always mark from reference faces and edges.
- Establish Reference Faces: Mark a “face” side and an “edge” side on both workpieces. All measurements for the joint will be taken from these marked faces.
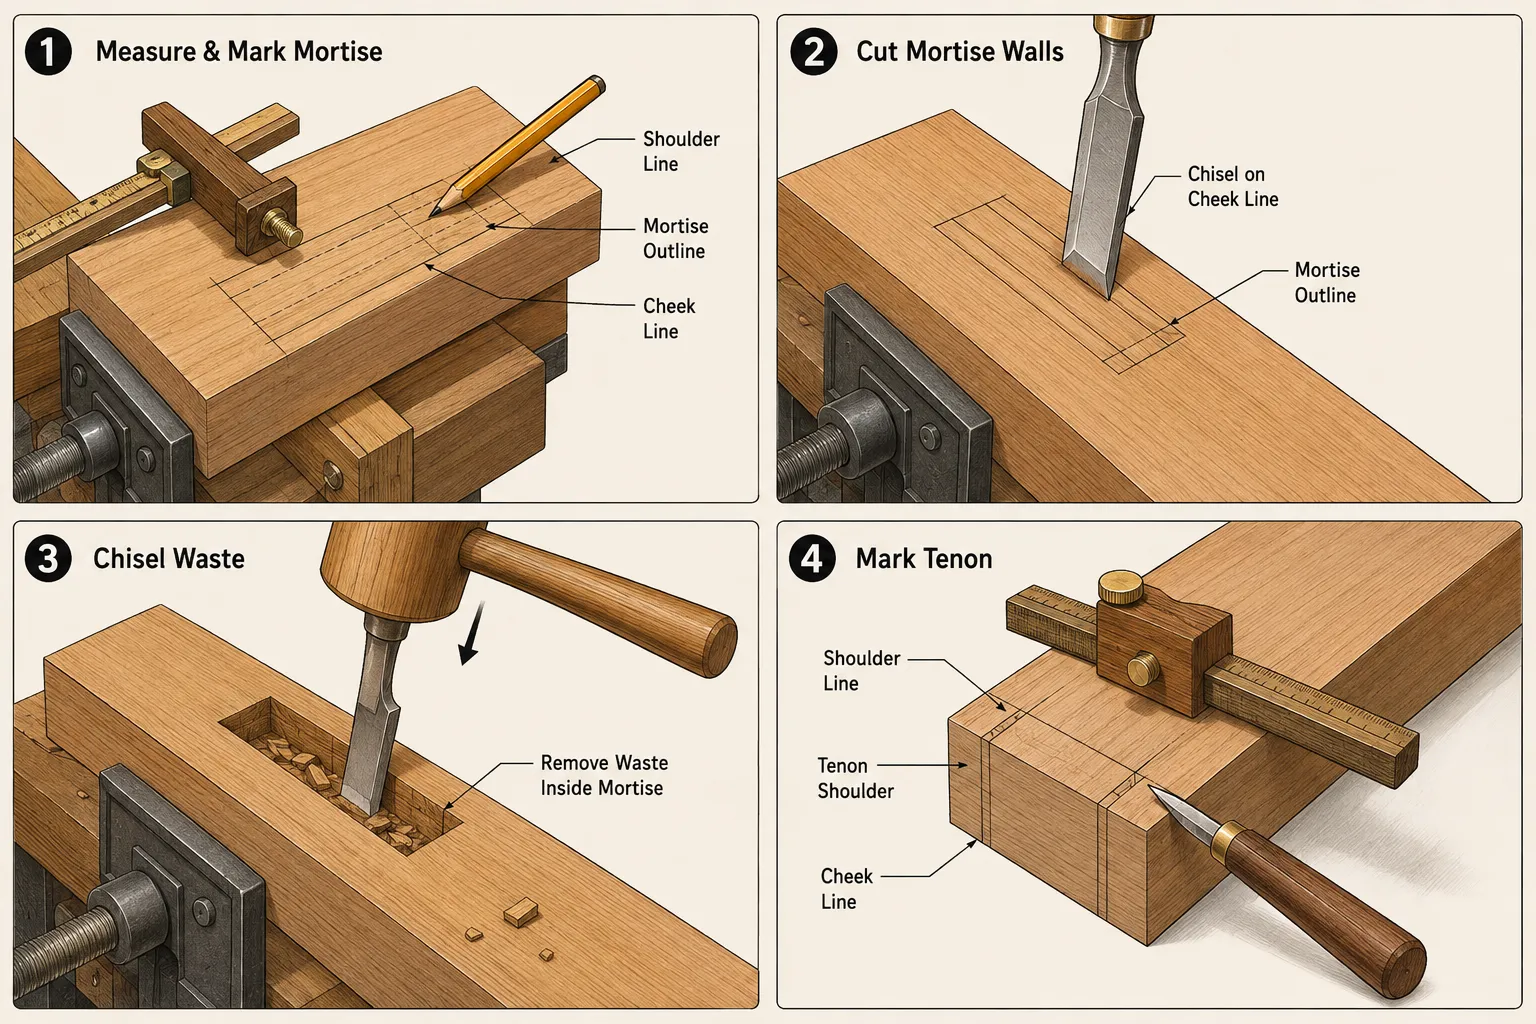
- Mark Mortise Location: Decide where the mortise will be located. Use your square and pencil to draw the overall length and width of the mortise on the face of the mortised piece.
- Set Marking Gauge for Thickness: Set your marking gauge to half the thickness of your tenon (e.g., if tenon is 1/2″, set to 1/4″). Score lines from both reference faces of the mortised piece to establish the two long edges of the mortise. These lines are critical.
- Mark Mortise Depth: Use a marking gauge or pencil to mark the desired depth of the mortise on the edge of the mortised piece. This visual cue will help you know when to stop chopping.
3. Chopping the Mortise
This is where the mortise chisels shine. Always work from both sides of the wood if possible, meeting in the middle to prevent tear-out on the back side. If the mortise is blind, you’ll work from one side.
- Pare the End Walls: Using a sharp bench chisel and a mallet, make shallow, vertical cuts along the end lines of the mortise (the width lines you drew). This establishes a clean edge.
- Chop out Waste: Position a mortise chisel slightly inside one of the long gauge lines. With the bevel facing the waste, drive the chisel straight down with a mallet. Take out small bites. Rotate the chisel and chop again, moving towards the center.
- Lever Out Waste: After making a few cuts, lever out the waste wood. Repeat this process, gradually working from one end of the mortise to the other, making sure to stay within your gauge lines.
- Clean and Refine: Once most of the waste is removed, use a narrower bench chisel or a sharp paring chisel to clean up the sides and ends of the mortise. Hold the chisel vertically and pare down to your scribed lines. Check the depth with a ruler or the marking gauge.
4. Laying Out the Tenon
The tenon must match the mortise precisely.
- Mark Shoulder Lines: Use your square and marking knife to mark the shoulder lines (the depth of the tenon) on all four faces of the tenoned piece. This is where the tenon meets the mortised piece.
- Set Marking Gauge for Thickness: Set your marking gauge to the exact width of your mortise chisel (or the desired tenon thickness). Score lines from both reference faces of the tenoned piece to establish the cheeks of the tenon.
- Mark Tenon Length: Measure the depth of your mortise and transfer this length to the tenoned piece, marking the end of the tenon on its edges.
5. Cutting the Tenon
This stage involves careful saw and chisel work.
- Cut Shoulders: Place the tenoned piece in your vise. Using a tenon saw, cut along the shoulder lines you marked. Start with a light score, then gradually deepen the cut. Saw precisely to the waste side of the line, leaving the line itself. Cut all four shoulders.
- Cut Cheeks: With the shoulders cut, you now need to remove the waste wood from the sides (cheeks) of the tenon. Secure the piece upright in your vise. Position your tenon saw just outside your gauge lines, cutting down towards the shoulder cuts. It’s often easier to cut slightly proud of the line and pare down.
- Remove Remaining Waste: For the material between the cheeks, you can use a coping saw to remove larger pieces of waste.
- Pare to the Line: Use a very sharp bench chisel to pare the tenon cheeks precisely down to your scribed lines. This is critical for a tight fit. Work slowly, taking very fine shavings. Continually check the fit against your mortise; it should be snug but not require excessive force. For more details on this, check out Beginners Guide To Hand Cut Joinery Classic Joints Adapted For Modern Workshop Workflows.
6. Test Fitting and Refinement
This is arguably the most important step for achieving heirloom quality.
- Dry Fit: Attempt to fit the tenon into the mortise without glue. It should go in with firm hand pressure, perhaps a light tap with a mallet, but not require brute force. If it’s too tight, identify where the interference is and pare away small amounts of material from the tenon cheeks, never the mortise.
- Check for Gaps: Look for any gaps at the shoulders. If there are gaps, it usually means your shoulders weren’t cut perfectly square or to the correct depth. Address these by carefully paring the shoulders back.
- Ensure Squareness: Once fitted, check the assembled joint for squareness using your try square.
Precision is key. Take your time during the dry fit and refinement. Even small imperfections can lead to a weaker joint or visible gaps in the finished piece.
7. Gluing and Assembly
Once you are satisfied with the dry fit, it’s time for the final assembly.
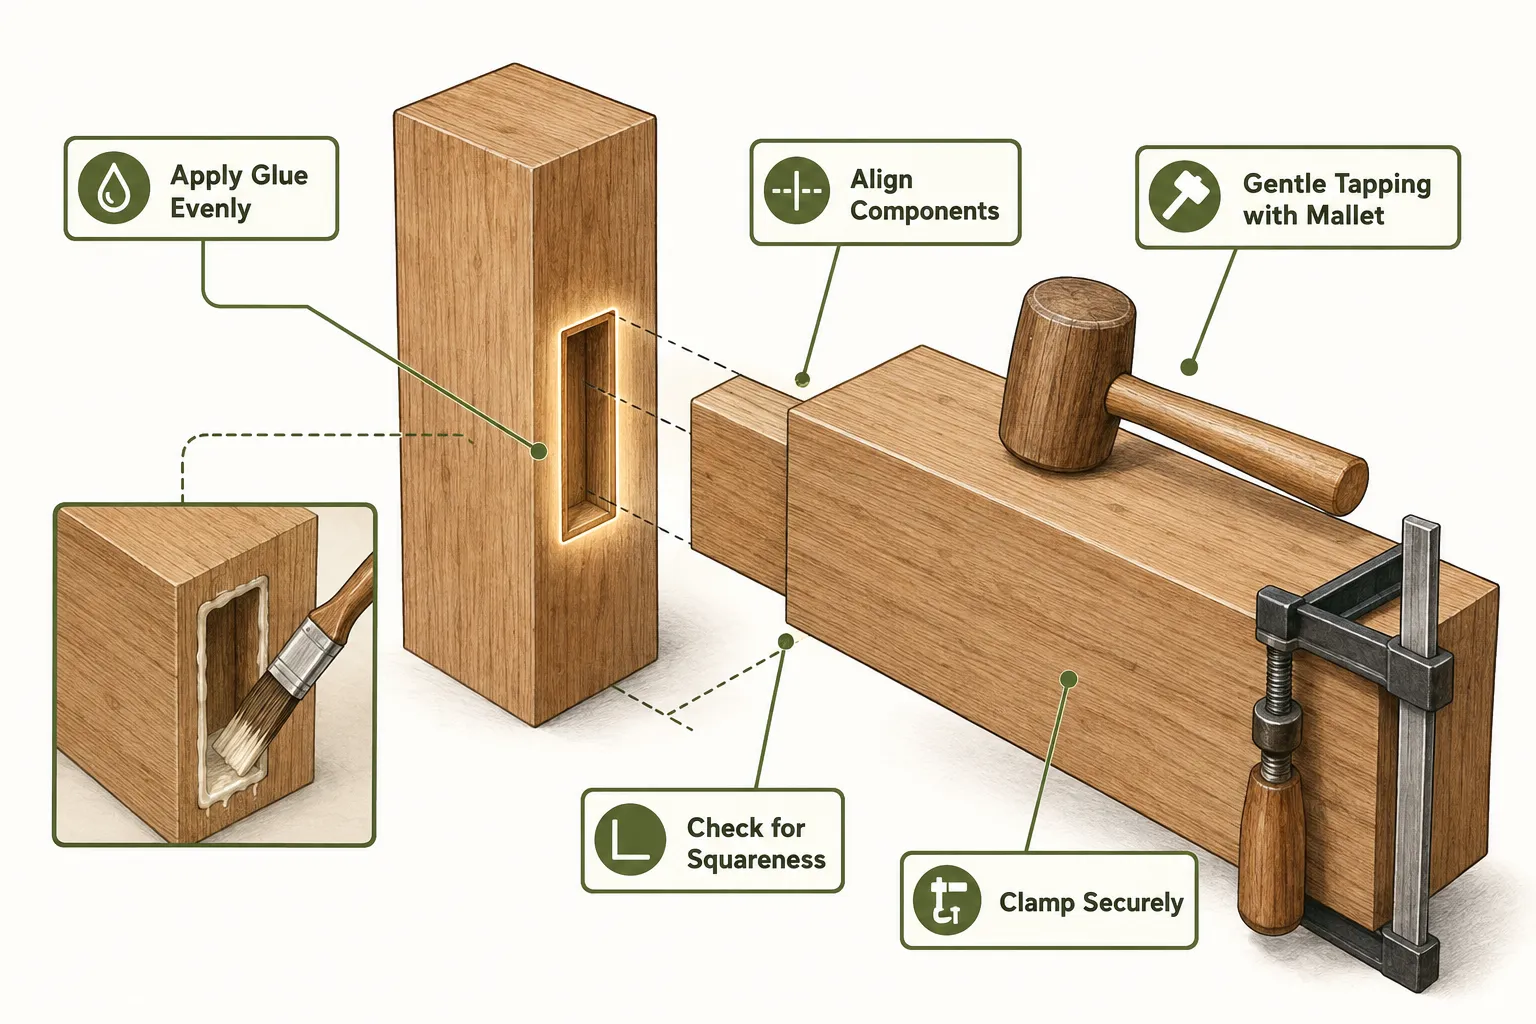
- Prepare for Glue-Up: Have your clamps, glue, and a damp rag ready.
- Apply Glue: Apply a thin, even coat of wood glue to both the inside surfaces of the mortise and all four faces of the tenon. Ensure complete coverage without excessive squeeze-out.
- Assemble: Carefully bring the two pieces together, aligning the tenon with the mortise.
- Clamp: Use clamps to bring the joint together, ensuring the shoulders are pulled tight and flush. Don’t over-tighten, as this can starve the joint of glue.
- Check Squareness: While the glue is still wet, re-check the joint for squareness. Make any necessary adjustments by gently tapping with a mallet.
- Clean Squeeze-Out: Immediately wipe away any excess glue squeeze-out with a damp rag. Dried glue is much harder to remove and can interfere with finishing.
- Cure Time: Allow the glue to cure fully according to the manufacturer’s instructions, typically 24 hours, before putting any stress on the joint.
Addressing Common Issues
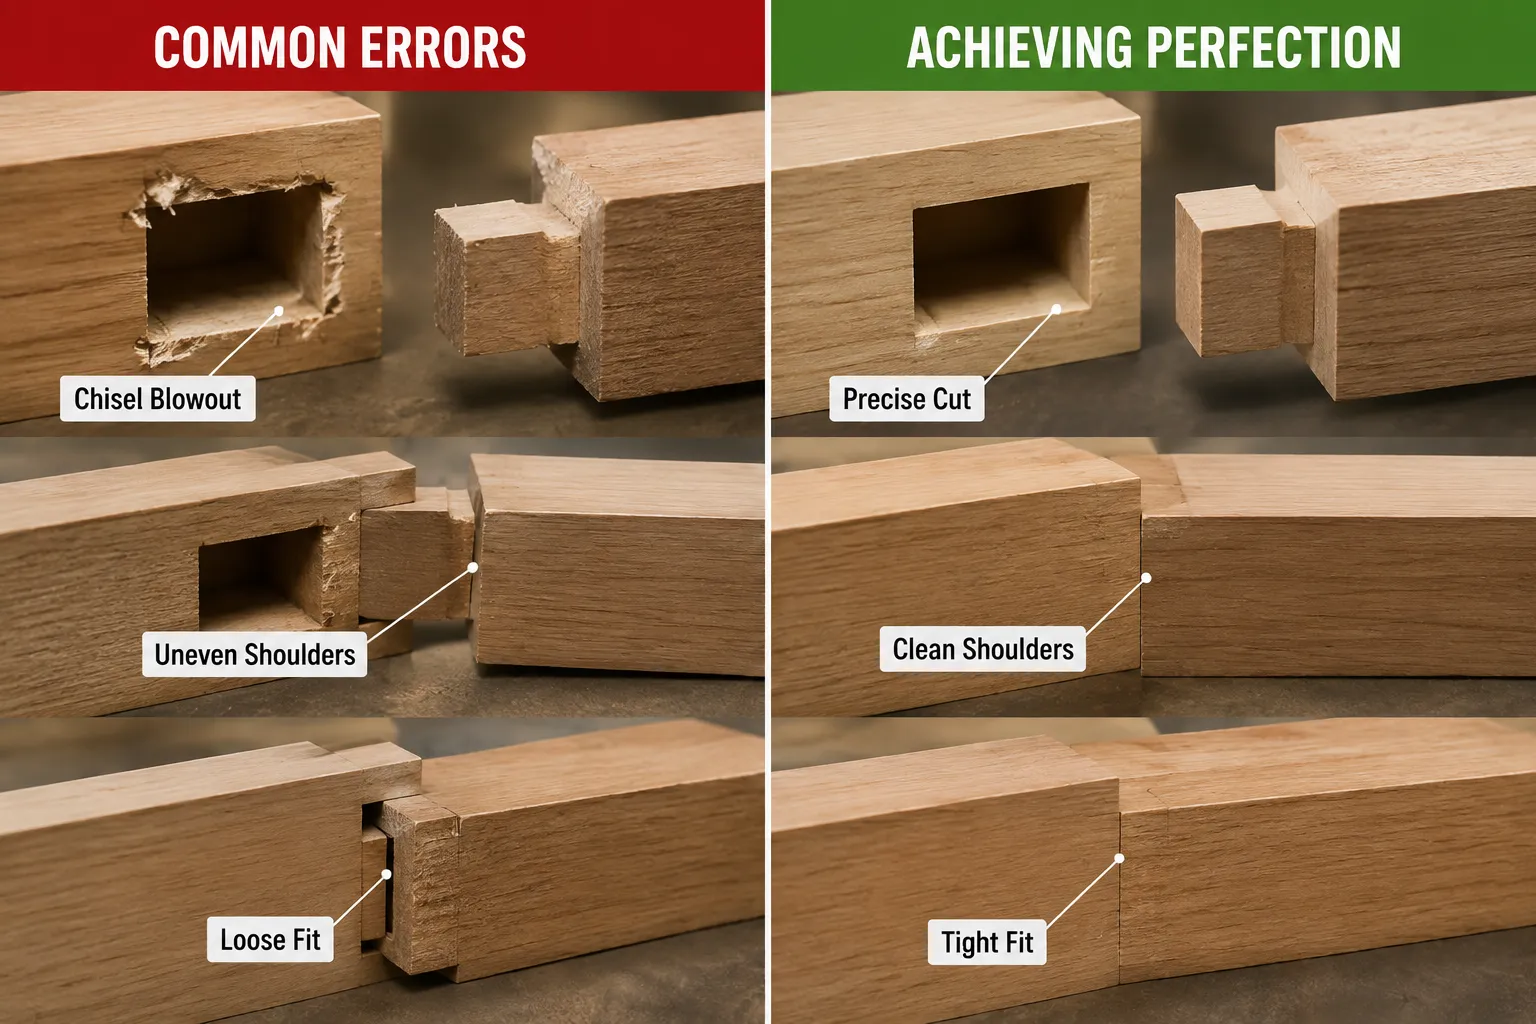
- Blow-out: Occurs when chopping the mortise, particularly on the backside of a through mortise. Prevention involves working from both sides or clamping a sacrificial board to the exit side.
- Gaps: Often due to imprecise marking or cutting. Always cut on the waste side of your knife line. Take small, controlled cuts.
- Loose Joint: If the tenon is too small for the mortise, the joint will be weak. This usually means the marking gauge was set incorrectly or the cheeks were pared too aggressively. Unfortunately, this is harder to fix and often requires remaking the component.
- Tenon Too Tight: Pare small amounts from the tenon cheeks. Never enlarge the mortise once it’s cut.
Advanced Tips for Heirloom Quality
- Chisel Sharpening: Master the art of sharpening. A truly sharp chisel slices wood fibers cleanly, while a dull one tears them. Regularly strop your chisels during the process to maintain their edge.
- Paring to the Line: Develop a feel for how your chisel cuts. Practice paring waste by taking whisper-thin shavings right up to your knife lines.
- Grain Direction: Always be aware of grain direction. Chopping with the grain can lead to splitting. When paring, ensure the bevel is facing away from your reference line.
- Visible Joinery: If the joint will be visible, consider Wood Species Selection For Visible Joinery Choosing Materials That Showcase Hand Cut Joints In Contemporary Designs.
- Practice, Practice, Practice: Your first mortise and tenon joint will likely not be perfect. The journey to heirloom quality is built on repetition and learning from each attempt.
Conclusion
Building Your First Mortise and Tenon Joints by Hand is more than just learning a woodworking technique; it’s an investment in a foundational skill that unlocks the ability to create truly lasting and beautiful furniture. While demanding patience and precision, the satisfaction of fitting a perfectly hand-cut joint is immensely rewarding. This step-by-step guide provides the framework, but the mastery comes with practice. Begin with simple projects, hone your layout and cutting skills, and prioritize sharp tools. With each joint you cut, you will improve, gradually moving from functional connections to the exquisite, tight-fitting joinery that defines heirloom-quality pieces. Embrace the process, learn from your mistakes, and enjoy the journey of crafting something that can genuinely stand the test of time.
Actionable Next Steps:
- Gather Your Tools: Ensure all your chisels are razor-sharp and you have appropriate marking and measuring tools.
- Practice on Scraps: Dedicate time to practicing mortise chopping and tenon cutting on scrap wood before attempting a project.
- Start Simple: Choose a basic project like a small stool or a simple frame that requires just a few mortise and tenon joints.
- Reference and Learn: Continue to consult resources, watch instructional videos, and learn from experienced woodworkers.