
The appeal of a piece of furniture that tells a story, showcasing the tree’s natural growth and unique character, is undeniable. In 2026, live edge slab furniture remains a prominent trend in interior design, offering a blend of rustic charm and modern sophistication. Many aspiring woodworkers, however, find the prospect of transforming a raw slab into a functional art piece daunting. This comprehensive guide on “Live Edge Slab Furniture for Beginners: How to Select, Prep, and Build Your First Live Edge Coffee Table or Shelf” aims to demystify the process, equipping you with the knowledge to confidently embark on your first live edge project. From understanding slab characteristics to mastering essential preparation techniques and simple assembly, you’re about to discover how accessible and rewarding live edge woodworking can be.
Key Takeaways
- Slab Selection is Crucial: Choose a dry, stable slab with minimal defects suitable for your project size and design.
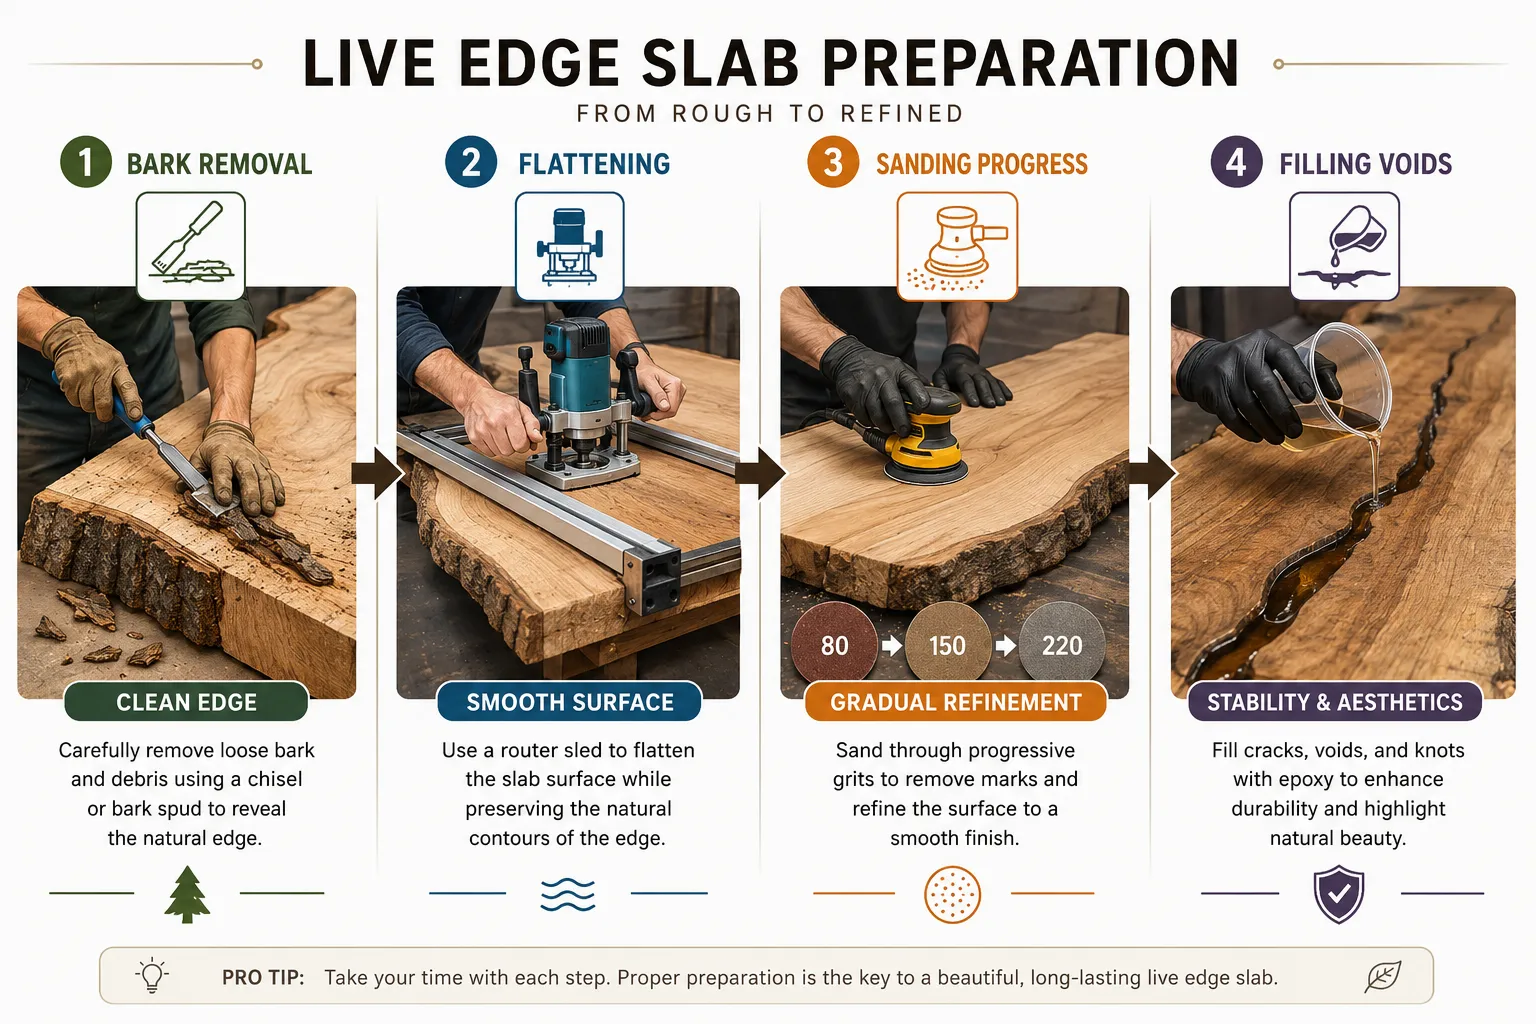
- Essential Prep Steps: Bark removal, flattening, sanding, and void filling are fundamental for a professional finish.
- Simple Joinery: For beginners, consider pre-made leg kits or straightforward dowel/bolt attachments for tables and cleat systems for shelves.
- Finishing Protects & Enhances: Proper sanding and a durable finish like oil or polyurethane are vital for longevity and beauty.
- Start Small: A coffee table or shelf is an ideal first project to build skills and confidence with live edge techniques.
Demystifying Live Edge Slab Selection for Beginners
The journey to creating stunning live edge furniture begins with the slab itself. Selecting the right piece of wood is arguably the most critical step, impacting everything from the project’s aesthetics to its structural integrity. For beginners venturing into live edge slab furniture, understanding what to look for can prevent costly mistakes and ensure a successful build.
Understanding Live Edge Slab Characteristics
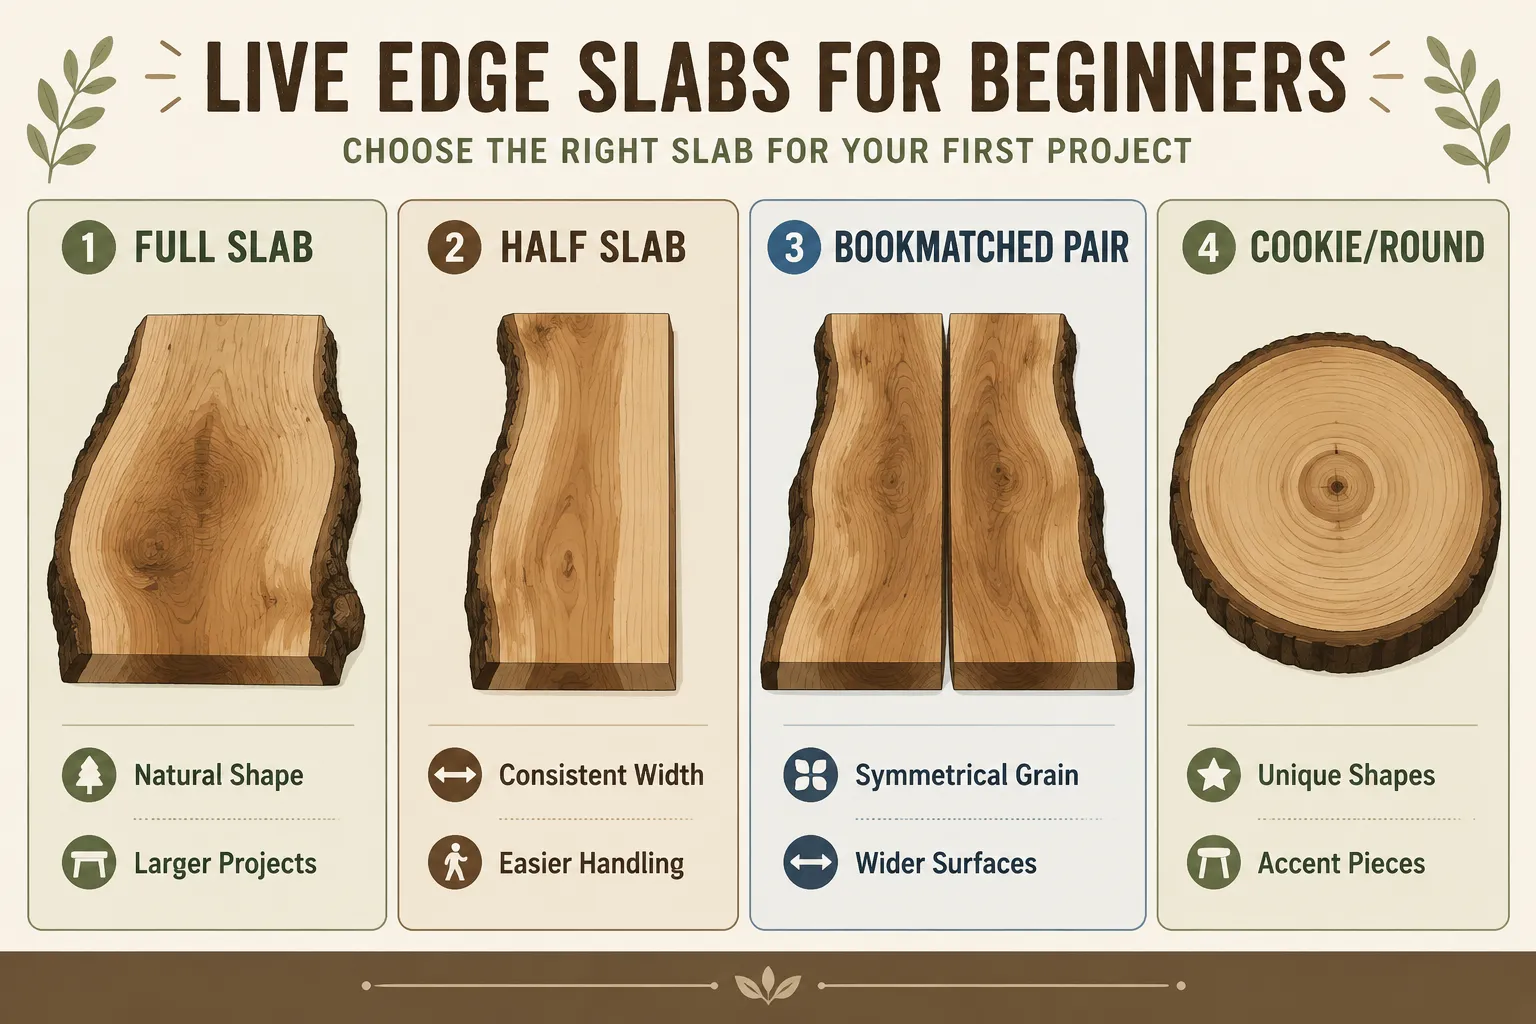
A live edge slab is essentially a cross-section of a tree, often retaining its natural, irregular edges. These edges, complete with bark, natural contours, and sometimes even remnants of moss or lichen, are what give live edge furniture its distinctive organic appeal.
Key characteristics to consider include:
- Wood Species: Different species offer varying aesthetics and working properties.
- Walnut: Prized for its rich dark color, beautiful grain, and good workability. It’s often more expensive but yields stunning results.
- Maple: Ranges from creamy white to light reddish-brown, offering excellent durability and often intricate figuring.
- Oak: Known for its prominent grain and strength, available in red and white varieties.
- Cherry: Develops a rich, deep patina over time, starting lighter and darkening to a beautiful reddish-brown.
- Locally Sourced Woods: Consider species common in your area, such as Elm, Sycamore, or Ash, which can be more affordable and unique.
- Moisture Content: This is paramount. A slab must be properly dried or “cured” to prevent warping, cracking, and movement after your project is built.
- Kiln-Dried (KD): Ideal for furniture, typically 6-8% moisture content. This is the safest bet for beginners as it’s stable and ready to work.
- Air-Dried (AD): Slower drying, moisture content can vary (12-20%). While more affordable, it requires a longer stabilization period and may still move.
- Green Wood: Freshly cut, high moisture content. Avoid for furniture projects unless you have the means and patience to dry it yourself over many months or years. Always ask the supplier about the drying process and moisture content.
- Size and Shape: Match the slab to your intended project.
- For a coffee table, a slab roughly 18-24 inches wide and 36-48 inches long is a good starting point.
- For a shelf, narrower and shorter pieces will suffice, typically 8-12 inches deep and 24-60 inches long.
- Consider the natural curves and irregularities. Do they fit your design vision?
- Defects and Features: What might be considered a “defect” in traditional woodworking is often celebrated as a “feature” in live edge.
- Cracks and Voids: Small cracks add character and can be filled with epoxy. Larger cracks may require bowtie splines for structural integrity.
- Knots: Solid knots are fine; loose or punky knots may need stabilization.
- Wormholes/Insect Damage: These can add unique texture but ensure the slab is completely dry and free of active infestations.
- Rot/Spalting: A limited amount of spalting (dark lines from fungal growth) can be beautiful, but avoid extensive rot that compromises structural strength.
Where to Find Quality Slabs
Finding a good source for live edge slabs is crucial.
- Local Sawmills/Lumberyards: Often the best source for variety, quality, and fair pricing. You can inspect slabs in person, discuss their drying process, and get advice. Some mills specialize in providing material for live edge wood projects from design to execution for home craftspeople.
- Specialty Wood Retailers: These stores often have a curated selection of kiln-dried slabs, though prices may be higher.
- Online Suppliers: Offer vast selections and delivery, but you lose the ability to inspect the slab yourself. Always check reviews, ask for detailed photos, and understand return policies.
- Local Woodworkers/Arborists: Sometimes have access to unique slabs or offcuts.
When you’ve found a potential slab, remember to inquire about its moisture content, how it was dried, and any treatments it may have received. A reliable supplier will be transparent about these details. For further insights on selecting and preparing raw materials, refer to our guide on “Live Edge Slab Selection And Preparation From Raw Material To Finished Showpiece”.
Essential Preparation Techniques for Your First Live Edge Slab Furniture for Beginners
Once you have your live edge slab, proper preparation is key to transforming it from a raw piece of wood into the foundation of a beautiful coffee table or shelf. This stage involves several steps, each contributing to the final look and durability of your Live Edge Slab Furniture for Beginners: How to Select, Prep, and Build Your First Live Edge Coffee Table or Shelf.
1. Bark Removal and Edge Cleaning
The natural edge, often covered in bark, is central to the live edge aesthetic. You’ll need to decide whether to keep the bark or remove it. For most beginner projects, removing the bark is recommended as it can loosen and fall off over time, creating a mess.
- Tools: A chisel, putty knife, wire brush, and a pull scraper are useful.
- Process:
- Start by gently prying the bark away from the wood. If the slab is well-dried, the bark might come off easily in large pieces.
- For stubborn areas, use a chisel or scraper, being careful not to gouge the wood beneath.
- Once the majority of the bark is removed, use a wire brush to clean any remaining fibers or debris from the cambium layer (the soft wood just beneath the bark).
- Sand the live edge gently with finer grit sandpaper (e.g., 150-220 grit) to smooth any rough spots without losing the natural contour.
2. Flattening the Slab
Most raw slabs are not perfectly flat. For a stable coffee table or a level shelf, flattening is crucial. While a large planer can do this quickly, many beginners don’t have access to one. A router sled is an excellent, affordable alternative.
- Tools: A large router, a straight bit, and materials to build a simple router sled (MDF or plywood, straight edges/rails). You can learn more about DIY router sleds and jigs for flattening slabs and wide boards.
- Process:
- Build a Sled: Construct a frame around your slab and a carriage for your router that slides along parallel rails.
- Shim and Secure: Place shims under the high spots of the slab to prevent it from rocking. Secure the slab within the frame.
- Router Passes: Make repeated passes with your router, removing small amounts of material with each pass, until one side is perfectly flat.
- Flip and Repeat: Flip the slab, shim it on the now-flat side, and repeat the flattening process for the second side, ensuring both faces are parallel.
3. Sanding for a Smooth Finish
Sanding is where the true beauty of the wood begins to emerge. It’s a time-consuming but highly rewarding step.
- Tools: Random orbital sander, various grits of sandpaper (80, 120, 150, 180, 220, 320), tack cloth, dust mask.
- Process:
- Start Coarse: Begin with a coarser grit (e.g., 80 or 100) to remove milling marks, deep scratches, and any remaining rough spots from flattening.
- Progress Gradually: Move through successive grits (120, 150, 180, 220, and optionally 320 for a very smooth finish). Do not skip grits, as this leaves deeper scratches that finer grits can’t remove.
- Inspect Thoroughly: After each grit, wipe the surface with a tack cloth and inspect it under good light to ensure all scratches from the previous grit are removed. You can also “wet” the wood with mineral spirits to see how the grain will look with a finish, revealing any missed scratches.
- Edge Sanding: Don’t forget to sand the live edge itself, smoothing it without losing its natural undulations.
4. Filling Cracks and Voids
Many live edge slabs feature natural cracks, knots, or voids. Filling these not only enhances the slab’s appearance but also adds stability.
- Materials: Two-part epoxy resin (clear or tinted), mixing cups, stir sticks, masking tape, sandpaper.
- Process:
- Clean Voids: Ensure cracks and voids are free of dust and debris. Use compressed air if available.
- Seal Bottom (if through-crack): For cracks that go all the way through the slab, apply masking tape to the underside to create a dam.
- Mix Epoxy: Carefully mix the two parts of the epoxy resin according to the manufacturer’s instructions. You can add color pigments if desired.
- Pour: Slowly pour the epoxy into the cracks and voids. Allow it to settle, and gently use a heat gun or torch to pop any air bubbles.
- Cure and Sand: Allow the epoxy to fully cure (usually 24-72 hours). Once hard, sand the excess epoxy flush with the wood surface, working through your grits again in that area until it’s perfectly smooth.
Building Your First Live Edge Coffee Table or Shelf
With your slab beautifully prepared, it’s time for the exciting part: assembly. For your first live edge slab furniture for beginners, simplicity and stability are key. We’ll focus on straightforward methods for building a coffee table and a shelf.
Designing Your First Live Edge Coffee Table or Shelf
Before cutting or attaching anything, visualize your finished piece.
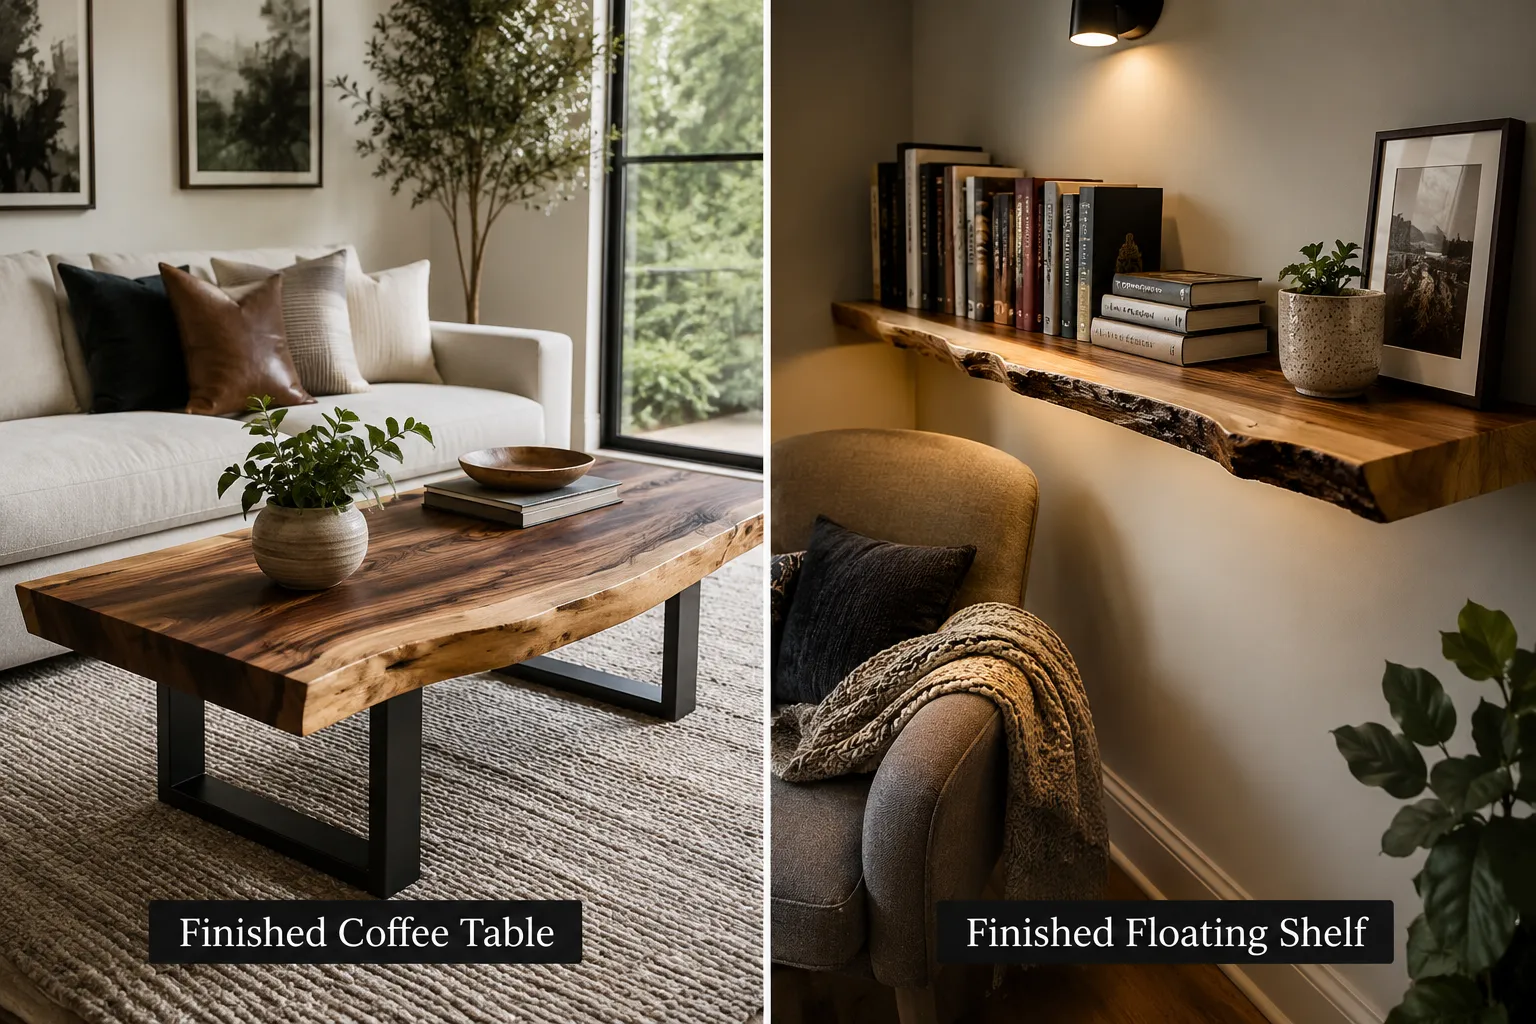
- Coffee Table: Consider the ideal height (typically 16-18 inches from the floor) and the desired aesthetic of the legs. Will it be modern, industrial, or more traditional?
- Shelf: Determine the length and depth you need. How will it be mounted, visible brackets, floating, or supported by a cleat? The guide on “Mastering Shelf Woodworking: Your Definitive Guide For 2026” offers excellent insights into various shelf designs.
Building a Live Edge Coffee Table
For beginners, attaching legs to a live edge slab is one of the most accessible woodworking tasks.
Leg Options:
- Metal Legs (Hairpin or Box Style): These are a popular choice for live edge coffee tables. They come in various heights and finishes, are easy to attach, and offer a modern, industrial look. They typically screw directly into the underside of the slab.
- Wooden Legs (Tapered or Straight): You can purchase pre-made wooden legs or craft your own. Attachment typically involves a mortise and tenon joint for strong adhesion, or simple mounting plates for screw-in legs. For guidance on mastering modern hand-cut joinery, refer to our detailed article.
- Wood Slab Legs: For a more substantial look, you can use smaller, vertical live edge slabs as legs, often attached with dowels, screws, or mortise and tenon joints for a seamless aesthetic.
Attachment Process (using metal legs as an example):
- Determine Placement: Flip your prepared slab upside down. Position the legs to ensure stability and aesthetic balance. Generally, place them about 2-3 inches in from the edges.
- Mark Holes: Use a pencil to mark the screw holes through the leg’s mounting plate onto the underside of the slab.
- Pre-Drill: Select a drill bit slightly smaller than the diameter of your screws. Pre-drill pilot holes to prevent the wood from splitting.
- Attach Legs: Securely attach the legs using appropriate wood screws. Ensure the screws are long enough to provide a strong hold without going all the way through the slab.
For more inspiration and design ideas for your coffee table, explore “Handcrafted Coffee Tables Designs That Sell From Farmhouse To Modern”.
Installing a Live Edge Shelf
Live edge shelves add a rustic yet refined touch to any room. Floating shelves are particularly popular for their clean lines.
Mounting Options:
- Floating Shelf Brackets: These metal rods are installed into wall studs, and the shelf is then drilled to slide over them, creating a seamless, “floating” appearance. This requires precise drilling into the shelf’s back edge.
- Heavy-Duty Shelf Cleats/Brackets: Visible brackets or a wooden cleat attached to the wall offer robust support and can complement the live edge aesthetic.
- Recessed Cleat: For a slightly cleaner look than visible brackets, a cleat can be routed into the back of the shelf itself, then screwed into wall studs.
Installation Process (using floating shelf brackets as an example):
- Locate Studs: Use a stud finder to locate and mark the center of two or more wall studs where you want to install your shelf.
- Mount Brackets: Following the manufacturer’s instructions, mount the floating shelf brackets securely into the studs, ensuring they are perfectly level and spaced appropriately for your slab’s length.
- Prepare Slab: Measure the distance between the bracket rods. On the back edge of your live edge slab, mark corresponding points for drilling.
- Drill Holes: Using a drill press (highly recommended for accuracy) or a hand drill with a suitable bit (often a Forstner bit), carefully drill holes into the back edge of your slab to match the depth and diameter of the floating rods. Ensure these holes are perfectly level and straight to avoid a crooked shelf.
- Test Fit: Carefully slide the slab onto the brackets. Adjust as needed.
- Secure (Optional): Some floating brackets allow for set screws to further secure the shelf, or you might use a strong adhesive if you’re confident in the placement.
Finishing Your Project
The final step is applying a finish, which protects the wood and enhances its natural beauty.
Sanding Review: Before applying any finish, give the entire piece a final light sanding with your finest grit (e.g., 220 or 320) and wipe clean with a tack cloth to remove all dust.
Finish Options:
- Oil Finishes (e.g., Tung Oil, Linseed Oil, Rubio Monocoat): Penetrate the wood, offering a natural look and feel. They are easy to apply and repair but offer less protection against moisture and scratches than film finishes. They enhance the wood’s natural color and grain.
- Polyurethane (Oil-Based or Water-Based): Creates a durable, protective film on the surface. Oil-based polyurethanes offer a warmer, amber tone and are very hard-wearing. Water-based options dry faster, are clearer, and have less odor.
- Varnish/Lacquer: Other film-building finishes that offer high durability but can be more challenging for beginners to apply evenly.
Application Tips:
- Read Instructions: Always follow the manufacturer’s instructions for mixing, application, and drying times.
- Work in a Clean Area: Dust is your enemy.
- Apply Thin Coats: Multiple thin coats are always better than one thick coat. This prevents drips, bubbles, and ensures a smooth, even finish.
- Light Sanding Between Coats: For film finishes, a very light sanding with 320 or 400 grit sandpaper between coats (after drying) helps adhesion and creates a smoother final surface. Clean dust thoroughly before the next coat.
- Allow Full Cure: Give the finish ample time to fully cure before heavy use.
Building your first live edge coffee table or shelf is an incredibly rewarding experience. With careful selection, thorough preparation, and thoughtful assembly, you’ll create a unique piece of furniture that showcases the inherent beauty of nature and your growing woodworking skills.
Conclusion
Embarking on your first live edge slab furniture project, whether it’s a coffee table or a shelf, is a journey that connects you directly with the raw beauty of nature and the satisfaction of craftsmanship. This guide, “Live Edge Slab Furniture for Beginners: How to Select, Prep, and Build Your First Live Edge Coffee Table or Shelf,” has outlined the essential steps from choosing the perfect slab to applying a protective finish. Remember that patience, attention to detail, and a willingness to learn are your most valuable tools.
By carefully selecting a dry, stable slab, meticulously preparing it through bark removal, flattening, sanding, and void filling, and then assembling it with a straightforward method, you will create a piece that is not only functional but truly unique. The subtle imperfections, the natural contours, and the rich grain of a live edge slab all contribute to its unparalleled charm. Don’t be afraid to embrace these natural characteristics; they are what make your furniture one-of-a-kind.
Your first live edge project in 2026 is more than just building furniture; it’s about developing new skills, understanding wood, and creating something meaningful with your own hands. The confidence and experience gained from this initial build will undoubtedly inspire you to tackle more ambitious woodworking projects in the future. So gather your tools, choose your slab, and begin the rewarding process of bringing a piece of nature into your home.
SEO Meta Title: Live Edge Slab Furniture for Beginners: Coffee Table & Shelf Guide SEO Meta Description: Learn to select, prep, and build your first live edge coffee table or shelf in 2026. A beginner’s guide to stunning wood slab furniture.