
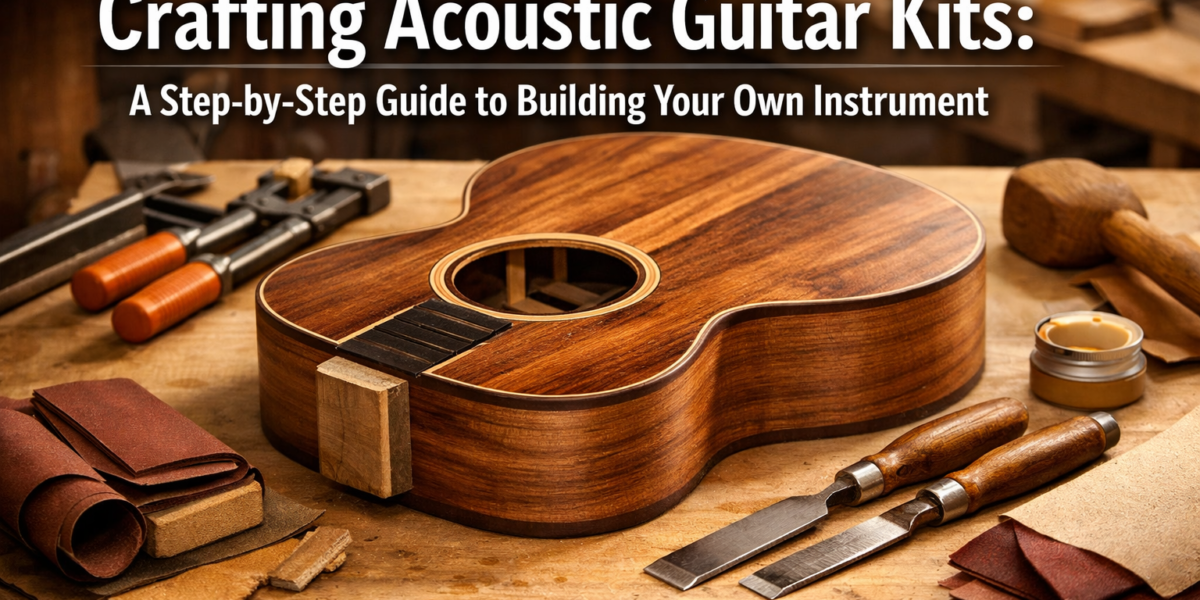

Only 1% of guitarists worldwide have the unique satisfaction of playing an instrument they’ve personally brought to life from raw components. This pursuit offers an unparalleled connection to your music, transcending the mere act of playing to embody the very essence of creation. Dive into the rewarding process of Crafting Acoustic Guitar Kits: A Step-by-Step Guide to Building Your Own Instrument, where passion meets precision, and every cut, glue, and finish brings you closer to a truly custom sound. This comprehensive guide will equip you with the knowledge, techniques, and confidence needed to embark on your own guitar-building journey in 2026.
Key Takeaways
- Start with Quality: Choosing a reputable guitar kit and understanding wood selection are crucial first steps for a successful build.
- Master the Basics: Fundamental woodworking skills like clamping, gluing, and sanding are paramount for structural integrity and aesthetics.
- Precision is Power: Accuracy in measurements and alignment throughout the assembly process directly impacts playability and tone.
- Finishing Defines: The final finishing stages not only protect your instrument but also significantly influence its visual appeal and resonant qualities.
- Patience is a Virtue: Building an acoustic guitar is a marathon, not a sprint; embrace the learning process and enjoy each stage.
Preparing for Your Build: Selecting a Kit and Essential Tools
The journey of Crafting Acoustic Guitar Kits: A Step-by-Step Guide to Building Your Own Instrument begins long before the first piece of wood is joined. It starts with careful planning, selecting the right kit, and gathering the necessary tools. This foundational stage is critical for ensuring a smooth and enjoyable building experience.

Choosing the Right Acoustic Guitar Kit
Guitar kits vary widely in complexity, quality, and price. For beginners, a kit with pre-bent sides, pre-slotted fretboards, and clear instructions is highly recommended. Consider the following factors when selecting your kit:
- Wood Species: The type of wood profoundly affects the guitar’s tone.
- Soundboard (Top): Spruce (Sitka, Engelmann, Adirondack) is common for its resonance and strength. Cedar offers a warmer, more immediate response.
- Back and Sides: Mahogany provides a punchy, direct tone. Rosewood offers rich overtones and sustain. Maple is bright and clear.
- Neck: Mahogany or maple are standard for their stability.
- Fretboard and Bridge: Ebony or rosewood are durable and dense, ideal for these high-wear areas.
- Kit Complexity: Some kits require more advanced woodworking skills, such as bending sides or shaping necks. Beginners should look for kits that minimize these intricate steps.
- Reputation: Research kit manufacturers. Read reviews and look for companies known for high-quality materials and excellent support.
Essential Tools and Workspace Setup
A well-equipped workspace is indispensable. While some specialized tools are beneficial, many basic woodworking tools suffice for a successful kit build.
Required Tools:
- Clamps: A variety of clamps (C-clamps, bar clamps, spool clamps) are essential for gluing operations.
- Files and Rasps: For shaping and refining wood.
- Sandpaper: A range of grits, from coarse to very fine, for shaping and finishing.
- Chisels and Gouges: Sharp chisels are invaluable for fine adjustments and joinery. Consider restoring vintage woodworking hand tools for quality options.
- Marking and Measuring Tools: Rulers, calipers, a try square, and a reliable hygrometer (to monitor humidity) are crucial for accuracy.
- Gluing Supplies: Wood glue (Titebond Original or Hide Glue are popular), brushes, and rags.
- Saws: A fine-tooth hand saw or coping saw for small cuts.
- Safety Gear: Safety glasses, dust mask, and hearing protection are non-negotiable.
Recommended Tools (for enhanced precision and efficiency):
- Router and Router Table: Excellent for precision shaping, routing binding channels, and trimming. Our guide on mastering the router table can be a valuable resource.
- Thickness Sander/Planer: For achieving exact wood thicknesses, though often unnecessary with quality kits.
- Go-Bar Deck: A simple jig for clamping guitar tops and backs.
- Side Bending Iron: If your kit requires side bending.
Your workspace should be clean, well-lit, and, ideally, humidity-controlled. Maintaining a consistent humidity level (around 45-55%) is crucial to prevent wood warping and cracking. Ensure good ventilation, especially for finishing stages. For general workshop improvements, consider creating ergonomic workshop furniture to enhance comfort and productivity.

Assembly Techniques: Bringing the Guitar to Life
With your kit chosen and tools ready, the core work of Crafting Acoustic Guitar Kits: A Step-by-Step Guide to Building Your Own Instrument begins. This section details the major assembly stages, emphasizing precision and proper technique.
Body Assembly: Top, Back, and Sides
The guitar’s body is its heart, responsible for much of its acoustic projection and tone.
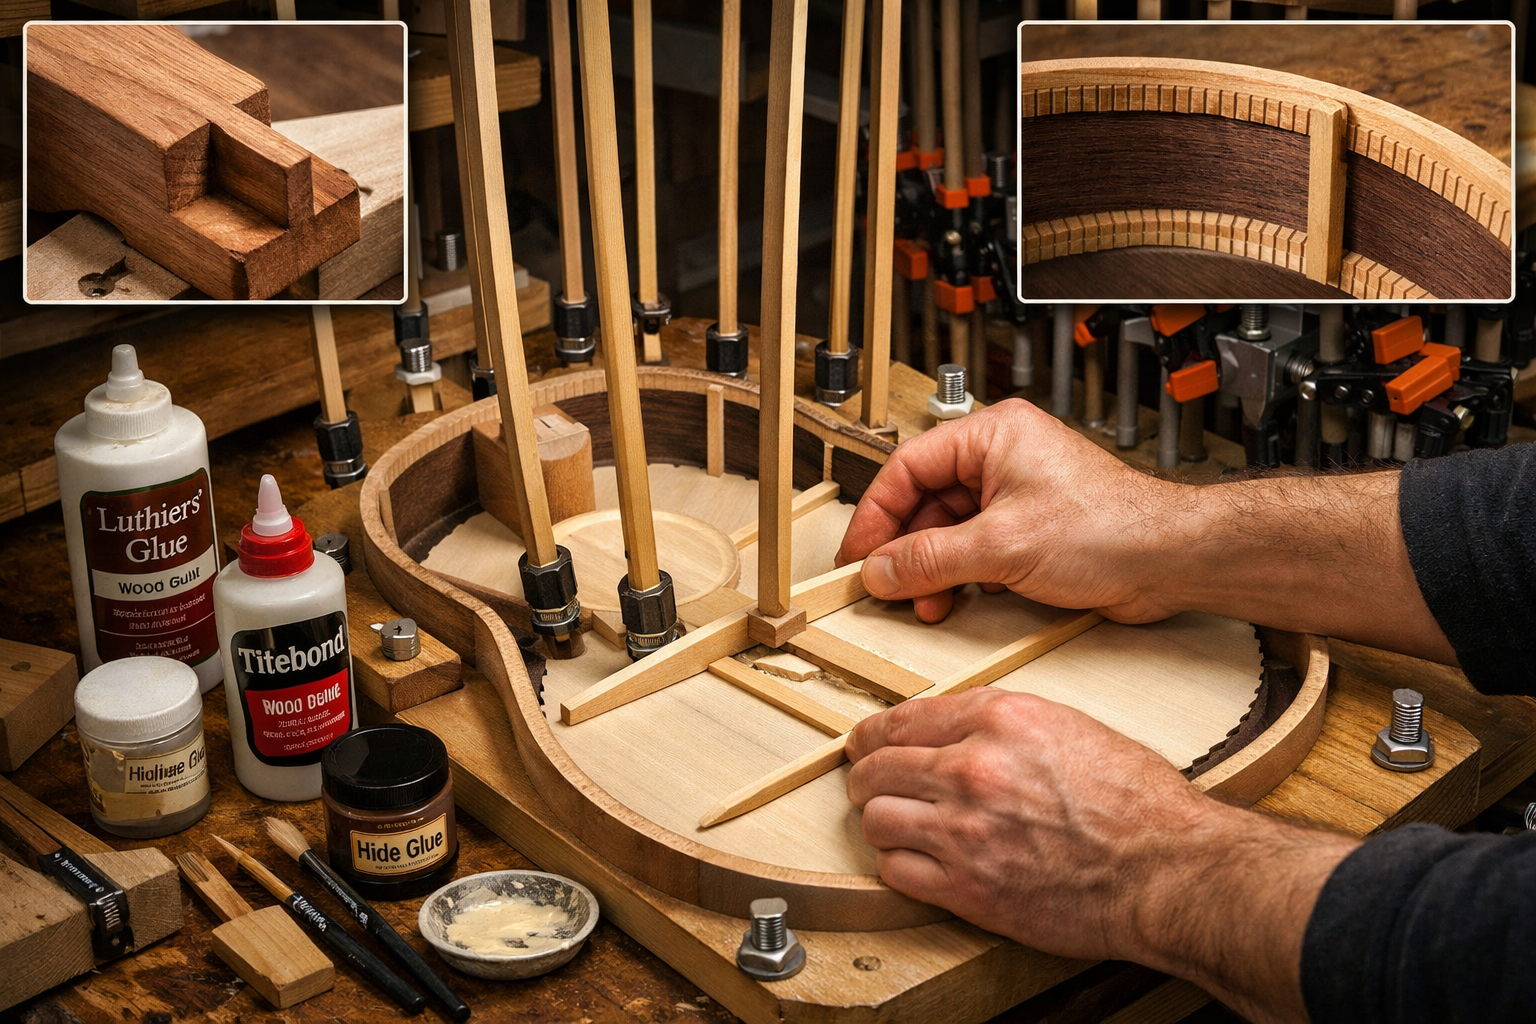
- Join the Top and Back Plates: Most kits provide two book-matched halves for the top and back. These must be perfectly planed and joined with glue to create a single, stable plate. Use a clamping jig or numerous clamps to ensure a tight, invisible seam.
- Install Bracing: Bracing on the soundboard (top) and back strengthens the wood and significantly influences the guitar’s tone. Each brace must be carefully shaped (carved or “voiced”) and glued with precision. This is a critical step, as even slight variations can alter the instrument’s sound. Use a go-bar deck or radius dishes and clamps to apply even pressure.
- Attach Kerfing: Kerfing (or lining) is a flexible strip of wood glued to the inside edge of the sides. It provides a larger gluing surface for the top and back plates, strengthening the body.
- Assemble the Sides to the Neck Block and Tail Block: If your kit has pre-bent sides, this step involves gluing the sides into the slots on the neck and tail blocks. If you are bending your own sides, this is a much more involved process, requiring a bending iron and forms.
- Glue on the Back Plate: Carefully align and glue the braced back plate to the kerfing, using plenty of clamps. Ensure an airtight seal.
- Glue on the Top Plate: Similarly, glue the braced soundboard to the kerfing. This is often the most nerve-wracking step, as it locks in the guitar’s primary resonant surface. Ensure perfect alignment and even clamp pressure.
Neck and Fretboard Integration
The neck assembly is crucial for playability.
- Prepare the Neck Joint: Ensure the neck joint (dovetail, bolt-on, or mortise and tenon) fits perfectly into the body’s neck block. This might require careful filing or sanding for a snug, gap-free fit.
- Install the Truss Rod: The truss rod, running inside the neck, stabilizes it and allows for relief adjustments. Install it according to your kit’s instructions, often before the fretboard is glued on.
- Glue the Fretboard to the Neck: With the truss rod in place, glue the fretboard onto the neck. Use a straight edge to ensure it’s perfectly straight and clamps to secure it evenly.
- Fret Installation: This is a delicate but rewarding step. Each fret wire must be cut, pressed or hammered into the pre-slotted fretboard, and then leveled and crowned for optimal playability. This stage benefits from specialized fret files and hammers.
- Shaping the Neck Profile: Using rasps, files, and sandpaper, shape the back of the neck to a comfortable profile. This is often where a builder’s personal touch comes through the most.
Bridge Installation and Setup
The bridge is where the strings transmit vibrations to the soundboard.
- Position the Bridge: The bridge must be positioned precisely for correct intonation. Measure carefully from the nut to the 12th fret, then double this distance to mark the bridge’s leading edge.
- Glue the Bridge: Use specialized bridge clamps or cauls to glue the bridge firmly to the soundboard. A tight bond is essential for sound transfer.
- Drill Bridge Pin Holes: If not pre-drilled, carefully drill the holes for the bridge pins.
This intricate process requires patience and attention to detail. Remember, “measure twice, cut once” is a mantra for guitar builders.
Finishing Touches and Final Setup
The final stages of Crafting Acoustic Guitar Kits: A Step-by-Step Guide to Building Your Own Instrument involve meticulous finishing and precise setup. These steps not only enhance the guitar’s aesthetic appeal but also profoundly affect its playability and acoustic properties.
Sanding and Surface Preparation
Before any finish is applied, the entire instrument must be sanded to an incredibly smooth surface. This is a time-consuming but crucial step.
- Gradual Sanding: Start with medium-grit sandpaper (e.g., 180 or 220) to remove any tool marks or imperfections. Gradually work your way up through finer grits (320, 400, 600, or even 800) until the wood feels silky smooth to the touch.
- Grain Filling: Open-pored woods like mahogany or rosewood often require a grain filler to achieve a perfectly smooth finish. Apply the filler, let it dry, and then sand back lightly.
- Wipe Down: Before finishing, thoroughly clean the surface to remove all dust and debris using a tack cloth or compressed air.
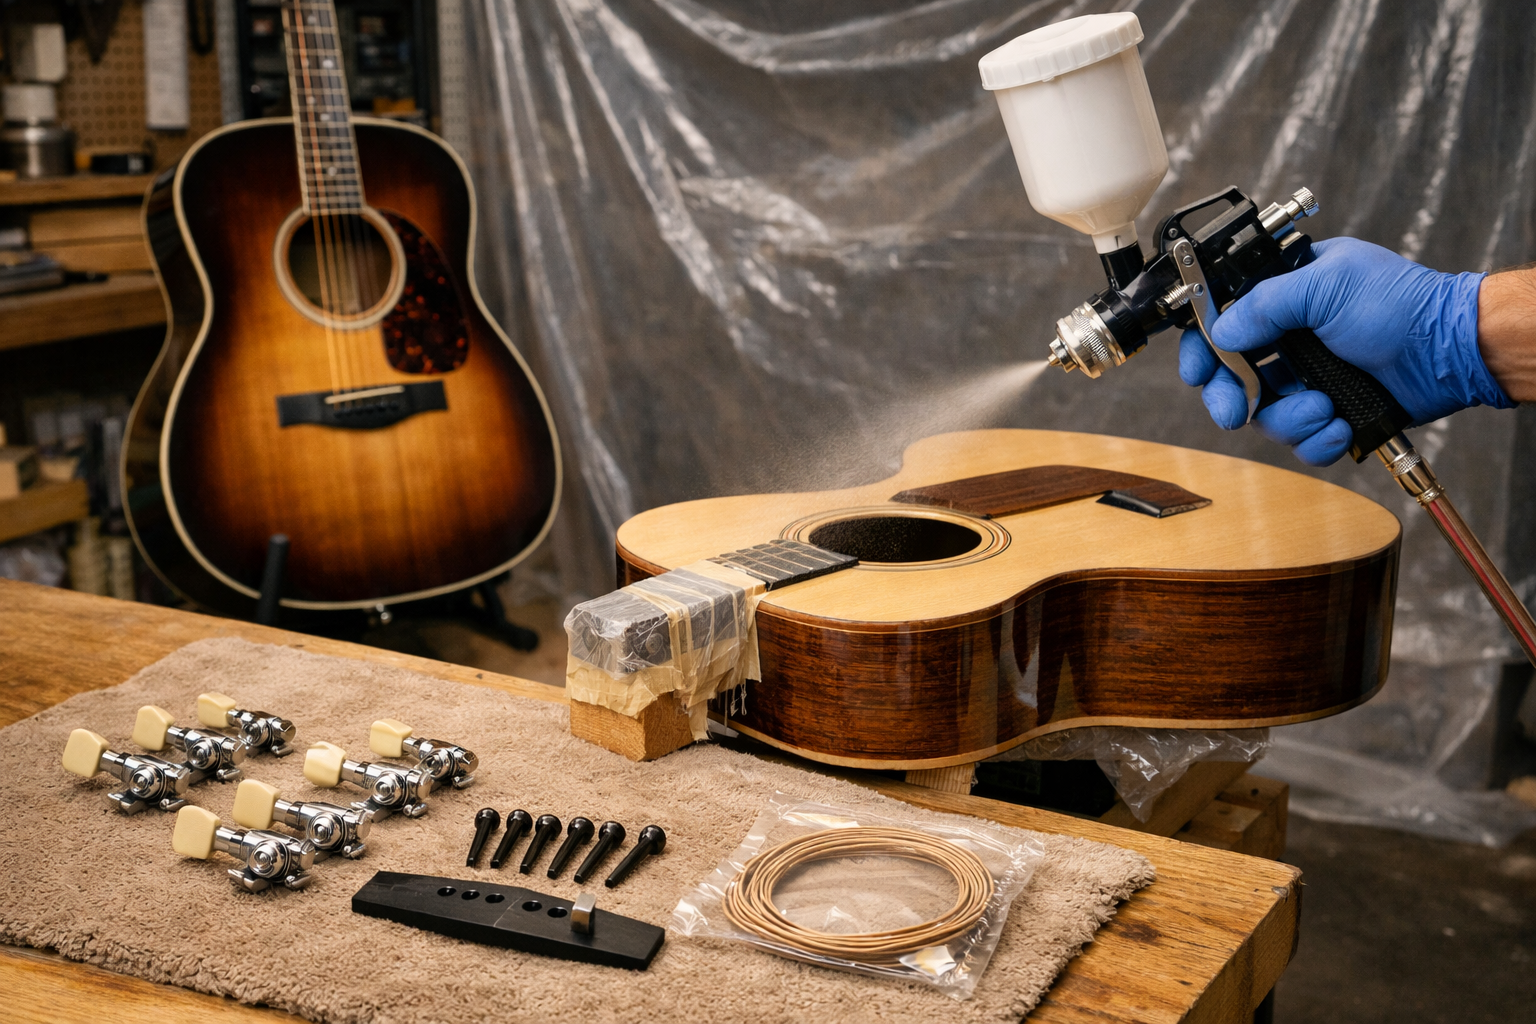
Applying the Finish
The finish protects the wood and contributes significantly to the guitar’s appearance and resonance. Choices range from thin, acoustically transparent finishes to durable, glossy ones.
- Lacquers (Nitrocellulose or Acrylic): Traditional choice, offering a beautiful, often ambering, gloss. Can be more challenging to apply and requires good ventilation.
- Polyurethane: More durable and scratch-resistant than lacquer, available in various sheens. Water-based polyurethanes are often easier for home builders. Refer to our guide on sprayable water-based polyurethane for application tips.
- Oils (Tung Oil, Linseed Oil): Offer a natural, matte look and feel, enhancing the wood’s grain. Provides less protection than lacquers or polyurethanes but is easier to repair.
Apply the finish in thin, even coats, allowing adequate drying time between each. Multiple coats are typically required to build up sufficient protection and depth. Sand lightly with very fine grit (e.g., 800-1500) between coats to ensure adhesion and smoothness.
Polishing and Buffing
Once the finish has fully cured (which can take weeks for some finishes), it’s time to polish and buff.

- Wet Sanding: For a high-gloss finish, carefully wet sand the cured finish with extremely fine grits (2000-4000) to remove any orange peel or imperfections.
- Buffing: Use a series of polishing compounds with a buffing pad (either by hand or with a low-speed buffer) to bring out a brilliant shine. Start with a coarser compound and work your way to finer ones.
Final Assembly and Setup
The moment of truth arrives!
- Install Hardware: Attach the tuning machines, strap buttons, and any other external hardware.
- Nut and Saddle: The nut (at the headstock) and saddle (on the bridge) are crucial for string height and intonation. These often require careful shaping and slotting to achieve optimal action and playability.
- Stringing and Tuning: Install a new set of strings.
- Action and Intonation Adjustment: Adjust the truss rod, nut height, and saddle height to set the string action (the height of the strings above the fretboard). Check the intonation at the 12th fret to ensure notes ring true across the fretboard. This may require small adjustments to the saddle.
- Play! The most rewarding step: playing your newly built custom acoustic guitar.
This meticulous finishing and setup process ensures your handcrafted instrument not only looks stunning but also plays beautifully, reflecting the care and dedication poured into every step of its creation.
Conclusion
Embarking on the journey of Crafting Acoustic Guitar Kits: A Step-by-Step Guide to Building Your Own Instrument is an incredibly fulfilling endeavor. From carefully selecting your wood to the final strum of a perfectly intonated chord, each stage offers an opportunity for learning, patience, and profound satisfaction. The result is more than just an instrument; it’s a personal statement, a testament to your dedication, and a unique musical companion that carries the mark of your own hands.
Whether you’re a seasoned woodworker looking for a new challenge or a passionate musician eager to deepen your connection with your craft, building a guitar from a kit provides invaluable insight into instrument design and construction. The skills acquired—precision measurement, careful joinery, and meticulous finishing—are transferable to countless other woodworking projects, such as building statement furniture pieces or even crafting custom wooden record player consoles. As you hold your finished instrument in 2026, you’ll undoubtedly appreciate not only the music it creates but also the journey you took to create it.
