


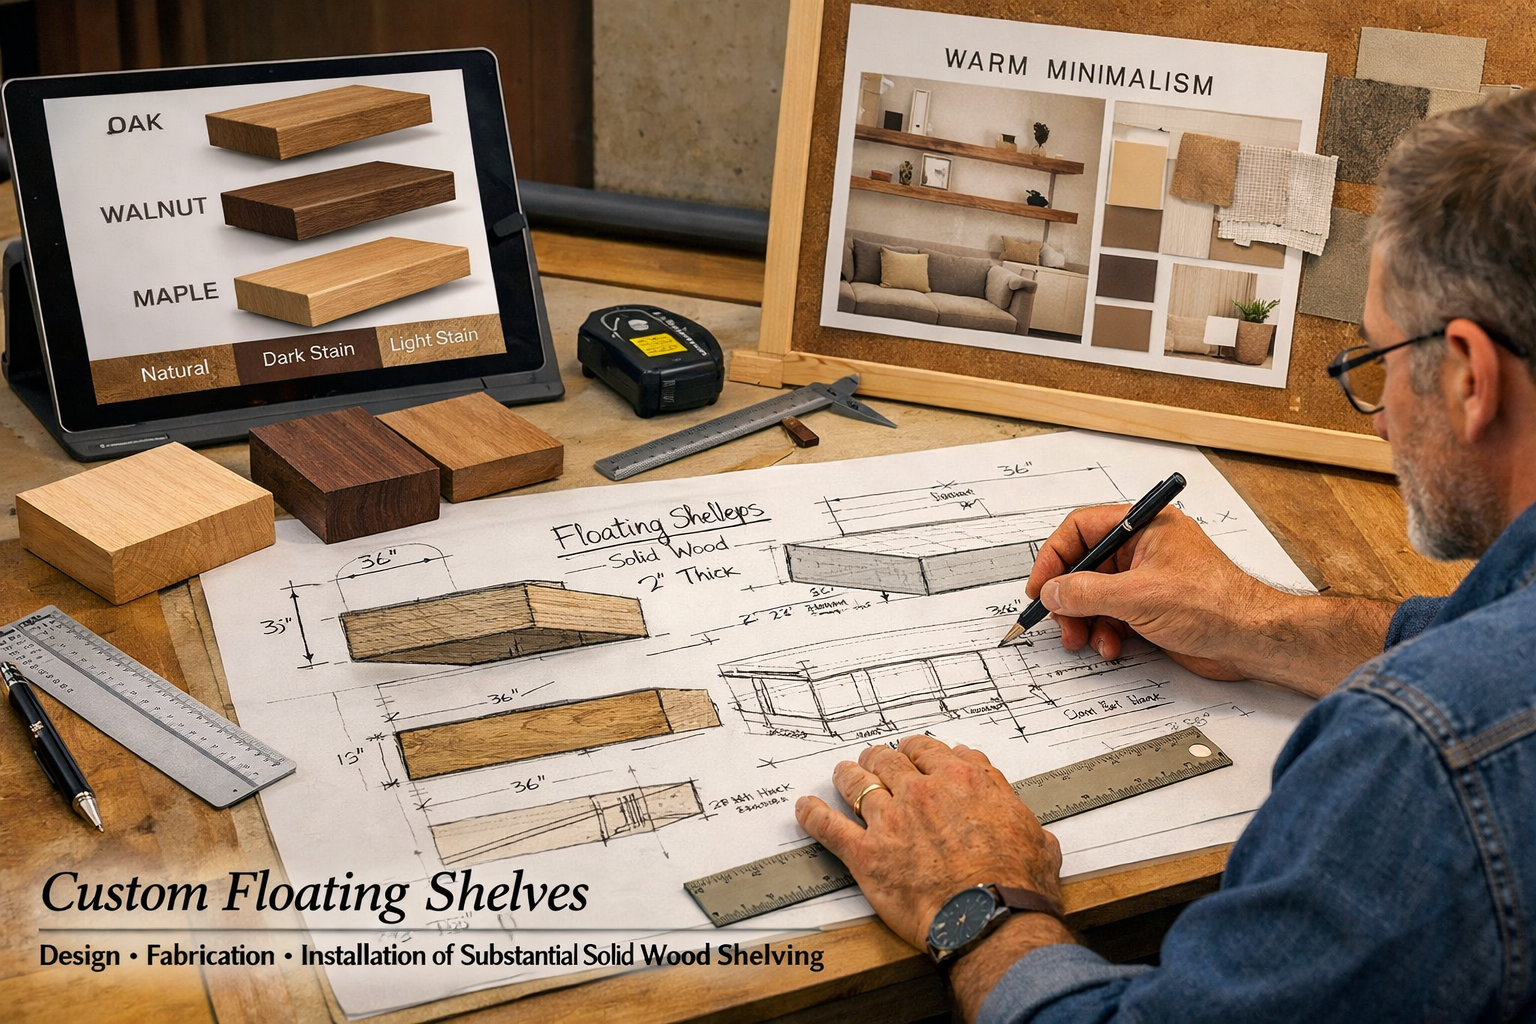
In 2026, home aesthetics are evolving, with a noticeable shift from stark minimalism to a more inviting and tactile style often dubbed “Warm Minimalism.” This trend embraces clean lines and uncluttered spaces, but infuses them with natural materials, rich textures, and a sense of enduring quality. One of the most impactful ways to embody this sophisticated style is through the strategic integration of Custom Floating Shelves: Design, Fabrication, and Installation of Substantial Solid Wood Shelving. Far from the flimsy, decorative ledges of yesteryear, these substantial, solid wood shelves are statement pieces designed to carry significant weight and convey an undeniable sense of permanence and craftsmanship. They offer a perfect blend of form and function, providing elegant storage while enhancing the architectural character of any room. This comprehensive guide will delve into every aspect of bringing these magnificent features into your home, from the initial creative vision to the final, secure installation.
Key Takeaways
- Embrace Warm Minimalism: Substantial solid wood floating shelves are a cornerstone of the 2026 “Warm Minimalism” trend, offering both aesthetic appeal and robust functionality.
- Design for Strength and Style: Careful consideration of wood species, dimensions, and finishes is crucial to achieve both the desired aesthetic and the necessary structural integrity for heavy loads.
- Precision in Fabrication: High-quality fabrication involves selecting premium solid wood, expert milling, joinery, and meticulous finishing to ensure durability and a flawless appearance.
- Robust Mounting is Paramount: The success of substantial floating shelves hinges on a secure, hidden mounting system anchored directly into wall studs or blocking, designed to support significant weight.
- Professional Expertise Recommended: While DIY is possible for some, complex designs and heavy shelves benefit immensely from the expertise of professional woodworkers and installers to ensure safety and longevity.
I. Designing Your Custom Floating Shelves: Vision and Specifications
The journey to creating truly remarkable Custom Floating Shelves: Design, Fabrication, and Installation of Substantial Solid Wood Shelving begins with a thoughtful design process. This stage is where your aesthetic desires meet practical requirements, ensuring the final product is not only beautiful but also perfectly suited to its purpose and environment.

A. Defining Your Aesthetic and Functional Needs
Before any wood is cut, it is essential to clarify the purpose and desired look of your shelves.
1. Style and Integration
- Warm Minimalism: Consider how the shelves will complement existing decor. Thick, natural wood tones fit perfectly into a “Warm Minimalism” scheme, adding warmth without visual clutter. Think about the overall flow of the room.
- Architectural Feature: Substantial floating shelves can become a focal point. Will they flank a fireplace, extend across a wall, or serve as open pantry shelving? Their size and presence make them more than just storage; they are integral design elements.
- Material Harmony: Evaluate existing wood elements in your home, such as flooring or furniture. While matching isn’t always necessary, aim for complementary tones and grain patterns. For insights into different wood characteristics, you might explore articles on maple wood finishing techniques or mahogany wood finishing techniques.
2. Intended Use and Load Bearing
This is perhaps the most critical functional consideration. What will you place on these shelves?
- Heavy Objects: Are you planning to display large book collections, heavy ceramics, or even small appliances? This dictates the required thickness of the wood and the robustness of the mounting system.
- Decorative Items: Lighter items allow for slightly more flexibility in design, but even then, solid wood shelves offer a superior aesthetic and feel.
- Kitchen vs. Living Room: Kitchen shelves may need to accommodate heavier dishware, while living room shelves might hold media equipment or decorative pieces.
B. Material Selection: The Heart of Substantial Shelving
The choice of solid wood is paramount for both aesthetics and structural integrity.
1. Wood Species
Each wood species offers unique characteristics in terms of grain, color, hardness, and cost.
- Oak (Red & White): Renowned for its strength, durability, and prominent grain. White oak is particularly resistant to moisture, making it suitable for kitchens or bathrooms.
- Walnut: A luxurious choice, known for its rich, dark brown color and elegant grain. It’s strong and stable but often more expensive.
- Maple: Offers a fine, even grain and light color, ideal for modern, clean aesthetics. It’s very hard and durable.
- Cherry: Known for its warm, reddish-brown tones that deepen beautifully with age and exposure to light. It has a finer grain than oak.
- Reclaimed Wood: For a rustic or industrial aesthetic, reclaimed wood offers unique character, history, and often exceptional density. This option aligns well with sustainable practices and can be enhanced with various reclaimed wood finishing techniques.
2. Dimensions
For truly substantial floating shelves, thickness is key.
- Thickness: Aim for a minimum of 1.75 to 2.5 inches (4.5 to 6.5 cm) for a robust look and feel. Thicker shelves can better conceal heavy-duty mounting hardware.
- Depth: Standard depths range from 8 to 12 inches (20 to 30 cm), but custom depths can be created to suit specific items or spaces.
- Length: Limited primarily by the structural capacity of the wall and the ability to find stable lumber. Longer shelves may require additional support points.
C. Finishing Touches: Enhancing Durability and Beauty
The finish protects the wood and enhances its natural beauty.
- Stains: Can deepen the wood’s color, match existing furniture, or create a specific aesthetic. Always test stains on scrap pieces of the chosen wood.
- Oils (e.g., Tung Oil, Linseed Oil): Penetrate the wood, offering a natural, matte finish that highlights the grain. Requires reapplication over time.
- Polyurethane/Varnish: Create a durable, protective layer that resists scratches, moisture, and stains. Available in various sheens (matte, satin, semi-gloss, gloss). For application tips, especially in challenging conditions, consider reviewing resources like applying polyurethane in high humidity: tips & techniques.
- Wax: Offers a soft, natural look and feel, but provides less protection than oils or polyurethanes. Often used over oil finishes for added depth. A great example is found when using products like Interstate Woodworks Beeswax Paste.
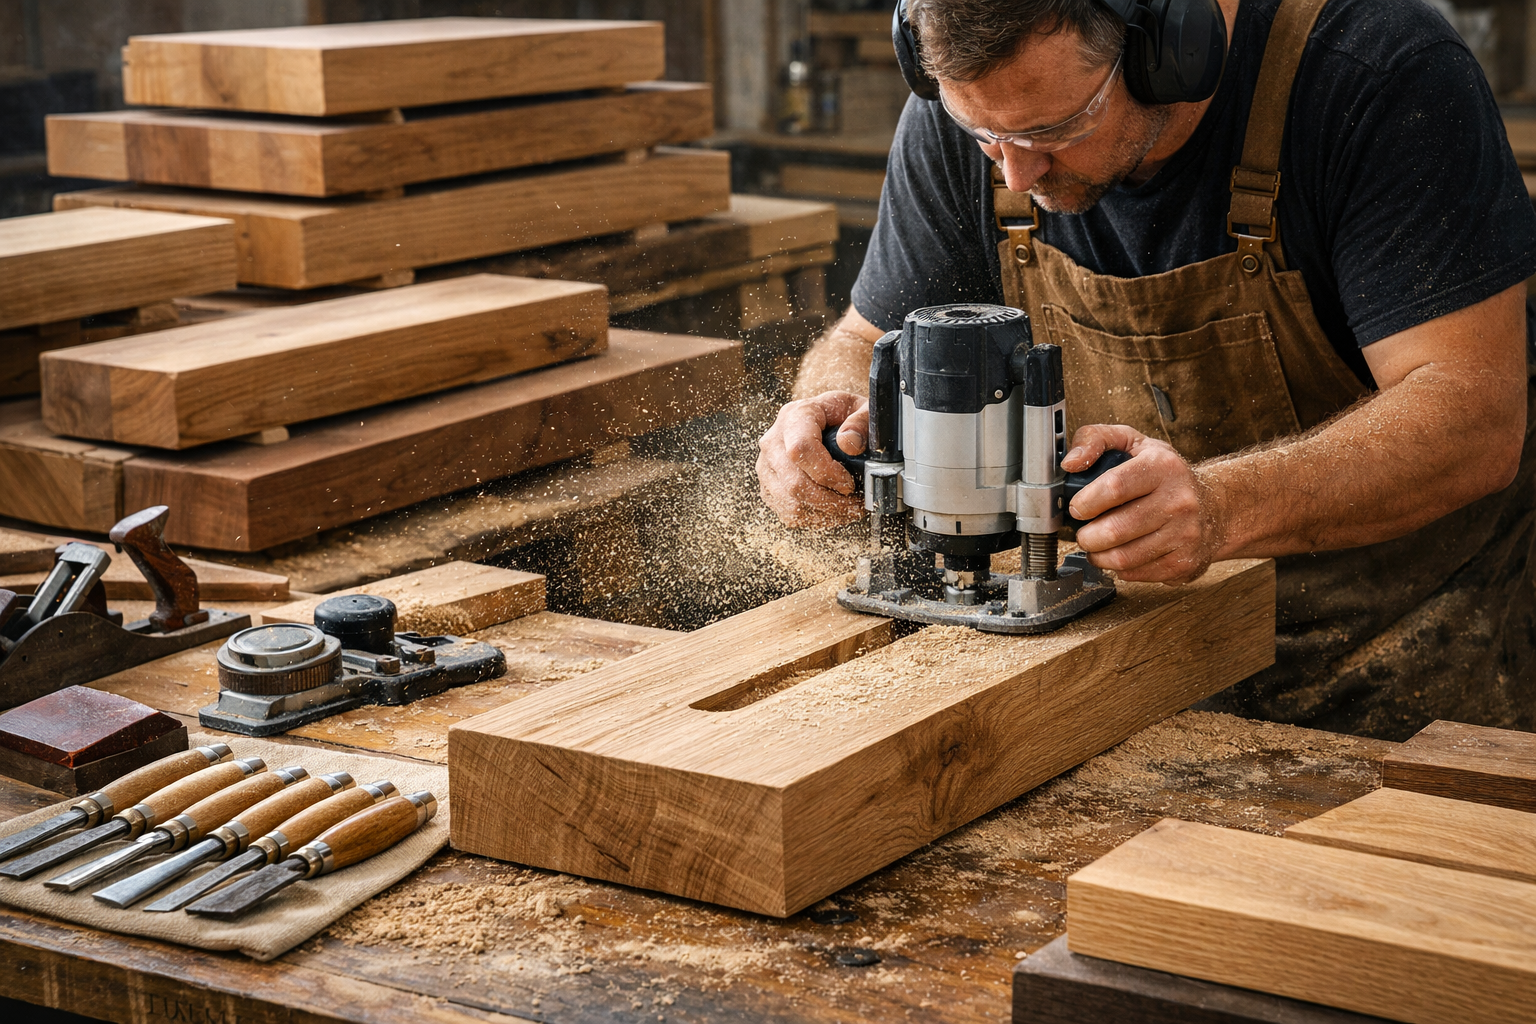
II. Fabrication: Crafting Your Substantial Solid Wood Floating Shelves
The fabrication stage is where the design comes to life. It requires skilled woodworking, precise measurements, and careful attention to detail to ensure the shelves are both beautiful and structurally sound. For Custom Floating Shelves: Design, Fabrication, and Installation of Substantial Solid Wood Shelving, this is particularly critical due to their intended weight-bearing capacity and prominent visual role.
A. Sourcing and Preparing the Wood
The quality of the raw material directly impacts the final product.
1. Lumber Selection
- Quality Grade: Select furniture-grade solid lumber that is straight, free of major defects (knots, checks, splits) that could compromise structural integrity or aesthetic appeal. Kiln-dried wood is essential to minimize warping and movement after installation.
- Rough Cut vs. Milled: While rough cut lumber has a charming, rustic appeal, for substantial floating shelves, it typically needs to be milled to precise dimensions. This ensures flatness, consistent thickness, and square edges. (For further reading on rough cut lumber, see: Rough Cut Lumber Flooring: A Comprehensive Guide to Installation and Finishing – Wood Craft Wiz)
2. Milling and Dimensioning
- Planing: Lumber must be planed to achieve uniform thickness and perfectly flat faces. This is crucial for shelves, ensuring they sit flush against the wall and appear level. Tools like an RBI Planer or a Delta Model 22-560 are essential for this step.
- Jointing: Edges are jointed to create perfectly straight, square sides, necessary for clean joinery if multiple boards are being glued together to achieve the desired depth or thickness.
- Cutting to Length: Precise cross-cuts ensure the shelves fit their designated space exactly.
B. Construction Techniques for Durability
For substantial solid wood shelves, simple butt joints are insufficient. Robust construction methods are required.
1. Solid Slab vs. Box Construction
- Solid Slab: If the desired thickness can be achieved from a single piece of lumber (e.g., a thick beam or a resawn log), this is the strongest and most aesthetically pure option. However, finding such large, stable pieces can be challenging and expensive.
- Glued-Up Panels: More commonly, multiple planks are edge-glued together to achieve the desired width and thickness. This requires strong, interlocking joints (e.g., biscuits, dowels, tongue and groove) and high-quality wood glue. The grain direction should be alternated to minimize warping.
- Box Construction: For very thick or very long shelves where a solid slab isn’t feasible, a hollow box construction can be used. This involves creating a torsion box or a series of solid wood faces mitered and glued around an internal frame. While lighter, it still presents the appearance of a substantial solid wood shelf. Careful joinery, often using a table saw like the Pro Tech 10 Table Saw, is critical for strength and seamless appearance.
2. Routing for Mounting Hardware
- Hidden Brackets: For a true “floating” appearance, the mounting hardware must be completely concealed. This typically involves routing precise mortises or channels into the back edge of the shelf to accept steel rods or a cleat system. Accuracy here is crucial for a snug fit and proper installation.
- Drilling Pilot Holes: Depending on the bracket type, pilot holes may need to be drilled into the shelf’s back or ends to accommodate screws or bolts that secure it to the mounting system.
C. Sanding and Finishing
These steps are critical for achieving a professional, durable finish.
1. Sanding Schedule
- Progressive Grits: Begin with a coarse grit (e.g., 80 or 100) to remove milling marks and imperfections. Gradually work through finer grits (120, 150, 180, 220, and sometimes higher) until the surface is perfectly smooth. This is vital to prevent sanding marks after staining.
- Dust Removal: Thoroughly remove all dust between grits to avoid embedding coarse particles into the wood, which can cause scratches.
2. Applying the Finish
- Stain Application: If staining, apply evenly according to product instructions, wiping off excess to prevent blotchiness.
- Top Coat Application: Apply chosen top coat (oil, polyurethane, varnish) in thin, even coats, allowing adequate drying time between applications. Light sanding with very fine grit (320-400) between coats can improve adhesion and smoothness. Several coats are typically needed for robust protection. Explore various natural wood finishing techniques for different looks and protection levels.
III. Installation: Securely Mounting Your Custom Floating Shelves
The installation of Custom Floating Shelves: Design, Fabrication, and Installation of Substantial Solid Wood Shelving is arguably the most critical stage. Improper installation can lead to sagging, instability, or even catastrophic failure, especially with heavy, substantial shelves. The goal is a rock-solid, visually seamless result.
A. Pre-Installation Planning and Preparation
Thorough preparation ensures a smooth and safe installation.
1. Locating Wall Studs
- Stud Finder: Use a reliable electronic stud finder to locate and mark the exact center of all wall studs where the shelf will be mounted. For substantial shelves, anchoring into at least two, preferably three or more, studs is essential.
- Test Drilling: Sometimes, a small test drill hole (easily patched) can confirm stud location and depth, especially in older homes where stud spacing may be irregular.
- Internal Blocking: For very long or extremely heavy shelves, or in areas where studs are not ideally spaced, it may be necessary to open the wall and install horizontal blocking between studs. This provides continuous, robust support along the entire length of the shelf’s back edge. This is a common practice for kitchen remodels or built-in projects.
2. Leveling and Marking
- Laser Level or Long Level: Use a laser level or a long (4-6 foot) carpenter’s level to draw a perfectly level line on the wall where the bottom edge of the shelf will sit. This line serves as your primary reference.
- Bracket Placement: Mark the precise locations for your mounting hardware, ensuring they align with the center of the studs or installed blocking. Measure multiple times to confirm accuracy.
B. Choosing and Installing Robust Mounting Hardware
The type of hardware used is paramount for substantial floating shelves. Do not compromise on quality or load capacity.

1. Heavy-Duty Floating Shelf Brackets
- Solid Steel Rods: These are a popular choice. They typically consist of thick steel rods (e.g., 1/2″ to 3/4″ diameter) that are welded to a flat backplate. The backplate is screwed into the wall studs, and the rods extend horizontally, sliding into pre-drilled holes or mortises in the back of the shelf.
- Advantages: Excellent load capacity, truly invisible once installed, aesthetically clean.
- Considerations: Requires precise drilling into the shelf, proper stud alignment, and can be challenging to install perfectly level.
- Heavy-Duty Blind Brackets/Cleats: These systems often involve a metal cleat that attaches to the wall studs, onto which the shelf (with corresponding routing) slides and locks into place. Some systems use heavy-duty channels or interlocking mechanisms.
- Advantages: Very strong, can be easier to level than individual rods, often designed for high weight capacity.
- Considerations: Still requires precise fabrication of the shelf to accept the cleat, may have specific depth requirements.
2. Anchoring to the Wall
- Lag Screws or Heavy-Duty Construction Screws: Use screws specifically designed for structural applications, long enough to penetrate well into the center of the wall studs (typically 2.5 to 3 inches).
- Pilot Holes: Always drill pilot holes for lag screws to prevent splitting the studs and ensure maximum holding power.
- Torque Appropriately: Ensure screws are driven securely but avoid over-tightening, which can strip the wood or damage the bracket.
- Toggle Bolts/Anchors (Use with Caution): For lighter shelves or non-load-bearing applications, toggle bolts can be used in drywall. However, for substantial solid wood floating shelves designed to hold significant weight, NEVER solely rely on drywall anchors. They are insufficient. Any part of the bracket not hitting a stud must be supported by robust blocking inside the wall if heavy loads are anticipated.
C. Final Shelf Installation and Securement
With the brackets firmly in place, the final step is to slide the shelf onto the hardware.
1. Sliding the Shelf
- Careful Alignment: Gently but firmly slide the shelf onto the protruding rods or cleat system, ensuring all holes/mortises align perfectly. This often requires two people due to the weight of substantial solid wood shelves.
- Checking for Level: As the shelf is pushed into place, continuously check for levelness. Minor adjustments might be possible by shimming or slightly adjusting the bracket if the system allows.
2. Securing the Shelf (If Applicable)
- Set Screws/Adhesive: Some floating shelf bracket systems include small set screws that thread up from the bottom of the shelf into the rods to prevent accidental removal or shifting. Alternatively, a strong construction adhesive (e.g., mirror to wood adhesive) can be applied to the rods or cleat before sliding the shelf on, providing an extra layer of security and rigidity. This creates a more monolithic feel.
- Concealed Fasteners: If the design calls for additional securing through the top or bottom of the shelf into the bracket, ensure these fasteners are countersunk and then artfully plugged or filled to maintain the floating aesthetic.
After installation, stand back and admire your new, substantial solid wood floating shelves. Their robust presence, natural beauty, and functional elegance will elevate your space, embodying the best of “Warm Minimalism” in 2026.
Conclusion
The resurgence of substantial solid wood floating shelves in 2026 is a testament to the enduring appeal of quality craftsmanship and natural materials within modern design. Moving beyond mere decorative elements, these robust pieces are designed to be focal points, offering both unparalleled strength and a sophisticated aesthetic that perfectly aligns with the “Warm Minimalism” trend. From the initial conceptualization and careful selection of a beautiful, durable wood species to the meticulous fabrication process and the crucial, secure installation of Custom Floating Shelves: Design, Fabrication, and Installation of Substantial Solid Wood Shelving, every step demands precision and attention to detail.
Embracing this trend means investing in timeless pieces that not only enhance your home’s functionality but also its intrinsic value and character. Whether you envision a collection of treasured books, cherished heirlooms, or simply an uncluttered display of art, substantial floating shelves provide the perfect platform. They speak of strength, stability, and a deep appreciation for the beauty of natural wood.
Actionable Next Steps:
- Define Your Vision: Begin by identifying the specific location, purpose, and aesthetic you desire for your custom floating shelves. Gather inspiration photos and consider the items you intend to display.
- Consult a Professional: For complex designs, heavy loads, or simply peace of mind, consider engaging a skilled local woodworker or custom cabinet maker. Their expertise in design, material selection, fabrication techniques, and robust installation methods will be invaluable. Many artisans even offer woodworking commissions.
- Choose Your Wood Wisely: Research different solid wood species based on their appearance, hardness, and cost. Obtain samples to see how they look in your space under various lighting conditions.
- Prioritize Secure Installation: Regardless of whether you DIY or hire a professional, ensure the chosen mounting system is appropriate for the weight of both the shelves and their intended contents, always anchoring into structural members.
- Enjoy the Transformation: Once installed, take pride in your new, beautiful, and highly functional custom floating shelves, knowing they are built to last and elevate your home’s style for years to come.
References
- Fine Woodworking Magazine. (2024). Floating Shelf Installation Techniques. Taunton Press.
- The Wood Database. (n.d.). Wood Species Info. Retrieved from https://www.wood-database.com/
- Wood Magazine. (2023). Building Strong Shelves: A Guide to Joinery and Fasteners. Meredith Corporation.
SEO Meta Title: Custom Floating Shelves: Design, Build, Install Solid Wood SEO Meta Description: Master custom floating shelves in 2026. Expert guide on designing, fabricating, and installing substantial solid wood shelving for enduring style & strength.
