


The relentless hum of a portable air conditioner often means sacrificing precious floor space in a compact workshop, not to mention the challenge of keeping tools organized amidst a flurry of projects. For many hobbyists and professional woodworkers operating in limited areas, balancing comfort and efficiency is a constant struggle. Building ventilated wooden enclosures around portable AC units that double as rolling tool storage offers an ingenious solution, transforming an unwieldy appliance into a functional, integrated part of your workspace. This approach not only tames the noise and aesthetic clutter of a portable AC but also dramatically enhances your tiny workshop’s organization, creating a cooler, more productive environment in 2026. This article delves into the comprehensive process of designing and constructing DIY Portable AC Enclosures and Tool Storage Cabinets: Keep Your Tiny Workshop Cool and Organized.
Key Takeaways

- Custom enclosures for portable AC units improve workshop aesthetics and reduce noise.
- Integrating tool storage into AC enclosures maximizes space in small workshops.
- Proper airflow design is critical for AC efficiency and preventing overheating.
- Ventilation calculations ensure the enclosure meets the AC unit’s cooling requirements safely.
- Building with modular components allows for future expansion and adaptability of storage.
Designing Your DIY Portable AC Enclosures and Tool Storage Cabinets
The first step in creating effective DIY Portable AC Enclosures and Tool Storage Cabinets: Keep Your Tiny Workshop Cool and Organized is meticulous design. This phase encompasses understanding your portable AC unit’s specifications, calculating necessary airflow, selecting appropriate materials, and planning the integrated tool storage.
Understanding Portable AC Unit Requirements
Every portable AC unit has specific requirements for air intake and exhaust. Before cutting any lumber, consult your unit’s manual to understand:
- Dimensions: Accurate measurements are crucial for the enclosure’s internal space.
- Air Intake: Where does the unit draw in air? Typically, this is from the rear or sides. Adequate space must be provided for unrestricted intake.
- Exhaust: The hot air exhaust vent is usually at the rear. This requires a dedicated exhaust port in your enclosure, often connected directly to the unit’s exhaust hose.
- Clearance: Manufacturers specify minimum clearances around the unit for safe operation and optimal airflow. Adhere strictly to these guidelines to prevent overheating and maintain efficiency.
- Condensate Drainage: Some units collect condensate in an internal tank, while others offer continuous drainage options. Plan for easy access to empty the tank or route a drainage hose if applicable.
Airflow Calculations and Ventilation Design
Proper ventilation is paramount. An enclosure that restricts airflow will cause the AC unit to overheat, reduce its lifespan, and severely diminish its cooling efficiency. This is where the engineering aspect of your DIY Portable AC Enclosures and Tool Storage Cabinets becomes critical.
Key Ventilation Principles:
- Sufficient Intake Area: The total open area for cool air intake into the enclosure must be at least 1.5 to 2 times the area of the AC unit’s fan intake grille. This prevents air starvation. Use louvered vents, perforated panels, or decorative grilles.
- Unrestricted Exhaust: The hot air exhaust must have a direct, sealed path to the exterior of your workshop. The AC’s exhaust hose should connect directly to a port in the enclosure, which then vents outside. Minimize bends and length in the exhaust hose for optimal performance.
- Internal Air Circulation: Ensure there’s enough internal volume and pathways for air to circulate freely around the AC unit. Avoid creating dead air pockets.
Calculating Vent Sizing (Example):
Suppose your portable AC unit has an intake grille of 12 inches by 12 inches (144 square inches).
- Minimum Intake Area: 144 sq in * 1.5 = 216 sq in.
- You might achieve this with two grilles, each 9 inches by 12 inches (108 sq in each), totaling 216 sq in.
- Alternatively, a single larger decorative grille can be used, ensuring its effective open area (accounting for grille material) meets the minimum.
Consider adding a small, low-RPM auxiliary fan inside the enclosure near the intake if your AC unit struggles in extremely hot conditions or if your enclosure design is particularly tight, though this is usually unnecessary with proper passive ventilation.
Material Selection and Planning Integrated Storage
For the enclosure, plywood or MDF are excellent choices due to their stability and ease of working. Hardwoods can be used for a more premium finish. Building Modular Wood Storage Systems for Small Workshops: Maximizing offers fantastic insights into material and design strategies for maximizing space.
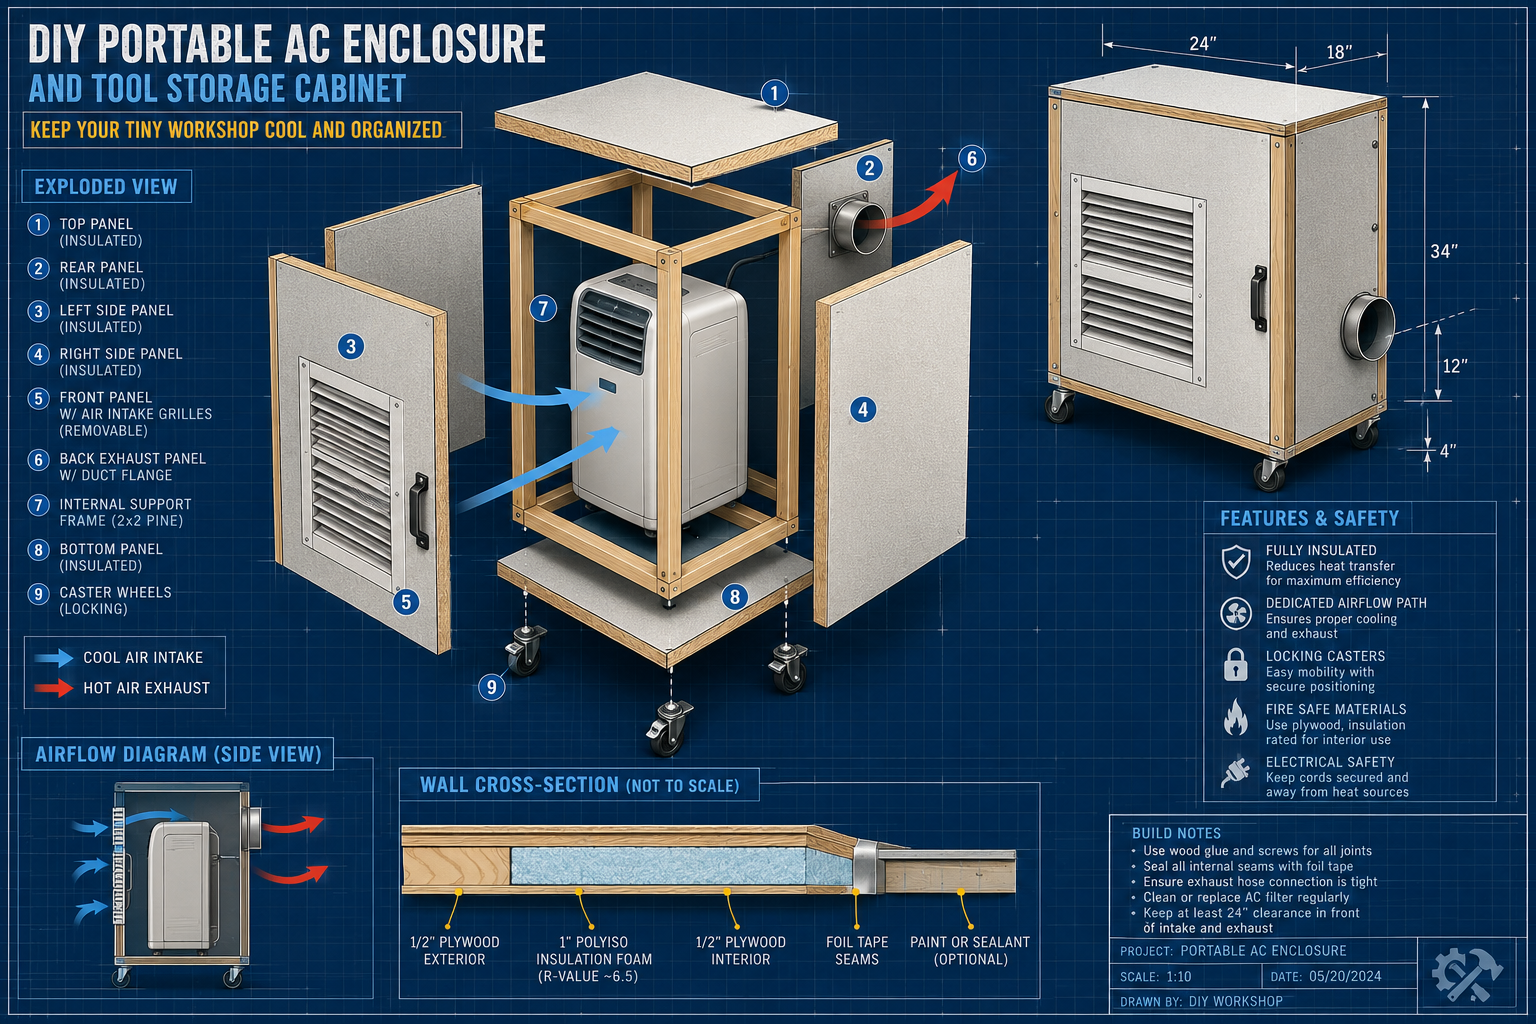
Material Considerations:
- Wood Type: 3/4-inch plywood (e.g., Baltic birch or cabinet-grade) provides stability and durability. MDF is more economical but less durable against moisture.
- Insulation: Consider lining the interior walls with sound-dampening insulation (e.g., rigid foam board or acoustic panels) to further reduce noise and improve thermal efficiency.
- Mobility: Heavy-duty locking casters are essential if you plan to move the unit.
- Finishing: A good sealant or paint will protect the wood from moisture and wear.
Integrated Tool Storage Planning:
This is where the enclosure truly shines as a multi-functional piece of workshop furniture. Refer to Smart Workshop Storage Solutions: Maximizing Small Spaces with for inspiration on making the most of every inch.
- Drawer Systems: Incorporate drawers of various sizes for different tools – shallow ones for chisels and hand planes, deeper ones for power tool accessories.
- Shelving: Adjustable shelves can store larger items or bins.
- Pegboards/Perforated Panels: Mount these on exterior or interior surfaces (where they don’t block AC vents) for hanging frequently used tools.
- Custom Inserts: Design foam or wooden inserts for specific tools to keep them secure and organized.
- Accessibility: Ensure all storage is easily accessible without obstructing AC function or maintenance.
Design Sketch and Cut List:
Before cutting, create detailed sketches or 3D models. This allows you to visualize the finished product, identify potential conflicts, and generate an accurate cut list. Factor in the thickness of your chosen materials.

Building the Portable AC Enclosure and Tool Cabinet
With a solid design in hand, the construction phase brings your vision to life. Precision, safety, and adherence to the ventilation plan are key to a successful build for your DIY Portable AC Enclosures and Tool Storage Cabinets.
Frame Construction and Enclosure Shell
Begin by constructing the robust frame that will house both the AC unit and the storage components.
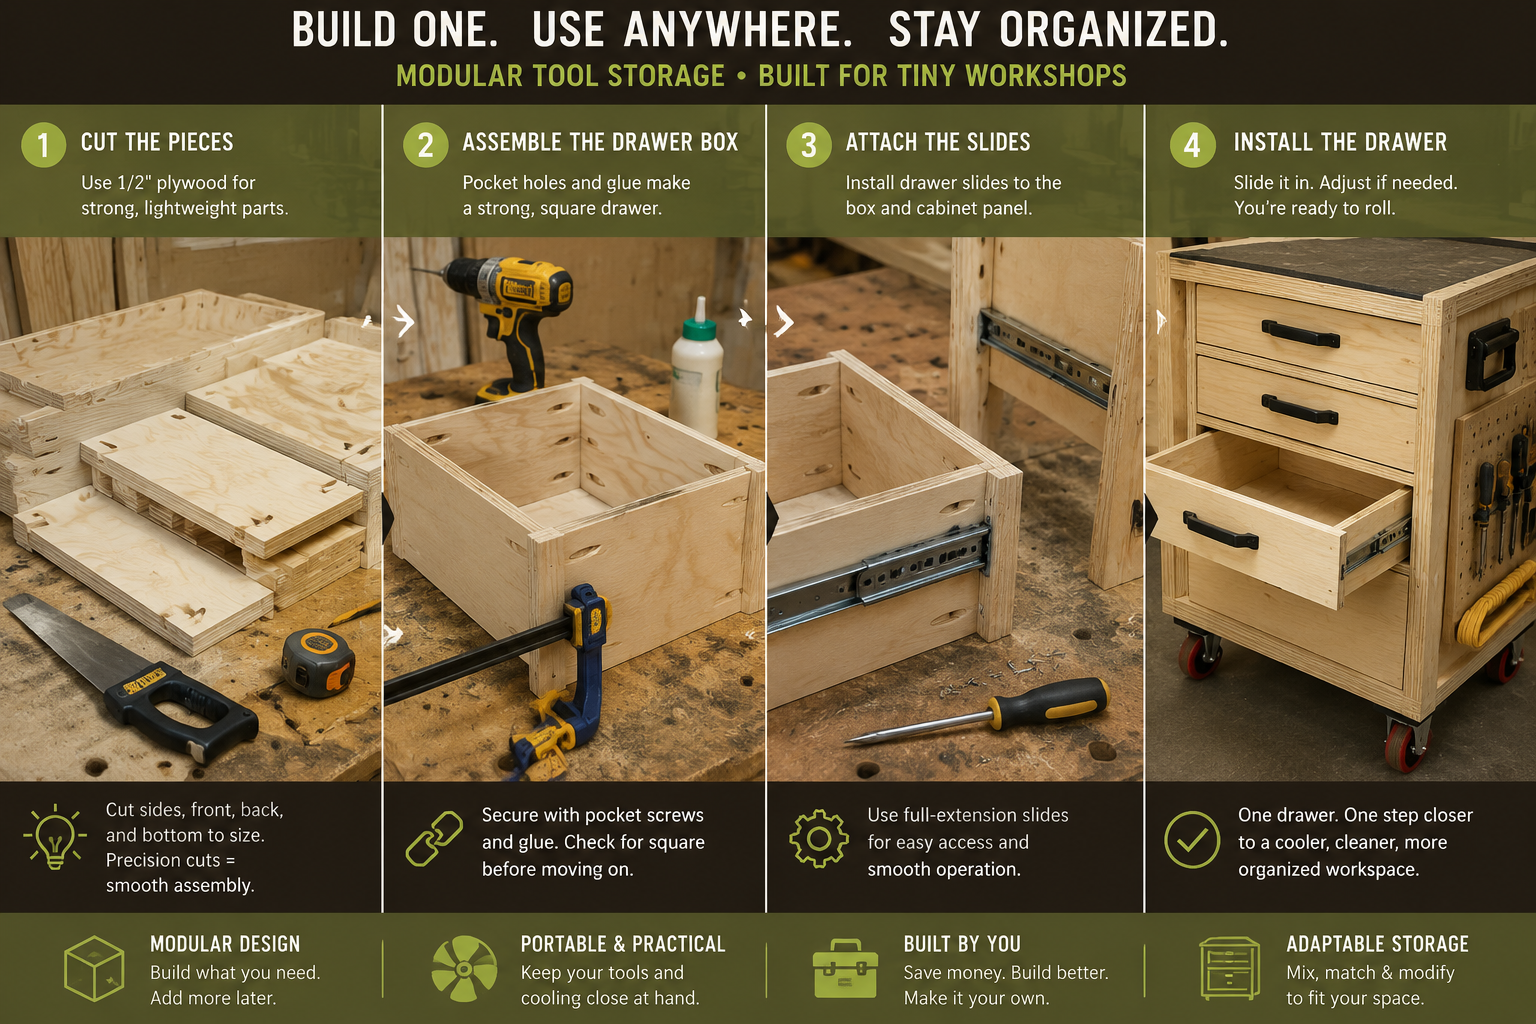
- Cut Components: Using your cut list, precisely cut all plywood or MDF pieces for the top, bottom, sides, and internal dividers.
- Assemble Main Box: Assemble the basic box structure using strong joinery techniques like dadoes, rabbets, or pocket screws, reinforced with wood glue. Ensure all corners are square. For added strength and longevity, consider techniques discussed in Beginner’s Guide to Essential Woodworking Joints: When to Use Which.
- AC Compartment: Create a dedicated compartment for the AC unit. This needs ample clearance on all sides, top, and rear, as per the manufacturer’s recommendations.
- Ventilation Openings: Cut out the openings for intake grilles and the exhaust port. Ensure these are precisely sized and positioned.
- Exhaust Ducting: Create a sealed port for the AC exhaust hose. This can be a simple hole with a rubber gasket, or a custom-built collar that securely connects the AC hose to an external vent. Consider a flexible exhaust hose extension to reach an exterior window or dedicated wall vent.
- Caster Installation: Attach heavy-duty locking casters to the bottom of the enclosure. Pre-drill pilot holes to prevent splitting the wood.
Integrating Storage and Accessibility Features
This step transforms the simple enclosure into a truly functional workshop asset, making your DIY Portable AC Enclosures and Tool Storage Cabinets an organization powerhouse.
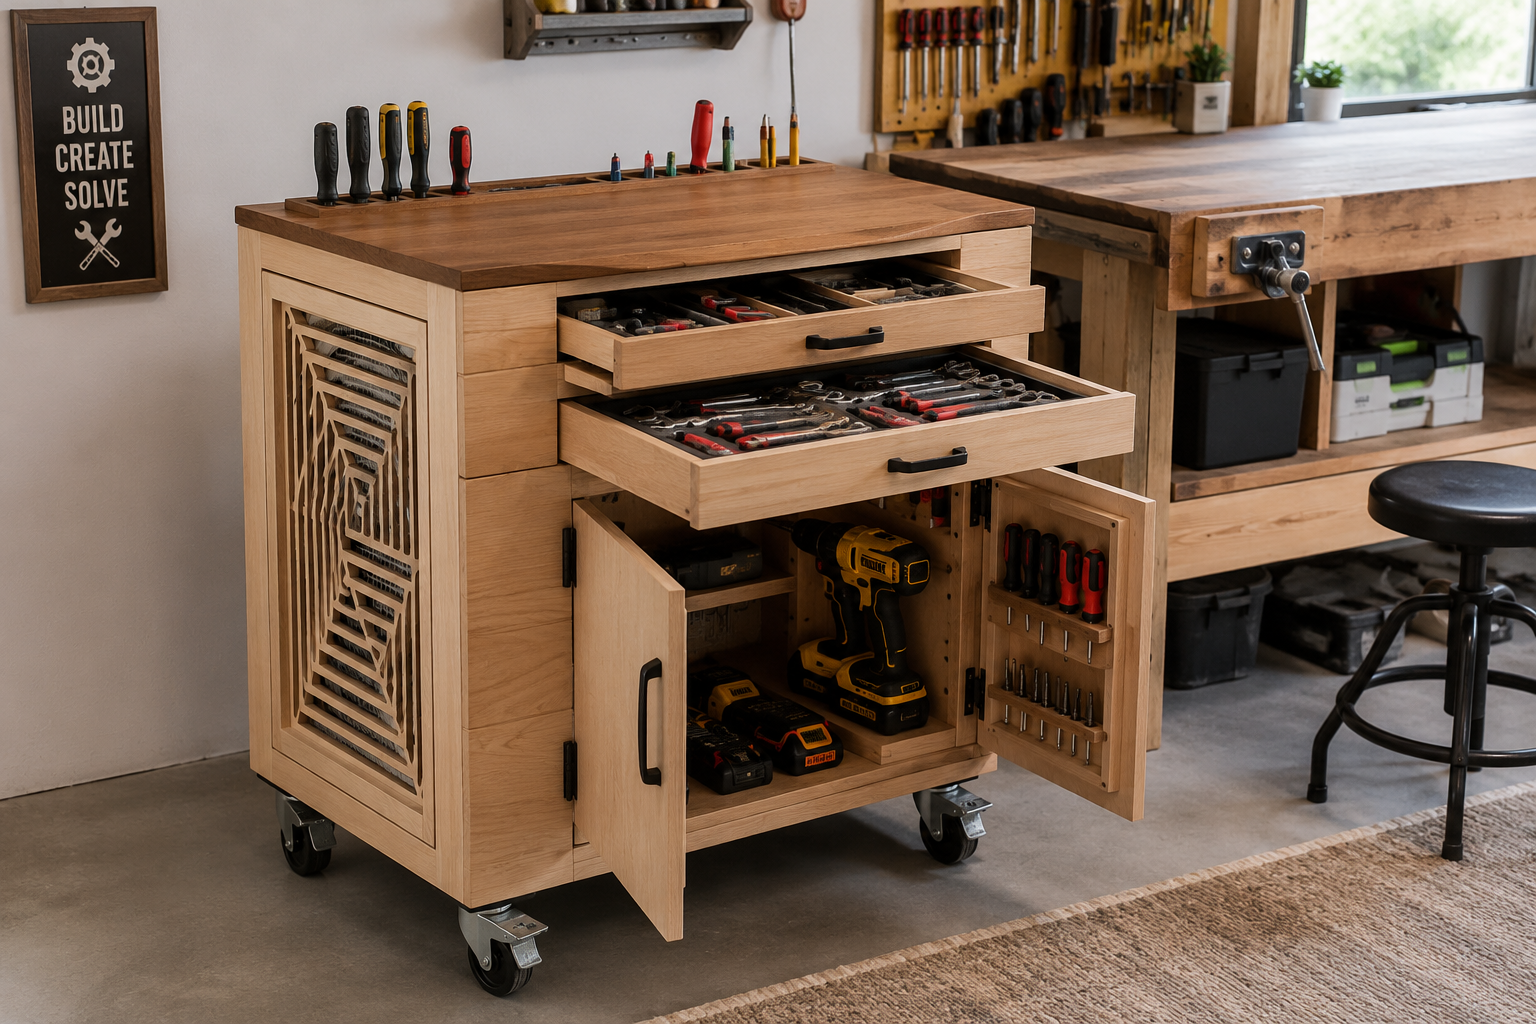
- Drawer Boxes: Construct drawer boxes using sturdy joinery. Dovetail joints or robust butt joints reinforced with screws and glue are excellent choices. For more on advanced drawer construction, see Mastering Dovetail Drawers for Cabinets: Hand-Cut and Router.
- Drawer Slides: Install high-quality drawer slides. Full-extension slides are ideal for complete access to tools.
- Shelving: Install fixed or adjustable shelves in the remaining storage areas. For adjustable shelves, use shelf pin jigs for consistent holes.
- Doors and Hardware: Add doors to storage compartments for a cleaner look and dust protection. Use appropriate hinges (e.g., Euro hinges, butt hinges) and handles. Magnetic catches can keep doors securely closed.
- AC Access Panel: Design an access panel or door for the AC compartment. This allows for easy filter cleaning, condensate drainage, and maintenance without having to remove the entire unit. Magnetic catches or simple latches work well here.
- Tool Organization Inserts: Craft custom dividers, foam inserts, or tool holders for your drawers and shelves. This level of customization truly maximizes organization.
Finishing Touches and Safety Considerations
The final steps focus on aesthetics, durability, and crucial safety measures.
- Sanding: Thoroughly sand all wooden surfaces, starting with a coarser grit and progressing to finer grits, to prepare for finishing.
- Finishing: Apply a durable finish such as polyurethane, lacquer, or paint. This protects the wood from moisture, dust, and wear. A light-colored finish can also help reflect heat if the enclosure is exposed to direct sunlight.
- Install Grilles and Vents: Securely attach the intake grilles and ensure the exhaust vent is properly sealed.
- Cable Management: Plan for neatly routing the AC power cord to avoid tripping hazards. Include cable clips or internal channels.
- Electrical Safety: Ensure that the AC unit’s power cord is not pinched or crimped by the enclosure. Avoid routing cords through sharp edges.
- Stability: Test the stability of the entire unit, especially with the AC unit inside and tools loaded. Ensure the casters lock firmly.
Maintenance, Customization, and Expanding Your Workshop Efficiency
Your new DIY Portable AC Enclosures and Tool Storage Cabinets are a testament to efficient workshop design. Ongoing maintenance, future customization, and integrating smart features can further enhance your workspace in 2026.
Regular Maintenance for Longevity
Even the best-built enclosure requires routine care to ensure both the AC unit and the storage components function optimally.
- AC Filter Cleaning: Regularly clean or replace the AC unit’s air filter as per its manual. Restricted airflow from a dirty filter will reduce cooling efficiency and potentially damage the unit. The access panel you built will make this a breeze.
- Condensate Management: If your AC unit collects condensate, ensure the tank is emptied regularly or the drainage hose is clear and properly routed. Check for any leaks around the unit or enclosure.
- Dust Removal: Keep the enclosure’s intake grilles clear of sawdust and debris. Over time, dust can accumulate inside, affecting AC performance and becoming a fire hazard. Use compressed air or a shop vacuum to clear internal spaces.
- Hardware Check: Periodically inspect drawer slides, hinges, and casters. Tighten any loose screws and lubricate moving parts as needed.
- Exhaust Path Inspection: Ensure the exhaust hose remains intact and free of kinks or blockages, and that the external vent is unobstructed.
Customization and Modular Additions
The beauty of DIY projects is the ability to adapt and expand. Your portable AC enclosure and tool cabinet can be a foundation for further workshop improvements.
- Modular Storage Extensions: Consider building additional modular storage units that can attach to or sit alongside your AC enclosure. This could include a workbench extension, a sanding station, or more specialized tool storage, building on principles from Building Modular Wood Storage Systems for Small Workshops: Maximizing.
- Integrated Power Strips: Mount a power strip with surge protection to the side or rear of the cabinet for easy access to power for handheld tools or chargers.
- Lighting: Add LED strip lighting to illuminate the contents of drawers or shelves, making it easier to find tools.
- Specialized Holders: Create custom holders for specific tools like drill bits, router bits (referencing Mastering the Router Table: Essential Jigs, Safety, and Advanced), or hand tools such as those discussed in Hand Tool Mastery for Detail Work: Chisels, Hand Planes, and.
- Color-Coding/Labeling: Implement a color-coding system or clear labeling for drawers and compartments to streamline tool retrieval.
Enhancing Workshop Efficiency and Comfort
Beyond the enclosure itself, consider how this project integrates with your overall workshop strategy to keep it cool and organized.
- Dust Collection Integration: While not directly part of the AC enclosure, an efficient dust collection system is vital for air quality and tool longevity. Explore building a Building a DIY Smart Workshop Dust Collection System: Integrating IoT to further enhance your clean air efforts.
- Ergonomic Enhancements: Position your rolling AC enclosure and tool cabinet strategically to support an ergonomic workflow. Consider how it interacts with your workbench or other Creating Ergonomic Workshop Furniture: Building Custom Workbenches, to reduce strain.
- Smart Home Integration (Future-Proofing): For advanced users, integrating smart switches could allow remote control of the AC unit. This could be part of broader DIY Smart Home Integration with Custom Wooden Enclosures: Concealing efforts to hide technology.
By treating your workshop as a dynamic, evolving space, your DIY Portable AC Enclosures and Tool Storage Cabinets become more than just a project – they become a cornerstone of a more comfortable, efficient, and enjoyable woodworking experience.
Conclusion
Transforming a cluttered, hot workshop into an organized, cool, and productive space is entirely achievable with the strategic construction of DIY Portable AC Enclosures and Tool Storage Cabinets. By meticulously designing for proper airflow, integrating clever tool storage solutions, and selecting durable materials, you can create a functional piece of workshop furniture that optimizes every square inch. Remember that safety through correct ventilation and electrical practices is paramount. As you complete this project, you’ll not only enjoy a more comfortable environment in 2026 but also gain a highly organized system that makes finding tools effortless, allowing you to focus on the craft rather than the chaos. Embrace the modularity and customization options to continually evolve your workshop, ensuring it remains an efficient and inspiring place to work for years to come.
Next Steps:
- Measure your portable AC unit and sketch preliminary designs, incorporating both AC and storage needs.
- Calculate minimum airflow requirements for intake and exhaust based on your AC unit’s specifications.
- Gather necessary materials, including plywood, lumber, hardware, and ventilation grilles.
- Begin construction, focusing on sturdy joinery and precise cuts.
- Install integrated storage and finishing touches, ensuring proper AC functionality and safety.
SEO Meta Title: DIY Portable AC Enclosures & Tool Storage: Cool, Organized Workshop SEO Meta Description: Build DIY portable AC enclosures that double as tool storage cabinets. Keep your tiny workshop cool and organized in 2026 with smart designs & airflow.

