

Large-scale wood planers often come with a formidable price tag, placing them out of reach for many hobbyist and small-shop woodworkers. Yet, the desire to work with stunning live-edge slabs and wide, character-rich boards remains. The good news? Achieving glass-smooth, perfectly flat surfaces on even the most unruly timber is entirely possible without investing thousands in a commercial planer. This comprehensive guide delves into the world of DIY Router Sleds and Jigs for Flattening Slabs and Wide Boards: Achieving Precision Without a Planer, offering accessible, effective, and budget-friendly methods to transform rough lumber into ready-to-use material.
Key Takeaways
- Cost-Effective Alternative: Router sleds offer a significantly more affordable solution for flattening large slabs and wide boards compared to industrial planers.
- Precision and Control: With careful setup and technique, DIY router sleds can achieve professional-level flatness and smoothness.
- Versatile Design: Simple designs can be adapted to various sizes of lumber, making them highly versatile for different projects.
- Essential for Woodworkers: Understanding and utilizing these jigs is crucial for those working with rough lumber, particularly live-edge or oversized pieces.
- Safety First: Proper clamping, router bit selection, and personal protective equipment are paramount for safe operation.
Understanding DIY Router Sleds and Jigs for Flattening
At its core, a router sled is a jig that guides a router across the surface of a workpiece, removing material in a controlled manner to create a perfectly flat plane. This method is particularly invaluable for wood that is too wide for a standard benchtop planer, too thick, or possesses irregular shapes like live-edge slabs. The principle is straightforward: the router travels along a fixed, flat plane (the sled) while the workpiece remains stationary beneath it. By taking shallow passes, the router gradually shaves off the highest points until the entire surface is level.

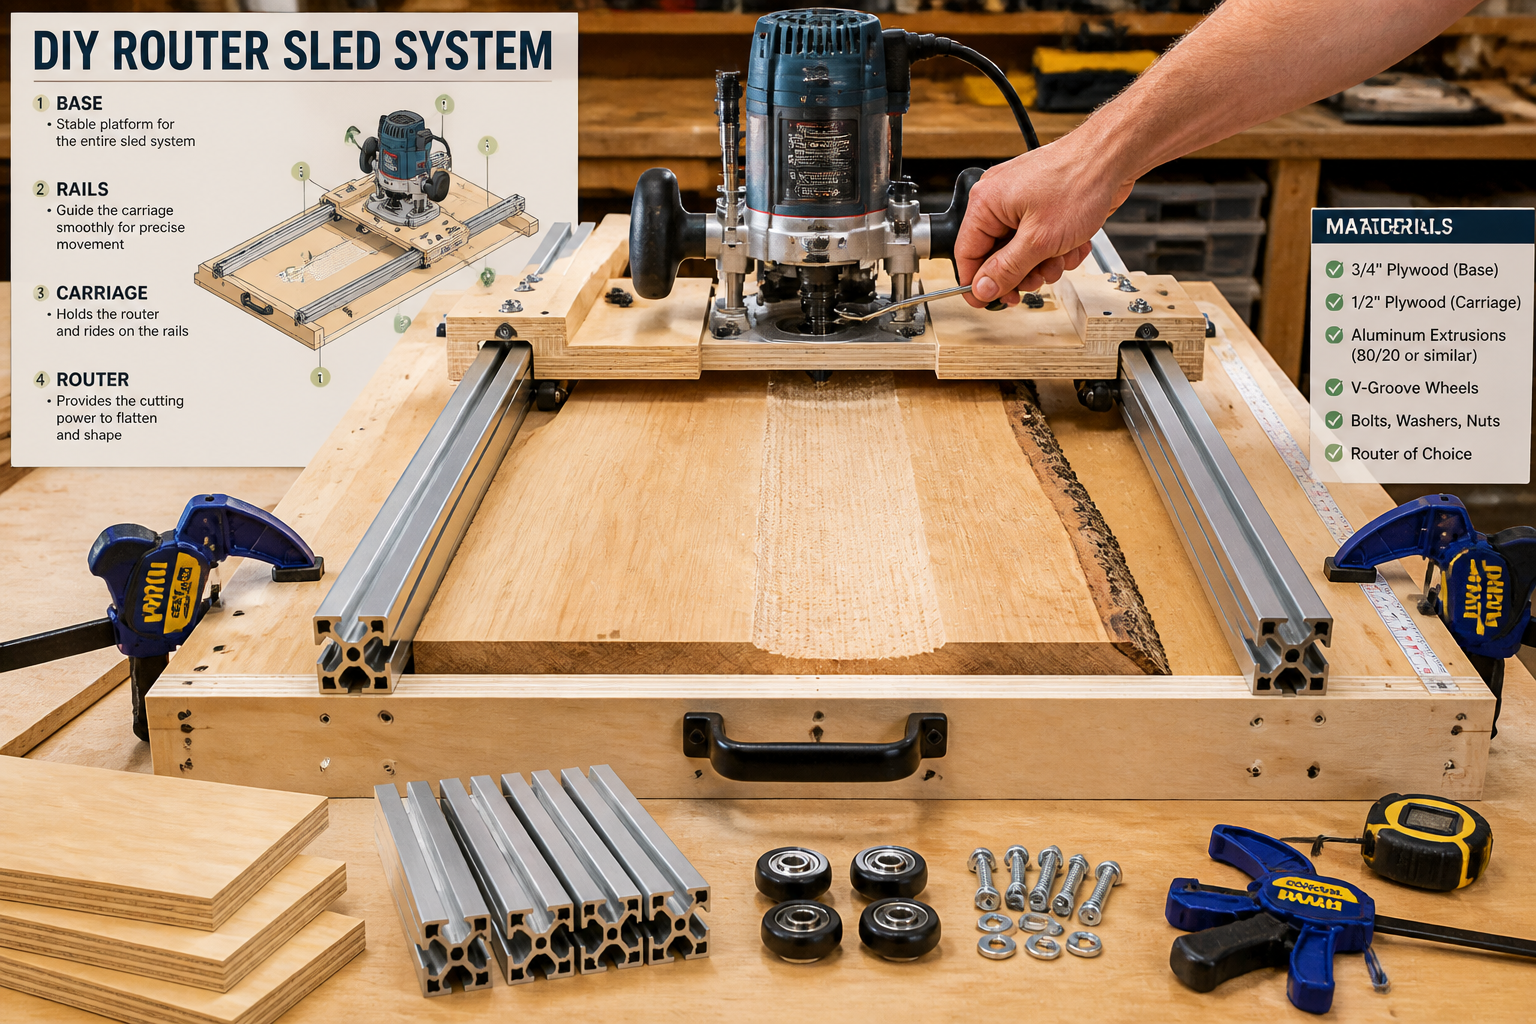
Components of a Basic Router Sled
A typical DIY router sled system consists of a few key elements:
- Base or Work Surface: This is the foundation upon which your workpiece rests. It needs to be stable, flat, and often includes methods for securing the slab.
- Side Rails: Two parallel, straight, and equally thick rails run along the length of the base. These provide the tracks for the router carriage to slide on. Aluminum extrusions, straight lengths of MDF, or sturdy plywood are common choices.
- Router Carriage (Sled): This is the component that holds your router. It’s designed to slide smoothly along the side rails. It typically consists of a flat platform with edges that ride on top of or along the inside of the rails, ensuring the router bit remains at a consistent height relative to the rails.
- Router: A plunge router is often preferred for its ease of depth adjustment, though fixed-base routers can also be adapted. The router needs to be powerful enough for the task and securely mounted to the carriage.
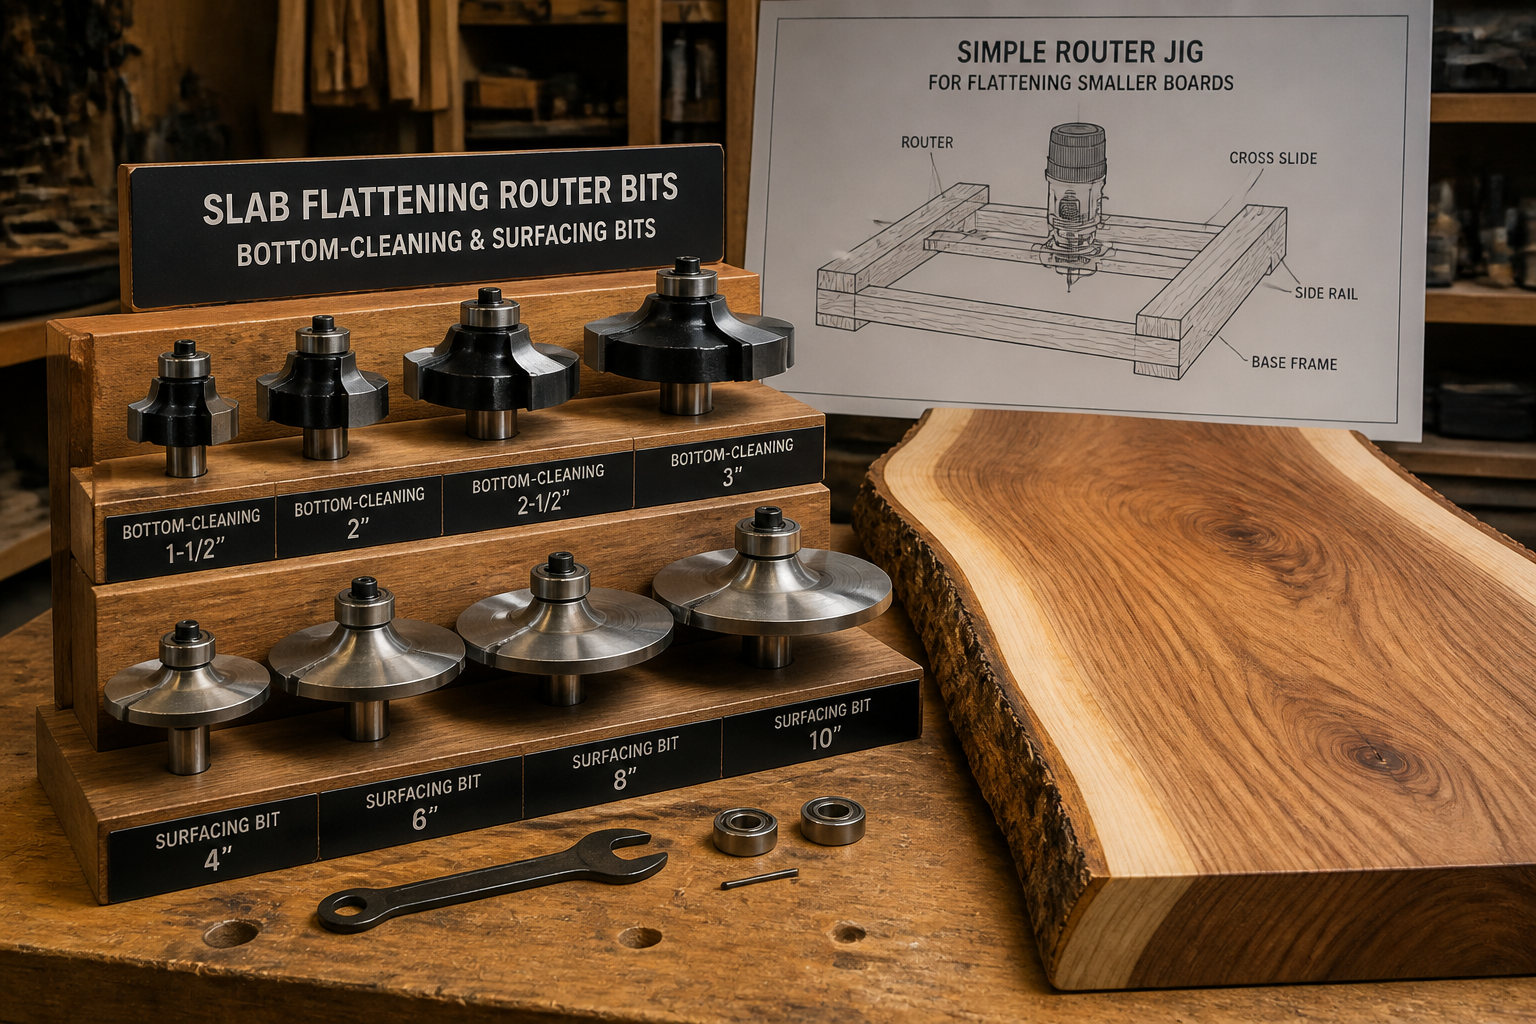
- Flattening Bit: Also known as a spoilboard surfacing bit or a bottom-cleaning bit, this is a large-diameter, flat-bottomed router bit designed to remove wide swaths of material efficiently.

Why Choose a Router Sled Over a Planer?
While drum sanders and thickness planers offer speed for dimensioning standard lumber, they have significant limitations when it comes to large, irregular, or extremely wide stock.
- Size Constraints: Most benchtop planers handle widths up to 13 inches. Slabs often exceed this.
- Cost: Industrial planers or wide-belt sanders are prohibitively expensive for many.
- Irregular Shapes: A planer requires a relatively flat reference face. Warped or twisted slabs cannot be planed effectively until one face is flattened. Router sleds excel at creating this initial flat reference.
- Material Removal: Planers can struggle with deep cupping or twisting. A router sled can easily remove significant material to achieve flatness.
- Accessibility: Router sleds can be built with readily available materials and basic woodworking tools, making them an accessible solution for any workshop. For more fundamental jig building, explore our Beginner’s Guide to Essential Woodworking Jigs.
Constructing Your DIY Router Sled and Jigs
Building an effective router sled doesn’t require complex joinery or exotic materials. Simplicity and stability are key. Here’s a step-by-step guide to constructing a versatile sled.
Materials You’ll Need
- Base: 3/4″ MDF or thick, flat plywood (sized larger than your largest intended slab).
- Side Rails: Two pieces of 3/4″ thick MDF, plywood, or aluminum extrusion. They must be perfectly straight and the same height.
- Router Carriage: 1/2″ or 3/4″ plywood or MDF.
- Fasteners: Wood screws, bolts, T-nuts, or clamping hardware.
- Adhesive: Wood glue if using plywood/MDF.
- Router Bit: A large-diameter flattening/spoilboard surfacing bit (e.g., 1-1/2″ to 2-1/2″ diameter). Learn more about selecting the right bits in The Essential Guide to Router Bits.
Step-by-Step Construction Guide
- Prepare the Base: Ensure your chosen base material is flat. If using plywood, select a high-quality sheet. This base will support your slab and provide a stable platform for the rails. It’s crucial that this surface remains flat throughout the process, so consider reinforcing it if working with very heavy slabs.
- Attach the Side Rails:
- Place your slab (or a sacrificial piece of the same thickness) on the base.
- Position the two side rails parallel to each other, ensuring they are perfectly straight and equidistant from the edges of the slab.
- The rails must be higher than the thickest part of your slab. This is critical for the router carriage to clear the workpiece.
- Secure the rails to the base. If using MDF or plywood, glue and screw them down. For aluminum extrusions, specific mounting hardware will be used. Ensure the tops of the rails are perfectly co-planar (in the same plane) and level. Shims can be used if necessary.
- Build the Router Carriage:
- Cut a piece of plywood or MDF for the carriage platform. It should be wide enough to comfortably hold your router and long enough to span the distance between your side rails, with a slight overhang on each side.
- Attach runners to the underside of the carriage platform. These runners will slide on top of the side rails. The distance between the outside edges of these runners should match the distance between the outside edges of your side rails. Alternatively, the runners can be narrower and slide between the rails, depending on your design.
- Test fit the carriage on the rails. It should slide smoothly without excessive wobble. If there’s too much play, adjust the runners or add shims.
- Cut an opening in the center of the carriage for your router bit to pass through. This hole should be large enough to accommodate your largest flattening bit.
- Mount the Router:
- Position your router securely to the carriage. Many users create a sub-base for their router that attaches to the carriage with bolts or T-nuts, allowing for easy removal and attachment.
- Ensure the router is centered on the carriage and the bit extends through the opening freely.
Essential Setup and Operation Tips
- Stabilize the Workpiece: Before routing, the slab must be absolutely stable and supported. Use wedges and shims underneath the slab to eliminate any rocking or movement. Clamp the slab securely to the base using cauls, F-clamps, or custom hold-downs. Any movement during routing will compromise flatness.
- Level the Slab: Use a long straightedge and feeler gauges or a digital level to identify the highest points on the slab. Mark these areas. Your goal is to create one perfectly flat reference face first.
- Shallow Passes: Take very shallow passes (e.g., 1/16″ or less per pass). This reduces strain on the router and bit, minimizes tear-out, and results in a smoother finish.
- Consistent Feed Rate: Maintain a steady, consistent feed rate. Rushing can lead to an uneven surface or damage to the bit.
- Overlap: Overlap each pass by at least one-third to one-half the diameter of your router bit to ensure no high spots are missed.
- Dust Collection: Flattening slabs generates a tremendous amount of dust and chips. Use a good dust collection system attached to your router or positioned nearby. A shop vacuum is a minimum requirement.

- Router Bit Maintenance: Keep your router bit sharp. A dull bit will burn the wood, cause tear-out, and make the router work harder.
“The true magic of a router sled lies not in its complexity, but in its ability to simplify the monumental task of flattening large, irregular lumber into a manageable, precise process for any woodworker.”
Advanced Jigs and Techniques for Router Flattening
While the basic router sled is incredibly effective, several advanced jigs and techniques can enhance precision, speed, and versatility.
Elevated Router Sleds for Extremely Thick Slabs
For very thick slabs, constructing an elevated router sled where the rails are supported by sturdy risers off the main workbench can be beneficial. This allows the router bit to be plunged deeper without hitting the workbench, or simply to accommodate taller workpieces. Ensure the risers are rigidly constructed and securely anchored.
Micro-Adjustable Router Carriages
For ultimate precision, some woodworkers build router carriages with fine-adjustment mechanisms. This could involve threaded rods and nuts to precisely control the height of the router bit relative to the rails, allowing for extremely fine depth adjustments without having to rely solely on the router’s plunge mechanism.
Flattening Both Sides: The Importance of a Reference Face
The process of flattening typically involves two stages:
- First Face: Flatten one side of the slab using the router sled. This will become your primary reference face.
- Second Face: Once the first face is flat, flip the slab over. Use this newly flattened face as a reference against your base or a set of parallel support strips. Then, use the router sled again to flatten the second side, making it parallel to the first.
Choosing the Right Router Bit for Flattening
The choice of router bit is critical for efficient and clean flattening.
| Router Bit Type | Characteristics | Best Use Case |
|---|---|---|
| Spoilboard Surfacing Bit | Large diameter (1.5″ – 2.5″+), flat bottom, often with replaceable carbide inserts. Designed for wide material removal. | Primary choice for flattening large slabs and creating level surfaces. |
| Bottom Cleaning Bit | Smaller diameter than surfacing bits, flat bottom, typically solid carbide. Good for smaller areas or specific applications. | General dadoing, rabbeting, and smaller flattening tasks. |
| Straight Bit (Large Diameter) | Can be used in a pinch, but not as efficient as dedicated surfacing bits due to smaller cutting area and less aggressive cut. | Not ideal for primary flattening, but usable for cleanup. |
Always use sharp, high-quality bits. For longevity and efficiency, carbide-tipped or solid carbide bits are recommended.

Safety Considerations
Working with powerful routers and large pieces of wood demands a strong focus on safety.
- Personal Protective Equipment (PPE): Always wear eye protection, hearing protection, and a dust mask.
- Secure Clamping: Ensure the workpiece is absolutely immovable. Any shifting can be dangerous and ruin your work.
- Router Control: Maintain a firm grip on the router. Be aware of kickback potential, especially with aggressive cuts or dull bits.
- Clear Workspace: Keep your work area free of clutter to prevent trips and falls.
- Electrical Safety: Inspect power cords for damage and ensure your router is properly grounded.
Beyond Flattening: Other Router Jigs
The principles learned from building a router sled can be applied to other useful shop jigs. For example, a similar setup can be used for Mastering the Router Table: Essential Jigs, Safety, and Advanced Techniques or even for Mastering Dovetail Joinery for Drawers when combined with specialized templates. These jigs are fundamental to improving accuracy and efficiency in woodworking, whether you’re crafting simple DIY Wooden Plant Stands or complex furniture.
Conclusion
The ability to flatten large wood slabs and wide boards precisely is a cornerstone skill for any serious woodworker, and in 2026, it remains an accessible goal even without industrial machinery. By investing a little time and effort into building DIY Router Sleds and Jigs for Flattening Slabs and Wide Boards: Achieving Precision Without a Planer, you unlock a world of possibilities for projects previously considered out of reach. From stunning live-edge coffee tables to expansive desk tops, these simple yet effective jigs empower you to transform rough lumber into beautiful, functional pieces with professional-grade flatness. Embrace the ingenuity of the DIY approach, prioritize safety, and enjoy the satisfaction of bringing your woodworking visions to life with unparalleled precision.

Actionable Next Steps:
- Gather Materials: Start by acquiring the necessary plywood, MDF, or aluminum for your sled.
- Select Your Router Bit: Invest in a high-quality spoilboard surfacing bit appropriate for your router.
- Build Your Sled: Follow the construction guide carefully, focusing on stability and precision in your measurements.
- Practice: Begin with a sacrificial piece of wood to get a feel for the process, depth of cut, and feed rate before tackling your prized slab.
- Refine Your Technique: Experiment with different clamping methods and dust collection setups to optimize your workflow.
