
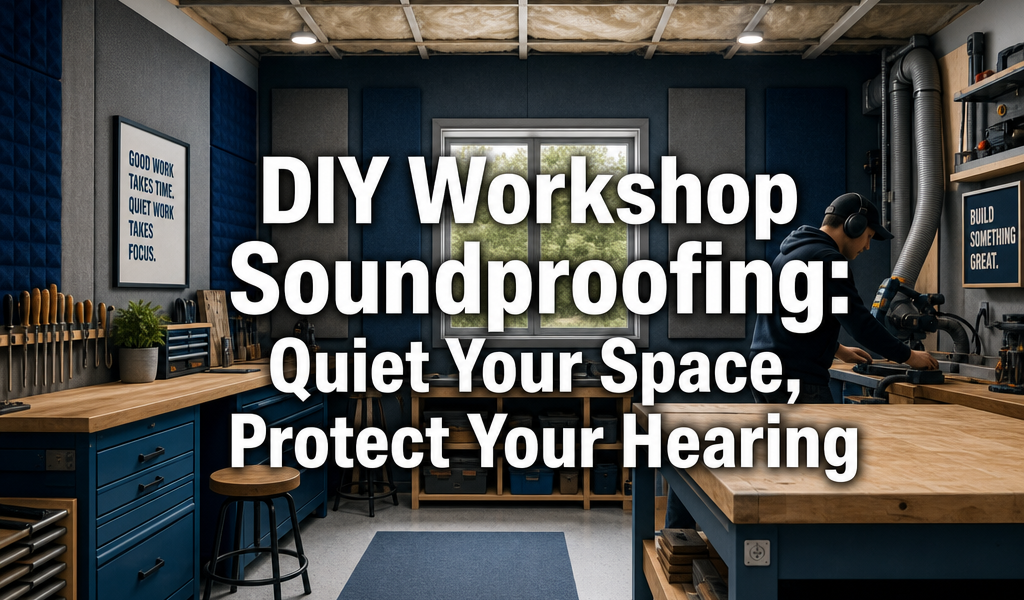
Imagine the insistent whine of a table saw or the percussive thud of a hammer echoing relentlessly, not just within your small workshop but potentially through your home and even into your neighbors’ yards. This pervasive noise isn’t merely an annoyance; it poses a significant risk to your hearing health and can strain relationships with those around you. Fortunately, transforming your noisy workspace into a quieter, more enjoyable sanctuary is entirely achievable through effective DIY Soundproofing for Small Workshops: Reducing Noise Pollution with Acoustic Panels, Insulation, and Enclosures. This comprehensive guide will equip you with the knowledge and practical steps to dramatically cut down on workshop din, allowing you to focus on your craft in peace.
Key Takeaways
- Understand Noise Transmission: Recognize that sound travels through air and structures, requiring different soundproofing approaches.
- Prioritize Sealing Gaps: Air leaks are major culprits for noise escape; focus on doors, windows, and wall penetrations first.
- Utilize Mass and Decoupling: Heavy, dense materials combined with techniques that separate structural elements are crucial for blocking sound transmission.
- Absorb Internal Reverberation: Acoustic panels and soft materials are essential for reducing echo and improving the acoustic quality within the workshop.
- Consider Tool Enclosures: For particularly loud machinery, building dedicated sound enclosures can offer significant noise reduction.
Understanding Workshop Noise and Its Impact
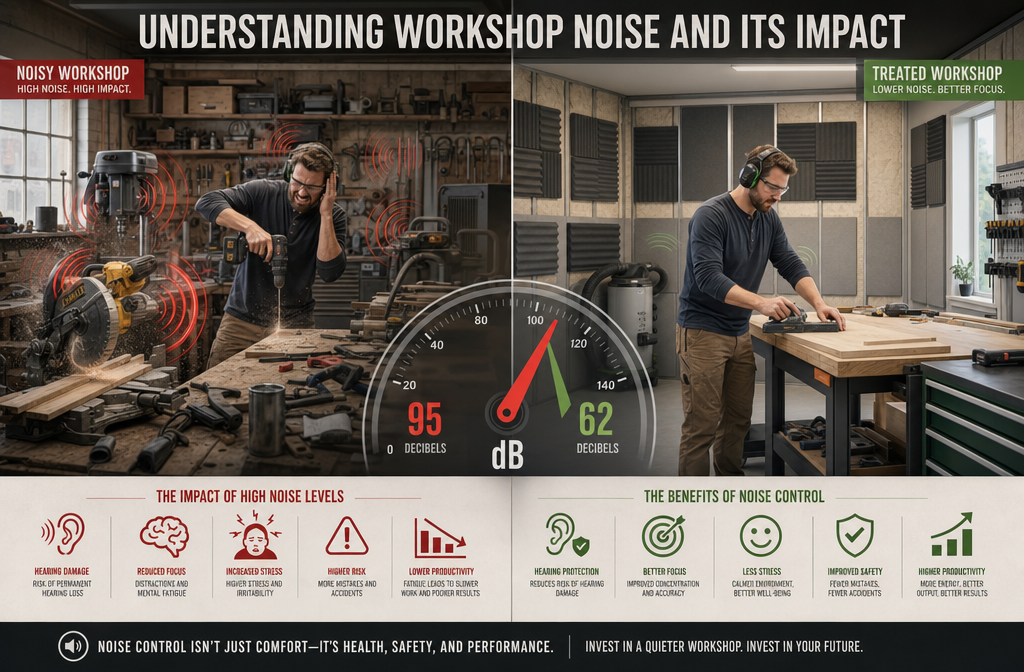
Noise in a small workshop often originates from a variety of sources, primarily power tools like table saws, planers, routers, and sanders. These tools generate both airborne sound (sound waves traveling through the air) and structure-borne vibration (vibrations traveling through the floor, walls, and other connected structures). Understanding how these noises propagate is the first step in effective soundproofing.
The Science of Sound Transmission
Sound, at its core, is vibration. When a power tool operates, it creates vibrations that manifest as pressure waves in the air. These waves hit surfaces – walls, doors, windows – and cause them to vibrate, transferring the sound to the other side. This is airborne sound transmission. Concurrently, the tool’s vibrations can travel directly through its stand, the workbench, and the floor into the building’s structure, radiating as sound in other parts of the building. This is structure-borne transmission.
To effectively reduce noise pollution, both types of transmission must be addressed. Simply adding soft materials will help with airborne noise within the room, but it won’t prevent sound from traveling through your walls or floor.
Health and Community Impacts of Workshop Noise
Chronic exposure to loud noise can lead to serious health issues, most notably permanent hearing loss. According to the Occupational Safety and Health Administration (OSHA), consistent exposure to noise levels above 85 decibels (dB) can cause damage. Many common woodworking tools exceed this threshold significantly:
- Table Saw: 100-110 dB
- Router: 95-105 dB
- Planer: 100-110 dB
- Impact Driver: 95-100 dB
Even at lower levels, sustained noise can cause stress, fatigue, and reduced concentration. Beyond personal health, excessive workshop noise can be a major source of conflict with neighbors, leading to complaints and strained community relations. In 2026, with many people working from home, minimizing such disturbances is more critical than ever. Implementing effective DIY Soundproofing for Small Workshops: Reducing Noise Pollution with Acoustic Panels, Insulation, and Enclosures protects both your well-being and your peace of mind.
Core Strategies for DIY Soundproofing
Effective DIY soundproofing hinges on applying three fundamental principles: adding mass, decoupling, and sealing gaps. These strategies work together to block and absorb sound waves.
1. Adding Mass: The Barrier Against Sound
Mass is your best friend when blocking sound. The heavier and denser a material, the more energy it takes for sound waves to make it vibrate, thus reducing sound transmission. Think of it like trying to push a feather versus a boulder – the boulder resists movement far more.
Practical Applications:
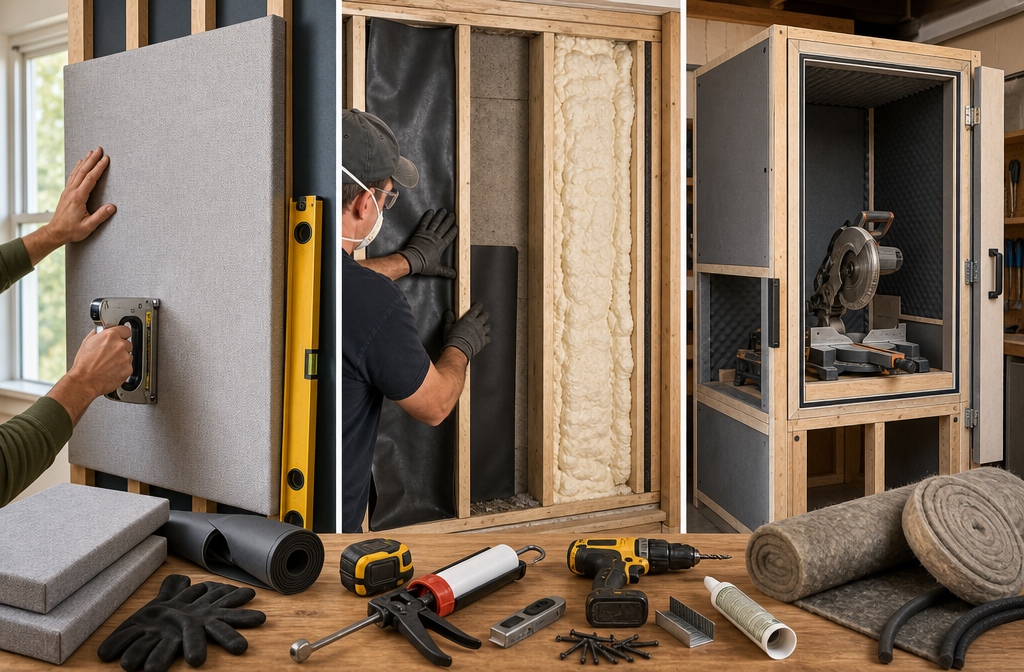
- Drywall Layers: Adding an extra layer or two of drywall to existing walls is one of the most cost-effective ways to increase mass. Use a viscoelastic damping compound (like Green Glue) between layers to further enhance soundproofing.
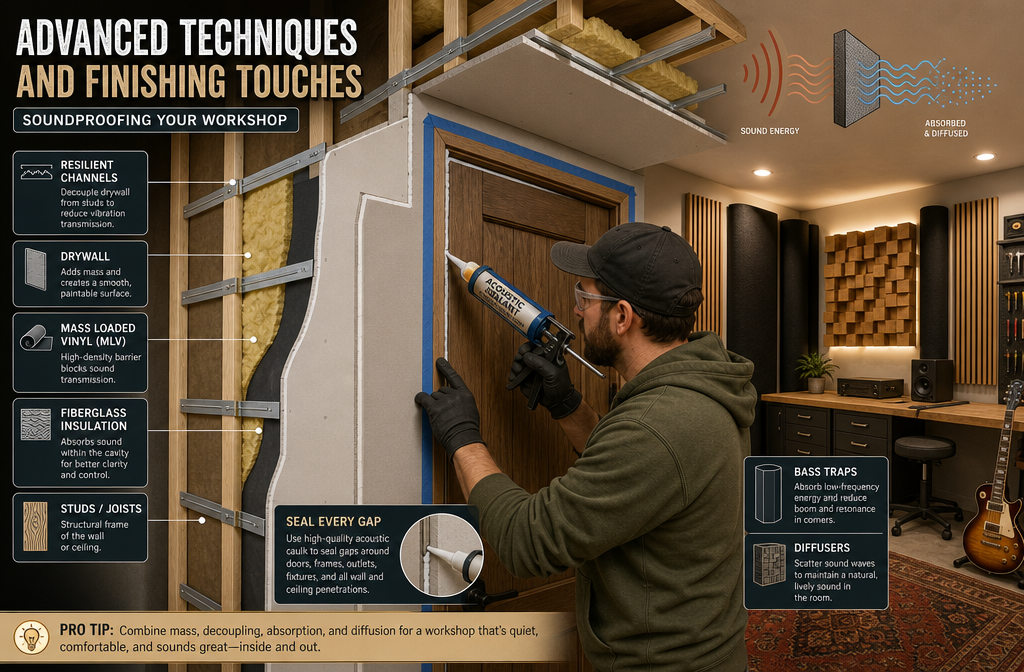
- Mass Loaded Vinyl (MLV): This flexible, dense material can be stapled directly to studs before drywall, or even hung behind existing drywall. It’s excellent for adding significant mass without excessive thickness.
- Plywood or MDF: For tool enclosures or small sections, thicker plywood or MDF can add considerable mass.
💡 Pro Tip: When adding drywall layers, stagger the seams to prevent sound leakage through continuous gaps.
2. Decoupling: Breaking the Sound Path
Decoupling refers to separating structures to prevent vibrations from transferring directly from one side to another. It creates a “room within a room” effect, significantly reducing structure-borne noise.
Practical Applications:
- Resilient Channels: These thin, metal strips are screwed to studs, and then drywall is attached to the channels. This creates a small air gap between the drywall and the studs, isolating the drywall from the wall’s structure.
- Staggered Stud Walls: If building new walls, staggering studs allows you to insulate between them without a direct connection for sound to travel through.
- Double-Wall Construction: The ultimate decoupling method involves building a second, independent wall inside the existing one, creating a large air gap filled with insulation.
- Floating Floors: Installing a subfloor over resilient mats or pucks can isolate the workshop floor from the building’s main structure, mitigating impact noise.
For more on optimizing your workspace, consider our guide on creating ergonomic workshop furniture.
3. Sealing Gaps: The Low-Hanging Fruit
Even the thickest, most decoupled wall is useless if there are unsealed cracks and gaps. Sound, like water, will find the path of least resistance. A small gap can undo hours of soundproofing work.
Practical Applications:
- Doors:
- Weatherstripping: Apply around the entire door frame to create a tight seal when closed.
- Door Sweeps/Bottom Seals: Install along the bottom edge to block gaps under the door.
- Solid Core Doors: Replace hollow core doors with solid core versions for added mass.
- Windows:
- Caulk: Seal any gaps around window frames.
- Heavy Curtains/Window Plugs: Thick, dense curtains or removable window plugs made from insulated MDF can significantly reduce sound transmission.
- Wall Penetrations:
- Acoustic Caulk/Sealant: Use generously around electrical outlets, light switches, pipes, and ventilation ducts where they penetrate walls.
- Outlet Gaskets: Install foam gaskets behind outlet and switch plates.
Table: Common Soundproofing Materials and Their Uses
| Material | Primary Use | Key Benefit |
|---|---|---|
| Drywall (multiple layers) | Walls, ceilings | Adds mass, easy to work with |
| Mass Loaded Vinyl (MLV) | Walls, floors, tool enclosures | High mass-to-thickness ratio |
| Mineral Wool/Fiberglass | Wall cavities, ceilings, tool enclosures (absorption) | Absorbs sound, adds some mass |
| Acoustic Caulk | Sealing gaps around doors, windows, penetrations | Essential for airtight seals |
| Resilient Channels | Walls, ceilings | Decouples drywall from framing |
| Solid Core Doors | Main workshop entrance | Significant mass for blocking airborne noise |
| Weatherstripping | Door and window seals | Blocks air leaks effectively |
Acoustic Panels, Insulation, and Enclosures
While mass, decoupling, and sealing prevent sound from escaping, acoustic treatment inside the workshop is equally important for reducing echo (reverberation) and improving the working environment. This is where acoustic panels and insulation shine.
DIY Acoustic Panels: Taming Reverberation
Acoustic panels are designed to absorb sound waves within a room, reducing echo and making the space feel quieter and more comfortable. They don’t block sound from leaving the room, but they improve the internal acoustics dramatically.
How to Build Simple DIY Acoustic Panels:
- Frame Construction: Build simple wooden frames (1x2s or 1x4s) to your desired size (e.g., 2’x4′).
- Infill Material: Fill the frame with dense, sound-absorbent material like mineral wool (Rockwool Safe’n’Sound) or Owens Corning 703 rigid fiberglass board. These materials are much more effective than common foam panels.
- Fabric Covering: Wrap the frame and infill with acoustically transparent fabric (e.g., burlap, speaker cloth). Stretch it tightly and staple it to the back of the frame.
- Mounting: Mount panels directly to walls or ceilings, especially at first reflection points.
You can also craft more advanced acoustic solutions. Our article on crafting acoustic diffusers and absorbers from scrap wood provides excellent ideas for upcycling materials into effective sound treatment.
Insulation: More Than Just Temperature Control
While standard insulation (like fiberglass batts) is primarily for thermal resistance, denser insulation types, such as mineral wool or Roxul Safe’n’Sound, also offer good sound absorption properties. Filling wall and ceiling cavities with dense insulation is crucial for both reducing sound transmission through the structure and absorbing sound within the air gap created by decoupling.
- Walls and Ceilings: Pack all wall and ceiling cavities completely with mineral wool insulation before adding drywall layers.
- Floors: If you have access to the underside of your workshop floor, install mineral wool batts between joists.
Building Sound Enclosures for Noisy Tools
Some tools, like a planer or a dust collector, are exceptionally loud. For these, a dedicated sound enclosure can provide significant noise reduction.
Key Principles for Enclosure Design:
- Mass: Use heavy materials for the walls of the enclosure (e.g., double layers of MDF or plywood with MLV in between).
- Sealing: Ensure all seams are airtight. Use acoustic caulk, weatherstripping, and cam latches to pull doors tightly shut.
- Absorption: Line the inside of the enclosure with acoustic foam or mineral wool panels to absorb sound that gets trapped inside.
- Ventilation: Tools generate heat, so proper ventilation is crucial. Design baffled air inlets and outlets (like a “Z” shaped path) to allow airflow without providing a direct sound path.
- Isolation: Place the enclosure on rubber isolation pads to prevent vibrations from transferring to the floor.
An enclosure for a dust collection system, for instance, can drastically reduce its operational noise. You might find our guide on building a DIY smart workshop dust collection system useful for integrating such a system with your soundproofing efforts.
Advanced Techniques and Finishing Touches
Beyond the core strategies, several advanced techniques and thoughtful finishing touches can further enhance your workshop’s acoustic environment, ensuring a comprehensive DIY Soundproofing for Small Workshops: Reducing Noise Pollution with Acoustic Panels, Insulation, and Enclosures project.
Addressing Vibrations from Equipment
Direct vibrations from tools contribute significantly to structure-borne noise.
- Isolation Pads: Place rubber anti-vibration mats or pads under stationary machinery (table saws, drill presses, planers, dust collectors).
- Springs/Isolators: For very heavy equipment, consider spring or neoprene isolators specifically designed for vibration dampening.
- Workbench Mass: Build a heavy, sturdy workbench. The increased mass will absorb vibrations rather than transferring them readily. Our advice on building modular wood storage systems for small workshops can also inspire solid workbench construction.
Soundproof Curtains and Blankets
While not a primary sound blocker, soundproof curtains or moving blankets can supplement other efforts, especially for windows or temporary divisions. They add mass and absorption, particularly helpful for reducing high-frequency sounds.
- Heavy Drapes: Install heavy, multi-layered drapes over windows.
- Acoustic Blankets: Hang dedicated acoustic blankets on walls or use them to temporarily cover openings during operation.
HVAC and Ductwork Considerations
Noise can travel easily through ventilation systems.
- Flexible Duct Connectors: Use flexible connectors at the junction of tools and dust collection ducts to absorb vibrations.
- Duct Liner: Line the inside of metal ducts with acoustic duct liner to absorb sound traveling through them.
- Baffles/Mufflers: For larger systems, consider building simple sound baffles or purchasing duct mufflers to reduce noise escaping through vents.
The Role of Floor Coverings
Hard, reflective surfaces like concrete floors can exacerbate echo and transmit impact noise.
- Rubber Mats: Lay down heavy rubber mats in high-traffic areas or under tools.
- Carpet/Rugs: While less common in a dusty workshop, dense carpet tiles or thick rugs can help absorb airborne sound.
Aesthetics and Integration
Soundproofing doesn’t have to mean an ugly workshop. Integrate your solutions aesthetically:
- Fabric Choices: Select fabric for acoustic panels that matches your workshop’s color scheme.
- Wood Finishes: Frame your acoustic panels with attractive wood finishes.
- Hidden Solutions: Conceal insulation behind drywall, integrate MLV discreetly.
For instance, if you’re building custom storage, you could incorporate hidden sound-dampening panels into the design, similar to how DIY smart home integration with custom wooden enclosures allows for functional yet beautiful concealment.
Conclusion
Embarking on DIY Soundproofing for Small Workshops: Reducing Noise Pollution with Acoustic Panels, Insulation, and Enclosures is a worthwhile investment in your health, your craft, and your relationship with your surroundings. By strategically applying principles of mass, decoupling, and sealing, coupled with internal absorption and specialized enclosures, you can significantly transform your workspace. From the initial sealing of tiny air gaps to the final installation of aesthetic acoustic panels, each step contributes to a quieter, more productive, and more enjoyable environment.
Start with the easiest and most impactful changes, like sealing gaps around doors and windows. Then, gradually add mass to walls and consider targeted absorption. For particularly noisy tools, explore dedicated enclosures. Remember to prioritize your hearing protection throughout the process, even in a soundproofed space. A quiet workshop isn’t just a luxury; it’s a necessity for any dedicated maker in 2026.
Actionable Next Steps:
- Conduct a Noise Audit: Identify your loudest tools and the most obvious sound leaks (cracks around doors, windows, etc.).
- Prioritize Sealing: Start by sealing all visible gaps and adding weatherstripping to doors and windows. This is often the most cost-effective first step.
- Plan Mass Additions: Decide where you can add mass (e.g., extra drywall layers, MLV) based on your budget and construction comfort.
- Consider Acoustic Panels: Begin fabricating DIY acoustic panels using mineral wool to address internal echo.
- Evaluate Tool Enclosures: For any persistently loud tools, research and plan a dedicated sound enclosure.
SEO Meta Title: DIY Workshop Soundproofing: Panels, Insulation & Enclosures SEO Meta Description: Master DIY soundproofing for your small workshop in 2026. Reduce noise pollution with acoustic panels, insulation, & tool enclosures for a quieter space.