
The hum of machinery, the scent of fresh-cut wood, and the focused energy of a maker at work, these are the hallmarks of a serious production space. Yet, for many, the reality involves a cluttered garage corner or a makeshift table struggling to keep pace with ambitious projects. The solution for serious makers and small production shops in 2026 isn’t just another workbench; it’s a strategically designed, multi-station hub. This article explores the critical elements of DIY Workbench Island Design: Multi-Station Layouts for Serious Makers and Small Production Shops, offering comprehensive insights into creating an efficient, versatile, and robust central workspace that can transform your workflow and elevate your craft.
Key Takeaways
- Modular Design is Essential: Building your workbench island with modular components allows for future expansion, rearrangement, and adaptation to evolving project needs.
- Multi-Station Layouts Boost Efficiency: Integrating distinct zones for different tasks (e.g., cutting, assembly, finishing) minimizes movement and maximizes productivity.
- Storage and Power Integration are Critical: Thoughtful inclusion of drawers, cabinets, tool storage, and accessible power outlets prevents clutter and streamlines operations.
- Durability and Stability are Paramount: A workbench island for serious use must be built with robust materials and joinery to withstand heavy tools and demanding work.
- Mobility Adds Versatility: Incorporating heavy-duty casters can transform a fixed island into a movable asset, adapting your workspace on the fly.
Foundations of Multi-Station DIY Workbench Island Design
Designing a workbench island for intensive use goes beyond simply building a sturdy table. It requires foresight, an understanding of workflow, and a commitment to integrating functionality into every dimension. For serious makers and small production shops, the island becomes the heart of operations, demanding features that support heavy-duty tasks, precise measurements, and efficient material handling.
The core principle is creating distinct, yet interconnected, workstations within a single footprint. This minimizes wasted motion and ensures that specialized tools and materials are always within reach for specific processes. Think about the stages of your typical project: material prep, cutting, joinery, assembly, sanding, and finishing. A well-designed island anticipates these needs and provides a dedicated space for each.
Key considerations for the foundation of your DIY workbench island design include:
- Size and Footprint: Determine the maximum usable space in your workshop. The island should be large enough to accommodate multiple stations but still allow for comfortable movement around it.
- Structural Integrity: This is non-negotiable. Use robust materials like 2x4s or 4x4s for the frame, and high-quality plywood or solid hardwood for the top. Engineered wood products designed for heavy loads are also excellent choices.
- Work Surface Material: Different tasks require different surfaces. A general-purpose hardwood top is excellent for most woodworking. However, you might consider areas with a sacrificial MDF top for cutting, a specialized surface for electronics, or even a small, integrated steel plate for metalworking or hammering.
- Height: Standard workbench height is often 34-36 inches, but consider your own ergonomics and the height of any integrated tools. Some makers prefer varying heights for different tasks, a slightly lower section for assembly, a standard height for general work.
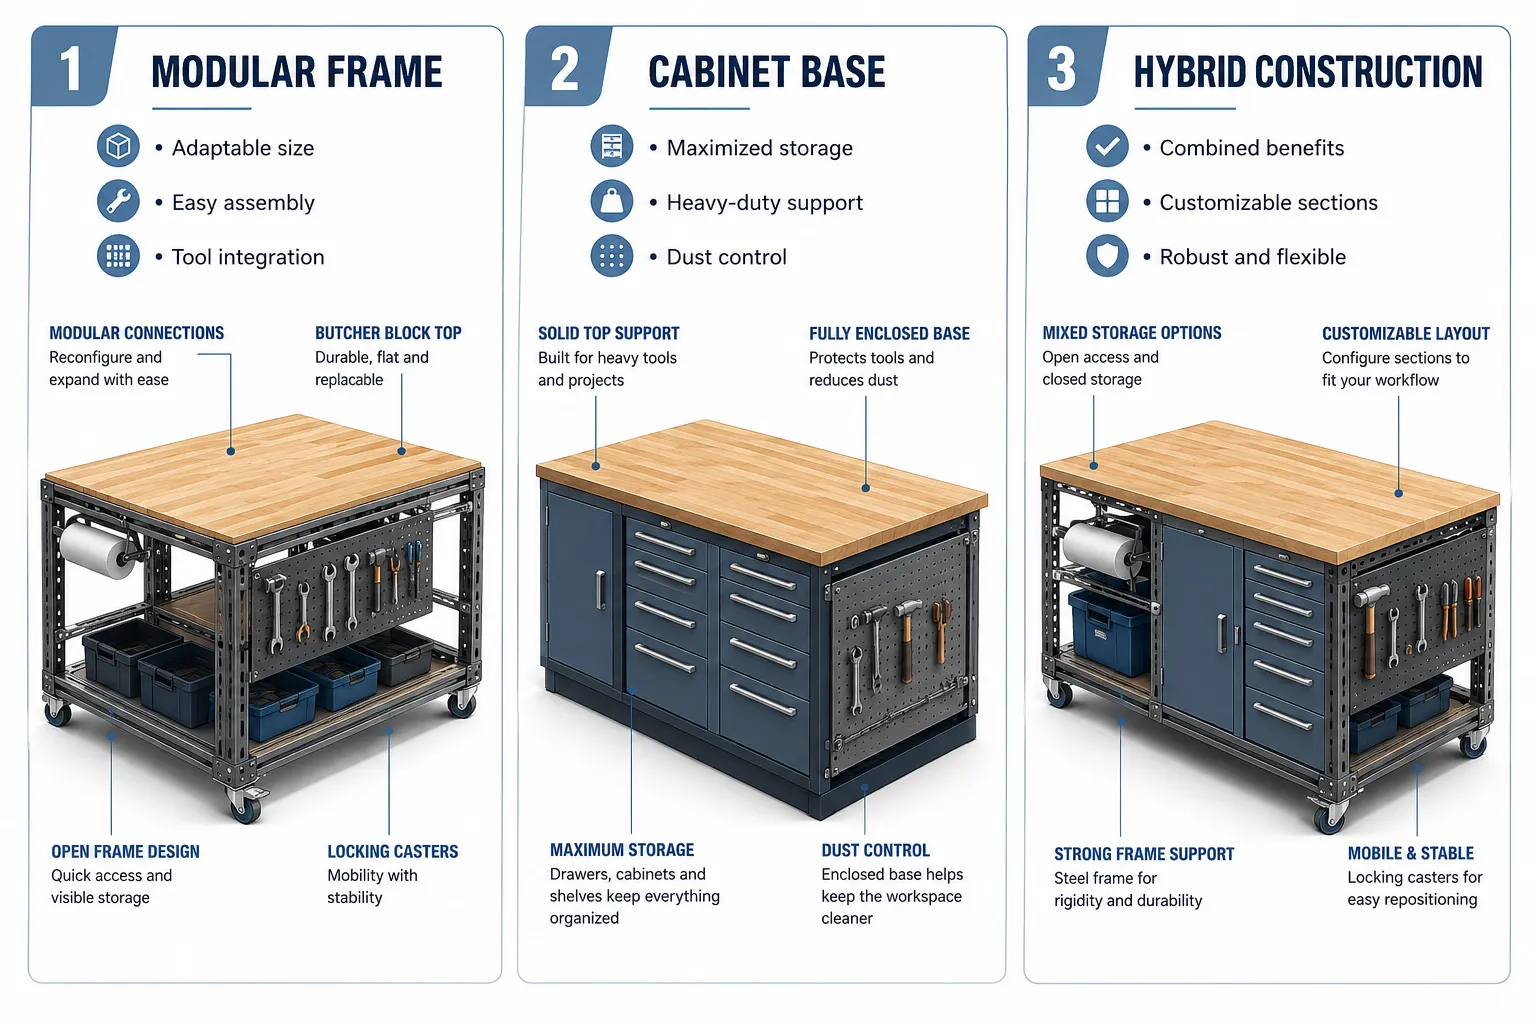
A truly effective DIY workbench island design for multi-station layouts prioritizes not just strength, but also adaptability. Modular construction, where sections can be added, removed, or reconfigured, provides long-term flexibility as your projects and tools evolve. This approach ensures your investment in time and materials pays off for years to come.
Optimizing Workflow with Integrated Workstations
The essence of a multi-station layout is to streamline your process. Instead of moving materials to different machines across the shop, the goal is to bring the functionality to the island itself, or at least minimize the travel distance between critical operations.
Consider these common workstation integrations:
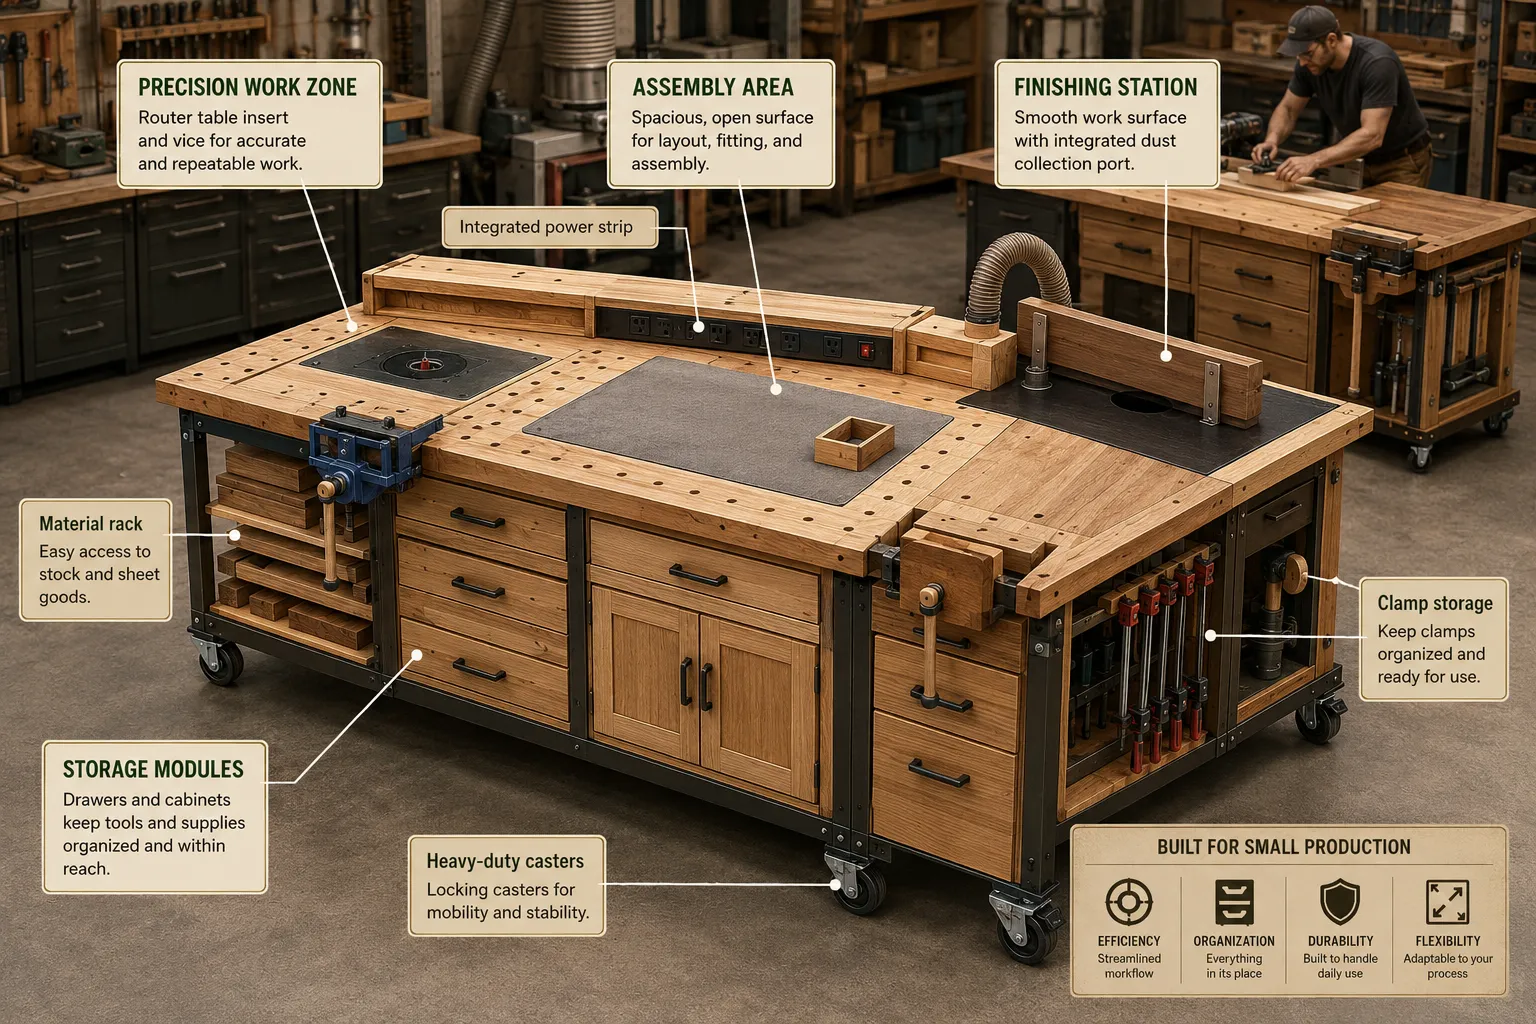
- Cutting and Routing Station: Incorporate a dedicated space for a router table, or even a smaller track saw cutting area. This often involves a recessed section of the workbench or a built-in router lift. For detailed planning on integrating versatile features, explore ideas for building a DIY folding workbench with integrated storage for tiny workshops as many of those space-saving concepts can be adapted for island functionality.
- Assembly and Clamping Zone: A large, clear section of the workbench is crucial for assembling components. Consider adding integrated T-tracks or dog holes to facilitate clamping and hold-downs.
- Finishing and Sanding Station: While finishing often requires a dedicated clean room, a small section of the island can be designated for sanding, equipped with robust dust collection. This might involve a grate system or a simple downdraft table insert.
- Precision and Detail Work: A smaller, often slightly elevated, section can be ideal for intricate tasks, featuring a bench vice, magnifying lamp, and specialized tool storage nearby.
Achieving a multi-station layout within your DIY workbench island design also means thinking vertically. Overhead gantries, integrated tool panels, and swing-arm tool holders can extend functionality without consuming precious surface area.
Integrating Storage, Power, and Mobility into Your Workbench Island
Beyond the raw work surface, the utility of a DIY workbench island for serious makers is dramatically enhanced by intelligent integration of storage, power, and mobility. These elements transform a static table into a dynamic, organized, and truly efficient production hub.
Smart Storage Solutions
Clutter is the enemy of efficiency. A well-designed workbench island incorporates a variety of storage options to keep tools, fasteners, and materials organized and accessible.
- Drawers and Cabinets: These are fundamental for storing hand tools, power tool accessories, and consumables. Consider different drawer depths: shallow for small items like drill bits and chisels, deep for larger tools. Full-extension drawer slides are a must for easy access.
- Open Shelving: Ideal for frequently used items, project components, or larger tools that don’t fit in drawers. Ensure shelves are adjustable.
- Integrated Tool Storage: Think about dedicated slots for clamps, specialized holders for often-used power tools, or even a built-in pegboard section on one end of the island.
- Material Storage: For small production shops, having quick access to common material stock (e.g., sheets of plywood, lengths of lumber) near the island can save significant time. This might involve vertical storage racks on an end or under the workbench if space permits. For larger slab materials, consider where to keep them for easy access, drawing inspiration from guides like live edge slab selection and milling from raw wood to finished surfaces for tables and islands for efficient handling.
The goal is to create a home for everything, minimizing the time spent searching for tools and materials.
Powering Up Your Production Hub
Modern making relies heavily on power tools and equipment. Integrating power directly into your DIY workbench island design is crucial for safety and efficiency.
- Built-in Power Strips: Install heavy-duty power strips or outlets directly into the workbench frame, preferably on multiple sides. Consider industrial-grade options with surge protection and individual switches.
- Dedicated Circuits: For serious makers running multiple high-draw tools simultaneously (e.g., router, dust collector, sander), consult an electrician to ensure your shop has adequate dedicated circuits to prevent overloads.
- USB Charging Ports: Essential for charging cordless tool batteries, phones, and other devices.
- Retractable Cords/Air Hoses: Keep your floor clear and reduce tripping hazards by incorporating retractable power cords or compressed air hoses directly into the island’s structure.
The Advantage of Mobility
While “island” implies a fixed position, the ability to move your workbench can revolutionize a small or multi-purpose workshop.
- Heavy-Duty Casters: Invest in robust locking casters that can handle the full weight of your loaded workbench island, plus any project you might be working on. Ensure they have brakes to keep the island stable during use.
- Leveling Feet: If your shop floor is uneven, casters with integrated leveling feet or separate leveling mechanisms can ensure a perfectly stable work surface even when the island is moved.
The ability to roll your island to a different part of the shop for specific tasks, like moving it closer to a large panel saw for cutting, or out of the way for a large assembly, adds an incredible layer of versatility. This is particularly valuable in small production shops where floor space might need to serve multiple functions throughout the day.
Advanced Features and Customization for the Serious Maker
Once the foundational structure and essential integrations are in place, serious makers and small production shops can elevate their DIY workbench island design with advanced features tailored to specific crafts and workflows. These customizations are what truly differentiate a generic workbench from a high-performance production asset.
Specialized Tool Integration
Beyond basic power tool storage, integrating specialized tools directly into the workbench island enhances efficiency and precision.
- Recessed Miter Saw Station: For repetitive cross-cutting, a miter saw can be built into one end of the island, with custom fences and outfeed supports that integrate seamlessly with the main work surface.
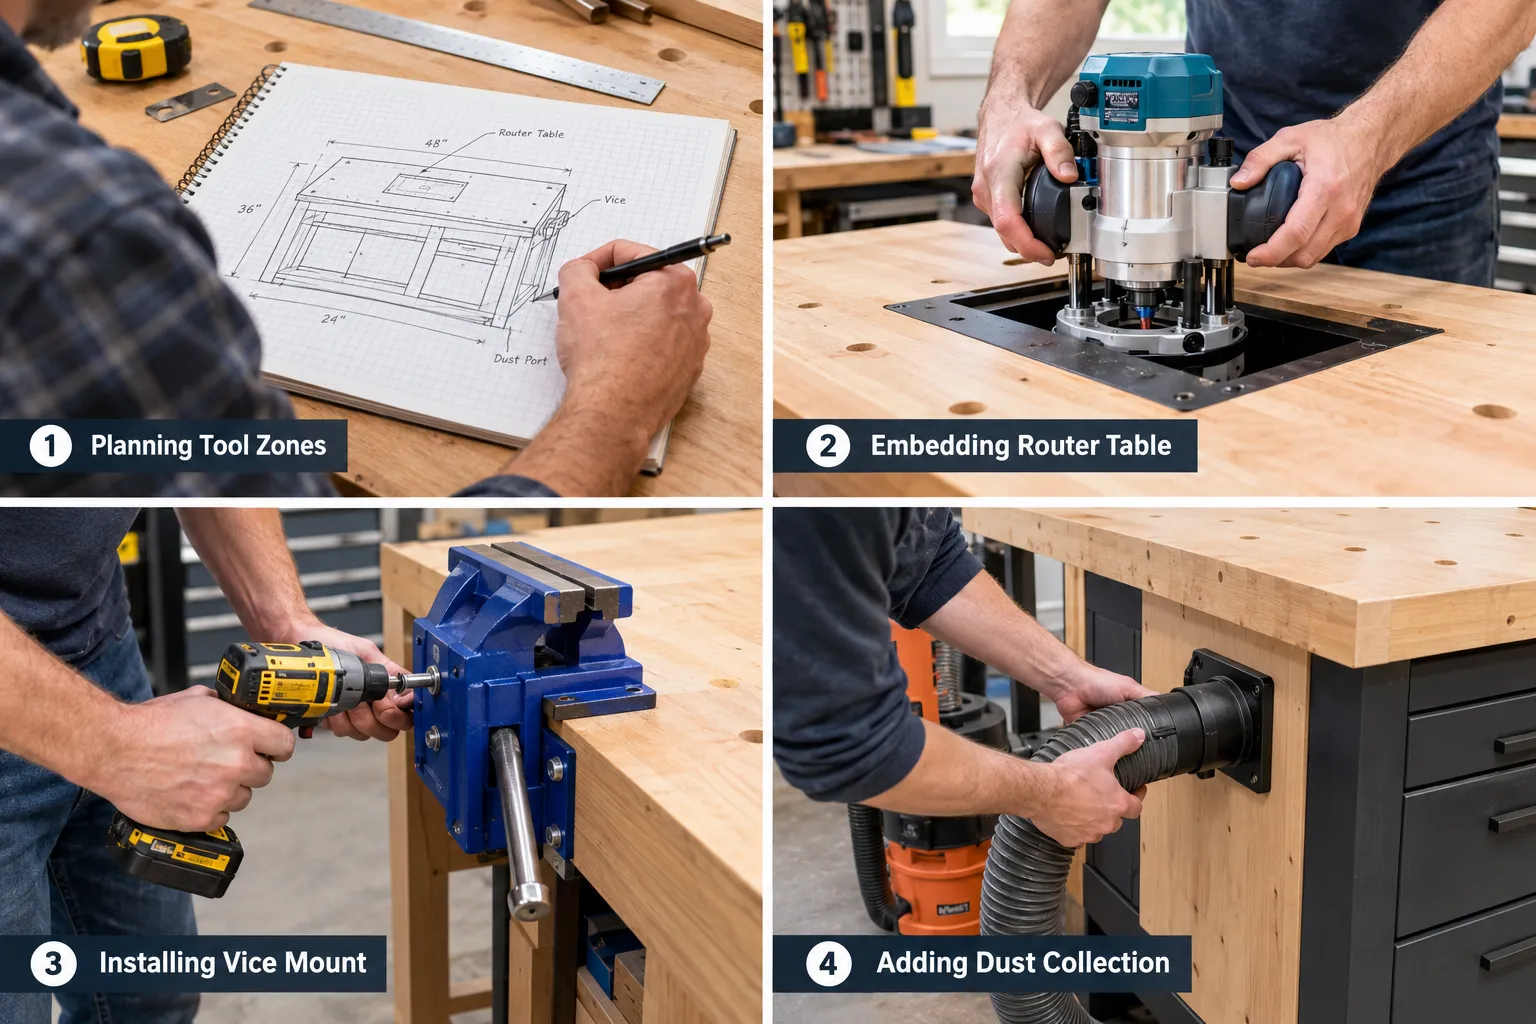
- Bench Vise Integration: Install a high-quality woodworking or metalworking vise flush with the workbench edge, ensuring maximum clamping pressure without protrusion.
- Downdraft Sanding Table: For fine woodworking or dusty operations, a section of the workbench can be converted into a downdraft table, connected to your shop’s dust collection system, effectively capturing airborne particles.
- Dedicated Electronics Bench: If your work involves electronics, a small section with an anti-static mat, soldering station, and dedicated small parts storage can be invaluable.
Consider also how to integrate tools that require specific mounting, like a drill press or grinder, possibly on a reinforced, cantilevered section or a dedicated flip-top module to save space.
Enhanced Dust Collection and Air Filtration
Dust is a major concern in any serious workshop. Proactive dust management is critical for health, safety, and the quality of your finished products.
- Integrated Dust Ports: Design your island with multiple dust collection ports, strategically placed near common dusty operations (e.g., router table, sanding station). These can connect directly to a central dust collection system.
- Hollow Core for Collection: The interior of a cabinet-based island can be leveraged as a plenum for dust collection, directing airflow to a central port.
- Overhead Air Filtration: While not directly part of the island, incorporating an overhead air filtration system works in tandem with localized dust collection to keep the entire workshop environment clean.
Lighting and Ergonomics
Proper lighting and ergonomic design are essential for long hours of focused work and preventing fatigue.
- Task Lighting: Install adjustable LED task lighting directly over key workstations on the island. Bright, flicker-free lights reduce eye strain and improve precision.
- Ergonomic Heights: As mentioned earlier, consider varying heights. A section might be slightly lower for assembly work, another at a comfortable standing height for general tasks. For processes requiring prolonged seated work, ensure adequate legroom and ergonomic seating.
- Anti-Fatigue Mats: While not part of the island itself, positioning anti-fatigue mats around your workbench island can significantly reduce strain during long periods of standing.
By focusing on these advanced features, you transform your DIY workbench island from a utilitarian object into a highly specialized, ergonomic, and efficient hub tailored precisely to the demands of a serious maker or a bustling small production shop. This level of customization truly unlocks the full potential of your workspace in 2026.
Customizing Your DIY Workbench Island for Specific Crafts
The beauty of a DIY workbench island design lies in its adaptability. Serious makers often specialize in particular crafts, and the workbench should reflect those unique demands. Customizing your multi-station layout to suit specific disciplines maximizes efficiency and comfort.
Woodworking Focus
For the dedicated woodworker, the island becomes the central hub for joinery, assembly, and fine detailing.
- Integrated Vises: Multiple high-quality woodworking vises, including face vises and end vises with dog holes, are paramount for secure workholding.
- Dog Holes and Bench Dogs: A grid of dog holes across the main work surface allows for versatile clamping using bench dogs and hold-downs.
- Router Table Integration: A permanent, precisely leveled router table, possibly with a lift mechanism, is essential for repeatable routing tasks.
- Outfeed Support: Design one end of the island to serve as an outfeed table for a nearby table saw or as support for long stock during cross-cutting.
- Clamp Storage: Vertical storage racks for various clamps on the ends or underneath the island keep them accessible without cluttering the work surface.
Consider building a robust framework that can support the weight and vibrations of heavy woodworking machinery. Wood species selection for visible joinery can even inform your island’s construction, offering both strength and aesthetic appeal.
Metalworking and Fabrication Layouts
Metalworkers require different considerations: heat resistance, heavier-duty workholding, and dedicated areas for cutting and grinding.
- Steel Plate Section: Integrate a thick steel plate into a section of the workbench for hammering, welding, or as a sturdy surface for heavy jigs.
- Heavy-Duty Vise: A robust machinist’s vise, often bolted directly to a reinforced section, is critical.
- Grinding/Deburring Station: A small, well-ventilated section with a bench grinder and clear access for debris collection. Fire safety is paramount here.
- Compressed Air Integration: Quick-connect air fittings for pneumatic tools are highly valuable.
- Arc/MIG Welding Space: If welding, ensure a fire-resistant surface, proper ventilation, and easy access to welding equipment and consumables.
Electronics and Precision Assembly
Makers focused on electronics, intricate models, or small-scale assembly have distinct needs.
- Anti-Static Surface: A dedicated anti-static mat for working with sensitive electronic components.
- Integrated Power and Data: Numerous power outlets, USB charging ports, and potentially Ethernet ports for testing equipment or CAD workstations.
- Magnification and Lighting: Articulated magnifying lamps and precision task lighting are crucial for fine detail work.
- Small Parts Storage: Modular drawer organizers, tilt-out bins, or clear compartmentalized trays integrated into the island for electronic components, fasteners, and small tools.
- Soldering Station: A heat-resistant surface with fume extraction can be built into a corner for soldering tasks.
Regardless of your specialty, the principle remains: observe your workflow, identify bottlenecks, and design specific solutions directly into your DIY workbench island design. This iterative process ensures your multi-station layout truly serves your craft.
Materials and Construction Techniques
The longevity and functionality of your DIY workbench island depend heavily on the materials chosen and the construction techniques employed. For serious makers and small production shops, durability, stability, and load-bearing capacity are paramount.
Core Materials
- Frame:
- Construction Lumber (2x4s, 4x4s): Economical and readily available. Excellent for sturdy frames, especially when laminated for increased thickness. Ensure lumber is straight and free of significant defects.
- Hardwood (Oak, Maple, Ash): Offers superior strength, density, and impact resistance. Ideal for a heavy-duty, long-lasting frame and especially for workbench tops. More expensive but worth the investment for a truly professional build.
- Steel Tubing: For the ultimate in strength and rigidity, a welded or bolted steel frame is unmatched. Requires specialized tools and skills but provides a platform capable of supporting the heaviest machinery.
- Work Surface:
- MDF (Medium-Density Fiberboard): Economical, flat, and takes finishes well. Often used as a sacrificial top that can be replaced, or as a substrate for other surfaces. Not highly impact-resistant on its own.
- Plywood (Baltic Birch, ACX/BCX): Stronger than MDF, especially Baltic Birch, which has more plies. Good for general work surfaces or as a base for laminated tops. Exterior grade plywood offers more durability in damp environments.
- Solid Hardwood (Maple, Birch, Beech): The gold standard for workbench tops. Extremely durable, resistant to dents, and can be refinished multiple times. Often constructed from glued-up strips (e.g., butcher block style) for maximum stability.
- Phenolic Plywood: A high-end option, typically birch plywood with a tough, resin-impregnated paper overlay. Highly resistant to abrasion, moisture, and chemicals, making it ideal for high-wear areas or finishing stations.
- Steel Plate: For metalworking or heavy impact areas, a section of thick steel plate (1/4″ or 3/8″) can be recessed into the workbench.
Joinery Methods
For maximum strength and stability in a DIY workbench island design, avoid relying solely on screws and nails.
- Mortise and Tenon Joints: Classic woodworking joinery. Incredibly strong and resistant to racking. Ideal for connecting legs to aprons and stretchers.
- Half-Lap Joints: Strong and relatively easy to cut, especially for connecting cross-braces within the frame.
- Bolted Connections: For heavy-duty frames (wood or steel), through-bolting with large carriage bolts or lag bolts provides exceptional strength and can be disassembled if needed. Use washers under nuts and bolt heads.
- Pocket Hole Joinery: A fast and effective method for strong corner joints, particularly useful for non-load-bearing components like cabinet frames or drawer boxes. While strong, they are generally less robust than mortise and tenons for primary structural elements under extreme stress.
- Glue: Always use high-quality wood glue (e.g., Titebond III for moisture resistance) on all wood joints, regardless of fasteners. Glue provides more joint strength than fasteners alone.
Integrated Features Construction
- Drawer Boxes: Use dovetail joints for superior strength, or dado and rabbet joints for robust plywood drawers. Full-extension drawer slides are essential for easy access.
- Cabinet Doors: Build with strong joinery (cope and stick, mortise and tenon) for durability, and use sturdy hinges.
- Power Integration: Ensure electrical components are properly enclosed and secured according to local electrical codes. Use conduit for wiring runs to protect against damage.
- Casters: Mount heavy-duty casters to reinforced blocks or directly to the frame’s lowest stretchers, using through-bolts for the strongest connection.
By carefully selecting materials and employing robust construction techniques, your DIY workbench island will not only meet the demands of serious making in 2026 but will also stand as a testament to craftsmanship itself.
Conclusion
A thoughtfully designed DIY workbench island is more than just a piece of furniture; it’s a strategic asset for serious makers and small production shops. By embracing multi-station layouts, integrating intelligent storage and power solutions, and customizing the design to fit specific craft needs, you can transform your workspace into a highly efficient and ergonomic hub. The principles of modularity, durability, and workflow optimization are key to creating an island that not only meets your current demands but also evolves with your future projects.
As you embark on your own DIY workbench island design, remember to plan meticulously, choose robust materials, and employ strong construction techniques. The investment of time and effort in building a truly functional and versatile workbench will pay dividends in enhanced productivity, reduced clutter, and a more enjoyable making experience for years to come. Start by analyzing your current workflow, identifying your most critical tools and processes, and then design an island that brings all these elements together into a cohesive, high-performance central workstation.
References
- Fine Woodworking Magazine. (n.d.). Workbenches, Outfeed Tables & Shop Organization. The Taunton Press. (No specific publication year provided for the collection, but content is evergreen)
- Schwarz, C. (2010). Workbenches: From Design & Theory to Construction & Use. Popular Woodworking Books.
- Wood Magazine. (n.d.). Shop Projects. Meredith Corporation. (No specific publication year provided for the collection, but content is evergreen)
SEO Meta Title: Build a Multi-Station DIY Workbench Island for Serious Makers SEO Meta Description: Design and build a DIY workbench island with multi-station layouts, integrated storage, and power for serious makers and small production shops in 2026.