

For centuries, master woodworkers relied on an intimate understanding of wood and a finely tuned set of hand tools to craft pieces of enduring strength and beauty. It’s a method that often feels lost in a world dominated by power tools, yet the profound satisfaction and unparalleled precision achieved through traditional hand tool joinery remain a cornerstone of true craftsmanship. This article, “Introduction to Traditional Hand Tool Joinery: Exploring Mortise and Tenon with Chisels and Saws,” delves into the foundational techniques required to master one of the most robust and versatile joints in woodworking.
Key Takeaways

- Traditional hand tool joinery offers superior control and a deep connection to the material, often resulting in tighter, more aesthetically pleasing joints.
- The mortise and tenon joint is a fundamental, incredibly strong connection essential for constructing frames, tables, and cabinets.
- Mastering layout and marking is crucial for successful hand-cut joinery, ensuring precision before any wood is removed.
- Chisels and saws are the primary tools for creating mortise and tenon joints, each requiring specific sharpening and usage techniques.
- Patience, practice, and a methodical approach are key to achieving clean, accurate hand-cut mortise and tenon joints.
The Enduring Appeal of Traditional Hand Tool Joinery: Exploring Mortise and Tenon with Chisels and Saws
In an era of advanced woodworking machinery, the decision to pursue traditional hand tool joinery might seem counterintuitive. However, the allure is undeniable. Hand tools provide an unparalleled level of control, allowing a woodworker to feel the grain, hear the cut, and respond directly to the material. This intimate interaction often leads to a deeper understanding of wood and ultimately, a higher quality product. The mortise and tenon joint, specifically, stands as a testament to this philosophy. It’s a joint that has graced furniture for millennia, known for its exceptional strength and durability, making it perfect for applications ranging from chair frames to door construction.
Why Choose Hand Tools Over Power Tools for Joinery?
While power tools offer speed and consistency, hand tools excel in precision and the ability to work quietly and without dust. For many, the rhythmic process of cutting a joint by hand is a meditative experience, fostering a connection to the craft that power tools cannot replicate.
Consider the following advantages of hand tool joinery:
- Precision and Finesse: Hand tools allow for extremely fine adjustments and detailed work that can be difficult to achieve with the brute force of machinery.
- Quiet Operation: No loud motors or dust collection systems are needed, creating a more peaceful workshop environment.
- Reduced Dust: Hand tools generate chips, not fine dust, which is healthier for the lungs and easier to clean.
- Portability: A basic set of hand tools is highly portable, making woodworking possible in various settings.
- Skill Development: Mastering hand tools builds fundamental woodworking skills, improving your understanding of wood and sharpening techniques.
The craft of joinery, particularly the mortise and tenon, is not just about making parts fit; it’s about making them unite to form a stronger, more beautiful whole. For those interested in visible wood joints and design features, hand-cut joinery offers an aesthetic that machines often struggle to replicate. You can explore more about Hand Tool Joinery for Visible Wood Joints: Dovetails, Mortis.
Essential Tools for Mortise and Tenon: Chisels, Saws, and Marking
To begin your journey into “Introduction to Traditional Hand Tool Joinery: Exploring Mortise and Tenon with Chisels and Saws,” you’ll need a well-curated selection of quality tools. Think of these not just as implements, but as extensions of your will, translating your design into tangible wood. The quality and sharpness of your tools are paramount; a dull chisel or a poorly set saw will only lead to frustration and inaccurate results.
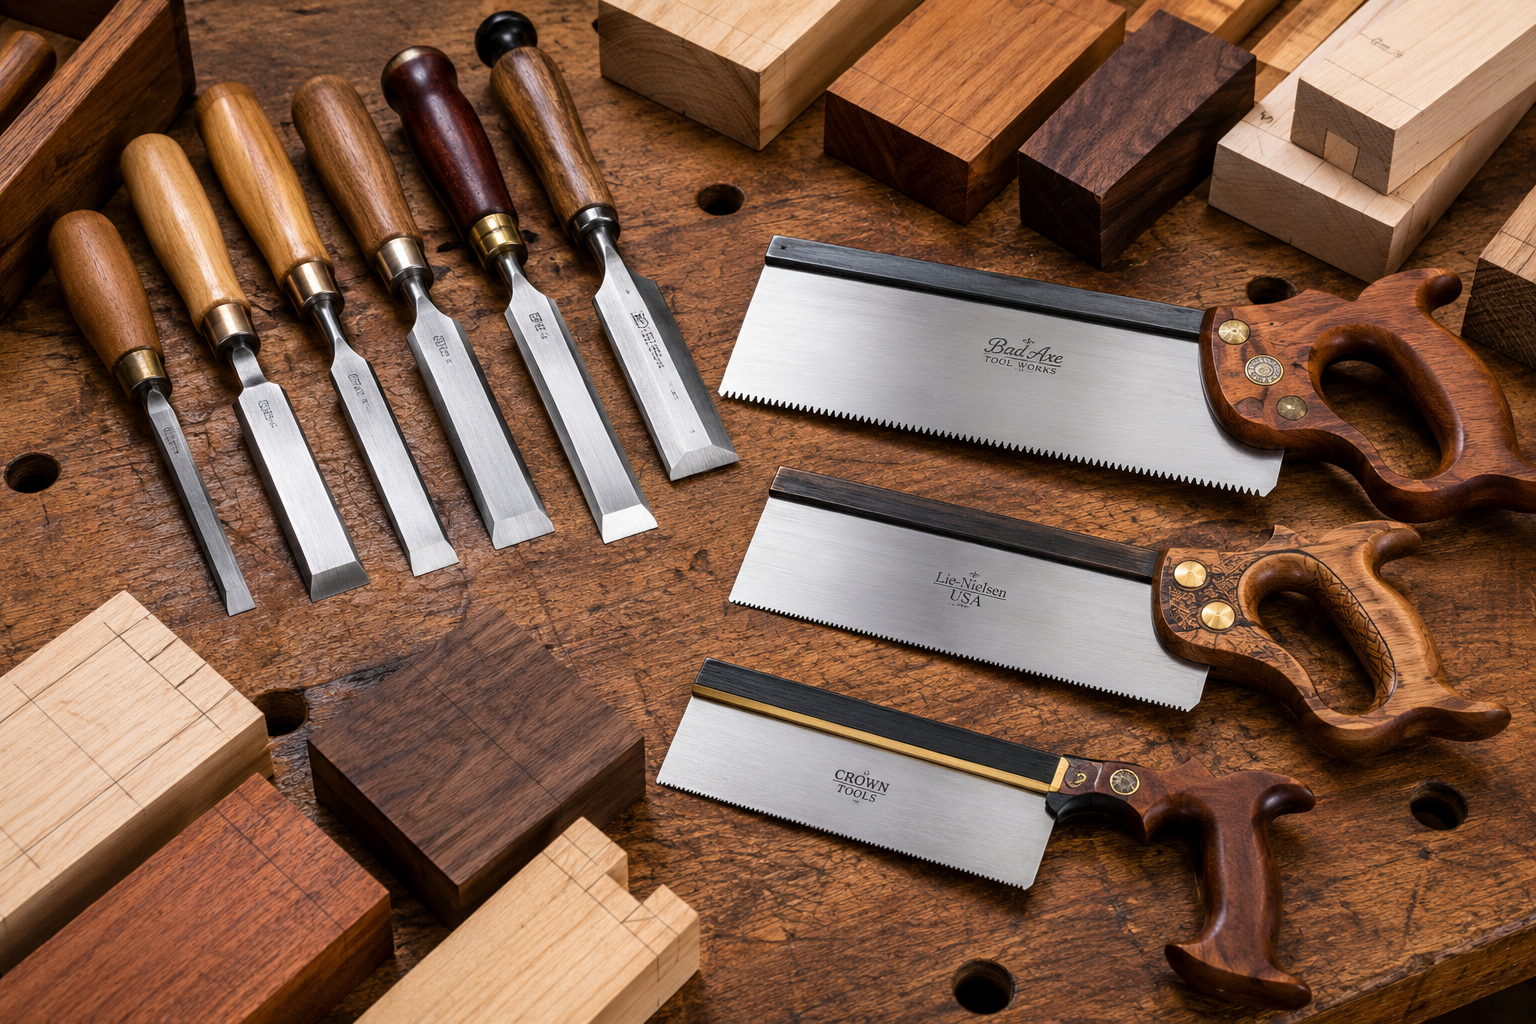
The Indispensable Chisels
Chisels are the heart of mortise and tenon joinery. You’ll need a variety of sizes and types.
- Mortise Chisels: These are robust chisels with thick blades, designed to withstand the leverage of prying out waste wood. They are often struck with a mallet.
- Bench Chisels: Versatile, all-purpose chisels used for paring, cleaning up shoulders, and fine-tuning the fit. A set from 1/4″ to 1″ is a good starting point.
- Paring Chisels: Longer, thinner blades for precise, controlled shaving of wood where minimal force is required.
Crucially, all chisels must be razor-sharp. A dull chisel is dangerous and ineffective. Investing time in learning Hand Tool Mastery for Detail Work: Chisels, Hand Planes, and is a worthy endeavor.
The Essential Saws
Saws are used for cutting the shoulders and cheeks of the tenon, and sometimes for roughing out the mortise.
- Backsaws: These saws have a stiffened spine along the top edge, allowing for thinner blades and greater control.
- Dovetail Saw: A small, fine-toothed backsaw perfect for delicate, precise cuts, ideal for tenon shoulders.
- Tenon Saw: A slightly larger backsaw with more teeth per inch (TPI) for cutting the longer cheeks of the tenon.
- Rip Saw: For cutting along the grain, useful for larger tenons or if you need to rip wider stock.
- Crosscut Saw: For cutting across the grain, essential for the initial shoulder cuts.
Marking and Measuring Tools
Precision in layout translates directly to success in joinery.
- Marking Gauge: Essential for scribing parallel lines, accurately defining the width and depth of mortises and tenons. A mortise gauge with two adjustable pins is ideal.
- Cutting Gauge: Similar to a marking gauge but with a small blade, useful for scribing lines across the grain that act as knife walls, guiding your chisels and saws.
- Pencil and Knife: A sharp pencil for initial layout and a marking knife for precise, definitive lines that guide your cuts.
- Rule and Square: A good steel rule and a try square are fundamental for accurate measurements and ensuring squareness.
- Mallet: A wooden or rawhide mallet is used to strike chisels for mortising.
Mastering the Mortise and Tenon Joint: Step-by-Step with Chisels and Saws
Creating a mortise and tenon joint by hand is a process that demands patience and accuracy. The following steps provide a guide, but remember that practice is the true teacher. Each piece of wood reacts differently, and your touch will refine with experience.
1. Planning and Marking the Joint
- Design and Dimensions: Determine the dimensions of your mortise and tenon. A common rule is for the tenon to be about one-third the thickness of the stock, but this can vary.
- Face Sides: Clearly mark the “face” side and “reference” edge on both pieces of wood. Consistency is critical for alignment.
- Marking the Tenon: Use a marking gauge to scribe the shoulder lines on all four faces of the tenon workpiece. Then, use the gauge again to mark the tenon’s thickness (cheeks) on the edges.
- Marking the Mortise: Using the same marking gauge settings (without altering them!), mark the width of the mortise on the mortise workpiece, ensuring it aligns perfectly with the face side and reference edge. Mark the length of the mortise. A cutting gauge can be used to define the mortise ends.
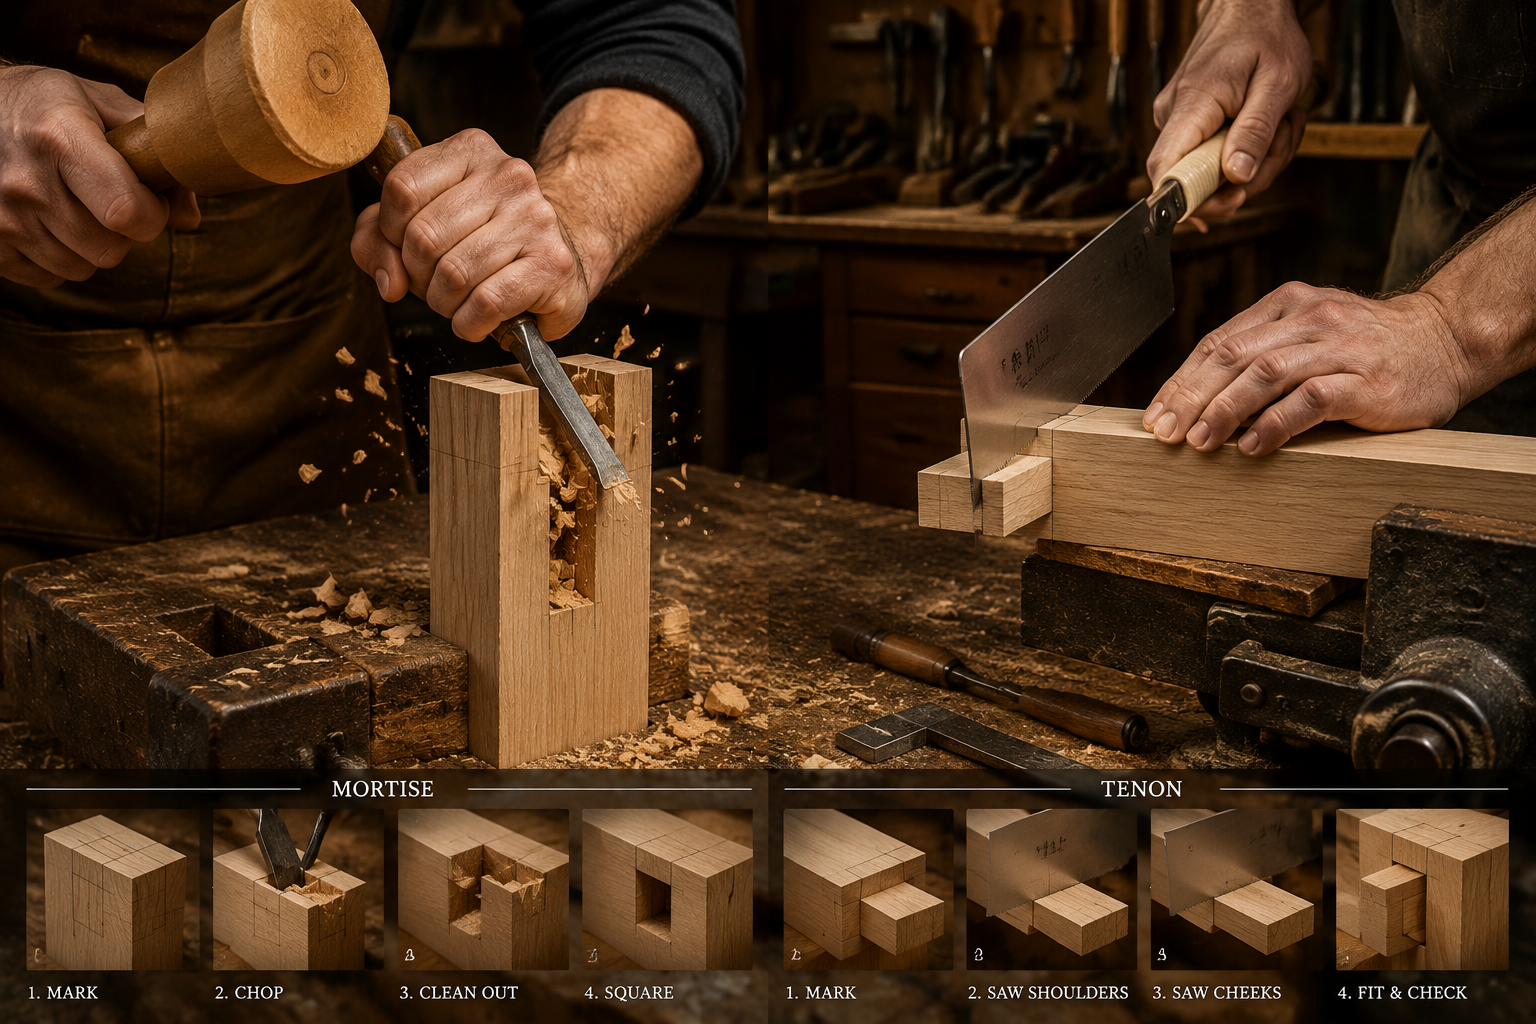
2. Cutting the Tenon
The tenon is generally cut first, as it’s easier to fit a mortise to a tenon than vice-versa.
- Shoulder Cuts: Place the tenon workpiece in a vise. With a dovetail or tenon saw, cut along the marked shoulder lines, just outside the line to leave room for paring. Cut all four shoulders.
- Cheek Cuts: With a tenon saw or rip saw, cut down the cheek lines, again just outside the line. For wider tenons, you might make multiple relief cuts to remove waste more easily.
- Paring to the Lines: Use a sharp bench chisel to pare the shoulders and cheeks precisely to your scribed lines. Aim for perfectly flat and square surfaces.
3. Cutting the Mortise
This is arguably the more challenging part, requiring careful waste removal.
- Initial Waste Removal: Secure the mortise workpiece in a vise. Using a mortise chisel (or a bench chisel slightly narrower than your mortise width) and a mallet, begin chopping out the waste. Start by chopping about 1/4″ from the ends, driving the chisel straight down. Then, move to the center, chopping at an angle towards the ends.
- Leverage and Clean Out: As you chop, leverage the chisel to pry out wood chips. Work progressively deeper, alternating sides and working towards the center.
- Paring the Sides: Once most of the waste is removed, use a sharp bench chisel to pare the walls of the mortise smooth and straight. Take light cuts, checking for squareness frequently.
- Checking Depth: Use your marking gauge to verify the depth of the mortise matches the length of the tenon.
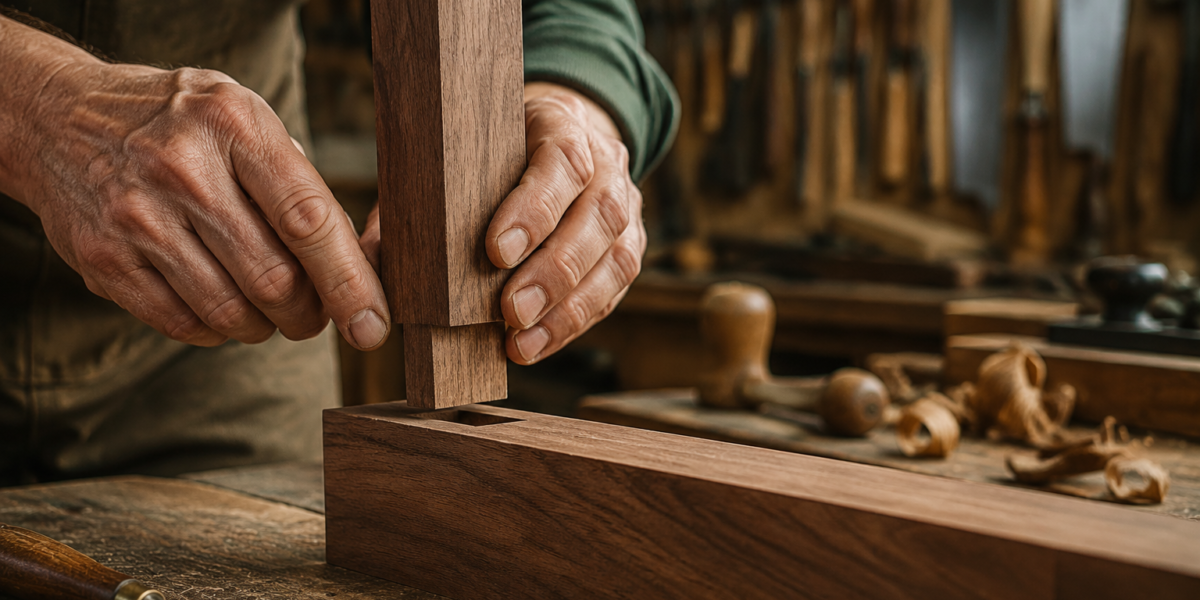
4. Fitting the Joint
This is the moment of truth.

- Trial Fit: Carefully attempt to fit the tenon into the mortise. It should be snug but not require excessive force.
- Adjustments: If too tight, identify where the interference is occurring (often proud shoulders or slightly wide cheeks/mortise walls) and make small, incremental adjustments with a paring chisel. Remove only tiny shavings at a time.
- Ideal Fit: A perfect fit allows the joint to be pressed together with firm hand pressure or a light tap from a mallet, without binding or excessive looseness.
For building projects that require precise joinery, like a custom wooden record player console or even simple bookshelves, this attention to detail is invaluable. Read more about Crafting Custom Wooden Record Player Consoles: Integrating Modern or a Beginner’s Guide to Building a Simple Wooden Bookshelf: Tools, for inspiration.
| Tool Type | Primary Use in Mortise & Tenon Joinery | Key Characteristics |
|---|---|---|
| Chisels | Chopping mortises, paring shoulders, refining tenon cheeks | Sharp bevels, varying widths, robust or delicate forms |
| Saws | Cutting tenon shoulders and cheeks, initial waste removal | Fine teeth, stiff backs, specific cutting directions |
| Marking Tools | Layout, scribing lines, ensuring precise dimensions | Sharp pins/blades, adjustable fences, accurate scales |
| Mallet | Driving chisels for mortise cutting | Balanced weight, comfortable grip, non-marring material |
Tips for Success
- Work from Lines: Always cut to your marked lines, never past them.
- Sharp Tools: This cannot be overstressed. Sharp tools cut cleanly and safely.
- Good Lighting: Ensure your workspace is well-lit to see your marking lines clearly.
- Secure Workpiece: Use vises and clamps to hold your wood firmly.
- Practice on Scraps: Don’t start on your final project. Practice on scrap pieces until you’re confident.
Once you’ve mastered the foundational mortise and tenon, you can explore more advanced joinery techniques. For instance, creating sturdy outdoor furniture like picnic tables often involves robust joinery. Consider building picnic tables for outdoor gatherings which often incorporates variations of the mortise and tenon. The principles remain the same: precision, clean cuts, and a respect for the material.
Conclusion
The “Introduction to Traditional Hand Tool Joinery: Exploring Mortise and Tenon with Chisels and Saws” is more than just a technique; it’s an embrace of a time-honored craft that rewards patience, precision, and a deep appreciation for woodworking. By mastering the mortise and tenon joint using only hand tools, you not only create incredibly strong and durable furniture but also develop a profound connection to the material and a refined set of skills that will serve you throughout your woodworking journey. In 2026, as technology continues to advance, the appeal of these fundamental, hands-on methods only grows stronger, offering a unique blend of historical craft and practical skill.
Your next steps should involve acquiring good quality chisels and saws, ensuring they are impeccably sharp, and dedicating time to practice on scrap wood. Start with simple joints, focusing on accurate marking and clean cuts. Gradually, you’ll develop the muscle memory and the keen eye necessary to create joints that are not only structurally sound but also aesthetically beautiful. The journey of traditional hand tool joinery is continuous learning, offering endless opportunities for refinement and mastery.
References
Schwarz, C. (2011). The Anarchist’s Tool Chest. Lost Art Press. Tage Frid Teaches Woodworking: Book 1—Joinery (1979). Taunton Press.
SEO Meta Title: Master Mortise & Tenon with Hand Tools in 2026 SEO Meta Description: Explore traditional hand tool joinery: learn to cut precise mortise and tenon joints using chisels and saws for strong, beautiful woodworking projects.
