


The art of creating decorative patterns and logos in wood through inlay techniques has captivated artisans for centuries, adding a layer of sophistication and personalization to woodworking projects. While traditionally a laborious handcraft, modern tools have democratized this intricate skill. Today, mastering the art of inlay with a router: creating decorative patterns and logos in wood is an accessible pursuit for woodworkers of all levels, offering a powerful method to elevate the aesthetic and value of any piece. This guide delves into advanced router techniques for precise inlay work, enabling you to transform simple contrasting wood patterns into intricate custom logos, adding personalized, high-end details to your furniture and projects in 2026.
Key Takeaways
- Router inlay simplifies a complex traditional technique, making it accessible for creating precise decorative patterns and logos.
- Specialized inlay kits, including guide bushings and straight bits, are essential for achieving accurate results.
- Careful design, template creation, and wood selection are crucial first steps for successful inlay projects.
- Mastering router control, depth settings, and template following ensures clean recesses and perfectly fitting inlay pieces.
- Proper glue-up, clamping, and flush sanding are vital for a seamless, professional finish that highlights the inlay.
The Foundation of Router Inlay: Tools, Materials, and Design
Achieving stunning inlays begins with understanding the core components: the right tools, appropriate materials, and a well-conceived design. Without these foundational elements, even the most skilled hand will struggle to produce precise and beautiful results. Mastering the art of inlay with a router: Creating decorative patterns and logos in wood hinges on this careful preparation.

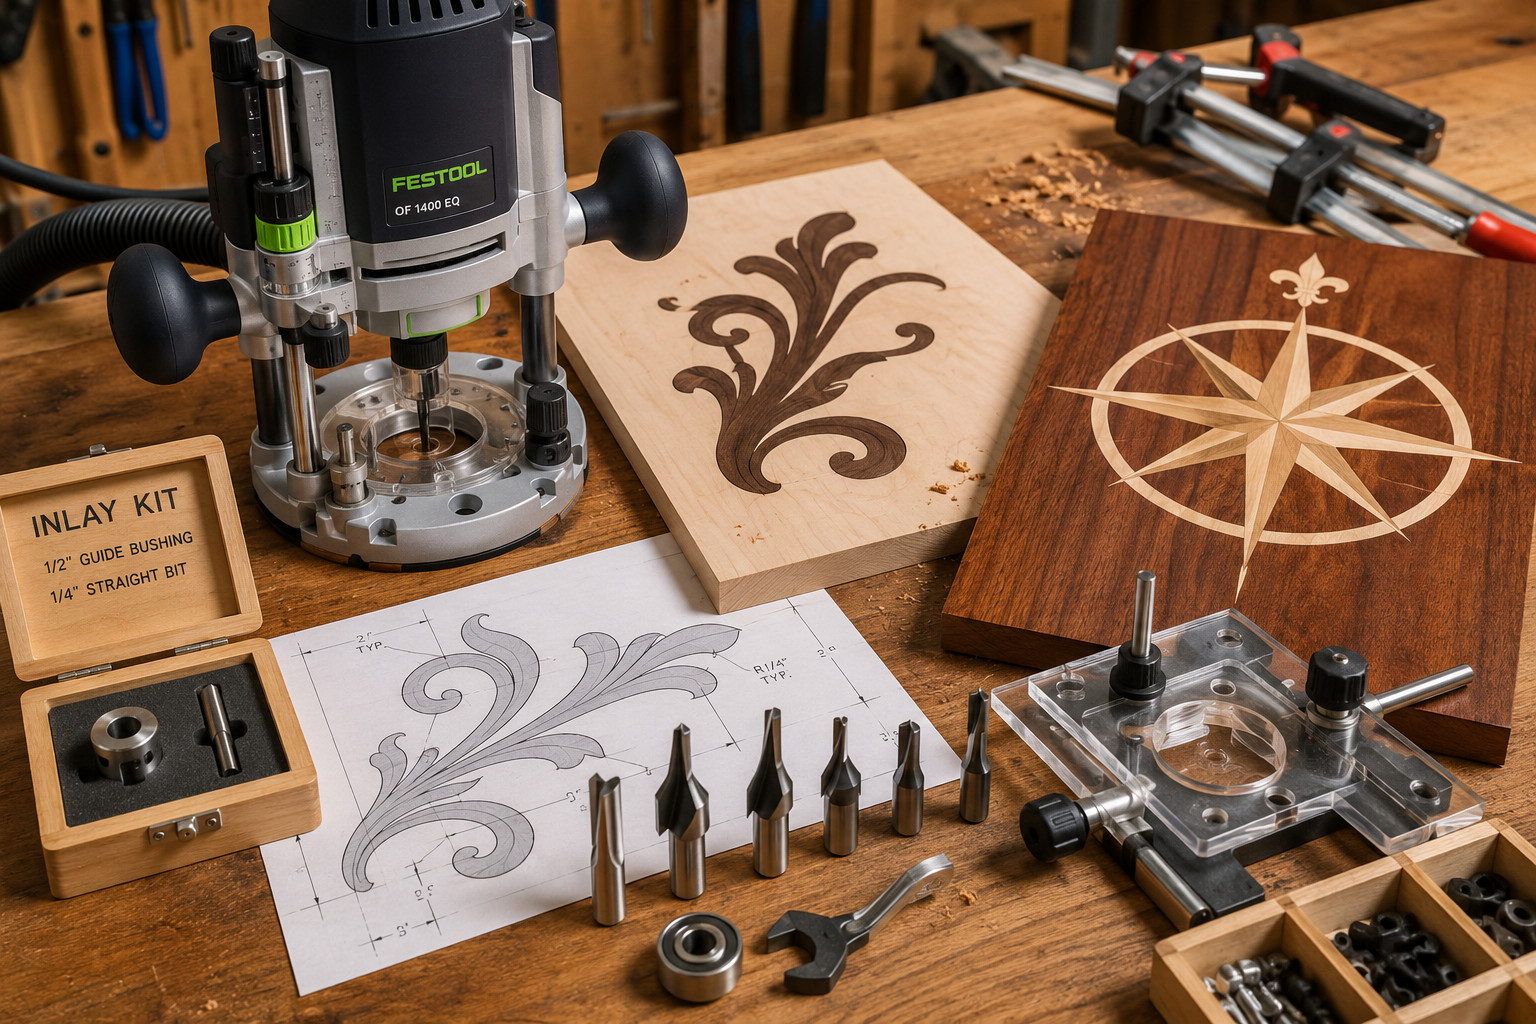
Essential Tools for Precision Inlay
The router is undeniably the star of inlay work. While many routers can technically cut recesses, specific accessories and types of routers enhance precision and ease of use significantly.
- Plunge Router: A plunge router is highly recommended for inlay as it allows you to lower the bit into the material at a precise depth and lift it cleanly. This is crucial for starting and stopping cuts within a design without leaving drag marks.
- Inlay Kit: The most critical accessory is a router inlay kit. This typically consists of a guide bushing (often a 7/16-inch or 1/2-inch outer diameter) and a specialized straight bit (commonly 1/8-inch or 1/4-inch diameter) that works in conjunction with it. The guide bushing rides along the edge of your template, while the smaller bit cuts the material, creating a slight offset. This offset is key to cutting both the recess and the inlay piece so they fit perfectly.
- Router Table (Optional but Recommended): While handheld routing is possible, using a router table offers greater stability and control, especially for smaller inlay pieces or when cutting the male inlay part. For more on maximizing your router table, see our guide on Mastering the Router Table: Essential Jigs, Safety, and Advanced.
- Clamps: A variety of clamps are essential for securing both your workpiece and your templates firmly.
- Sharp Knives and Chisels: For cleaning up corners or making minor adjustments, sharp hand tools are indispensable.
Selecting the Right Wood for Inlay
The choice of wood greatly influences the visual impact of your inlay. Contrast is paramount.
- Host Wood: This is the main piece into which the inlay will be set. Consider its grain, color, and stability.
- Inlay Wood: This should starkly contrast with the host wood. For example, a dark walnut inlay in a light maple host or a bright maple inlay in a dark cherry host creates a dramatic effect.
- Grain Direction: Aligning the grain of the inlay piece with that of the host wood can create a more seamless appearance, especially with wider inlay sections.
- Stability: Choose stable woods that are less prone to movement with changes in humidity. Different expansion and contraction rates between the host and inlay wood can lead to cracks or gaps over time.
Designing Your Inlay Patterns and Logos
The design stage is where creativity meets precision.
- Simplicity vs. Complexity: Start with simpler geometric shapes or contrasting strips before attempting intricate logos. Understanding the limitations of your router bit size is crucial. Internal corners will always have a radius determined by your bit.
- Digital Design: Software like Adobe Illustrator, Inkscape, or CAD programs are invaluable for creating precise vectors for logos and complex patterns. These can then be printed as templates.
- Physical Templates: You’ll need to create a physical template of your design. This can be made from 1/4-inch or 1/2-inch MDF, plywood, or even thicker acrylic. The template must have smooth, clean edges for the guide bushing to follow accurately. The precision of your template directly impacts the quality of your inlay.
“The true magic of router inlay lies in the dance between precision tooling and artistic vision. It’s about translating a flat design into a three-dimensional wooden tapestry.”
Step-by-Step Router Inlay Process: From Template to Finish
Once your tools are ready and your design is finalized, the practical application of router inlay begins. This process requires patience, attention to detail, and a methodical approach to ensure a perfect fit.
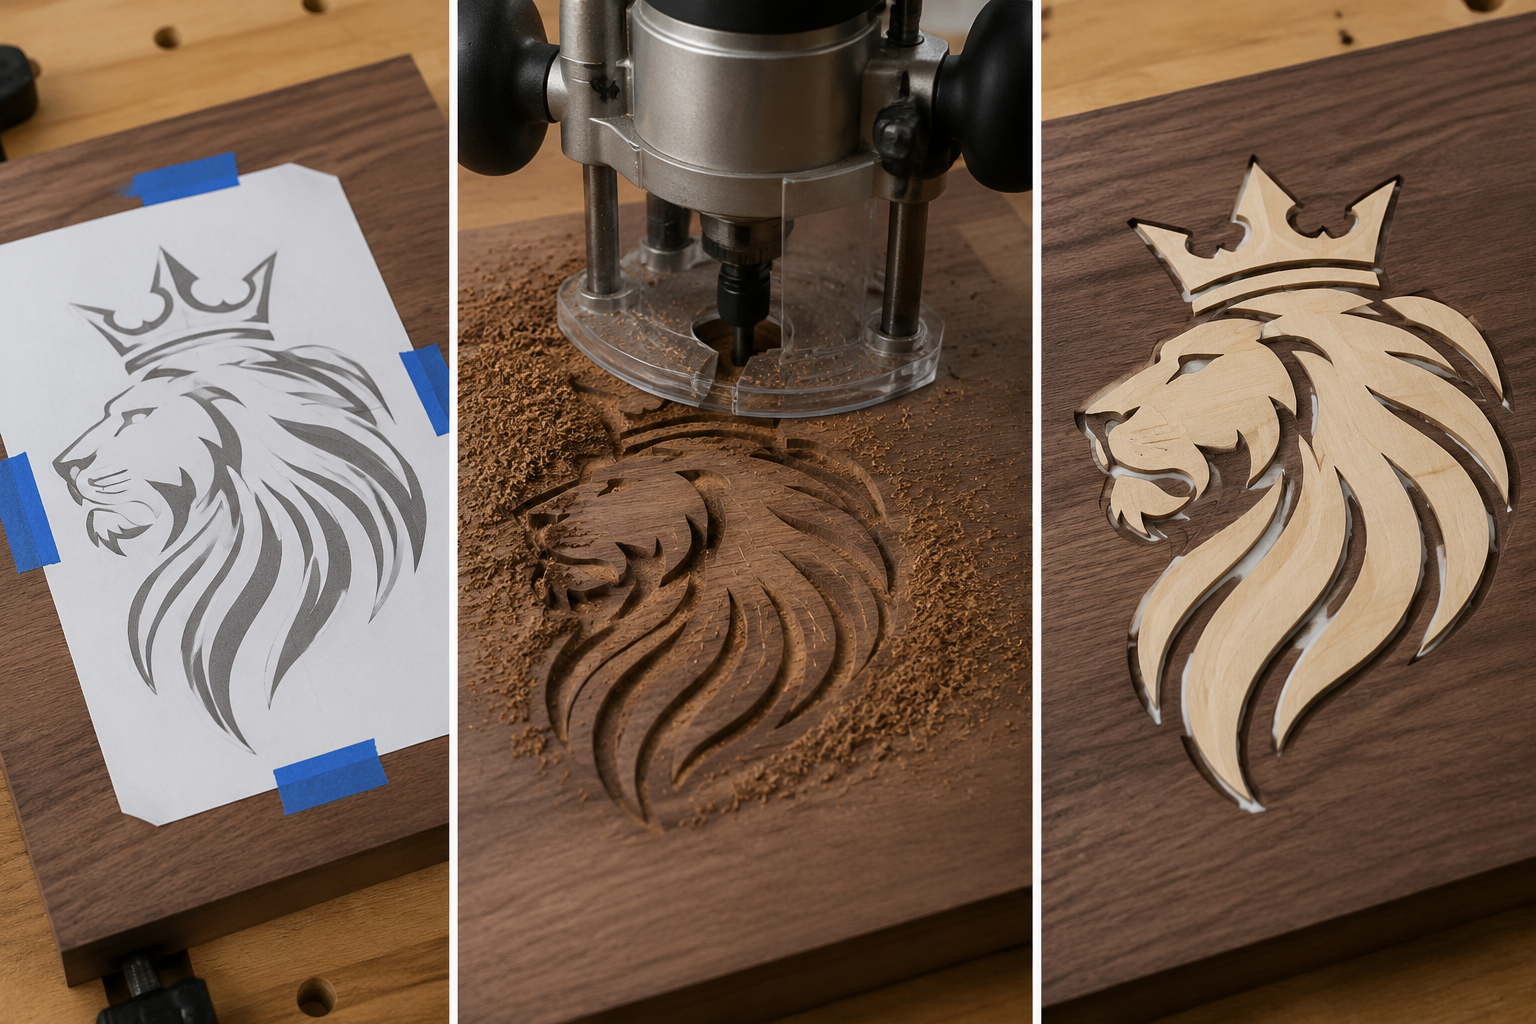
Creating the Recess (Female Part)
This is the pocket in your host wood where the inlay will sit.
- Secure the Template: Carefully position and securely clamp your template onto the host workpiece. Any movement here will compromise the entire inlay.
- Install Inlay Kit: Attach the guide bushing to your router base and insert the appropriate straight bit. Ensure the bit is tightened securely.
- Set Depth: Crucially, set your router’s depth of cut. The recess should be deep enough to fully accommodate the inlay material, plus a tiny margin for sanding flush later. A common depth is around 1/8-inch to 1/4-inch. Make test cuts on scrap material to confirm the depth.
- Route the Recess:
- Inside Cuts: With the guide bushing riding against the inside edge of your template, route out the inner sections of your design. Always cut in a climb-cut direction (clockwise for outside cuts, counter-clockwise for inside cuts) or make multiple shallow passes to reduce tear-out and motor strain.
- Outside Cuts: Once the inside is routed, if applicable, the guide bushing will follow the outside edge of your template for the perimeter. For intricate logos, you might have only internal cuts.
- Cleanliness: Keep the work area clear of sawdust for better visibility and to prevent the guide bushing from riding on debris, which can lead to imprecise cuts.
Cutting the Inlay Piece (Male Part)
This is the contrasting wood piece that will fit into the recess.
- Prepare Inlay Material: Select a piece of inlay wood slightly thicker than your recess depth and larger than your design. Securely affix your template to this piece.
- Adjust Router Setup: This is the clever part of an inlay kit. You will remove the guide bushing from your router. Now, the router bit will cut the exact size of the template’s outer edge, as opposed to the guide bushing creating an offset.
- Route the Inlay Piece: Carefully route around the outside perimeter of your template. Since there’s no offset, the bit cuts directly to the template’s edge. This creates an inlay piece that is precisely the size of the recess created by the guide bushing’s offset in the previous step.
- Test Fit: Gently test fit the inlay piece into the recess. It should be a snug fit, perhaps requiring light tapping with a mallet. If it’s too tight, you may need to very slightly re-route the inlay piece or clean up the recess. If it’s too loose, your template or router setup was imprecise, and you might need to start over with new material.
Gluing and Finishing
The final steps are crucial for the longevity and aesthetic appeal of your inlay.
- Glue Application: Apply a thin, even coat of wood glue to the bottom and sides of the recess. Avoid excessive glue, as squeeze-out can be difficult to clean and can affect subsequent finishes.
- Insert Inlay: Carefully place the inlay piece into the recess. Use a hammer and a wooden block to gently tap it down until it is fully seated and flush, or slightly proud of the host material.
- Clamping: Apply even clamping pressure over the entire inlaid area. If the inlay is small, use cauls (flat boards) to distribute pressure. Wipe away any excess glue squeeze-out immediately with a damp cloth.
- Drying Time: Allow the glue to cure fully, following the manufacturer’s recommendations.
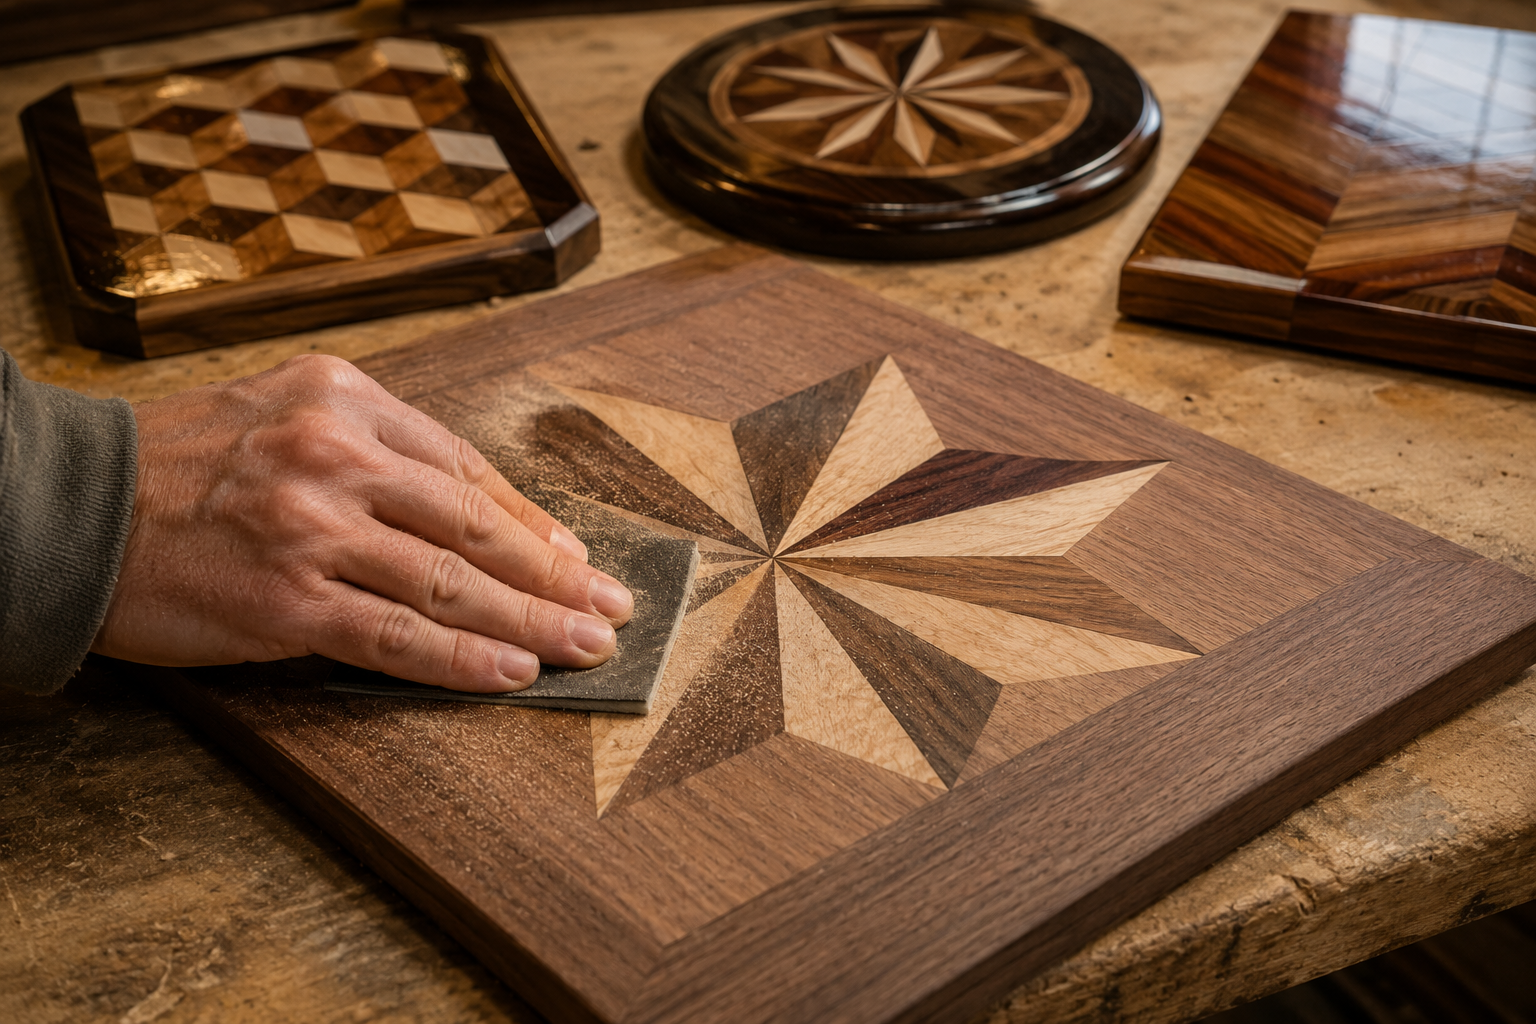
- Flush Sanding: Once dry, remove clamps and sand the entire surface until the inlay is perfectly flush with the host material. Start with a coarser grit (e.g., 120-grit) to remove any proud material, then progressively move to finer grits (180, 220, or higher) for a smooth finish. This step is critical for making the inlay feel seamless.
- Final Finish: Apply your desired finish (oil, varnish, lacquer, etc.) to protect the wood and enhance the contrast of the inlay. For inspiration on finishing, explore various wood finishing techniques.
Advanced Techniques and Troubleshooting for Decorative Inlays
Once you’ve mastered the basics, you can explore more complex designs and refine your techniques. Mastering the art of inlay with a router: creating decorative patterns and logos in wood extends to understanding how to handle challenges and achieve truly unique results.
Complex Inlay Patterns and Multi-Color Designs
- Layered Inlays: For logos with multiple colors or intricate details, you might need to create multiple inlay pieces that fit together. This involves creating separate templates for each color or layer and routing them individually.
- Curved Inlays: Routers excel at curves. Ensure your templates for curved designs are smooth and free of wobbles to allow the guide bushing to glide seamlessly.
- Veneer Inlays: For extremely thin inlays, often for highly detailed pictorial work, veneers can be used. These typically require different routing depths and more delicate handling.
- Beyond Wood: While primarily focused on wood, routers can also be used to inlay other materials like brass, mother-of-pearl, or stone, though specialized bits and techniques are required. Consider how a brass accent could complement your wooden inlay.
Router Bit Selection and Care
The quality and type of your router bits profoundly impact the cleanliness and precision of your cuts.
- Straight Bits: Essential for most inlay work. High-quality carbide-tipped bits will stay sharp longer.
- Spiral Upcut Bits: These bits pull chips upwards, providing cleaner cuts and are particularly good for recesses, especially in softer woods.
- Bit Sharpening: Keep your bits sharp. Dull bits cause tear-out, burning, and require more force, leading to less precise cuts. Learn more about essential router bits.
- Cleaning: Regularly clean resin buildup from your bits to maintain their cutting efficiency.
Troubleshooting Common Inlay Problems
- Gaps: Gaps usually indicate an issue with template precision, guide bushing installation, or inconsistent router pressure. Double-check your template edges and ensure the guide bushing is flush with the router base.
- Tear-out: This often happens when routing against the grain or taking too deep a cut. Use sharp bits, take shallow passes, and consider climb cutting (especially for the final pass) on edges prone to tear-out. Backer boards can also help prevent blow-out on exit cuts.
- Burn Marks: Caused by dull bits, feeding too slowly, or excessive depth of cut. Address bit sharpness and adjust your feed rate.
- Inlay Not Flush: This means your recess depth or inlay thickness was inconsistent. Ensure your router depth is consistently set and your inlay material is uniformly thick. Careful sanding will correct minor discrepancies.
- Glue Stains: Use painter’s tape around the inlay area before gluing to protect the host wood from squeeze-out. If stains occur, try to sand them out, but some finishes can make them more apparent.
Mastering these techniques and troubleshooting skills will allow you to create stunning and durable decorative patterns and logos in wood, adding a truly custom touch to your woodworking projects in 2026. Whether it’s for a custom mantel or a unique plant stand, inlay work elevates craftsmanship.
Conclusion
Mastering the art of inlay with a router is a journey that transforms ordinary woodworking into extraordinary craftsmanship. By carefully selecting your tools, meticulously designing your patterns, and diligently executing each step from routing the recess to the final flush sanding, you gain the ability to embed personalized details and sophisticated artistry into every piece. This technique, once reserved for master artisans with hand tools, is now within reach for any woodworker willing to embrace the precision and versatility of the router. In 2026, the potential for creating unique decorative patterns and custom logos is boundless, offering endless opportunities to add a signature touch to your furniture and projects.
Actionable Next Steps:
- Invest in Quality: Acquire a dedicated router inlay kit with a guide bushing and appropriate bits if you don’t already own one.
- Start Simple: Begin with basic geometric shapes or contrasting wood strips to build confidence and refine your technique.
- Practice on Scraps: Always make test cuts on scrap material that matches your project wood before committing to your final piece.
- Refine Templates: Focus on creating highly accurate and smooth templates, as these are the foundation of precise inlays.
- Explore Designs: Experiment with digital design software to create intricate patterns and custom logos, pushing the boundaries of your inlay capabilities.
- Document Your Process: Keep notes on successful settings, bit choices, and wood combinations to build your personal knowledge base.
Meta Title: Router Inlay Art: Create Decorative Wood Patterns & Logos Meta Description: Master router inlay techniques in 2026. Learn to create stunning decorative wood patterns and custom logos with precision and skill.

