


Achieving truly excellent woodworking relies on more than just powerful tools and skilled hands; it hinges critically on precision from the very first mark. A fractional error in measurement or an imprecise line can compound, leading to frustrating waste, ill-fitting joints, and ultimately, a flawed project. For woodworkers of all skill levels, mastering “The Ultimate Guide to Measuring and Marking Tools: Achieving Accuracy in Every Woodworking Project” is not merely beneficial—it is foundational. This guide explores the essential tools and techniques necessary to ensure every cut, every joint, and every component aligns perfectly, transforming your visions into tangible, high-quality finished pieces in 2026.
Key Takeaways

- Foundational Tools are Paramount: Accurate woodworking begins with reliable basic tools like steel rules, tape measures, and various squares.
- Precision Marking is Key: Understanding and utilizing tools like marking gauges, calipers, and marking knives ensures precise lines for cutting and joinery.
- Techniques Matter: Proper methods for reading tools, checking squareness, and transferring measurements are as crucial as the tools themselves.
- Calibration and Maintenance: Regularly checking and maintaining your measuring and marking tools ensures their long-term accuracy and effectiveness.
- Practice for Perfection: Consistent practice with these tools and techniques builds muscle memory and a keen eye for detail, leading to superior results.
Foundational Measuring Tools for Pinpoint Accuracy
The bedrock of any successful woodworking project is accurate measurement. Without it, even the most intricate joinery or powerful cuts will fall short. The right foundational measuring tools provide the reliable data needed to proceed with confidence.
Steel Rules and Tape Measures
These are the most basic, yet indispensable, measuring tools in any workshop.
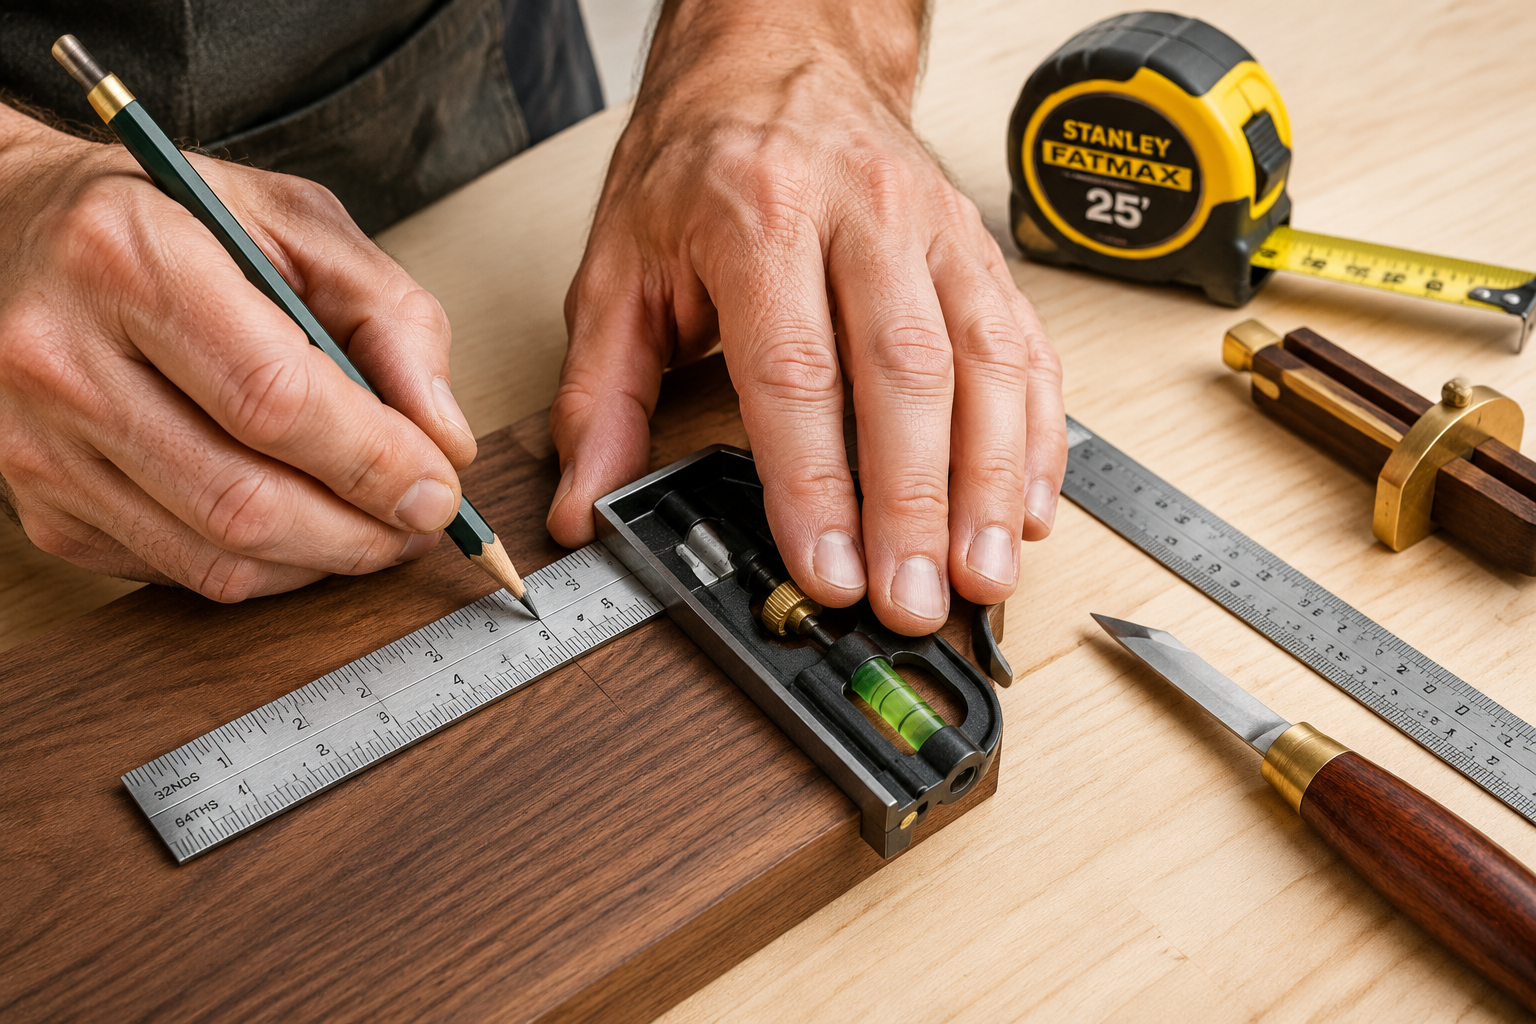
- Steel Rule: Often considered the gold standard for accuracy over shorter distances. Look for rules with etched, rather than printed, markings for durability and precision. A good steel rule will be rigid and have clear, legible graduations, typically in 1/32nds or 1/64ths of an inch. They are ideal for precise layout work and checking small dimensions.
- Tape Measure: Essential for longer measurements, such as those required for large panels, carcases, or determining overall project dimensions. A quality tape measure should have a sturdy case, a positive blade lock, and a strong, non-kinking blade. The hook at the end should be accurate for both inside and outside measurements; some premium tapes feature a self-adjusting hook to compensate for its thickness.
Squares: The Cornerstone of Woodworking Geometry
Squares are critical for ensuring that pieces are truly square (at 90 degrees), or for accurately marking parallel and perpendicular lines.
- Combination Square: Arguably the most versatile square in the workshop. It typically consists of a steel rule and an adjustable head that can slide along the rule and be locked in place. The head often has 90-degree and 45-degree faces, making it ideal for marking square lines, miter angles, depth measurements, and even as a height gauge. Its ability to act as a marking gauge for short distances is also a significant advantage.
- Try Square: A fixed-angle square, usually with a wooden or metal handle and a steel blade. Its primary function is to check for squareness on edges and ends of boards or to mark lines perpendicular to an edge. A good try square should be robust and, most importantly, precisely square.
- Framing Square (Steel Square): A large L-shaped square, often 16×24 inches, used for laying out large projects, rafters, stair strings, and checking the squareness of large assemblies. While primarily a construction tool, it has its place in the woodworking shop for bigger work.
- Speed Square: A triangular square combining a try square, miter square, and protractor into one compact tool. It’s excellent for quick and accurate marking of 90 and 45-degree angles, as well as finding other angles. While popular in carpentry, it’s also highly useful for general woodworking layout.
Maintaining the accuracy of your squares is paramount. Periodically check them against a known true edge or by drawing a line, flipping the square, and drawing another line adjacent to the first. If the lines are not perfectly parallel, your square is out of true.
Advanced Marking and Layout Tools for Precision Woodworking
Beyond the foundational measuring devices, a range of specialized marking and layout tools elevates accuracy to an even higher level, enabling the meticulous detail required for fine woodworking and intricate joinery. Understanding and using these tools effectively is a hallmark of skilled craftsmanship.
Marking Gauges and Wheel Gauges
These tools are designed to scribe lines precisely parallel to an edge or face of a workpiece, crucial for joinery.
- Pin-Style Marking Gauge: Features a movable fence that slides along a beam, with a sharp pin extending from the end. The fence registers against the edge of the wood, and the pin scratches a line at a set distance. While effective, the pin can sometimes tear wood fibers, especially across the grain.
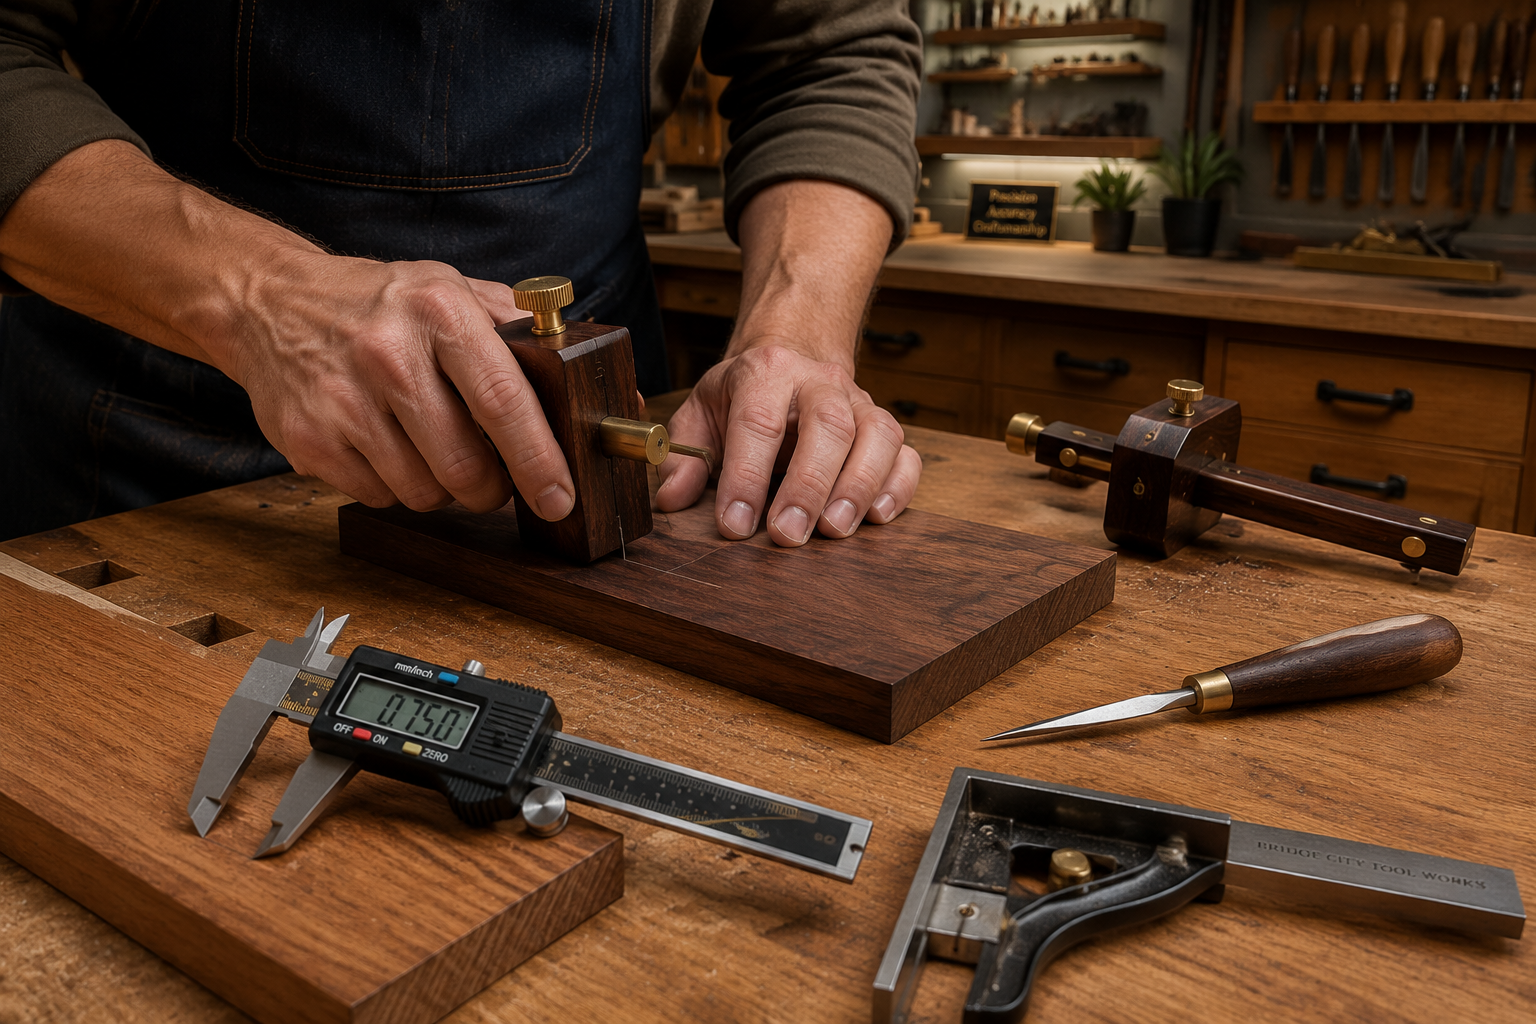
- Wheel Marking Gauge: A more advanced and often preferred version. Instead of a pin, it uses a sharp, hardened steel wheel that cuts rather than tears the wood fibers, resulting in a cleaner, more precise line, even across the grain. The wheel also minimizes tear-out, making it superior for delicate work. Many feature micro-adjustment capabilities for extremely fine settings.
- Mortise Gauge: A specialized marking gauge with two pins, allowing you to scribe two parallel lines simultaneously. This is indispensable for accurately laying out mortise and tenon joints, ensuring the mortise width is consistent.
For more on intricate joinery, explore articles like “Mastering Dovetail Joinery for Drawers: Hand and Router Methods for Cabinet Builders” or “The Essential Guide to Router Bits: Choosing the Right Profile,” which often rely on precise marking for successful execution.
Calipers and Dividers
For precise measurement and transfer of dimensions, these tools are invaluable.
- Digital Calipers: Provide highly accurate measurements of inside, outside, depth, and step dimensions, typically to 0.001 inches or 0.01 mm. They are indispensable for checking the thickness of stock, tenon shoulders, or router bit depths, ensuring components fit together perfectly. Their digital readout eliminates the guesswork of reading fine scale markings.
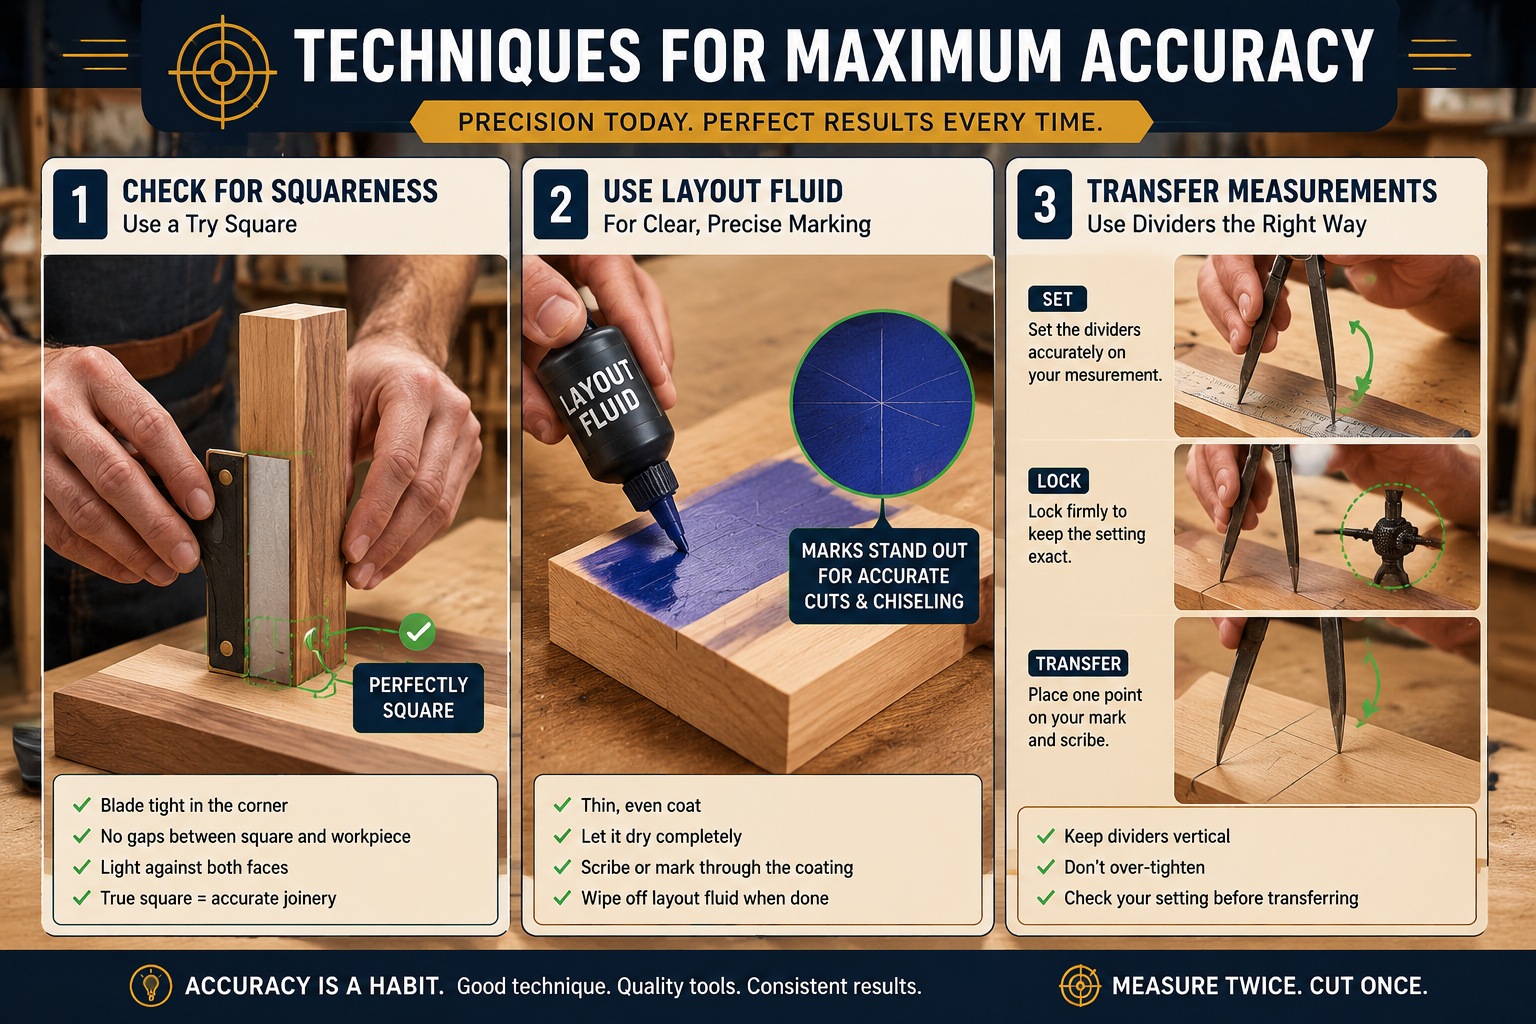
- Dividers: Similar to a compass but with two sharp points. Dividers are used to transfer measurements, step off equal distances, or scribe arcs and circles. They excel at transferring dimensions directly from a ruler to a workpiece or from one workpiece to another, minimizing potential errors that can occur when re-reading measurements.
Marking Knives and Pencils
The choice of marking instrument is as important as the measurement itself.
- Marking Knife: Essential for precision layout, particularly for joinery. A sharp marking knife creates a fine, crisp line that provides a clean shoulder for a saw or chisel to register against, greatly reducing tear-out and improving accuracy. Many woodworkers use Japanese-style marking knives or utility knives with snap-off blades for this purpose.
- Pencils: While marking knives offer superior precision for joinery, sharp pencils are still indispensable for general layout, rough cuts, and marking large areas. Always use a finely sharpened pencil with a hard lead (e.g., H or 2H) for the thinnest possible line, minimizing the width of the mark.
Techniques for Maximum Accuracy in Every Woodworking Project
Having the right tools is only half the battle; knowing how to use them effectively is the other. Developing sound techniques for measuring and marking is paramount to achieving consistent, high-quality results in all your woodworking projects in 2026.
Proper Reading and Transferring of Measurements
Even with precise tools, errors can creep in if measurements are not read or transferred correctly.
- Minimize Parallax Error: When reading a rule or tape measure, always view the scale directly from above to avoid parallax error, which is the apparent shift in measurement when viewed from an angle.
- Marking to the Line: When marking with a pencil, ensure your line is as thin as possible and decide whether you are cutting to the line, on the line, or removing the line. For precision joinery, a marking knife provides a fine cut that indicates the exact waste side.
- Transferring with Dividers/Calipers: For repetitive measurements or when transferring dimensions from one part to another, use dividers or calipers. This eliminates the potential for misreading a rule multiple times. For example, when creating multiple wooden boxes or frames, consistent dimensions are key. Refer to “Profitable Beginner Woodworking: Picture Frames, Cutting Boa” for projects where this technique is vital.
Checking for Square and Flatness
Accuracy extends beyond length; ensuring components are truly square and flat is critical for assembly.
- Checking Squareness: Regularly check the squareness of your workpieces, especially before cutting or joining. Use a reliable try square or combination square against reference edges. For larger assemblies, such as a custom wood workbench, a large framing square or a pair of winding sticks can help ensure flatness and squareness. Read more about workbench construction in “Building a Custom Wood Workbench: Design Considerations and”.
- Winding Sticks: These are two perfectly straight, parallel-sided pieces of wood used to check for twist (wind) in a board. By placing one stick at each end of the board and sighting across them, any misalignment reveals twist that needs to be removed.
Establishing Reference Faces and Edges
In woodworking, accuracy often begins by establishing a flat, straight, and square reference.

- The “Face Side” and “Face Edge”: Before any layout, mark one face of your board as the “face side” and one adjacent edge as the “face edge” (often with a squiggly line and a triangle). All subsequent measurements and markings should be taken from these two established references. This ensures consistency and prevents cumulative errors.
- Using Layout Fluid: For critical marking on dark woods or metals, a thin coat of layout fluid (like Dykem) can be applied. This provides a high-contrast surface on which a marking knife or scribe can create extremely sharp and visible lines.
- Sharp Tools for Clear Marks: Whether using a marking knife or a pencil, ensure it is always sharp. A dull tool creates a wide, fuzzy line that introduces imprecision. A razor-sharp marking knife is paramount for defining the exact location of a cut.
Maintaining Your Measuring and Marking Tools
The accuracy of your woodworking projects is directly tied to the accuracy of your tools. Regular maintenance and calibration are not optional; they are essential.
- Cleanliness: Dust, grime, and sap can obscure markings and interfere with the smooth operation of moving parts. Regularly wipe down all your measuring and marking tools with a clean cloth. For metal tools, a light coat of rust preventative or paste wax can protect them from corrosion.
- Calibration: Periodically check the accuracy of your squares, rules, and calipers.
- Squares: As mentioned, draw a line along an edge, flip the square, and draw another. If the lines diverge, your square is out. Some combination squares can be adjusted, while others may need to be replaced.
- Calipers: Check the zero setting when the jaws are closed. You can also use a known standard block to verify accuracy.
- Tape Measures: Ensure the end hook is not bent. Some can be carefully adjusted if needed.
- Storage: Store tools in a way that protects them from damage. Sharp edges on marking knives and wheel gauges can be dulled if left to rattle in a drawer. Consider custom inserts in toolboxes or magnetic strips to keep them secure and accessible. For ideas on organizing your workshop, refer to “Building Modular Wood Storage Systems for Small Workshops: Maximizing”.
- Sharpening: Marking knives and wheel gauges must be kept razor-sharp. A dull cutting edge will tear wood fibers rather than cut cleanly, diminishing the precision of your marks. Regular honing is crucial.
Conclusion
Mastering “The Ultimate Guide to Measuring and Marking Tools: Achieving Accuracy in Every Woodworking Project” is a continuous journey that underpins all successful woodworking. From the fundamental steel rule and versatile combination square to the precise wheel marking gauge and indispensable digital caliper, each tool plays a vital role. However, the tools are only as effective as the techniques employed. By consistently practicing proper reading, marking from established references, and diligently checking for squareness and flatness, you cultivate a precision mindset that elevates your craft. In 2026, investing in quality measuring and marking tools and committing to their proper use and maintenance will pay dividends in the form of impeccably crafted projects, reduced material waste, and the immense satisfaction of creating with true accuracy. Take the time to understand these principles, refine your techniques, and observe how your woodworking transforms.
